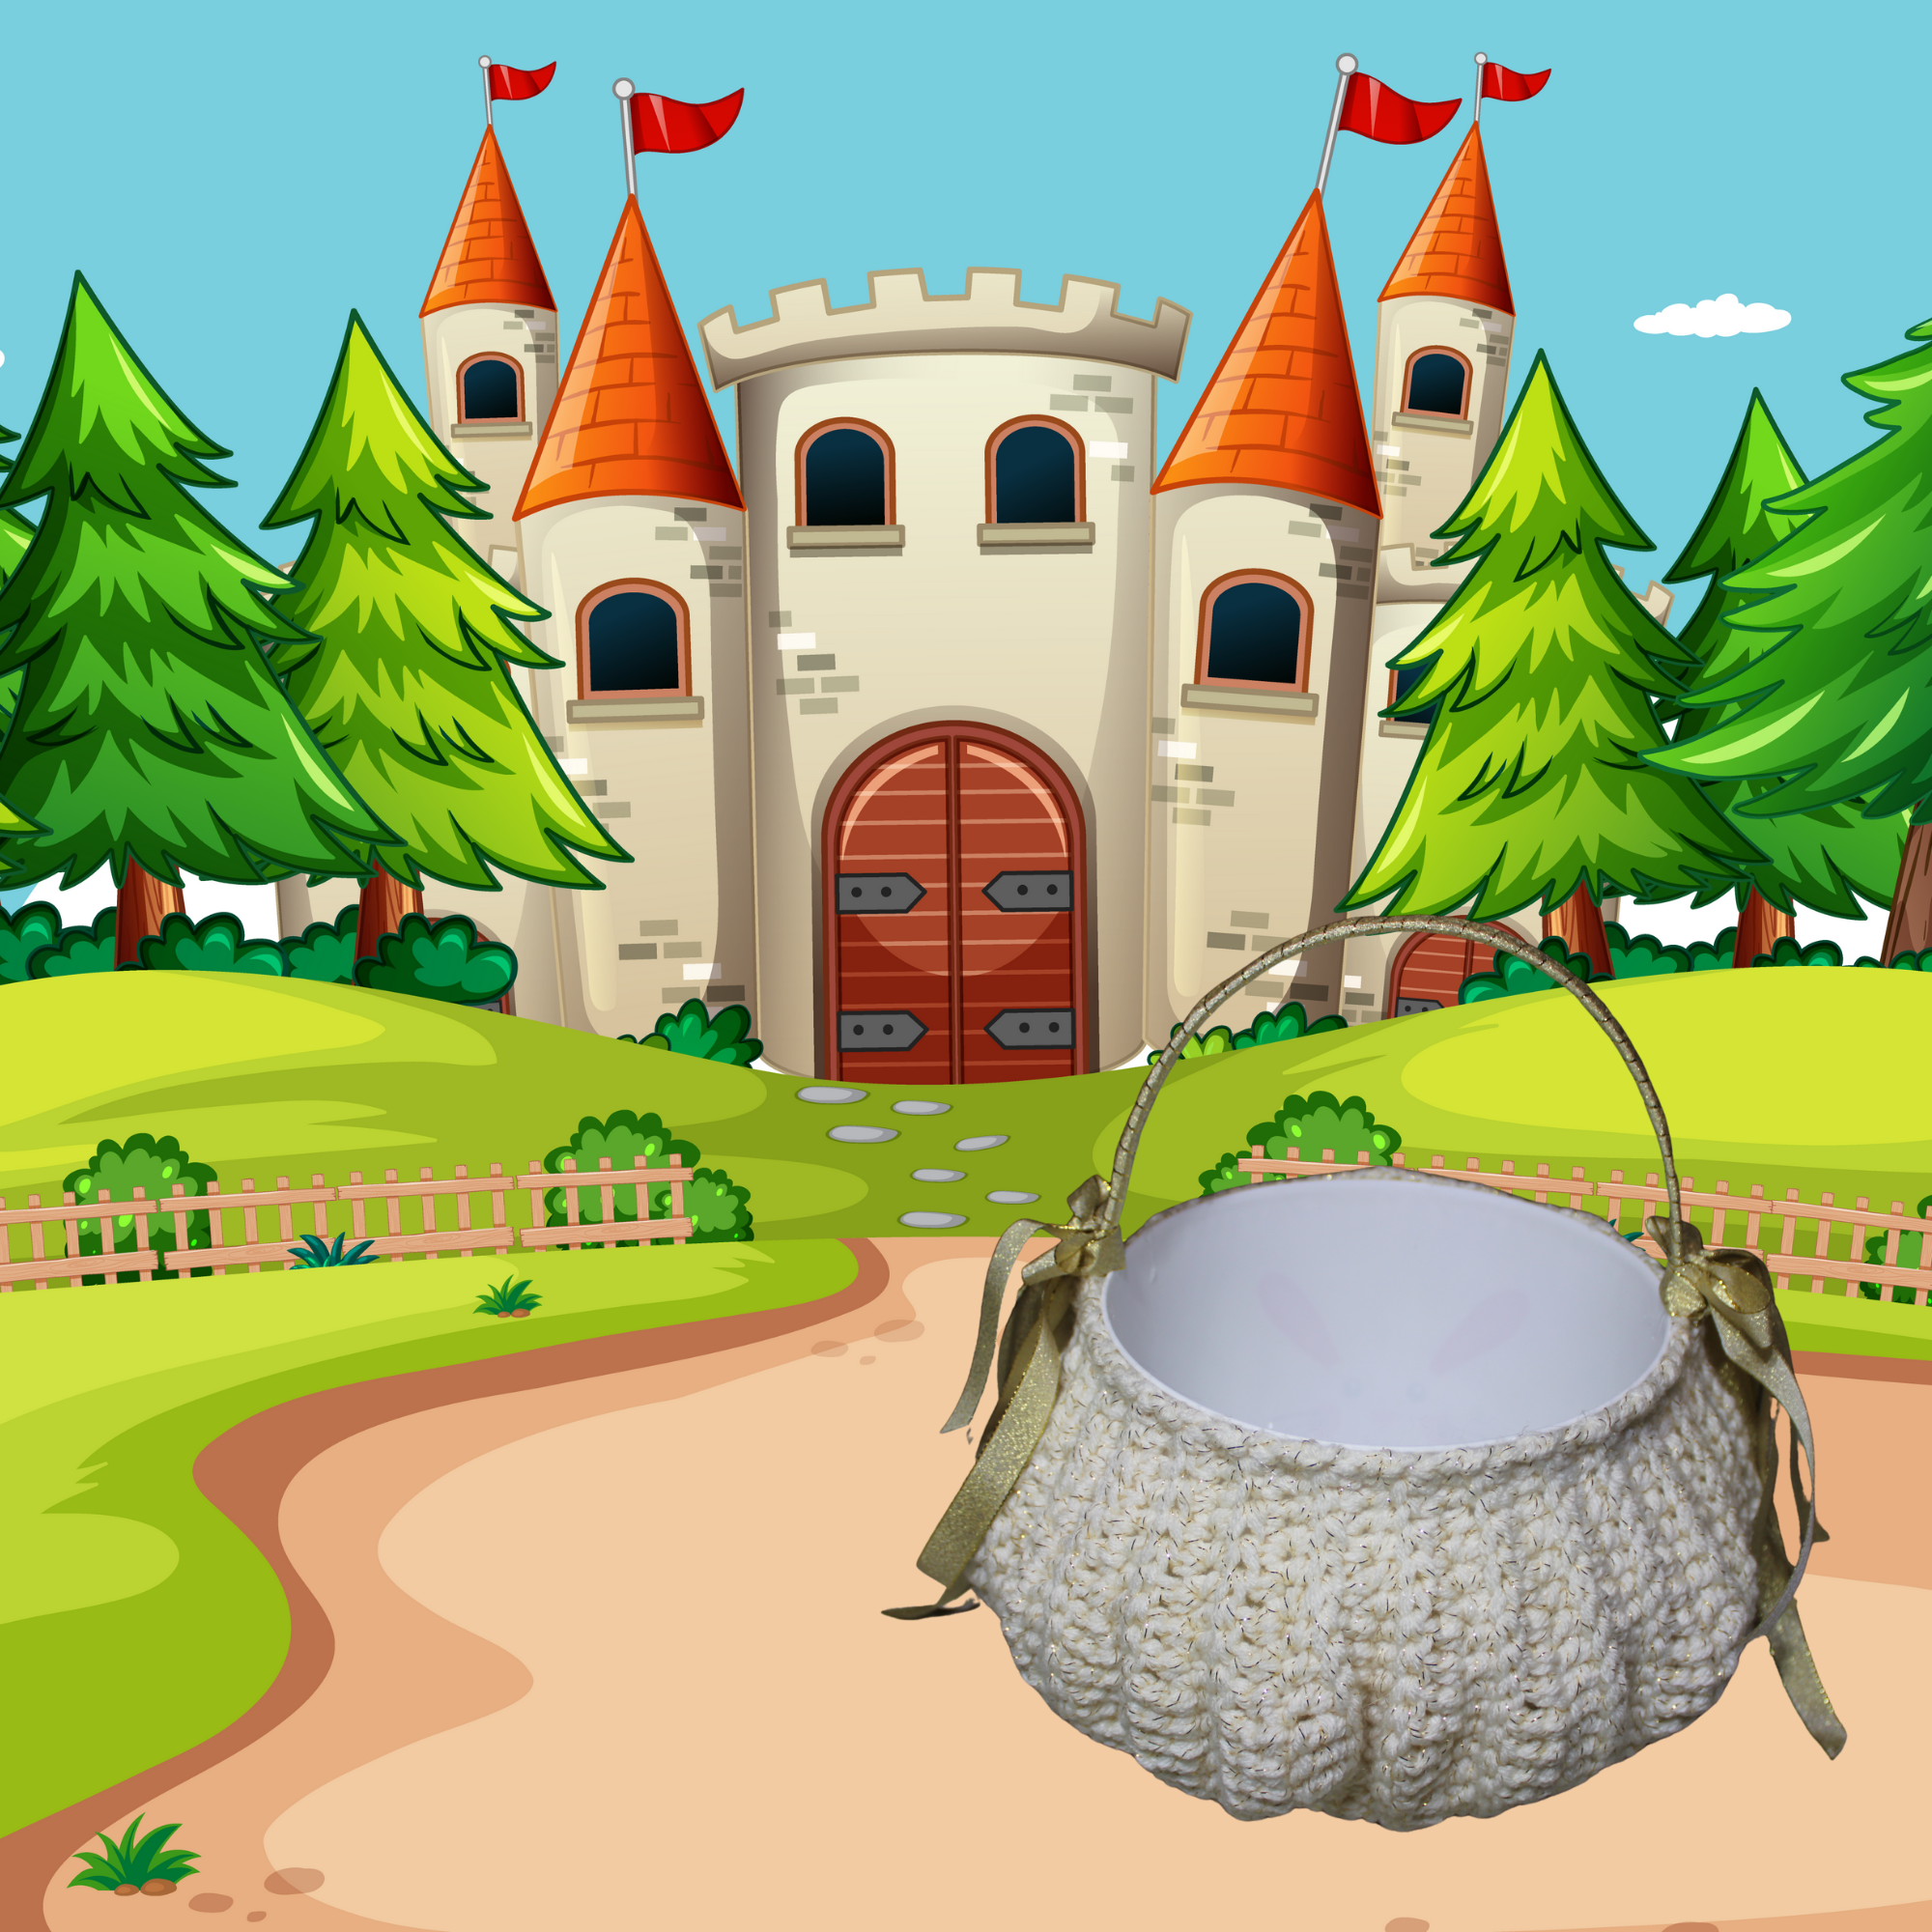
Rodgers & Hammerstein wrote, “Impossible, for a plain yellow pumpkin to become a golden carriage.”
Maybe turning a pumpkin into a golden carriage is impossible—but with a crochet hook and a little creativity, you can easily make a golden carriage to complete your little princess’s Halloween costume this year! ✨🎃👑
It’s a magical finishing touch for a Cinderella-inspired costume and a fun handmade accessory she’ll treasure long after Halloween is over.
Materials:
I Love This Yarn Metallic
400 yards Ivory
Crochet hook size J (6.0 mm)
Yarn needle
½” to 1” gold ribbon
Plastic Halloween bucket (from dollar store or use gallon ice cream bucket)
Measures approximately 7” tall (not including handle). This may vary based on the type of bucket you use.
Directions:
SIDE: Row 1: Using a double strand of yarn, ch 23, sc in 2nd ch from hook, sc in next 2 ch, hdc in next 3 ch, dc in next 3 ch, tr in next 4 ch, dc in next 3 ch, hdc in next 3 ch, sc in last 3 ch (22 sts).
Row 2: (Right side) Ch 1, turn. Working in BLO, sc in 3 sc, hdc in 3 hdc, dc in 3 dc, tr in 4 tr, dc in 3 dc, hdc in 3 hdc, sc in 3 sc.
Row 3: Ch 1, turn. Working in both lps, sc in 3 sc, hdc in 3 hdc, dc in 3 dc, tr in 4 tr, dc in 3 dc, hdc in 3 hdc, sc in 3 sc.
Rows 4-59: Repeat Rows 2-3 until piece measures 25” (measuring along sc edge) or until desired length to fit around your bucket. Fasten off yarn leaving 15” length for sewing.
With right sides tog, sew foundation ch of Row 1 to BLO of Row 59.
BOTTOM:
NOTE: St counts may vary if the number of rows you made is not equal to 59.
Rnd 1: With right side facing, attach double strand of yarn to bottom and sc around with 1 sc in each row end (approximately 59 sc). Do not join.
Rnd 2: Working in BLO, *dec, sc in next 6 sts,* 7 times, dec, sc in remaining sts (51 sc).
Rnd 3: Working in both lps, *dec, sc in next 5 sts,* 7 times, sc in remaining sts (44 sc).
Rnd 4: *Dec, sc in next 4 sts,* 7 times, sc in remaining sts (37 sc).
Rnd 5: *Dec, sc in next 3 sts,* 7 times, sc in remaining sts (30 sc).
Rnd 6: *Dec, sc in next 2 sts,* 7 times, dec, sc in remaining sts (22 sc).
Rnd 7: *Dec, sc in next st,* 7 times, sc in remaining sts (15 sc).
Rnd 8: Dec around, sc in last st (8 sc). Close with ult fin.
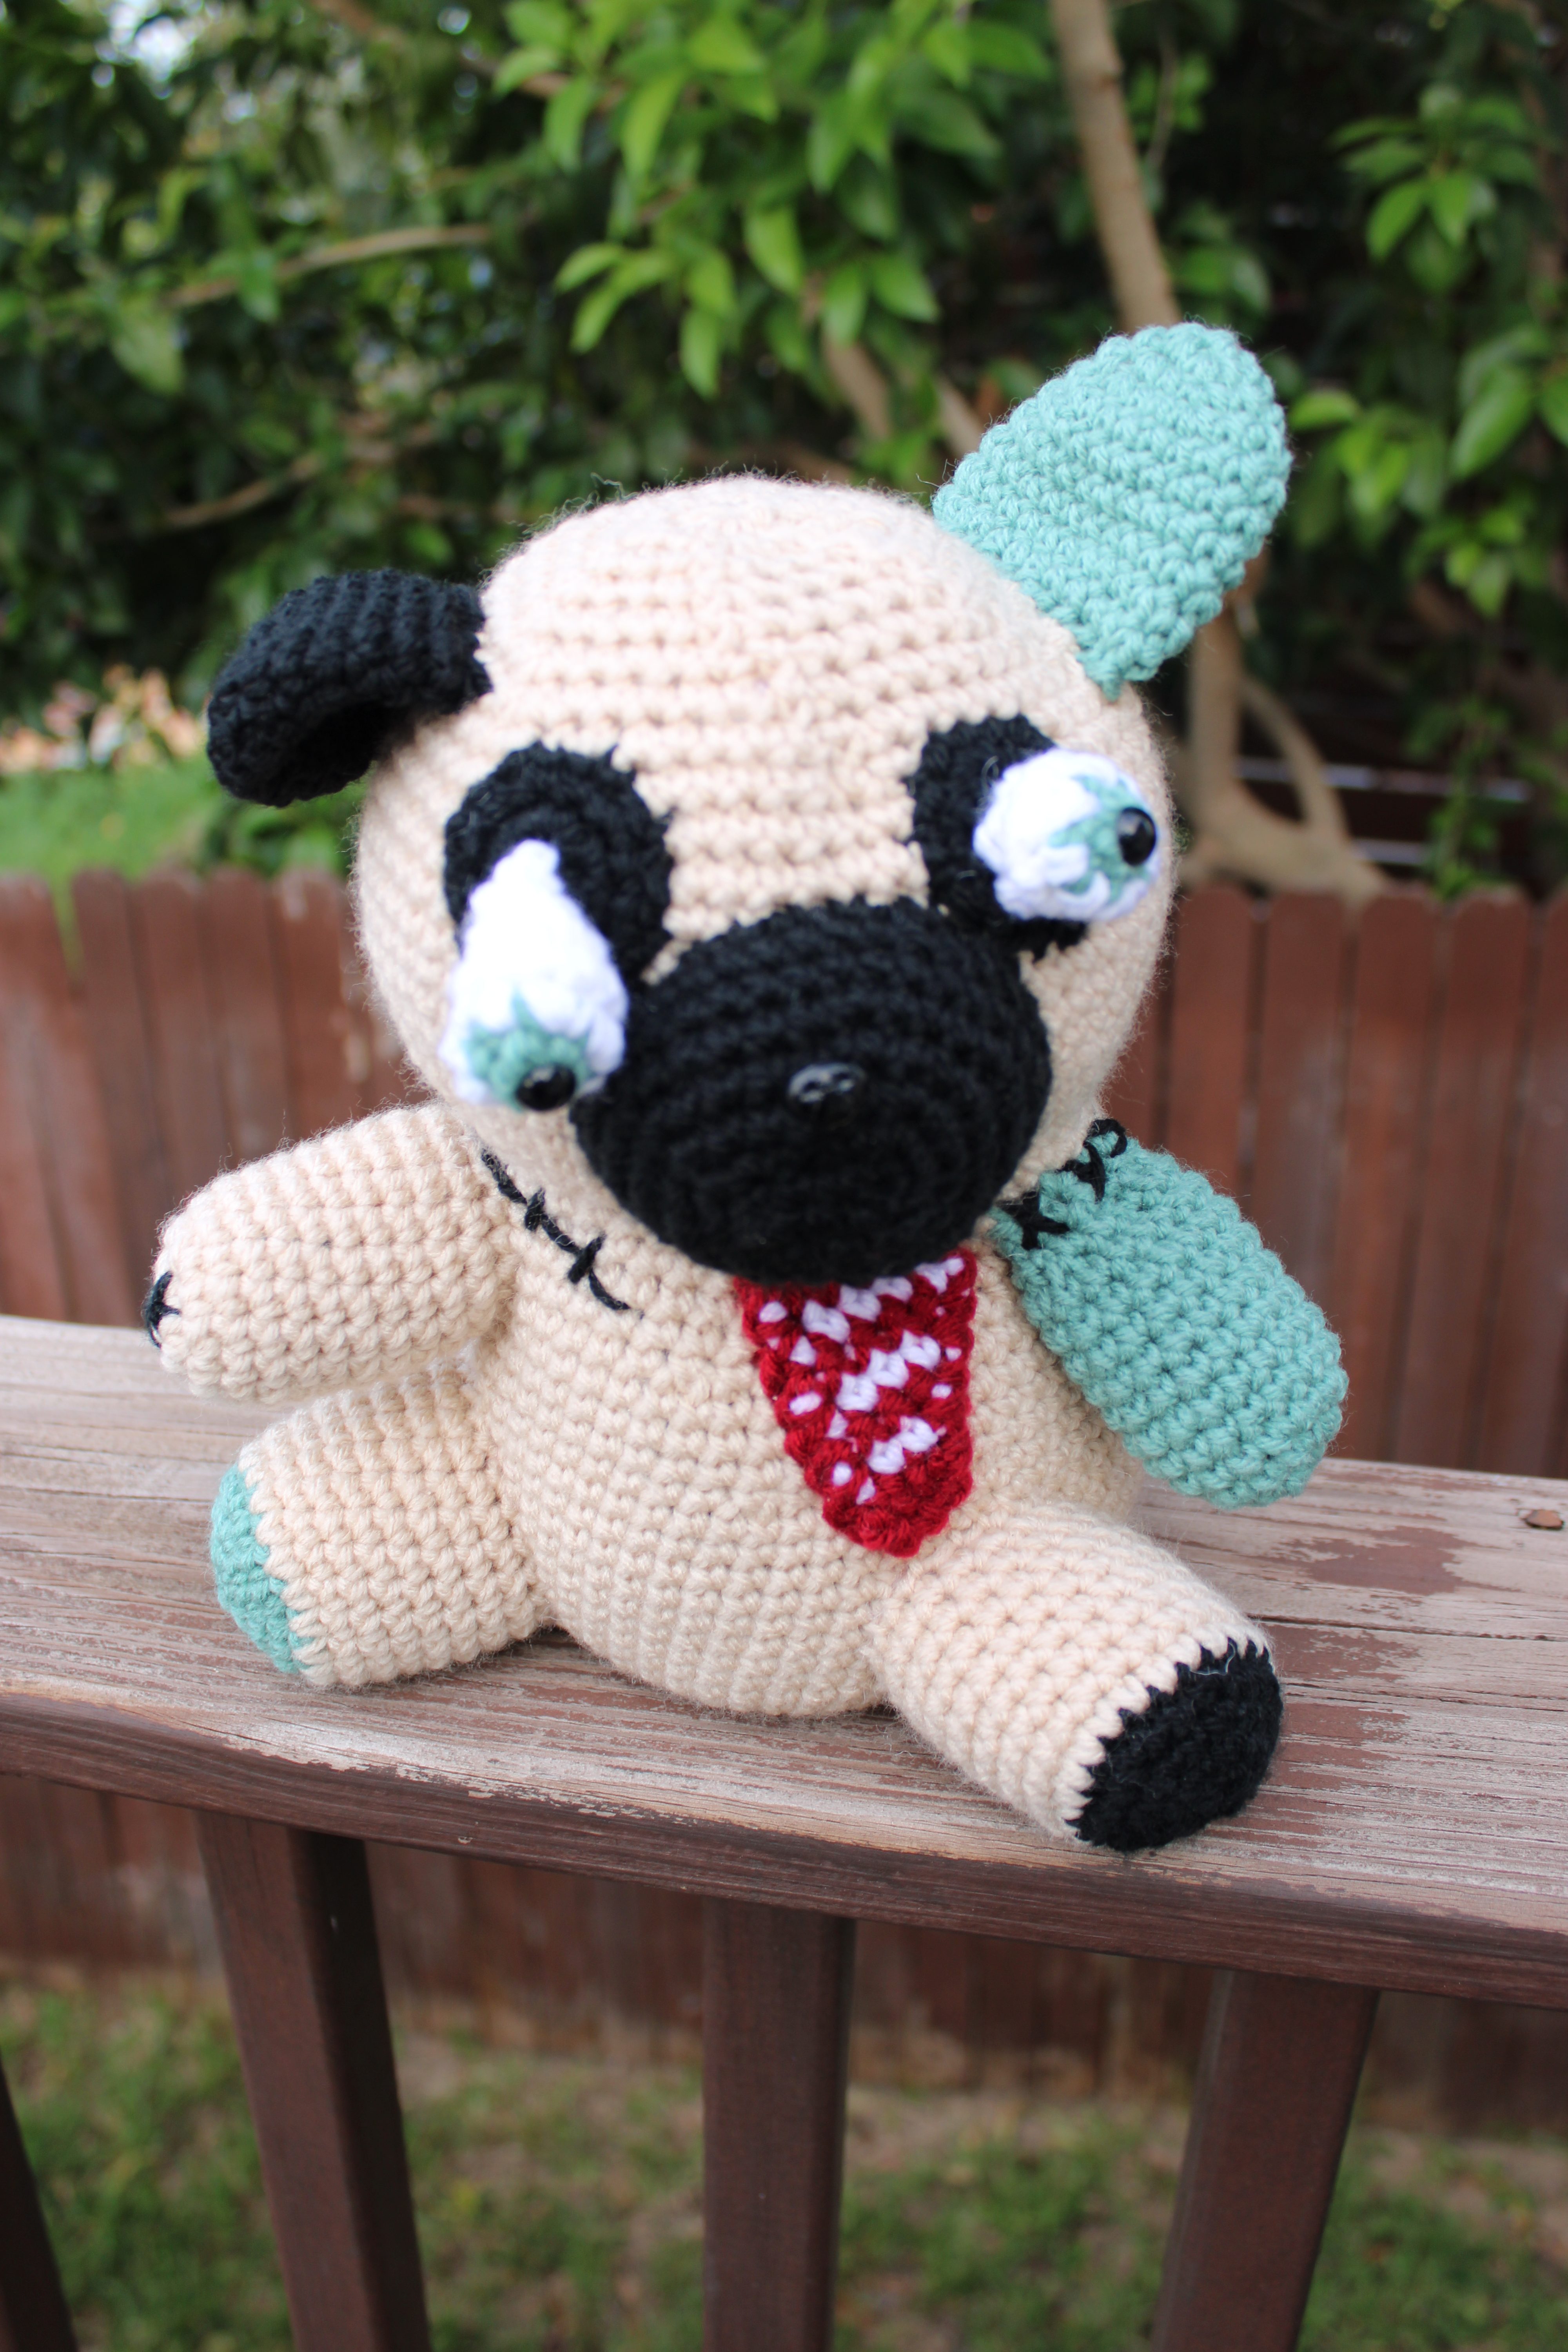
Looking for a crochet project that’s Looking for a crochet project that’s equal parts creepy and cute? Meet the Zombie Pug Crochet Pattern! This little undead pup is ready to shuffle his way into your Halloween decorations, amigurumi collection, or the heart of your favorite pug lover.
Who says zombies have to be scary? With his adorable pug features and spooky undead charm, this little guy brings a whole new meaning to puppy love!
A Halloween Crochet Pattern with Personality
If you love crocheting quirky characters, this Zombie Pug is the perfect addition to your collection. He combines the irresistible charm of a pug with just the right touch of Halloween spookiness. He’s a fun project for amigurumi fans who enjoy making something a little different from the usual pumpkins, ghosts, and black cats.
Imagine him sitting on your Halloween mantel, guarding your candy bowl, or keeping company with your other spooky crochet creations. He would also make a fun handmade gift for the pug enthusiast who appreciates a little creepy cuteness!
Perfect for Halloween Crochet
Halloween is the perfect excuse to let your creativity run wild, and this Zombie Pug fits right in. Whether you’re building a collection of handmade Halloween decorations or looking for your next fun amigurumi project, this quirky canine is ready to join the fun.
Pair him with your favorite crocheted monsters, witches, and other spooky creatures for a Halloween display that’s sure to get attention.
And let’s be honest: even the undead deserve a little love!
Ready to Crochet Your Own Zombie Pug?
Grab your crochet hook and get ready to bring this little zombie dog to life—or perhaps back to life!
Add the Zombie Pug Crochet Pattern to your Halloween project list and create a spooky-cute companion that’s sure to make you smile. Are you team cute Halloween or team creepy Halloween?
Let’s have a crochet-along! Post a photo of your Zombie Pug in the Facebook group. The photo with the most likes wins a free pattern of your choice from my Ravelry store.
Rnd 1: With tan yarn, ch 2 (or magic circle), 6 sc in 2nd ch from hook. Do not join. Work in continuous rnds throughout unless otherwise specified.
Rnd 2: 2 sc in each st (12 sc).
Rnd 3: *Sc in next st, 2 sc in next st,* repeat around (18 sc).
Rnd 4: *Sc in next 2 sts, 2 sc in next st,* repeat around (24 sc).
Rnd 5: *Sc in next 3 sts, 2 sc in next st,* repeat around (30 sc).
Rnd 6: *Sc in next 4 sts, 2 sc in next st,* repeat around (36 sc).
Rnd 7: *Sc in next 5 sts, 2 sc in next st,* repeat around (42 sc).
Rnd 8: *Sc in next 6 sts, 2 sc in next st,* repeat around (48 sc).
Rnd 9: *Sc in next 7 sts, 2 sc in next st,* repeat around (54 sc).
Rnd 10: *Sc in next 8 sts, 2 sc in next st,* repeat around (60 sc).
Rnds 11-20: Sc in each st.
Rnd 21: *Inv dec, sc in next 8 sts,* repeat around (54 sc).
Rnds 22-24: Sc in each st.
Rnd 25: *Inv dec, sc in next 7 sts,* repeat around (48 sc).
Rnds 26-28: Sc in each st.
Rnd 29: *Inv dec, sc in next 6 sts,* repeat around (42 sc).
Rnd 30: *Inv dec, sc in next 5 sts,* repeat around (36 sc). Do not fasten off.
Optional to give extra support to head and neck:
Insert foam curlers into body and let it extend out the top. Stuff body.
HEAD:
Rnd 31: *Sc in next 2 sts, 2 sc in next st,* repeat around (48 sc).
Rnd 32: *Sc in next 7 sts, 2 sc in next st,* repeat around (54 sc).
Rnd 33: *Sc in next 8 sts, 2 sc in next st,* repeat around (60 sc).
Rnds 34-42: Sc in each st.
Rnd 43: *Inv dec, sc in next 8 sts,* repeat around (54 sc).
Rnd 44: *Inv dec, sc in next 7 sts,* repeat around (48 sc).
Rnd 45: *Inv dec, sc in next 6 sts,* repeat around (42 sc).
Rnd 46: *Inv dec, sc in next 5 sts,* repeat around (36 sc).
Rnd 47: *Inv dec, sc in next 4 sts,* repeat around (30 sc).
Rnd 48: *Inv dec, sc in next 3 sts,* repeat around (24 sc). Stuff head.
Rnd 49: *Inv dec, sc in next 2 sts,* repeat around (18 sc).
Rnd 36: *Inv dec, sc in next st,* repeat around (12 sc). Join with sl st. Finish stuffing head and close with ult fin.
HIND LEGS:
Rnd 1: With black yarn, ch 2 (or magic circle), 6 sc in 2nd ch from hook. Do not join. Work in continuous rnds throughout unless otherwise specified.
Rnd 2: 2 sc in each st (12 sc).
Rnd 3: *Sc in next st, 2 sc in next st,* repeat around (18 sc).
Rnd 4: *Sc in next 2 sts, 2 sc in next st,* repeat around (24 sc). Join with sl st. Fasten off black yarn.
Rnds 5-12: With tan yarn, sc in each st. Join with sl st at end of Rnd 12. Fasten off leaving 12” length for sewing.
Repeat for second hind leg using green for Rnds 1-4 and tan for Rnds 5-12.
Stuff legs and sew to front of body at Rnds 10-19. Add a few black sts if desired.
FRONT LEGS:
Rnd 1: With tan yarn, ch 2 (or magic circle), 6 sc in 2nd ch from hook. Do not join. Work in continuous rnds throughout unless otherwise specified.
Rnd 2: 2 sc in each st (12 sc).
Rnd 3: *Sc in next st, 2 sc in next st,* repeat around (18 sc).
Rnds 4-12: Sc in each st. Join with sl st at end of Rnd 12. Fasten off leaving 12” length for sewing.
On tan leg, embroider sts in black across Rnds 1-3. Stuff tan leg and sew to front of body at Rnds 23-30.
Repeat Rnds 1-12 for second front leg using green yarn. Stuff green leg lightly and sew end closed. Sew Rnd 12 of leg to Rnd 30 of body and leave the leg hanging. Add black sts to seam.
RIBS:
Row 1: With red yarn, ch 4, sc in 2nd ch from hook and in next 2 ch (3 sc).
Row 2: With white yarn, ch 1, turn, sc in each st.
Row 3: With red yarn, ch 1, turn, sc in 2 sc, 2 sc in last sc (4 sc).
Row 4: With white yarn, ch 1, turn, sc in each st.
Row 5: With red yarn, ch 1, turn, sc in 3 sc, 2 sc in last sc (5 sc).
Row 6: With white yarn, ch 1, turn, sc in each st.
Row 7: With red yarn, ch 1, turn, sc in each sc, then sc around entire piece. Join with sl st. Fasten off yarn leaving 12” length.
Sew ribs to front of body at Rnds 21-29 on the left side.
SNOUT:
Rnd 1: With black yarn, ch 5, sc in 2nd ch from hook, sc in next 2 ch, 3 sc in last ch. Working on opposite side of starting ch, sc in next 2 ch, 2 sc in last ch (10 sc). Do not join.
Rnd 2: 2 sc in first st, sc in next 2 sts, 2 sc in next 3 sts, sc in next 2 sts, 2 sc in next 2 sts (16 sc).
Rnd 3: *Sc in first st, 2 sc in next st,* sc in next 2 sts, * to * 3 times, sc in next 2 sts, * to * 2 times (22 sc).
Rnd 4: *Sc in 2 sts, 2 sc in next st,* sc in next 2 sts, * to * 3 times, sc in next 2 sts, * to * 2 times (28 sc).
Rnd 5: *Sc in 3 sts, 2 sc in next st,* sc in next 2 sts, * to * 3 times, sc in next 2 sts, * to * 2 times (34 sc).
Rnds 6-7: Sc in each st. Join with sl st at end of Rnd 7. Fasten off with 12” length for sewing. Insert safety nose in center of the top side of Rnd 4. Stuff snout and sew to head at Rnds 33-41.
EYE PATCHES: (Make 2)
Rnd 1: With black yarn, ch 2 (or magic circle), 6 sc in 2nd ch from hook. Do not join. Work in continuous rnds throughout unless otherwise specified.
Rnd 2: 2 sc in each st (12 sc).
Rnd 3: *Sc in next st, 2 sc in next st,* repeat around (18 sc). Join with sl st. Fasten off yarn leaving 9” length for sewing.
Sew eye patches above snout but touching snout. Patches should be approximately 6 sts from each other.
EYEBALLS:
Rnd 1: With green yarn, ch 2 (or magic circle), 6 sc in 2nd ch from hook. Join with sl st. Fasten off green.
Rnd 2: Attach white yarn, 2 sc in each st (12 sc). Do not join.
Rnd 3: Sc in each st. Join with sl st. Fasten off white yarn leaving 6” length for sewing. Insert safety eye in center of Rnd 1. Sew eyeball to center of eye patch.
For second eyeball, repeat Rnds 1-3. Do not fasten off.
Rnd 4: *Inv dec, sc in next st,* around (8 sc). Insert black safety eye in center of Rnd 1. Stuff slightly.
Rnd 5: Inv dec 4 times (4 sc). Join with sl st. Close with ult fin. Sew to center of eye patch and let the eyeball hang free.
EARS: (Make 1 black, 1 green)
Rnd 1: Ch 2 (or magic circle), 6 sc in 2nd ch from hook. Do not join. Work in continuous rnds throughout unless otherwise specified.
Rnd 2: 2 sc in each st (12 sc).
Rnd 3: *Sc in next st, 2 sc in next st,* repeat around (18 sc).
Rnd 4: *Sc in next 2 sts, 2 sc in next st,* repeat around (24 sc).
Rnds 5-10: Sc in each st. Join with sl st at end of Rnd 10. Fasten off leaving 12” length for sewing.
Are you ready to add a little wild magic to your Halloween crochet projects? In honor of Wolf Awareness Week, I’m sharing a fun and spooky crochet project that combines the mysterious beauty of wolves with the creativity of handmade accessories: the Wolf Eye Halloween Bag Crochet Pattern!
A Little Wild, A Little Spooky
Wolves have long captured our imaginations. Their piercing eyes, mysterious howls, and connection to the wilderness make them a favorite subject in folklore, fantasy, and Halloween stories. Whether you picture a wolf prowling through a moonlit forest or a mythical creature guarding a hidden treasure, wolves bring a touch of wild enchantment to the season.
Wolf Awareness Week is also a wonderful opportunity to learn more about these fascinating animals, their role in the environment, and the importance of protecting their natural habitats.
What better way to celebrate than with a crochet project inspired by one of nature’s most captivating creatures?
If you’re looking for a Halloween accessory that’s a little different from the usual pumpkins, ghosts, and black cats, this Wolf Eye Halloween Bag is ready to howl its way into your project queue!
Inspired by the striking gaze of a wolf, this bag makes a fun addition to your Halloween wardrobe. It’s a great choice for anyone who loves wolves, wildlife-inspired crochet, or accessories with a spooky twist.
Use it as part of your Halloween outfit, carry your essentials on an autumn outing, or make one for a fellow wolf enthusiast. It’s also a conversation starter for anyone who appreciates the beauty and mystery of these amazing animals.
I remember one year my mom made Little Red Riding Hood capes for myself and my sister for Halloween, and my brother was dressed as a wolf.
And, of course, it’s a wonderful excuse to pick up your crochet hook and make something a little wild!
Celebrate Wolves Through Creativity
Crochet is a wonderful way to express the things we love, whether that’s animals, holidays, or unusual designs that stand out from the crowd. The Wolf Eye Halloween Bag brings together two fun themes: Halloween creativity and an appreciation for wolves.
As you work on your bag, take a moment to learn something new about wolves and the challenges they face in the wild. Sharing accurate information about wildlife is one small way we can help build awareness and appreciation for these important animals.
Get Your Crochet Hook Ready!
Are you ready to add a little wolf-inspired magic to your Halloween?
Whether you’re making it for yourself or gifting it to a wolf-loving friend, this unique crochet project is a fun way to celebrate Wolf Awareness Week and bring a little wilderness into your handmade Halloween.
Happy crocheting, and may your Halloween be wonderfully wild!
Wolf Eye Trick or Treat Bag
Materials:
I Love This Cotton yarn –
2.5 oz. Bright Green
3 oz. Buttercup
2 oz. Black
Size H (5.0 mm) crochet hook
Yarn needle
¼ yard cotton flannel fabric (optional)
Gauge: 9 sts = 2”, 10 rows = 2”
Finished measurements: 14.5” diameter with 4” depth and 12.5” handles
(15” diameter with 4” depth and 13” handles using Red Heart Super Saver yarn)
Directions:
SIDES (Make 2):
Rnd 1: With green yarn, magic circle, 6 sc in magic circle. Do not join. Work in continuous rnds throughout unless otherwise specified.
Rnd 2: 2 sc in each st (12 sc).
Rnd 3: *Sc in next st, 2 sc in next st, repeat around (18 sc).
Rnd 4: *Sc in each of next 2 sts, 2 sc in next st,* repeat around (24 sc).
Rnd 5: *Sc in each of next 3 sc, 2 sc in next st,* repeat around (30 sc).
Rnd 6: *Sc in each of next 4 sts, 2 sc in next st,* repeat around (36 sc).
Rnd 7: *Sc in each of next 5 sts, 2 sc in next st,* repeat around (42 sc).
Rnd 8: *Sc in each of next 6 sts, 2 sc in next st,* repeat around (48 sc).
Rnd 9: *Sc in each of next 7 sts, 2 sc in next st,* repeat around (54 sc).
Rnd 10: *Sc in each of next 8 sts, 2 sc in next st,* repeat around (60 sc).
Rnd 11: *Sc in each of next 9 sts, 2 sc in next st,* repeat around (66 sc).
Rnd 12: *Sc in each of next 10 sts, 2 sc in next st,* repeat around (72 sc).
Rnd 13: *Sc in each of next 11 sts, 2 sc in next st,* repeat around (78 sc).
Rnd 14: *Sc in each of next 12 sts, 2 sc in next st,* repeat around (84 sc).
Rnd 15: *Sc in each of next 13 sts, 2 sc in next st,* repeat around (90 sc).
Rnd 16: *Sc in each of next 14 sts, 2 sc in next st,* repeat around (96 sc).
Rnd 17: *Sc in each of next 15 sts, 2 sc in next st,* repeat around (102 sc).
Rnd 18: *Sc in each of next 16 sts, 2 sc in next st,* repeat around (108 sc).
Rnd 19: *Sc in each of next 17 sts, 2 sc in next st,* repeat around (114 sc). Join with sl st. Fasten off green.
Rnd 20: With Buttercup yarn, *sc in each of next 18 sts, 2 sc in next st,* repeat around (120 sc).
Rnd 21: *Sc in each of next 19 sts, 2 sc in next st,* repeat around (126 sc).
Rnd 22: *Sc in each of next 20 sts, 2 sc in next st,* repeat around (132 sc).
Rnd 23: *Sc in each of next 21 sts, 2 sc in next st,* repeat around (138 sc).
Rnd 24: *Sc in each of next 22 sts, 2 sc in next st,* repeat around (144 sc).
Rnd 25: *Sc in each of next 23 sts, 2 sc in next st,* repeat around (150 sc).
Rnd 26: *Sc in each of next 24 sts, 2 sc in next st,* repeat around (156 sc).
Rnd 27: *Sc in each of next 25 sts, 2 sc in next st,* repeat around (162 sc).
Rnd 28: *Sc in each of next 26 sts, 2 sc in next st,* repeat around (168 sc).
Rnd 29: *Sc in each of next 27 sts, 2 sc in next st,* repeat around (174 sc). Join with sl st. Fasten off Buttercup.
Rnd 30: With black yarn, sc in next 57 sts, ch 45, skip next 29 sts, sc in next 88 sts.
Rnd 31: Sc in each sc and ch around (190 sc).
Rnds 32-36: Sc in each st. At end of Rnd 36, join with sl st. Fasten off black.
ASSEMBLY:
Mark center bottom, count 60 sts back and place marker. Count 60 sts from center marker and place marker. Measure distance from top markers to handle to ensure they are even. Adjust markers as necessary. Holding right sides together, sl st through both sides from side marker and around bottom to the other side marker. Fasten off. Weave in ends.
PUPIL:
Rnd 1: With black yarn, ch 30, sc in 2nd ch from hook and in next 5 ch, hdc in next 6 ch, dc in next 5 ch, hdc in next 6 ch, sc in next 5 ch, 3 sc in last ch. Working on opposite side of starting ch, sc in next 5 ch, hdc in next 6 ch, dc in next 5 ch, hdc in next 6 ch, sc in next 5 ch, 2 sc in last ch. Join with sl st.
Rnd 2: Ch 1, 2 sc in first sc, sc in next 5 sc, hdc in next 6 hdc, dc in next 5 dc, hdc in next 6 hdc, sc in next 5 sc, 2 sc in next sc, (sc, ch 1, sc) in next sc, 2 sc in next sc, sc in next 5 sc, hdc in next 6 hdc, dc in next 5 dc, hdc in next 6 hdc, sc in next 5 sc, 2 sc in next sc, (sc, ch 1, sc) in next sc. Join with sl st. Fasten off with 12” length for sewing. Block bag and pupils. Sew pupils vertically across green section of eye, one on each side of bag.
LINING (Optional):
Lay completed side on cotton flannel fabric and cut 2 pieces of fabric to size plus ½”. With right sides together, sew fabric pieces together. Then sew lining into inside of bag.
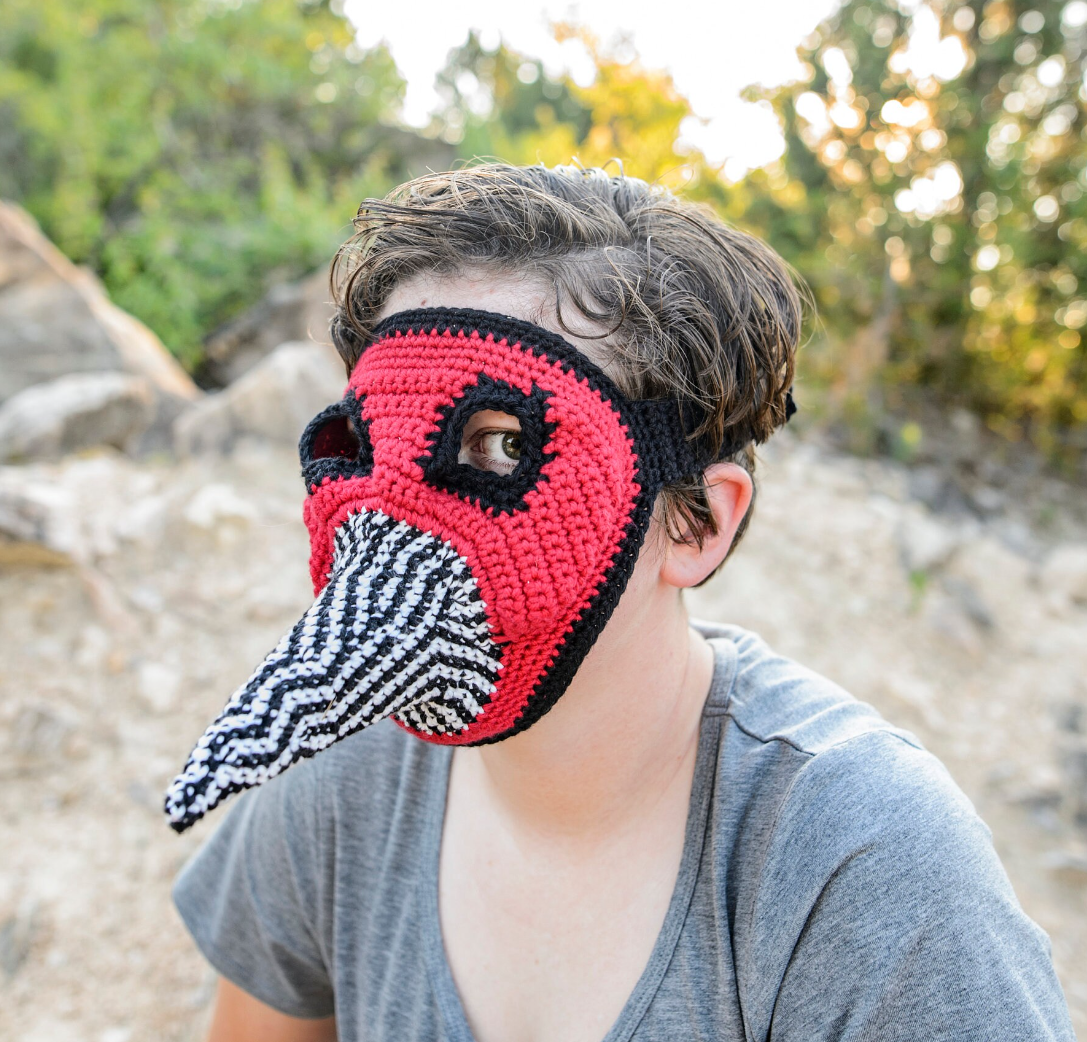
Looking for a crochet project that is a little unusual, a little creepy, and guaranteed to get people talking? Meet the Plague Doctor Mask Crochet Pattern!
With its distinctive long beak and mysterious appearance, the plague doctor mask is instantly recognizable. This crochet version puts a fun, handmade twist on one of the most iconic images associated with medieval European history.
A Little History Behind the Look
The familiar plague doctor costume—with its long beaked mask, dark clothing, gloves, and hat—is strongly associated with the physicians who treated plague victims.
Interestingly, the famous beaked mask wasn’t actually documented until later than the major 14th-century Black Death. The design is particularly associated with 17th-century plague doctors, and the idea that the beak was stuffed with fragrant herbs to protect the wearer is part of the history and folklore surrounding the costume.
Today, that distinctive silhouette has become a popular symbol of spooky season, historical costumes, Halloween decorations, and gothic-inspired designs.
Turn History Into Crochet
I love taking something unexpected and turning it into crochet, and this project definitely falls into that category!
The Plague Doctor Mask Crochet Pattern is a fun project for crocheters who enjoy unusual designs and want to make something a little different from the typical Halloween projects.
The long beak gives it that unmistakable plague doctor look, while the handmade crochet construction adds a playful twist.
Perfect for Halloween
Looking for something unique for your Halloween costume?
A crochet plague doctor mask can make a memorable addition to a spooky or historical-inspired costume. Pair it with dark clothing, a long coat, a hat, or other costume pieces to create your own mysterious plague doctor look.
It’s also a fun project for anyone who loves gothic, medieval, steampunk, or historical-inspired crafts.
A Conversation Starter for Crocheters
One of my favorite things about crochet is that you don’t always have to make the expected.
Sometimes it’s fun to look at something unusual and think:
“I wonder if I could crochet that?”
That’s exactly the kind of creativity that makes designing so much fun. 🧶
If you’re looking for a crochet project that’s creepy, quirky, and definitely not ordinary, the Plague Doctor Mask Crochet Pattern might be just the project for you.
Grab your hook, choose your yarn, and get ready to create something that looks like it stepped right out of a spooky history book!
Materials:
I Love This Cotton yarn:
1 oz. white
1 oz. black
1.5 oz. solid (MC)
Size G (4.0 mm) crochet hook for small, size H (5.0 mm) for medium mask
Yarn needle
Stitch markers
3 buttons 3/4+” to 7/8”
Sizing Info:
Small – From right strap to left across eyes is 8.25″. Top center to bottom is 8″. Distance between eye sockets 2.25″. Eye hole is 1″ across.
Medium – Across eyes is 8.5″. Top center to bottom is 9″. Distance between eye sockets 2.33″.
Gauge:
G hook – 5 sts = 1”, 6 rows = 1”
H hook – 5 sts = 1”, 5 rows = 1”
Directions:
For Rnds 1-31, alternate 1 sc white, 1 sc black.
Rnd 1: Ch 2 (or magic circle), 4 sc in 2nd ch from hook. Do not join. Work in continuous rnds throughout unless otherwise specified.
Rnd 2: *Sc in next st, 2 sc in next st twice (6 sc).
Rnd 3: Sc in each st.
Rnd 4: *Sc in next st, 2 sc in next st,* repeat twice (9 sc).
Rnd 5: Sc in each st.
Rnd 6: *Sc in next 2 sts, 2 sc in next st,* repeat twice (12 sc).
Rnds 7-8: Sc in each st.
Rnd 9: *Sc in next 3 sts, 2 sc in next st,* repeat twice (15 sc).
Rnds 10-11: Sc in each st.
Rnd 12: *Sc in next 4 sts, 2 sc in next st,* repeat twice (18 sc).
Rnds 13-14: Sc in each st.
Rnd 15: *Sc in next 5 sts, 2 sc in next st,* repeat twice (21 sc).
Rnds 16-17: Sc in each st.
Rnd 18: *Sc in next 6 sts, 2 sc in next st,* repeat twice (24 sc).
Rnds 19-20: Sc in each st.
Rnd 21: *Sc in next 7 sts, 2 sc in next st,* repeat twice (27 sc).
Rnds 22-23: Sc in each st.
Rnd 24: *Sc in next 8 sts, 2 sc in next st,* repeat twice (30 sc).
Rnds 25-26: Sc in each st.
Rnd 27: *Sc in next 4 sts, 2 sc in next st,* repeat around (36 sc).
Rnd 28: *Sc in next 5 sts, 2 sc in next st,* repeat around (42 sc).
Rnd 29: *Sc in next 6 sts, 2 sc in next st,* repeat around (48 sc).
Rnd 30: *Sc in next 7 sts, 2 sc in next st,* repeat around (54 sc).
Rnd 31: *Sc in next 8 sts, 2 sc in next st,* repeat around (60 sc). Join with sl st. Mark last st of Rnd 31. Fasten off black and white yarn. Count back 30 sts from marked st and mark 30th st.
Row 32: With right side facing, attach MC (solid) yarn at first marker, ch 1, sc in same st, sc in next 2 sts, 2 sc in next st, *sc in next 3 sts, 2 sc in next st,* 5 times, sc in next 2 sts, sc in next st of Rnd 31 (38 sc).
Row 33: Ch 1, turn, *sc in next 4 sts, 2 sc in next st,* repeat across, sc in remaining sts (45 sc).
Row 34: Ch 1, turn, sc in each st.
The next 9 rows will be worked in 3 sections.
RIGHT CHEEK:
Row 35: Ch 1, turn, dec, sc in next 9 sts (10 sc).
Row 36: Ch 1, turn, sc in next 8 sc, dec (9 sc).
Row 37: Ch 1, turn, dec, sc in next 6 sts, inc (9 sc).
Row 38: Ch 1, turn, inc, sc in next 6 sc, dec (9 sc).
Row 39: Repeat Row 37.
Row 40: Repeat Row 38.
Row 41: Repeat Row 37.
Row 42: Repeat Row 38.
Row 43: Repeat Row 37. Fasten off.
NOSE BRIDGE:
Row 35: Return to Row 34, sk 8 sts, attach MC yarn in 9th st, ch 1, sc in same st, sc in next 6 sts (7 sc).
Rows 36-39: Ch 1, turn, sc in each st.
Rows 40-41: Ch 1, turn, inc, sc across to last st, inc last st (11 sc at end of Row 41). Fasten off at end of Row 41.
NOTE: Nose bridge is 2 rows shorter than cheek sections. Don’t worry, it will even out at Rnd 44.
LEFT CHEEK:
Row 35: Return to Row 34, sk 8 sts, attach MC yarn in 9th st, ch 1, sc in same st, sc in next 8 sts, dec (10 sc).
Row 36: Ch 1, turn, dec, sc in next 8 sts (9 sc).
Row 37: Ch 1, turn, inc, sc in 6 sts, dec (9 sc).
Row 38: Ch 1, turn, dec, sc in 6 sts, inc (9 sc).
Row 39: Repeat Row 37.
Row 40: Repeat Row 38.
Row 41: Repeat Row 37.
Row 42: Repeat Row 38.
Row 43: Repeat Row 37.
Rnd 44: Now you’ll connect the 3 sections and beginning working in rnds again, making a border around the entire mask. Ch 1, turn, dec, sc in next 6 sts, 2 sc in last st of this section, ch 4, 2 sc in 1st st of nose bridge, sc in next 9 sts, 2 sc in last st of nose bridge, ch 4, 2 sc in 1st st of cheek section, sc in next 6 sts, dec. Turn to work down cheek, 10 sc evenly spaced across 11 row ends. This leaves 1 row, work dec between this sp and next sc on Rnd 31. Sc in each remaining st of Rnd 31 except last st before cheek. Dec over last st of Rnd 31 and first st of cheek, work 10 sc evenly spaced along remaining row ends. Join with sl st in first st of Rnd 44.
Rnd 45: Ch 1, sc in each sc and ch. Join with sl st. Fasten off MC.
Rnds 46-47: Join black yarn, ch 1, sc in each st. Join with sl st. Do not fasten off.
STRAP:
Ch 1, turn, sc in next 6 sts.
Next Row: ch 1, turn, sc in each st. Repeat this row until strap measures 9”.
Next Row: Dec, sc in next 2 sts, dec (4 sc). Fasten off.
Fold mask in half and mark 6 sts on opposite side corresponding to strap.
Row 1: Attach black yarn in first marked st, ch 1, sc in next 6 sts.
Row 2: Ch 1, turn, sc in each st. Repeat this row until strap measures 6”.
Next Row (buttonhole row): Ch 1, turn, sc in next 2 sts, ch 2, sk 2 sts, sc in last 2 sts.
Repeat Row 2 five times.
Repeat last 6 rows once.
Repeat buttonhole row.
Repeat Row 2 twice.
Last row: Ch 1, turn, dec, sc in next 2 sts, dec (4 sc). Fasten off.
EYE HOLES: (Right eye)
Rnd 1: The bottom of eye opening has 8 sts. With right side facing, attach accent color in 2nd st, ch 1, sc in this st, sc in next 5 sts, dec between last st on bottom and 1st row edge on side, work 7 sc evenly spaced along side, dec next corner, sc next 2 loops, dec next corner, work 6 sc evenly spaced along inner side, dec last corner (25 sc). Join with sl st. If larger eye holes are desired, fasten off after Rnd 1.
Rnd 2: Ch 1, *sc in next 3 sts, dec,* repeat around (20 sc). Join with sl st. Fasten off.
(Left eye)
Rnd 1: With right side facing, attach accent color in 2nd st, ch 1, sc in this st, sc in next 5 sts, dec between last st on bottom and 1st row edge on side, work 6 sc evenly spaced along side, dec next corner, sc next 2 loops, dec next corner, work 7 sc evenly spaced along inner side, dec last corner (25 sc). Join with sl st. If larger eye holes are desired, fasten off after Rnd 1.
Rnd 2: Ch 1, *sc in next 3 sts, dec,* repeat around (20 sc). Join with sl st. Fasten off.
Weave in all ends.
If desired, glue wire to inside of nose bridge below eyes. For best fit, try on mask and mark position for buttons, then sew on.
Roll a coffee filter or paper towel into a cone and insert into nose.
In the heart of a bustling city, where the streets hummed with the rhythm of life, there lived an elephant named Miles. But Miles wasn’t your ordinary elephant; he was a jazzy elephant. With his sleek, silver trumpet in his trunk and a smooth fedora perched on his head, he was the coolest cat — or, rather, the coolest elephant — in town.
Every evening, as the sun dipped below the skyline, Miles would wander down to the local jazz club, The Trumpeting Tusk, where musicians from all over gathered to play. The air was thick with melodies, harmonies, and the gentle sway of jazz, but whenever Miles showed up, the music took on a whole new vibe.
Miles had an ear for the blues, the swing, and everything in between. His trunk moved effortlessly over his trumpet’s keys, sending out notes that made people feel things they couldn’t quite describe. His music wasn’t just sound; it was emotion. With each note, he told stories of joy, heartbreak, adventure, and mystery. The crowd would lean in closer, mesmerized by the soul Miles poured into every performance.
But Miles had a secret. Despite his outward charm and rhythm, he wasn’t always this confident. When he was younger, Miles felt different from the other elephants in the herd. While they stomped through the jungle, shaking the ground with their powerful steps, Miles was more interested in the sounds of the world around him — the birds singing, the wind rustling through the leaves, and the distant beats of city life. He found an old trumpet one day, left behind by travelers, and from that moment on, he knew his path was in music.
However, it wasn’t easy. The other elephants didn’t understand why Miles spent so much time practicing instead of foraging or playing. “You can’t eat music,” they’d say with a laugh. But Miles didn’t let it stop him. He kept practicing, his heart filled with the desire to bring his unique sound to life.
And one day, the opportunity came. A group of jazz musicians visiting from the city heard him playing his trumpet near a watering hole. They were captivated by the depth and rhythm of his music. They invited him to join them back in the city, where he could share his gift with the world.
Now, years later, Miles had become a legend in the city’s music scene. People from all over came to hear the jazzy elephant who could turn any moment into a soulful symphony. His friends, both old and new, admired his resilience, and Miles, ever humble, always reminded them: “It’s not about being the loudest. It’s about playing with heart.”
And so, as the stars twinkled over the city and the night carried on, Miles continued to play, his trumpet echoing through the streets. His music was a reminder that no matter where you come from or what others think, as long as you follow your heart, you’ll find your rhythm.
Materials:
Worsted weight yarn:
15 oz. baby blue
11 oz. gray
7.5 oz. pale yellow
1 oz. black
½ oz. blue denim
¼ oz. pink
¼ oz. charcoal
5 yards white
1.5 oz. Kelly Green
Crochet hook size J (6.00 mm U.S.)
Yarn needle
Difficulty Level: Intermediate
Finished Measurements: 50″ x 37″
Gauge: 5 blocks = 4”
Directions:
Rows 1-48 are increase rows.
Row 1: With color baby blue, ch 6, dc in 4th ch from hook, dc in each of the next 2 ch (1 block made).
Row 2: Ch 6, turn, dc in 4th ch from hook, dc in each of the next 2 ch, sl st in first block. Ch 3, 3 dc in ch-3 sp of first block (2 blocks). Continue to increase in same manner through Row 48, following chart for color changes.
Rows 49-64 will decrease on right side of blanket and increase on left side of blanket to maintain 48 blocks for each row. To decrease on right side, ch 1, turn, sl st in 3 dc, ch 3, 3 dc in ch-3 sp of last block.
Rnd 1: With white, ch 4, sc in 2nd ch from hook, sc in next ch, 3 sc in last ch. Working on opposite side of starting ch, sc in next ch, 2 sc in last ch. Do not join.
Rnd 2: 2 sc in first st, sc in next st, 2 sc in each of next 3 sts, sc in next st, 2 sc in each of next 2 sts (14 sc). Join with sl st. Fasten off white leaving 12” length for sewing.
Pupil: With black yarn, ch 2 (or magic circle), 6 sc in 2nd ch. Fasten off leaving 6” length and sew to bottom center of eye.
Sew eyes to face at position marked on chart.
Make 5 quarter notes in black yarn and sew above elephant’s head.
Rnd 1: With black, ch 4, sc in 2nd ch from hook, sc in next ch, 3 sc in last ch. Working on opposite side of starting ch, sc in next ch, 2 sc in last ch. Do not join.
Rnd 2: 2 sc in first st, sc in next st, 2 sc in each of next 3 sts, sc in next st, 2 sc in each of next 2 sts (14 sc). Join with sl st. Ch 11, sc in 2nd ch ch from hook and next 9 ch. Sl st in next st of Rnd 2. Fasten off leaving 12” length for sewing. Sew notes above the elephant’s head.
Use black thread to embroider details following the chart.
Used to determine whether a user is included in an A / B or Multivariate test.
18 months
_ga
ID used to identify users
2 years
_gali
Used by Google Analytics to determine which links on a page are being clicked
30 seconds
_ga_
ID used to identify users
2 years
_gid
ID used to identify users for 24 hours after last activity
24 hours
_gat
Used to monitor number of Google Analytics server requests when using Google Tag Manager
1 minute
_gac_
Contains information related to marketing campaigns of the user. These are shared with Google AdWords / Google Ads when the Google Ads and Google Analytics accounts are linked together.
90 days
__utma
ID used to identify users and sessions
2 years after last activity
__utmt
Used to monitor number of Google Analytics server requests
10 minutes
__utmb
Used to distinguish new sessions and visits. This cookie is set when the GA.js javascript library is loaded and there is no existing __utmb cookie. The cookie is updated every time data is sent to the Google Analytics server.
30 minutes after last activity
__utmc
Used only with old Urchin versions of Google Analytics and not with GA.js. Was used to distinguish between new sessions and visits at the end of a session.
End of session (browser)
__utmz
Contains information about the traffic source or campaign that directed user to the website. The cookie is set when the GA.js javascript is loaded and updated when data is sent to the Google Anaytics server
6 months after last activity
__utmv
Contains custom information set by the web developer via the _setCustomVar method in Google Analytics. This cookie is updated every time new data is sent to the Google Analytics server.
2 years after last activity
Marketing cookies are used to follow visitors to websites. The intention is to show ads that are relevant and engaging to the individual user.
Pinterest Tag is a web analytics service that tracks and reports website traffic.
Unique value with which users can be identified by X. Collected information is used to be personalize X services, including X trends, stories, ads and suggestions.
2 years
external_referer
Our Website uses X buttons to allow our visitors to follow our promotional X feeds, and sometimes embed feeds on our Website.
2 years
guest_id
This cookie is set by X to identify and track the website visitor. Registers if a users is signed in the X platform and collects information about ad preferences.