Did you know September is National Piano Month? 🎹✨ It’s the perfect time to celebrate the beauty of music and honor the instrument that has inspired countless songs, from classical masterpieces to pop chart-toppers. And what better way for yarn lovers to join in the celebration than with a crochet hook in hand?
This month, I’m excited to share the Piano Ornament Crochet Pattern – a quick, fun project that’s both creative and musical.
🧶 About the Pattern
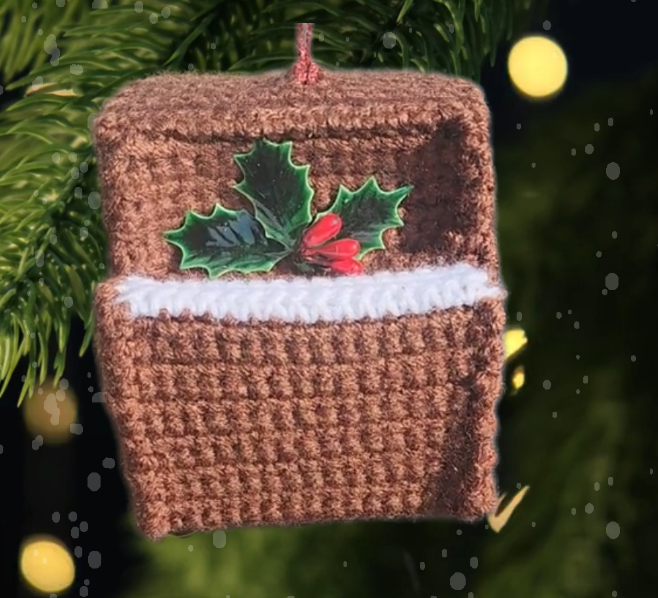
The Piano Ornament Crochet Pattern is a miniature design that captures the charm of this timeless instrument. Whether you hang it on your Christmas tree, gift it to a piano teacher, or add it to your music room décor, this ornament is sure to strike a chord with music lovers.
✨ Pattern Features:
-
Step-by-step instructions (US crochet terms)
-
Beginner-friendly and quick to make
-
Perfect stash-busting project
-
Finished size makes it ideal for ornaments, gift toppers, or keepsakes (approximately 4” tall by 3.5” wide)
🎁 Perfect Gift Idea
This pattern makes a wonderful handmade gift for:
-
Piano teachers 🎼 (imagine gifting one at a recital!)
-
Music students who just reached a new milestone
-
Friends and family who love music
-
Your own tree, if you want it to sing with handmade charm this holiday season
📥 Get the Pattern
The Piano Ornament Crochet Pattern is available now as a PDF instant download in my shop. That means you can start crocheting your own little piece of musical décor today!
👉 Shop the Pattern Here
This September, celebrate National Piano Month by making something that combines your love of music and crochet. 🎹🧶 Handmade ornaments like this add meaning and melody to the holidays – and every stitch will be music to your heart. 💖
Materials:
Sport yarn:
65 yards brown
3 yards white
Size F (3.75 mm) crochet hook
Yarn needle
Black fabric paint or marker
12” length of ribbon or cord
Peel & stick felt
Gauge: 5 sc = 1”, 5 rows = 1”
Directions:
Row 1: (Section 1) With brown yarn, ch 17, sc in 2nd ch from hook and all remaining chs (16 sc).
Rows 2-7: Ch 1, turn, sc in each st.
Row 8: (Section 2) Ch 1, turn, working in BLO, sc in each st.
Rows 9-14: Ch 1, turn, working in both lps, sc in each st.
Row 15: (Section 3) Ch 1, turn, working in FLO, sc in each st.
Rows 16-33: Ch 1, turn, working in both lps, sc in each st.
Row 34: (Section 4) Ch 1, turn, working in BLO, sc in each st.
Rows 35-44: Ch 1, turn, working in both lps, sc in each st.
Row 45: (Section 5) Ch 1, turn, working in FLO, sc in each st.
Rows 46-55: Ch 1, turn, working in both lps, sc in each st.
Row 56: With white yarn, sc in each st.
Row 57: (Section 6) Ch 1, turn, working in FLO, sc in each st. Fasten off white yarn.
Rows 58-65: With brown yarn, ch 1, turn, working in both lps, sc in each st.
Sides: (Make 2)
Row 1: With brown yarn, ch 11, sc in 2nd ch from hook and each remaining ch (10 sc).
Rows 2-12: Ch 1, turn, sc in each st.
Row 13: Ch 1, turn, sc in next 7 sts, leave remaining 3 sts unworked (7 sc).
Rows 14-19: Ch 1, turn, sc in each st. Fasten off at end of Row 19.
Cut a piece of felt for each piano section and 2 pieces for the sides. Peel and stick as you fold sections and sew in place.
Sew Row 1 to Row 59 to start the box. Sew on one side at a time. As you begin to join outline of first side to body of piano, it will begin to take the proper shape.
OPTIONAL:
Use black fabric marker or fabric paint to create black keys on keyboard.
If you would like to use piano as a hanging ornament, cut 12” piece of ribbon and lp through top center of piano. Decorate as desired.


Question: It says for Row 58: “Rows 58-55: With brown yarn, ch 1, turn, working in both lps, sc in each st.” Is that supposed to be Rows 58-65, or are we supposed to go back and work in Rows 58-55? Thank you.
Thanks for catching that typo. It should be Rows 58-65.