
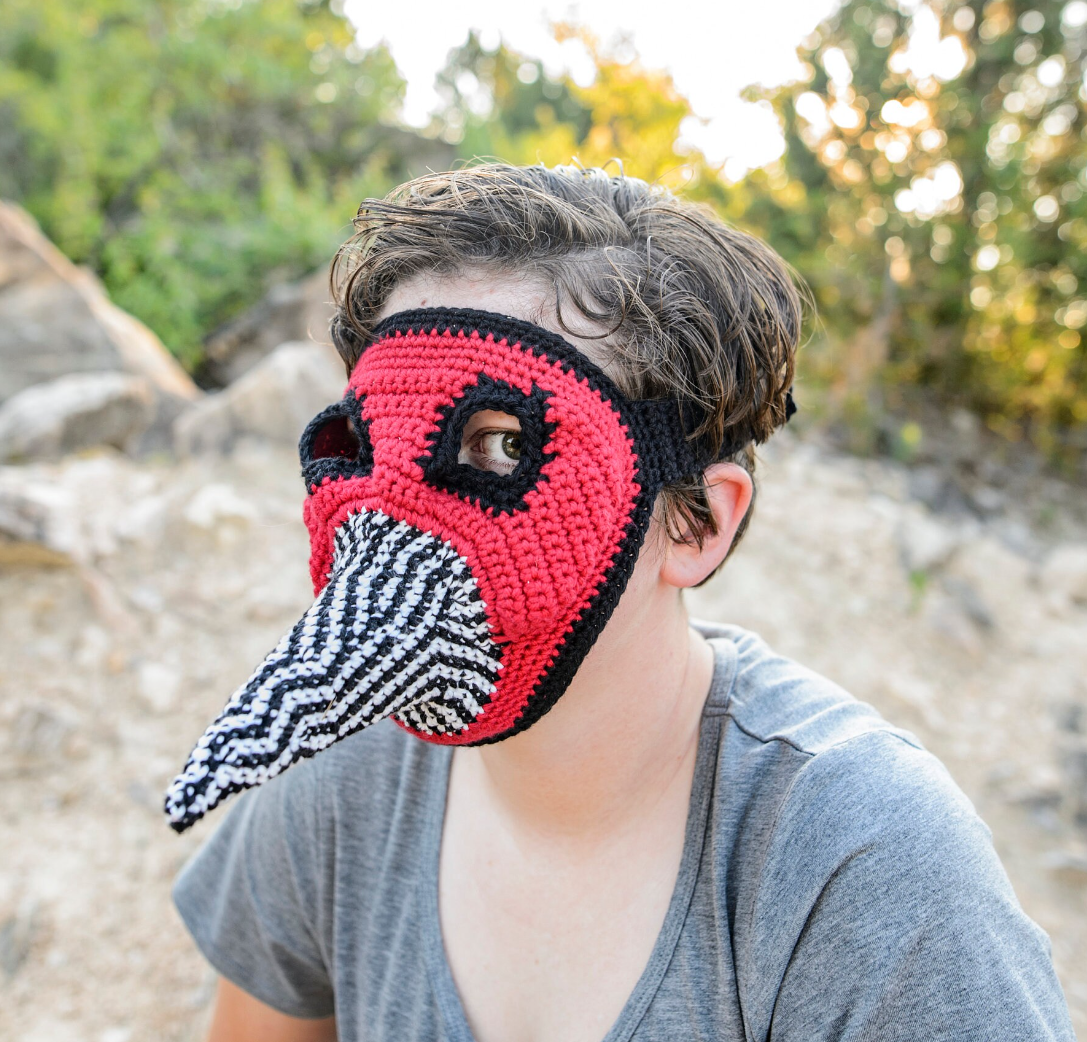
Looking for a crochet project that is a little unusual, a little creepy, and guaranteed to get people talking? Meet the Plague Doctor Mask Crochet Pattern!
With its distinctive long beak and mysterious appearance, the plague doctor mask is instantly recognizable. This crochet version puts a fun, handmade twist on one of the most iconic images associated with medieval European history.

A Little History Behind the Look
The familiar plague doctor costume—with its long beaked mask, dark clothing, gloves, and hat—is strongly associated with the physicians who treated plague victims.
Interestingly, the famous beaked mask wasn’t actually documented until later than the major 14th-century Black Death. The design is particularly associated with 17th-century plague doctors, and the idea that the beak was stuffed with fragrant herbs to protect the wearer is part of the history and folklore surrounding the costume.
Today, that distinctive silhouette has become a popular symbol of spooky season, historical costumes, Halloween decorations, and gothic-inspired designs.
Turn History Into Crochet
I love taking something unexpected and turning it into crochet, and this project definitely falls into that category!
The Plague Doctor Mask Crochet Pattern is a fun project for crocheters who enjoy unusual designs and want to make something a little different from the typical Halloween projects.
The long beak gives it that unmistakable plague doctor look, while the handmade crochet construction adds a playful twist.
Perfect for Halloween
Looking for something unique for your Halloween costume?
A crochet plague doctor mask can make a memorable addition to a spooky or historical-inspired costume. Pair it with dark clothing, a long coat, a hat, or other costume pieces to create your own mysterious plague doctor look.
It’s also a fun project for anyone who loves gothic, medieval, steampunk, or historical-inspired crafts.
A Conversation Starter for Crocheters
One of my favorite things about crochet is that you don’t always have to make the expected.
Sometimes it’s fun to look at something unusual and think:
“I wonder if I could crochet that?”
That’s exactly the kind of creativity that makes designing so much fun. 🧶
If you’re looking for a crochet project that’s creepy, quirky, and definitely not ordinary, the Plague Doctor Mask Crochet Pattern might be just the project for you.
Grab your hook, choose your yarn, and get ready to create something that looks like it stepped right out of a spooky history book!
Materials:
I Love This Cotton yarn:
1 oz. white
1 oz. black
1.5 oz. solid (MC)
Size G (4.0 mm) crochet hook for small, size H (5.0 mm) for medium mask
Yarn needle
Stitch markers
3 buttons 3/4+” to 7/8”
Sizing Info:
Small – From right strap to left across eyes is 8.25″. Top center to bottom is 8″. Distance between eye sockets 2.25″. Eye hole is 1″ across.
Medium – Across eyes is 8.5″. Top center to bottom is 9″. Distance between eye sockets 2.33″.
Gauge:
G hook – 5 sts = 1”, 6 rows = 1”
H hook – 5 sts = 1”, 5 rows = 1”
Directions:
For Rnds 1-31, alternate 1 sc white, 1 sc black.
Rnd 1: Ch 2 (or magic circle), 4 sc in 2nd ch from hook. Do not join. Work in continuous rnds throughout unless otherwise specified.
Rnd 2: *Sc in next st, 2 sc in next st twice (6 sc).
Rnd 3: Sc in each st.
Rnd 4: *Sc in next st, 2 sc in next st,* repeat twice (9 sc).
Rnd 5: Sc in each st.
Rnd 6: *Sc in next 2 sts, 2 sc in next st,* repeat twice (12 sc).
Rnds 7-8: Sc in each st.
Rnd 9: *Sc in next 3 sts, 2 sc in next st,* repeat twice (15 sc).
Rnds 10-11: Sc in each st.
Rnd 12: *Sc in next 4 sts, 2 sc in next st,* repeat twice (18 sc).
Rnds 13-14: Sc in each st.
Rnd 15: *Sc in next 5 sts, 2 sc in next st,* repeat twice (21 sc).
Rnds 16-17: Sc in each st.
Rnd 18: *Sc in next 6 sts, 2 sc in next st,* repeat twice (24 sc).
Rnds 19-20: Sc in each st.
Rnd 21: *Sc in next 7 sts, 2 sc in next st,* repeat twice (27 sc).
Rnds 22-23: Sc in each st.
Rnd 24: *Sc in next 8 sts, 2 sc in next st,* repeat twice (30 sc).
Rnds 25-26: Sc in each st.
Rnd 27: *Sc in next 4 sts, 2 sc in next st,* repeat around (36 sc).
Rnd 28: *Sc in next 5 sts, 2 sc in next st,* repeat around (42 sc).
Rnd 29: *Sc in next 6 sts, 2 sc in next st,* repeat around (48 sc).
Rnd 30: *Sc in next 7 sts, 2 sc in next st,* repeat around (54 sc).
Rnd 31: *Sc in next 8 sts, 2 sc in next st,* repeat around (60 sc). Join with sl st. Mark last st of Rnd 31. Fasten off black and white yarn. Count back 30 sts from marked st and mark 30th st.
Row 32: With right side facing, attach MC (solid) yarn at first marker, ch 1, sc in same st, sc in next 2 sts, 2 sc in next st, *sc in next 3 sts, 2 sc in next st,* 5 times, sc in next 2 sts, sc in next st of Rnd 31 (38 sc).
Row 33: Ch 1, turn, *sc in next 4 sts, 2 sc in next st,* repeat across, sc in remaining sts (45 sc).
Row 34: Ch 1, turn, sc in each st.
The next 9 rows will be worked in 3 sections.
RIGHT CHEEK:
Row 35: Ch 1, turn, dec, sc in next 9 sts (10 sc).
Row 36: Ch 1, turn, sc in next 8 sc, dec (9 sc).
Row 37: Ch 1, turn, dec, sc in next 6 sts, inc (9 sc).
Row 38: Ch 1, turn, inc, sc in next 6 sc, dec (9 sc).
Row 39: Repeat Row 37.
Row 40: Repeat Row 38.
Row 41: Repeat Row 37.
Row 42: Repeat Row 38.
Row 43: Repeat Row 37. Fasten off.
NOSE BRIDGE:
Row 35: Return to Row 34, sk 8 sts, attach MC yarn in 9th st, ch 1, sc in same st, sc in next 6 sts (7 sc).
Rows 36-39: Ch 1, turn, sc in each st.
Rows 40-41: Ch 1, turn, inc, sc across to last st, inc last st (11 sc at end of Row 41). Fasten off at end of Row 41.
NOTE: Nose bridge is 2 rows shorter than cheek sections. Don’t worry, it will even out at Rnd 44.
LEFT CHEEK:
Row 35: Return to Row 34, sk 8 sts, attach MC yarn in 9th st, ch 1, sc in same st, sc in next 8 sts, dec (10 sc).
Row 36: Ch 1, turn, dec, sc in next 8 sts (9 sc).
Row 37: Ch 1, turn, inc, sc in 6 sts, dec (9 sc).
Row 38: Ch 1, turn, dec, sc in 6 sts, inc (9 sc).
Row 39: Repeat Row 37.
Row 40: Repeat Row 38.
Row 41: Repeat Row 37.
Row 42: Repeat Row 38.
Row 43: Repeat Row 37.
Rnd 44: Now you’ll connect the 3 sections and beginning working in rnds again, making a border around the entire mask. Ch 1, turn, dec, sc in next 6 sts, 2 sc in last st of this section, ch 4, 2 sc in 1st st of nose bridge, sc in next 9 sts, 2 sc in last st of nose bridge, ch 4, 2 sc in 1st st of cheek section, sc in next 6 sts, dec. Turn to work down cheek, 10 sc evenly spaced across 11 row ends. This leaves 1 row, work dec between this sp and next sc on Rnd 31. Sc in each remaining st of Rnd 31 except last st before cheek. Dec over last st of Rnd 31 and first st of cheek, work 10 sc evenly spaced along remaining row ends. Join with sl st in first st of Rnd 44.
Rnd 45: Ch 1, sc in each sc and ch. Join with sl st. Fasten off MC.
Rnds 46-47: Join black yarn, ch 1, sc in each st. Join with sl st. Do not fasten off.
STRAP:
Ch 1, turn, sc in next 6 sts.
Next Row: ch 1, turn, sc in each st. Repeat this row until strap measures 9”.
Next Row: Dec, sc in next 2 sts, dec (4 sc). Fasten off.
Fold mask in half and mark 6 sts on opposite side corresponding to strap.
Row 1: Attach black yarn in first marked st, ch 1, sc in next 6 sts.
Row 2: Ch 1, turn, sc in each st. Repeat this row until strap measures 6”.
Next Row (buttonhole row): Ch 1, turn, sc in next 2 sts, ch 2, sk 2 sts, sc in last 2 sts.
Repeat Row 2 five times.
Repeat last 6 rows once.
Repeat buttonhole row.
Repeat Row 2 twice.
Last row: Ch 1, turn, dec, sc in next 2 sts, dec (4 sc). Fasten off.
EYE HOLES: (Right eye)
Rnd 1: The bottom of eye opening has 8 sts. With right side facing, attach accent color in 2nd st, ch 1, sc in this st, sc in next 5 sts, dec between last st on bottom and 1st row edge on side, work 7 sc evenly spaced along side, dec next corner, sc next 2 loops, dec next corner, work 6 sc evenly spaced along inner side, dec last corner (25 sc). Join with sl st. If larger eye holes are desired, fasten off after Rnd 1.
Rnd 2: Ch 1, *sc in next 3 sts, dec,* repeat around (20 sc). Join with sl st. Fasten off.
(Left eye)
Rnd 1: With right side facing, attach accent color in 2nd st, ch 1, sc in this st, sc in next 5 sts, dec between last st on bottom and 1st row edge on side, work 6 sc evenly spaced along side, dec next corner, sc next 2 loops, dec next corner, work 7 sc evenly spaced along inner side, dec last corner (25 sc). Join with sl st. If larger eye holes are desired, fasten off after Rnd 1.
Rnd 2: Ch 1, *sc in next 3 sts, dec,* repeat around (20 sc). Join with sl st. Fasten off.
Weave in all ends.
If desired, glue wire to inside of nose bridge below eyes. For best fit, try on mask and mark position for buttons, then sew on.
Roll a coffee filter or paper towel into a cone and insert into nose.

PDF download includes both versions

Free Halloween crochet patterns


ICYMI (In Case You Missed It)


[…] Pickle Kick Sack crochet pattern Tiger Pillow Sham Diagonal Skinny Scarf Crochet Pattern Snow Bunny Wrist Warmers Miles the Jazzy Elephant blanket pattern Plague Doctor Mask […]