Posted on — Leave a comment

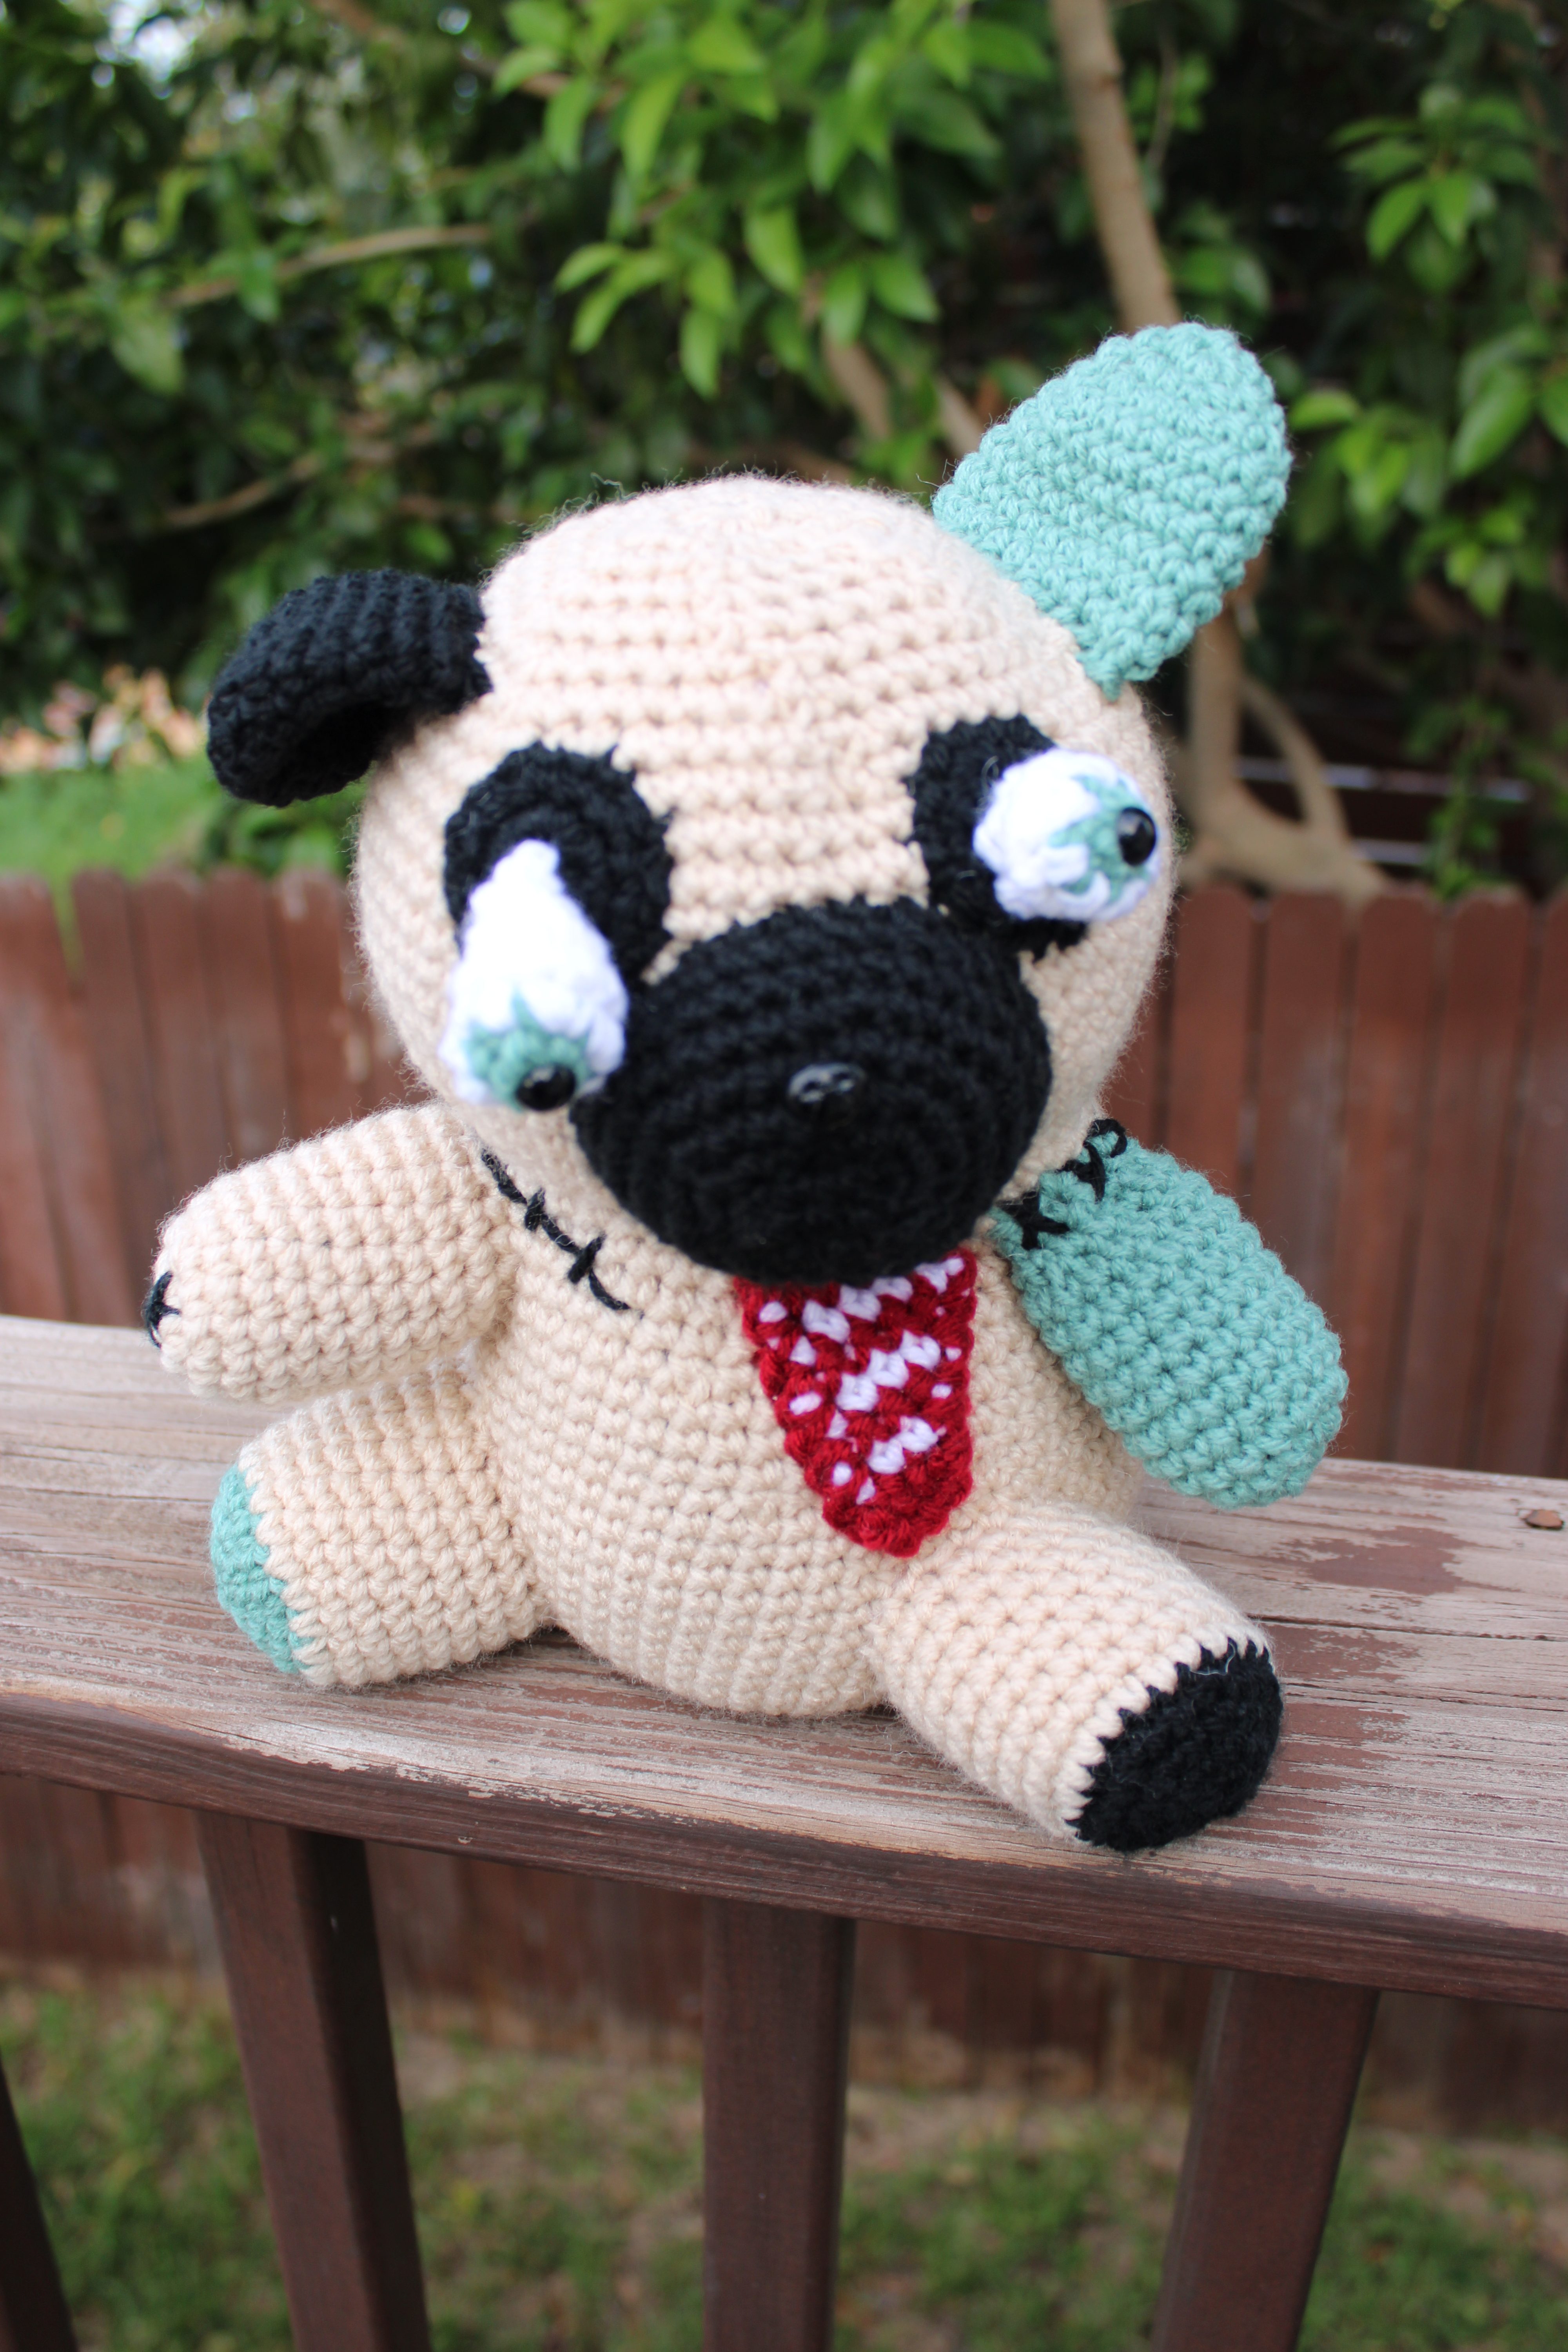
Meet the Zombie Pug: A Spooky Crochet Project for Halloween!

Looking for a crochet project that’s Looking for a crochet project that’s equal parts creepy and cute? Meet the Zombie Pug Crochet Pattern! This little undead pup is ready to shuffle his way into your Halloween decorations, amigurumi collection, or the heart of your favorite pug lover.
Who says zombies have to be scary? With his adorable pug features and spooky undead charm, this little guy brings a whole new meaning to puppy love!
A Halloween Crochet Pattern with Personality
If you love crocheting quirky characters, this Zombie Pug is the perfect addition to your collection. He combines the irresistible charm of a pug with just the right touch of Halloween spookiness. He’s a fun project for amigurumi fans who enjoy making something a little different from the usual pumpkins, ghosts, and black cats.
Imagine him sitting on your Halloween mantel, guarding your candy bowl, or keeping company with your other spooky crochet creations. He would also make a fun handmade gift for the pug enthusiast who appreciates a little creepy cuteness!
Perfect for Halloween Crochet
Halloween is the perfect excuse to let your creativity run wild, and this Zombie Pug fits right in. Whether you’re building a collection of handmade Halloween decorations or looking for your next fun amigurumi project, this quirky canine is ready to join the fun.
Pair him with your favorite crocheted monsters, witches, and other spooky creatures for a Halloween display that’s sure to get attention.
And let’s be honest: even the undead deserve a little love!
Ready to Crochet Your Own Zombie Pug?
Grab your crochet hook and get ready to bring this little zombie dog to life—or perhaps back to life!
Add the Zombie Pug Crochet Pattern to your Halloween project list and create a spooky-cute companion that’s sure to make you smile.
Are you team cute Halloween or team creepy Halloween?


Let’s have a crochet-along! Post a photo of your Zombie Pug in the Facebook group. The photo with the most likes wins a free pattern of your choice from my Ravelry store.

My Fingers Fly Crochet Family | Let’s have a crochet-along

Zombie Pug Amigurumi Crochet Pattern

Materials:

Worsted weight yarn:

90 yards tan

35 yards moss green

35 yards black

15 yards white

5 yards dark red

Size G (4.0 mm) crochet hook

Yarn needle

Fiberfill

Two 8-mm black safety eyes

12-mm black safety nose

Soft foam curlers


Finished pug measures approximately 8.5” tall.

Gauge: 9 sc = 2”, 10 rows = 2”


STITCHES:

Invisible decrease: https://youtube.com/shorts/0NC5nXyDvwI?feature=share

Ultimate finish:  https://youtu.be/jVpTr8mId3I

DIRECTIONS:

BODY:

Rnd 1: With tan yarn, ch 2 (or magic circle), 6 sc in 2nd ch from hook. Do not join. Work in continuous rnds throughout unless otherwise specified.

Rnd 2: 2 sc in each st (12 sc).

Rnd 3: *Sc in next st, 2 sc in next st,* repeat around (18 sc).

Rnd 4: *Sc in next 2 sts, 2 sc in next st,* repeat around (24 sc).

Rnd 5: *Sc in next 3 sts, 2 sc in next st,* repeat around (30 sc).

Rnd 6: *Sc in next 4 sts, 2 sc in next st,* repeat around (36 sc).

Rnd 7: *Sc in next 5 sts, 2 sc in next st,* repeat around (42 sc).

Rnd 8: *Sc in next 6 sts, 2 sc in next st,* repeat around (48 sc).

Rnd 9: *Sc in next 7 sts, 2 sc in next st,* repeat around (54 sc).

Rnd 10: *Sc in next 8 sts, 2 sc in next st,* repeat around (60 sc).

Rnds 11-20: Sc in each st.

Rnd 21: *Inv dec, sc in next 8 sts,* repeat around (54 sc).

Rnds 22-24: Sc in each st.

Rnd 25: *Inv dec, sc in next 7 sts,* repeat around (48 sc).

Rnds 26-28: Sc in each st.

Rnd 29: *Inv dec, sc in next 6 sts,* repeat around (42 sc).

Rnd 30: *Inv dec, sc in next 5 sts,* repeat around (36 sc). Do not fasten off.

Optional to give extra support to head and neck:

Insert foam curlers into body and let it extend out the top. Stuff body.

HEAD:

Rnd 31: *Sc in next 2 sts, 2 sc in next st,* repeat around (48 sc).

Rnd 32: *Sc in next 7 sts, 2 sc in next st,* repeat around (54 sc).

Rnd 33: *Sc in next 8 sts, 2 sc in next st,* repeat around (60 sc).

Rnds 34-42: Sc in each st.

Rnd 43: *Inv dec, sc in next 8 sts,* repeat around (54 sc).

Rnd 44: *Inv dec, sc in next 7 sts,* repeat around (48 sc).

Rnd 45: *Inv dec, sc in next 6 sts,* repeat around (42 sc).

Rnd 46: *Inv dec, sc in next 5 sts,* repeat around (36 sc).

Rnd 47: *Inv dec, sc in next 4 sts,* repeat around (30 sc).

Rnd 48: *Inv dec, sc in next 3 sts,* repeat around (24 sc). Stuff head.

Rnd 49: *Inv dec, sc in next 2 sts,* repeat around (18 sc).

Rnd 36: *Inv dec, sc in next st,* repeat around (12 sc). Join with sl st. Finish stuffing head and close with ult fin.

HIND LEGS:

Rnd 1: With black yarn, ch 2 (or magic circle), 6 sc in 2nd ch from hook. Do not join. Work in continuous rnds throughout unless otherwise specified.

Rnd 2: 2 sc in each st (12 sc).

Rnd 3: *Sc in next st, 2 sc in next st,* repeat around (18 sc).

Rnd 4: *Sc in next 2 sts, 2 sc in next st,* repeat around (24 sc). Join with sl st. Fasten off black yarn.

Rnds 5-12: With tan yarn, sc in each st. Join with sl st at end of Rnd 12. Fasten off leaving 12” length for sewing.

Repeat for second hind leg using green for Rnds 1-4 and tan for Rnds 5-12.

Stuff legs and sew to front of body at Rnds 10-19. Add a few black sts if desired.

FRONT LEGS:

Rnd 1: With tan yarn, ch 2 (or magic circle), 6 sc in 2nd ch from hook. Do not join. Work in continuous rnds throughout unless otherwise specified.

Rnd 2: 2 sc in each st (12 sc).

Rnd 3: *Sc in next st, 2 sc in next st,* repeat around (18 sc).

Rnds 4-12: Sc in each st. Join with sl st at end of Rnd 12. Fasten off leaving 12” length for sewing.

On tan leg, embroider sts in black across Rnds 1-3. Stuff tan leg and sew to front of body at Rnds 23-30.

Repeat Rnds 1-12 for second front leg using green yarn. Stuff green leg lightly and sew end closed. Sew Rnd 12 of leg to Rnd 30 of body and leave the leg hanging. Add black sts to seam.

RIBS:

Row 1: With red yarn, ch 4, sc in 2nd ch from hook and in next 2 ch (3 sc).

Row 2: With white yarn, ch 1, turn, sc in each st.

Row 3: With red yarn, ch 1, turn, sc in 2 sc, 2 sc in last sc (4 sc).

Row 4: With white yarn, ch 1, turn, sc in each st.

Row 5: With red yarn, ch 1, turn, sc in 3 sc, 2 sc in last sc (5 sc).

Row 6: With white yarn, ch 1, turn, sc in each st.

Row 7: With red yarn, ch 1, turn, sc in each sc, then sc around entire piece. Join with sl st. Fasten off yarn leaving 12” length.

Sew ribs to front of body at Rnds 21-29 on the left side.

SNOUT:

Rnd 1: With black yarn, ch 5, sc in 2nd ch from hook, sc in next 2 ch, 3 sc in last ch. Working on opposite side of starting ch, sc in next 2 ch, 2 sc in last ch (10 sc). Do not join.

Rnd 2: 2 sc in first st, sc in next 2 sts, 2 sc in next 3 sts, sc in next 2 sts, 2 sc in next 2 sts (16 sc).

Rnd 3: *Sc in first st, 2 sc in next st,* sc in next 2 sts, * to * 3 times, sc in next 2 sts, * to * 2 times (22 sc).

Rnd 4: *Sc in 2 sts, 2 sc in next st,* sc in next 2 sts, * to * 3 times, sc in next 2 sts, * to * 2 times (28 sc).

Rnd 5: *Sc in 3 sts, 2 sc in next st,* sc in next 2 sts, * to * 3 times, sc in next 2 sts, * to * 2 times (34 sc).

Rnds 6-7: Sc in each st. Join with sl st at end of Rnd 7. Fasten off with 12” length for sewing. Insert safety nose in center of the top side of Rnd 4. Stuff snout and sew to head at Rnds 33-41.

EYE PATCHES: (Make 2)

Rnd 1: With black yarn, ch 2 (or magic circle), 6 sc in 2nd ch from hook. Do not join. Work in continuous rnds throughout unless otherwise specified.

Rnd 2: 2 sc in each st (12 sc).

Rnd 3: *Sc in next st, 2 sc in next st,* repeat around (18 sc). Join with sl st. Fasten off yarn leaving 9” length for sewing.

Sew eye patches above snout but touching snout. Patches should be approximately 6 sts from each other.

EYEBALLS:

Rnd 1: With green yarn, ch 2 (or magic circle), 6 sc in 2nd ch from hook. Join with sl st. Fasten off green.

Rnd 2: Attach white yarn, 2 sc in each st (12 sc). Do not join.

Rnd 3: Sc in each st. Join with sl st. Fasten off white yarn leaving 6” length for sewing. Insert safety eye in center of Rnd 1. Sew eyeball to center of eye patch.

For second eyeball, repeat Rnds 1-3. Do not fasten off.

Rnd 4: *Inv dec, sc in next st,* around (8 sc). Insert black safety eye in center of Rnd 1. Stuff slightly.

Rnd 5: Inv dec 4 times (4 sc). Join with sl st. Close with ult fin. Sew to center of eye patch and let the eyeball hang free.

EARS: (Make 1 black, 1 green)

Rnd 1: Ch 2 (or magic circle), 6 sc in 2nd ch from hook. Do not join. Work in continuous rnds throughout unless otherwise specified.

Rnd 2: 2 sc in each st (12 sc).

Rnd 3: *Sc in next st, 2 sc in next st,* repeat around (18 sc).

Rnd 4: *Sc in next 2 sts, 2 sc in next st,* repeat around (24 sc).

Rnds 5-10: Sc in each st. Join with sl st at end of Rnd 10. Fasten off leaving 12” length for sewing.

Sew ears to top of head in desired configuration.

Ad-free PDF is only $2.00 through 10/31/2026 – Zombie Pug Amigurumi Crochet Pattern

axe ornaments


Add a tiny axe to the Zombie’s head – Axe Christmas Tree Ornament Crochet Patterns – Firefighter, Lumberjack, Tomahawk


Zombie Coloring Page
zombie messy bun hat
Zombie Messy Bun Hat


halloween patterns


Free Halloween crochet patterns


Ghost Ski Mask crochet pattern
Mummy Mask Template
bat mask mate
Bat Mask Mate crochet pattern
Owl Mask template


ICYMI (In Case You Missed It)

Pickle Kick Sack crochet pattern
Diagonal Skinny Scarf Crochet Pattern
Snow Bunny Wrist Warmers
Miles the Jazzy Elephant blanket pattern
Plague Doctor Mask

Wolf Pack Coloring Page

Posted on — Leave a comment

Celebrate Wolf Awareness Week with a Wolf Eye Halloween Bag Crochet Pattern!

Are you ready to add a little wild magic to your Halloween crochet projects? In honor of Wolf Awareness Week, I’m sharing a fun and spooky crochet project that combines the mysterious beauty of wolves with the creativity of handmade accessories: the Wolf Eye Halloween Bag Crochet Pattern!

A Little Wild, A Little Spooky

Wolves have long captured our imaginations. Their piercing eyes, mysterious howls, and connection to the wilderness make them a favorite subject in folklore, fantasy, and Halloween stories. Whether you picture a wolf prowling through a moonlit forest or a mythical creature guarding a hidden treasure, wolves bring a touch of wild enchantment to the season.

Wolf Awareness Week is also a wonderful opportunity to learn more about these fascinating animals, their role in the environment, and the importance of protecting their natural habitats.

What better way to celebrate than with a crochet project inspired by one of nature’s most captivating creatures?

Meet the Wolf Eye Halloween Bag

If you’re looking for a Halloween accessory that’s a little different from the usual pumpkins, ghosts, and black cats, this Wolf Eye Halloween Bag is ready to howl its way into your project queue!

Inspired by the striking gaze of a wolf, this bag makes a fun addition to your Halloween wardrobe. It’s a great choice for anyone who loves wolves, wildlife-inspired crochet, or accessories with a spooky twist.

Use it as part of your Halloween outfit, carry your essentials on an autumn outing, or make one for a fellow wolf enthusiast. It’s also a conversation starter for anyone who appreciates the beauty and mystery of these amazing animals.

I remember one year my mom made Little Red Riding Hood capes for myself and my sister for Halloween, and my brother was dressed as a wolf.

And, of course, it’s a wonderful excuse to pick up your crochet hook and make something a little wild!

Celebrate Wolves Through Creativity

Crochet is a wonderful way to express the things we love, whether that’s animals, holidays, or unusual designs that stand out from the crowd. The Wolf Eye Halloween Bag brings together two fun themes: Halloween creativity and an appreciation for wolves.

As you work on your bag, take a moment to learn something new about wolves and the challenges they face in the wild. Sharing accurate information about wildlife is one small way we can help build awareness and appreciation for these important animals.

Get Your Crochet Hook Ready!

Are you ready to add a little wolf-inspired magic to your Halloween?

Get the Wolf Eye Halloween Bag Crochet Pattern and create a spooky-season accessory with a wild side! 🐺🧶

Whether you’re making it for yourself or gifting it to a wolf-loving friend, this unique crochet project is a fun way to celebrate Wolf Awareness Week and bring a little wilderness into your handmade Halloween.

Happy crocheting, and may your Halloween be wonderfully wild!

Wolf Eye Trick or Treat Bag

Materials:

I Love This Cotton yarn  –

2.5 oz. Bright Green

3 oz. Buttercup

2 oz. Black

Size H (5.0 mm) crochet hook

Yarn needle

¼ yard cotton flannel fabric (optional)

Gauge:  9 sts = 2”,  10 rows = 2”

 Finished measurements: 14.5” diameter with 4” depth and 12.5” handles

(15” diameter with 4” depth and 13” handles using Red Heart Super Saver yarn)


Directions:

SIDES (Make 2):

Rnd 1: With green yarn, magic circle, 6 sc in magic circle. Do not join. Work in continuous rnds throughout unless otherwise specified.

Rnd 2: 2 sc in each st (12 sc).

Rnd 3: *Sc in next st, 2 sc in next st, repeat around (18 sc).

Rnd 4: *Sc in each of next 2 sts, 2 sc in next st,* repeat around (24 sc).

Rnd 5: *Sc in each of next 3 sc, 2 sc in next st,* repeat around (30 sc).

Rnd 6: *Sc in each of next 4 sts, 2 sc in next st,* repeat around (36 sc).

Rnd 7: *Sc in each of next 5 sts, 2 sc in next st,* repeat around (42 sc).

Rnd 8: *Sc in each of next 6 sts, 2 sc in next st,* repeat around (48 sc).

Rnd 9: *Sc in each of next 7 sts, 2 sc in next st,* repeat around (54 sc).

Rnd 10: *Sc in each of next 8 sts, 2 sc in next st,* repeat around (60 sc).

Rnd 11: *Sc in each of next 9 sts, 2 sc in next st,* repeat around (66 sc).

Rnd 12: *Sc in each of next 10 sts, 2 sc in next st,* repeat around (72 sc).

Rnd 13: *Sc in each of next 11 sts, 2 sc in next st,* repeat around (78 sc).

Rnd 14: *Sc in each of next 12 sts, 2 sc in next st,* repeat around (84 sc).

Rnd 15: *Sc in each of next 13 sts, 2 sc in next st,* repeat around (90 sc).

Rnd 16: *Sc in each of next 14 sts, 2 sc in next st,* repeat around (96 sc).

Rnd 17: *Sc in each of next 15 sts, 2 sc in next st,* repeat around (102 sc).

Rnd 18: *Sc in each of next 16 sts, 2 sc in next st,* repeat around (108 sc).

Rnd 19: *Sc in each of next 17 sts, 2 sc in next st,* repeat around (114 sc). Join with sl st. Fasten off green.

Rnd 20: With Buttercup yarn, *sc in each of next 18 sts, 2 sc in next st,* repeat around (120 sc).

Rnd 21: *Sc in each of next 19 sts, 2 sc in next st,* repeat around (126 sc).

Rnd 22: *Sc in each of next 20 sts, 2 sc in next st,* repeat around (132 sc).

Rnd 23: *Sc in each of next 21 sts, 2 sc in next st,* repeat around (138 sc).

Rnd 24: *Sc in each of next 22 sts, 2 sc in next st,* repeat around (144 sc).

Rnd 25: *Sc in each of next 23 sts, 2 sc in next st,* repeat around (150 sc).

Rnd 26: *Sc in each of next 24 sts, 2 sc in next st,* repeat around (156 sc).

Rnd 27: *Sc in each of next 25 sts, 2 sc in next st,* repeat around (162 sc).

Rnd 28: *Sc in each of next 26 sts, 2 sc in next st,* repeat around (168 sc).

Rnd 29: *Sc in each of next 27 sts, 2 sc in next st,* repeat around (174 sc). Join with sl st. Fasten off Buttercup.

Rnd 30: With black yarn, sc in next 57 sts, ch 45, skip next 29 sts, sc in next 88 sts.

Rnd 31: Sc in each sc and ch around (190 sc).

Rnds 32-36: Sc in each st. At end of Rnd 36, join with sl st. Fasten off black.


ASSEMBLY:

Mark center bottom, count 60 sts back and place marker. Count 60 sts from center marker and place marker. Measure distance from top markers to handle to ensure they are even. Adjust markers as necessary. Holding right sides together, sl st through both sides from side marker and around bottom to the other side marker. Fasten off. Weave in ends.


PUPIL:

Rnd 1: With black yarn, ch 30, sc in 2nd ch from hook and in next 5 ch, hdc in next 6 ch, dc in next 5 ch, hdc in next 6 ch, sc in next 5 ch, 3 sc in last ch. Working on opposite side of starting ch, sc in next 5 ch, hdc in next 6 ch, dc in next 5 ch, hdc in next 6 ch, sc in next 5 ch, 2 sc in last ch. Join with sl st.

Rnd 2: Ch 1, 2 sc in first sc, sc in next 5 sc, hdc in next 6 hdc, dc in next 5 dc, hdc in next 6 hdc, sc in next 5 sc, 2 sc in next sc, (sc, ch 1, sc) in next sc, 2 sc in next sc, sc in next 5 sc, hdc in next 6 hdc, dc in next 5 dc, hdc in next 6 hdc, sc in next 5 sc, 2 sc in next sc, (sc, ch 1, sc) in next sc. Join with sl st. Fasten off with 12” length for sewing. Block bag and pupils. Sew pupils vertically across green section of eye, one on each side of bag.

LINING (Optional):

Lay completed side on cotton flannel fabric and cut 2 pieces of fabric to size plus ½”. With right sides together, sew fabric pieces together. Then sew lining into inside of bag.


Wolf Pack Coloring Page


halloween patterns


Free Halloween crochet patterns


Ghost Ski Mask crochet pattern
Mummy Mask Template
bat mask mate
Bat Mask Mate crochet pattern
Owl Mask template


ICYMI (In Case You Missed It)

Pickle Kick Sack crochet pattern
Tiger Pillow Sham
Diagonal Skinny Scarf Crochet Pattern
Snow Bunny Wrist Warmers
Miles the Jazzy Elephant blanket pattern
Plague Doctor Mask
Posted on — 1 Comment

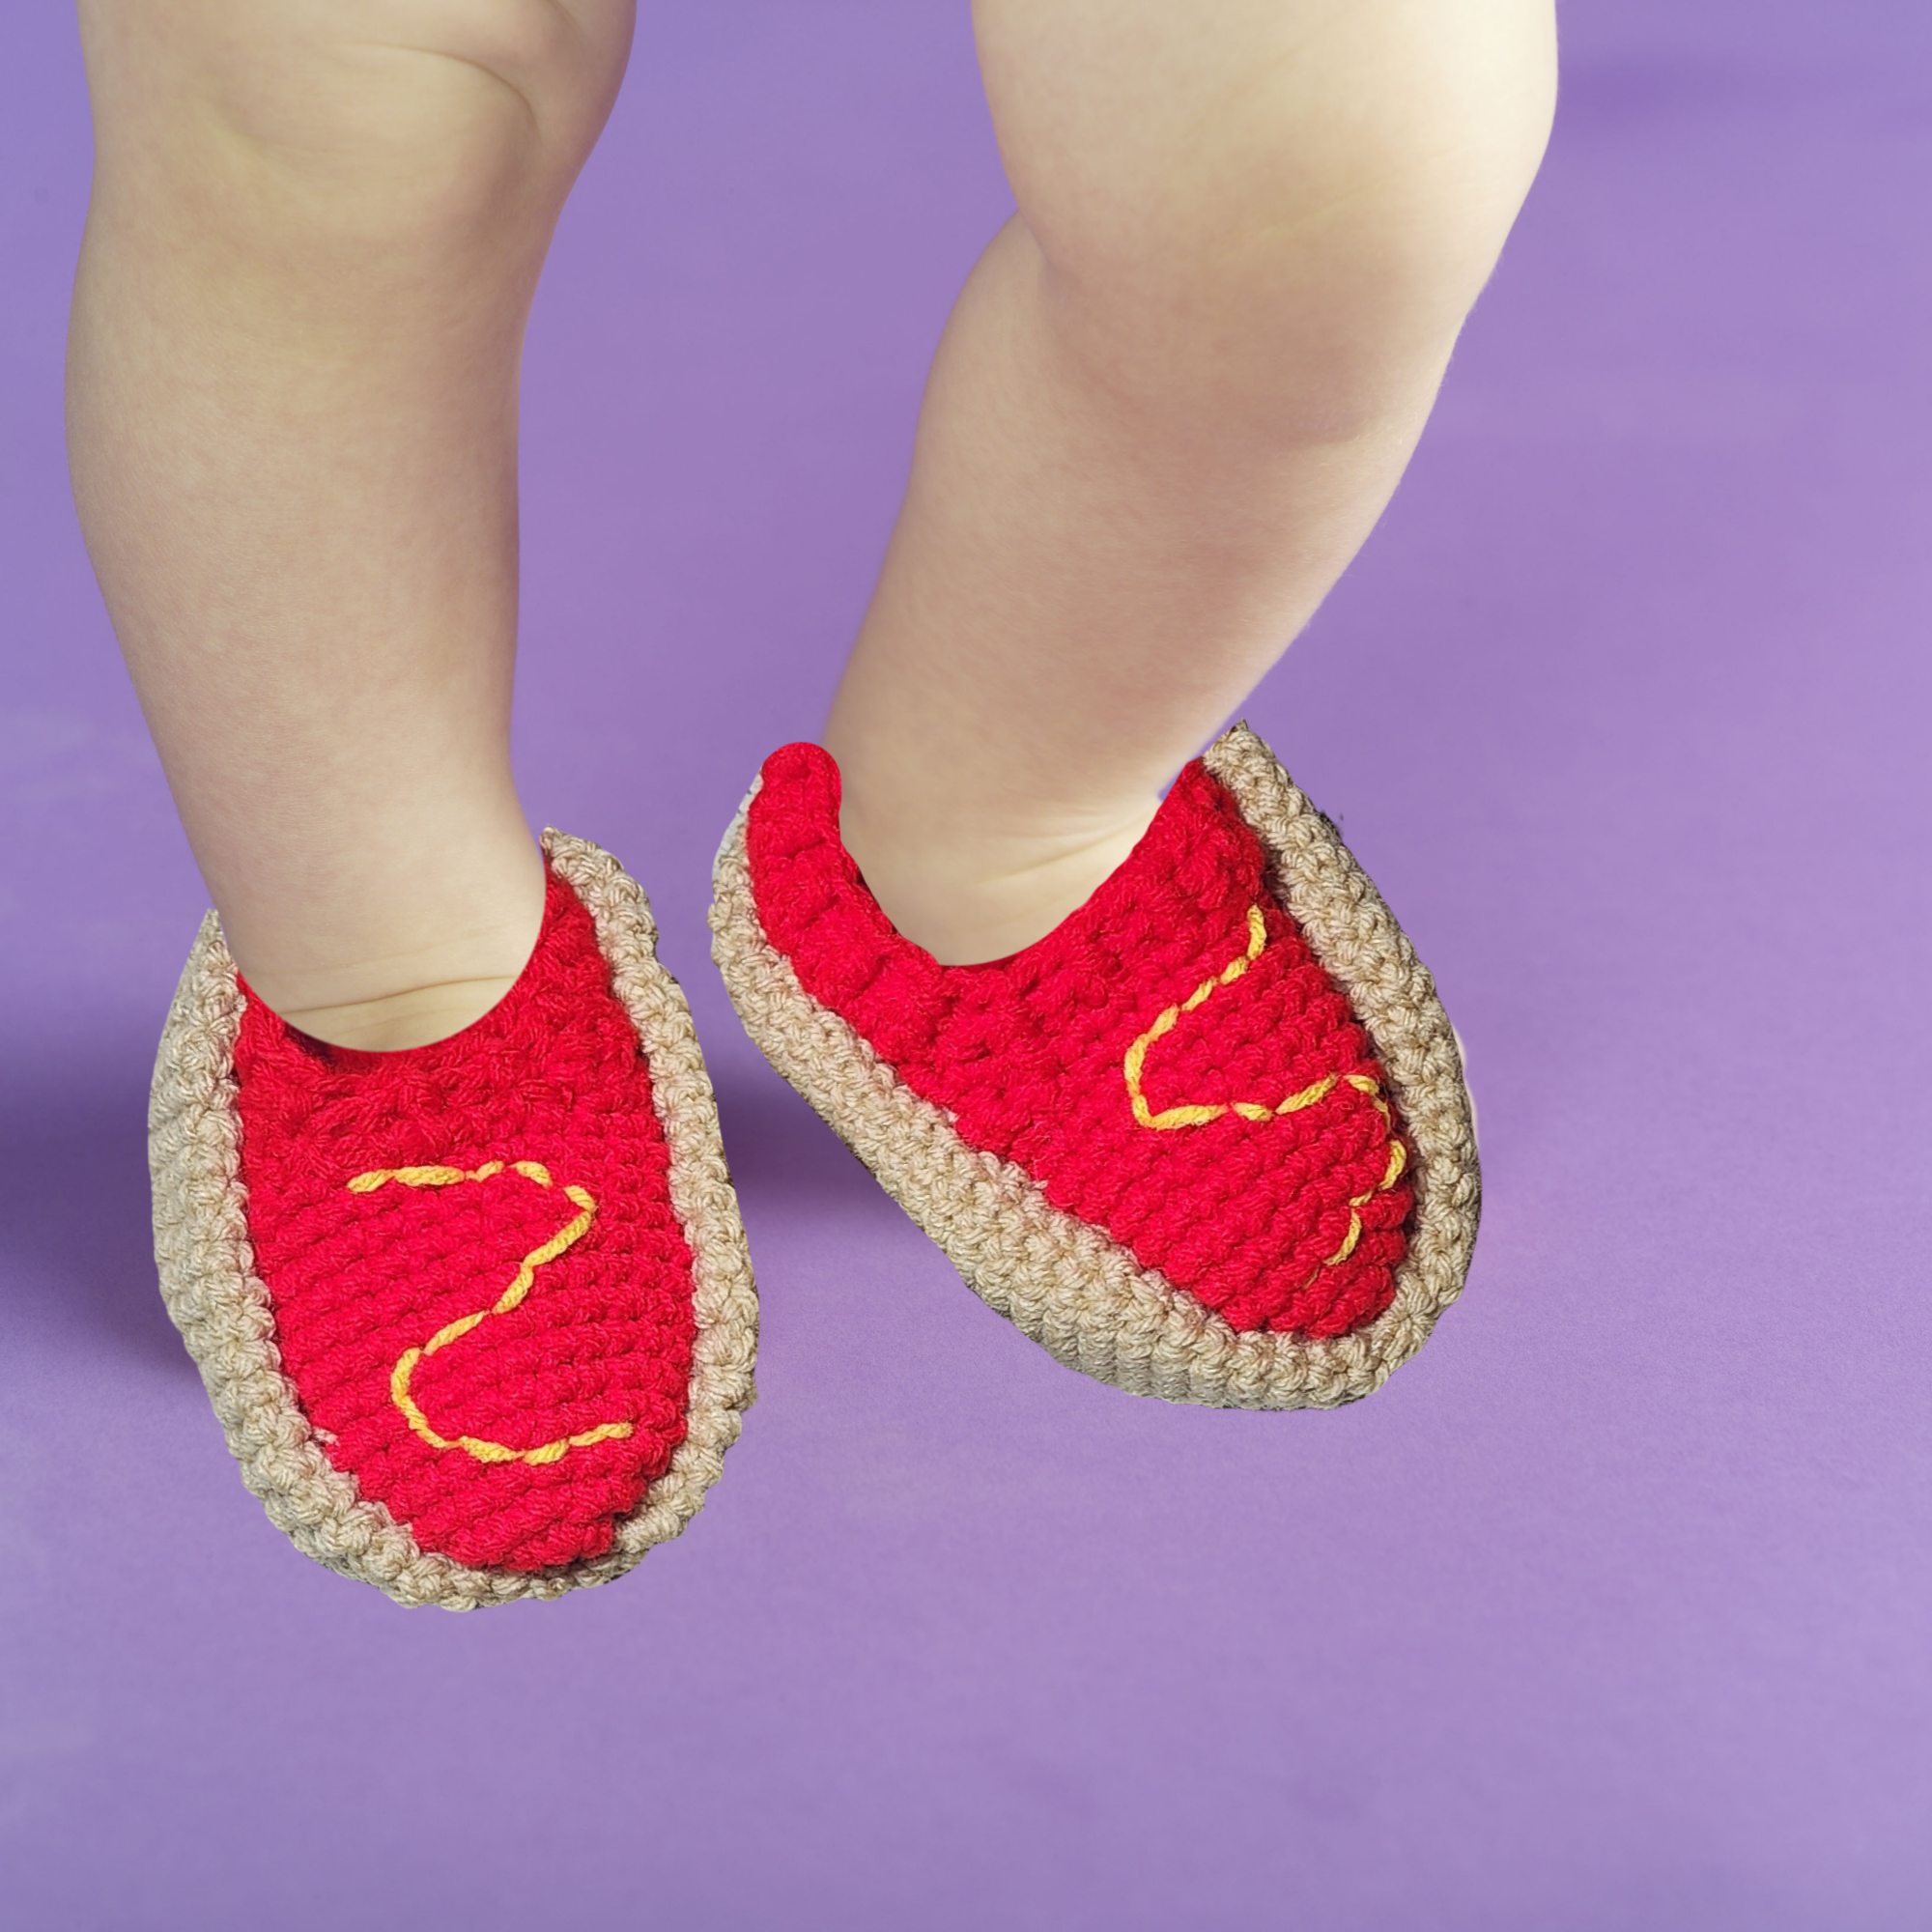
Warm Your Slippers Blog Hop – Hot Dog Slippers for Toddlers

There’s nothing better than slipping your feet into something soft and handmade—especially when there’s still a chill in the air. That’s exactly why the Warm Your Slippers Blog Hop is here!

This cozy event brings together some of my favorite crochet designers to share slipper patterns that are perfect for lounging, gifting, and keeping those toes toasty warm. Whether you love classic styles, whimsical designs, or something with a little personality stitched in, you’ll find plenty of inspiration along the way.

Why Slippers?

Slippers are:

  • Quick to make

  • Practical and giftable

  • Perfect for using up stash yarn

  • A crowd-pleaser at craft fairs

  • Ideal for holiday gift planning (yes, already 😉)

They’re the kind of project that feels both thoughtful and useful—warmth wrapped in stitches.

My Featured Pattern – Hot Dog Slippers

I’m so excited to share my contribution to this hop! My slipper design combines comfort, charm, and just a touch of fun. Designed for warmth and everyday wear, these slippers are great for playtime, photos, and unforgettable handmade gifts. They work up quickly and are a joyful project for any crocheter.

Skill Level: Beginner to intermediate (basic stitches and simple shaping)

Sizes Included: Slippers fit 3-4-year-old (6.25″ long) or 5-6-year-old size (7.0″ long).

Materials Needed:
* Worsted weight yarn in bun, hot dog, and condiment colors
* Crochet hook H (5.0 mm)
* Yarn needle
* Scissors
* Fiberfill
* Optional non-slip sole material

🎁 Perfect For:

• Funny handmade gifts
• Toddler slippers
• Birthday presents
• Photo props
• Holiday or stocking stuffers

The Hot Dog Toddler Slippers crochet pattern is a fun and unique way to make something warm, silly, and totally memorable.

STITCHES:

Invisible decrease: https://youtube.com/shorts/0NC5nXyDvwI?feature=share

Ultimate finish:  https://youtu.be/jVpTr8mId3I

Directions:

HOT DOG:

Rnd 1: With red yarn, ch 2 (or magic circle), 6 sc in 2nd ch from hook (6 sc). Join with sl st.

Rnd 2: Ch 1, 2 sc in each st (12 sc). Join with sl st.

Rnd 3: Ch 1, *sc in sc, 2 sc in next sc,* repeat around (18 sc). Join with sl st.

Rnd 4: Ch 1, sc in each st. Join with sl st.

Rnd 5: Ch 1, *sc in 2 sc, 2 sc in next sc,* repeat around (24 sc). Join with sl st.

Rnd 6: Ch 1, sc in each st. Join with sl st.

Rnd 7 for size 3/4: Ch 1, *sc in 5 sc, 2 sc in next sc,* repeat around (28 sc). Join with sl st.

Rnd 7 for size 5/6: Ch 1, *sc in 3 sc, 2 sc in next sc,* repeat around (30 sc).

Rnds 8-13[15]: Ch 1, sc in each st. Join with sl st at end of Rnd 13 [15].

Rnd 14[16]: Ch 1, turn, dec, sc in next 19[21] sc, dec (21[23] sc). Leave remaining sts unworked.

Rnd 15[17]: Ch 1, turn, dec, sc in next 17[19 sc], dec (19[21] sc).

Rnds 16-26[18-30]: Ch 1, turn, sc in each st. Fasten off at end of Rnd 26[30] leaving 6” length. Fold Row 26[30] and sew tog for heel.

Cuff:

Rnd 1: Join red yarn at back seam. Ch 1, hdc across 12[16] row ends, dec at corner, hdc across front, dec at corner, hdc across 12 [16] rows on other side, join with sl st (30[34] hdc.

Rnd 2: Ch 1, *fpdc, bpdc,* repeat around. Join with sl st. Fasten off yarn.

BUN:

Rnd 1: With tan yarn, ch 2, 6 sc in 2nd ch from hook. Do not join. Work in continuous rnds throughout.

Rnd 2: Ch 1, 2 sc in each st (12 sc).

Rnd 3: Ch 1, *sc in sc, 2 sc in next sc,* repeat around (18 sc).

Rnd 4: Ch 1, *sc in next 2 sc, 2 sc in next sc,* repeat around (24 sc).

Rnd 5: Ch 1, *sc in next 3 sc, 2 sc in next sc,* repeat around (30 sc).

Rnd 6: Ch 1, *sc in next 4 sc, 2 sc in next sc,* repeat around (36 sc).

Rnd 7: Ch 1, *sc in next 5 sc, 2 sc in next sc,* repeat around (42 sc).

Rnd 8: Ch 1, *sc in next 6 sc, 2 sc in next sc,* repeat around (48 sc).

Rnd 9: (Size 5/6 only) Ch 1, *sc in next 7 sc, 2 sc in next sc,* repeat around (54 sc).

Rnds 9-22 [10-25]: Sc in each st.

Rnd 23[26]: (Size 5/6 only) *Inv dec, sc in next 7 sc,* repeat around (48 sc).

Rnd 24[27]: *Inv dec, sc in next 6 sc,* repeat around (42 sc).

Rnd 25[28]: *Inv dec, sc in next 5 sc,* repeat around (36 sc).

Rnd 26[29]: *Inv dec, sc in next 4 sc,* repeat around (30 sc).

Rnd 27[30]: *Inv dec, sc in next 3 sc,* repeat around (24 sc).

Rnd 28[31]: *Inv dec, sc in next 2 sc,* repeat around (18 sc).

Rnd 29[32]: *Inv dec, sc in next sc,* repeat around (12 sc).

Rnd 30[33]: Inv dec 6 times (6 sc). Close with ult fin.

Do not stuff bun. Lay flat and fold it around hot dog portion with top of slipper not covered by bun. Sew in place firmly.

Use yellow yarn to embroider mustard line across top of hot dog.


Hot Dog Toddler Slippers Crochet Pattern – free download for one day only on February 25

NOTE: Downloading this pattern adds you to my email list where I share new patterns, exclusive discounts, and crochet inspiration. You can unsubscribe anytime—no hard feelings!


ICYMI (In Case You Missed It)

Puppy Love Slippers
Cupid’s Arrow Lip Balm Holder
Heart Doll
Pigskin Amigurumi


Affiliate Links

This post contains affiliate links. This means I may earn a commission should you chose to sign up for a program or make a purchase using my link. It’s okay – I love all of these companies anyways, and you will too!


Amazon affiliate: https://amzn.to/4hkS5Zd

Red Heart Crochet Kit


Posted on — Leave a comment

Head Over Heels Blog Hop – Topsy Turvy Hearts Beanie pattern

You’ll be head over heels for these lovely Valentine’s Day patterns!

Each day during the top, 1-2 patterns will be free for 24 hours only.

Visit the blog hop every day February 9-20 to see the free patterns and get your coupon code.

https://lisamff–madamestitch.thrivecart.com/head-over-heels-pattern-bundle-2026/67a2130402b49/


Buy the bundle of all these patterns for only $11.99 at https://lisamff–madamestitch.thrivecart.com/head-over-heels-pattern-bundle-2026/


Today’s feature is my own design, Topsy Turvy Hats Beanie.

A little twist on a classic favorite 💕 The Topsy Turvy Heart Beanie features a fun upside-down heart design that’s perfect for Valentine’s Day and beyond.

Topsy Turvy Hearts Beanie Crochet Pattern

NOTE: Downloading this pattern adds you to my email list where I share new patterns, exclusive discounts, and crochet inspiration. You can unsubscribe anytime—no hard feelings!


Valentine's day crochet patterns

More Free Valentine’s Day Crochet Patterns


Day 11 of the Valentine’s Day Advent Calendar Hop – free keychain crochet patterns

Valentine’s Advent Day 11 – Keychains

Weekly Featured Pattern


Chicken C2C Afghan Pattern is 50% off through February 15 with the coupon code found at

Crochet Designer Community on Facebook 

Cancer Cozy Comforts

Nybody Beanie from Jo’s Crafty Hook

Crochet a beanie that N’ybody can wear using this beautifully textured hat design.

Crochet Designer Community on Facebook 

Crochet - Texas Style Crochet Patterns Ebook

Bonus Sale – 50% off Crochet Texas Style ebook on Ravelry: https://www.ravelry.com/redeem/my-fingers-fly-designs?sale=417115

To see all featured patterns, please visit https://myfingersflyblog.com/cancer-cozy-comforts-2-hop-2026/


ICYMI (In Case You Missed It)

Day 1 – Bedroom Decor

Day 2 – Scarves

Day 3 – Kitchen Crochet

Day 4 – Lip Balm Holder

Day 5 – Pillows

Day 6 – Crochet for Pets

Day 7 – Amigurumi

Day 8 – Jewelry

Day 9 – Crochet for Baby 


Affiliate Links

This post contains affiliate links. This means I may earn a commission should you chose to sign up for a program or make a purchase using my link. It’s okay – I love all of these companies anyways, and you will too!


Amazon affiliate: https://amzn.to/4hkS5Zd

Red Heart Crochet Kit


Posted on — 1 Comment

Valentine’s Advent Day 10 – Heart Doll Crochet Pattern

Heart Doll Crochet Pattern ❤️

If you’re looking for a crochet project that’s sweet, meaningful, and perfect for gifting, this Heart Doll Crochet Pattern is full of handmade charm. Whether you’re stitching for Valentine’s Day, a baby shower, a get-well gift, or just because, this adorable doll delivers comfort and love in every stitch.

Soft, huggable, and full of personality, the heart doll makes a thoughtful keepsake for kids and adults alike.


A Handmade Gift from the Heart

There’s something special about a project that literally features a heart. This doll is designed to be both cute and symbolic—representing love, friendship, encouragement, and comfort.

It’s perfect for:

  • Valentine’s Day gifts ❤️
  • Baby shower keepsakes 👶
  • Encouragement or get-well presents 💕
  • Mother’s Day surprises 🌸
  • Craft fair bestsellers

Because it’s handmade, each heart doll carries a little extra warmth and intention.


Materials:

Bernat Blanket yarn

180 yards MC

60 yards variegated

50 yards white

Size M (9.00 mm) crochet hook

Yarn needle

25-mm safety eyes

Finished doll measures approximately 26” tall by 12” wide (excluding arms).

STITCHES:

Invisible decrease: https://youtube.com/shorts/0NC5nXyDvwI?feature=share

Ultimate finish:  https://youtu.be/jVpTr8mId3I

Directions:

HEAD:

Rnd 1: With MC yarn, ch 2 (or magic ring), 8 sc in 2nd ch from hook. Do not join. Work in continuous rnds throughout unless otherwise specified.

Rnd 2: *Sc in next st, 2 sc in next st, repeat around (12 sc).

Rnd 3: *Sc in each of next 2 sts, 2 sc in next st, * repeat around (16 sc).

Rnd 4: *Sc in each of next 3 sc, 2 sc in next st,* repeat around (20 sc).

Rnd 5: *Sc in each of next 4 sts, 2 sc in next st,* repeat around (24 sc).

Rnd 6: *Sc in each of next 5 sc, 2 sc in next st,* repeat around (28 sc).

Rnd 7: *Sc in each of next 6 sts, 2 sc in next st,* repeat around (32 sc).

Rnd 8: *Sc in each of next 7 sts, 2 sc in next st,* repeat around (36 sc).

Rnd 9: *Sc in each of next 8 sts, 2 sc in next st,* repeat around (40 sc).

Rnd 10: *Sc in each of next 9 sts, 2 sc in next st,* repeat around (44 sc).

Rnd 11: *Sc in each of next 10 sts, 2 sc in next st,* repeat around (48 sc).

Rnd 12: *Sc in each of next 11 sts, 2 sc in next st,* repeat around (52 sc).

Rnd 13: *Sc in each of next 12 sts, 2 sc in next st,* repeat around (56 sc).

Rnd 14: *Sc in each of next 13 sts, 2 sc in next st,* repeat around (60 sc).

Rnds 15-24: Sc in each st.

Rnd 25: Ch 5, sk 30 sts, sc in rem 30 sts. Do not join.

Rnd 26: Sc in each ch and sc around (35 sc).

Rnd 27: *Dec, sc in next 5 sts,* repeat around (30 sc).

Rnd 28: *Dec, sc in next 4 sts,* repeat around (25 sc).

Rnd 29: *Dec, sc in next 3 sts,* repeat around (20 sc).

Rnd 30: *Dec, sc in next 2 sts,* repeat around (15 sc).

Rnd 31: *Dec, sc in next st,* repeat around (10 sc). Join with sl st. Fasten off leaving 6” length. Use Ultimate Finish to close. Stuff bottom and top half.

Return to unused sts of Rnd 25. Sc in each st and rem loops of 5 ch (35 sc).

Repeat Rnds 26-31: Stuff. Join with sl st. Fasten off leaving 6” length. Use Ultimate Finish to close.

If you see gaps at Rnd 25, use a piece of MC yarn to sew gaps closed.

SHOES (Make 2):

Rnd 1: With MC yarn, ch 2 (or magic ring), 6 sc in 2nd ch from hook (6 sc). Do not join.

Rnd 2: 2 sc in st (12 sc). Do not join.

Rnd 3: *2 sc in first st, sc in next st,* repeat around (18 sc). Do not join.

Rnds 4-6: Sc in each st.  Do not join.

Rnd 7: Ch 1, turn, sc in next 16 sts. Leave rem sts unworked.

Rnds 8-11: Ch 1, turn, sc in each st. Fasten off leaving 6” length for sewing. Turn inside out. Fold heel and sew both sides of Rnd 11 together. Turn back to right side.

LEGS:

Rnd 1: Attach variegated/ombre yarn at back of shoe opening. Ch 1, work 16 sc evenly spaced around opening. Do not join. Work in continuous rnds for the remainder of the legs.

Rnd 2: Sc in each st.

Repeat Rnd 2 until leg measures approximately 15” (or desired length), stuffing as you go. Join with sl st.

Fasten off leaving 12” length for sewing. Stuff legs very firmly to support body. Sew legs to Rnds 1-4 of body.

HANDS: (Make 2)

Rnd 1: With MC yarn, ch 2 (or magic ring), 6 sc in 2nd ch from hook (6 sc). Do not join.  Work in continuous rnds throughout unless otherwise specified.

Rnd 2: 2 sc in each st (12 sc).

Rnd 3: *Sc in next 3 sts, 2 sc in next st,* repeat around (15 sc).

Rnd 4: Sc in each st.

Rnd 5: Ch 3 (thumb), sc in 2nd ch, sc in 3rd ch, sc in next 15 sc.

Rnd 6: Working behind thumb, sc in each st.

Rnd 7: *Dec, sc in next 3 sts,* repeat around (12 sc. Join with sl st. Fasten off MC.

ARMS:

Rnd 8: Join white at opposite side of thumb, sc in each st.

Rnd 9: Sc in each st.

Repeat Rnd 9 until arm measures approximately 10” (or desired length). Sew to Rnds 14-18 of body with thumb facing up.

EYES: (Make 2)

Use desired color of yarn, ch 3, work 2 dc, 2 hdc, ch 1, 2 hdc, 2 dc, ch 2, sl st all in 3rd ch from hook. Fasten off yarn leaving 9” length for sewing.

Insert safety eye in middle of heart. Sew eyes to Rnds 17-20 of body.

MOUTH:

Repeat eyes with white yarn. Fasten off yarn leaving 9” length for sewing. Attach pink or red yarn in center top of heart and sc around with 2 sc in each ch-2 sp. Sew to Rnds 9-12 of body.

LIPS: (optional)

With red or pink yarn, ch 9, sl st in 2nd ch from hook, sc in next ch, hdc in next ch, dc in next ch, ch 1, sl st in same ch, ch 1, dc in next ch, hdc in next ch, sc in next ch, sl st in last ch. Working on opposite side of foundation ch, sl st in lp, sc in next lp, hdc in next lp, dc in next lp, ch 1, sl st in same lp, ch 1, dc in next lp, hdc in next lp, sc in next lp, sl st in next lp, sl st in beg sl st.  Fasten off leaving 12” length for sewing. Sew to Rnds 9-12 of body.


PDF available at Heart Doll Amigurumi Crochet Pattern


Valentine’s Advent Day 10 – Crochet Patterns for Children

Ophelia the Octopus, Mrs Shanks Designs


Valentine’s Worry Worm from Start Crochet

https://startcrochet.com/valentines-worry-worm-crochet-pattern-poem/

Pretty in Pink Elephant Lovey
Elephant Lovey, My Fingers Fly


Heart Eyeglass Tray


Today’s free download is a Valentine’s Day Coloring Book.


Valentine's day crochet patterns

More Free Valentine’s Day Crochet Patterns


Cancer Cozy Comforts

Bluebonnet Shawl from My Fingers Fly

Spring will soon be here, and with it comes the rolling fields of bluebonnets. Instructions are given for fingering weight yarn and DK weight yarn with a repeating pattern which will allow you to make the shawl to whatever size you desire.

Go to Crochet Designer Community on Facebook for the coupon code to get this amazing pattern for only $2. www.facebook.com/CrochetDesignerCommunity 

Crochet - Texas Style Crochet Patterns Ebook

Bonus Sale – 50% off Crochet Texas Style ebook on Ravelry: https://www.ravelry.com/redeem/my-fingers-fly-designs?sale=417115

To see all featured patterns, please visit https://myfingersflyblog.com/cancer-cozy-comforts-2-hop-2026/


Head Over Heels Hop

Colorscape Beanie from Green Fox Farms

The Colorscape Beanie is a cute and cozy beanie with great texture that looks good and adds extra warmth too! This fun beanie looks gorgeous in solid or self striping yarns!

Get this beautiful pattern free for one day only at https://lisamff–madamestitch.thrivecart.com/head-over-heels-pattern-bundle-2026/67a2130402b49/

ICYMI (In Case You Missed It)

Day 1 – Bedroom Decor

Day 2 – Scarves

Day 3 – Kitchen Crochet

Day 4 – Lip Balm Holder

Day 5 – Pillows

Day 6 – Crochet for Pets

Day 7 – Amigurumi

Day 8 – Jewelry

Day 9 – Crochet for Baby 


Affiliate Links

This post contains affiliate links. This means I may earn a commission should you chose to sign up for a program or make a purchase using my link. It’s okay – I love all of these companies anyways, and you will too!


Amazon affiliate: https://amzn.to/4hkS5Zd

Red Heart Crochet Kit