Posted on 10 Comments

Kane, the Kick Cancer Doll Crochet Pattern plus Valentine’s Advent Day 5

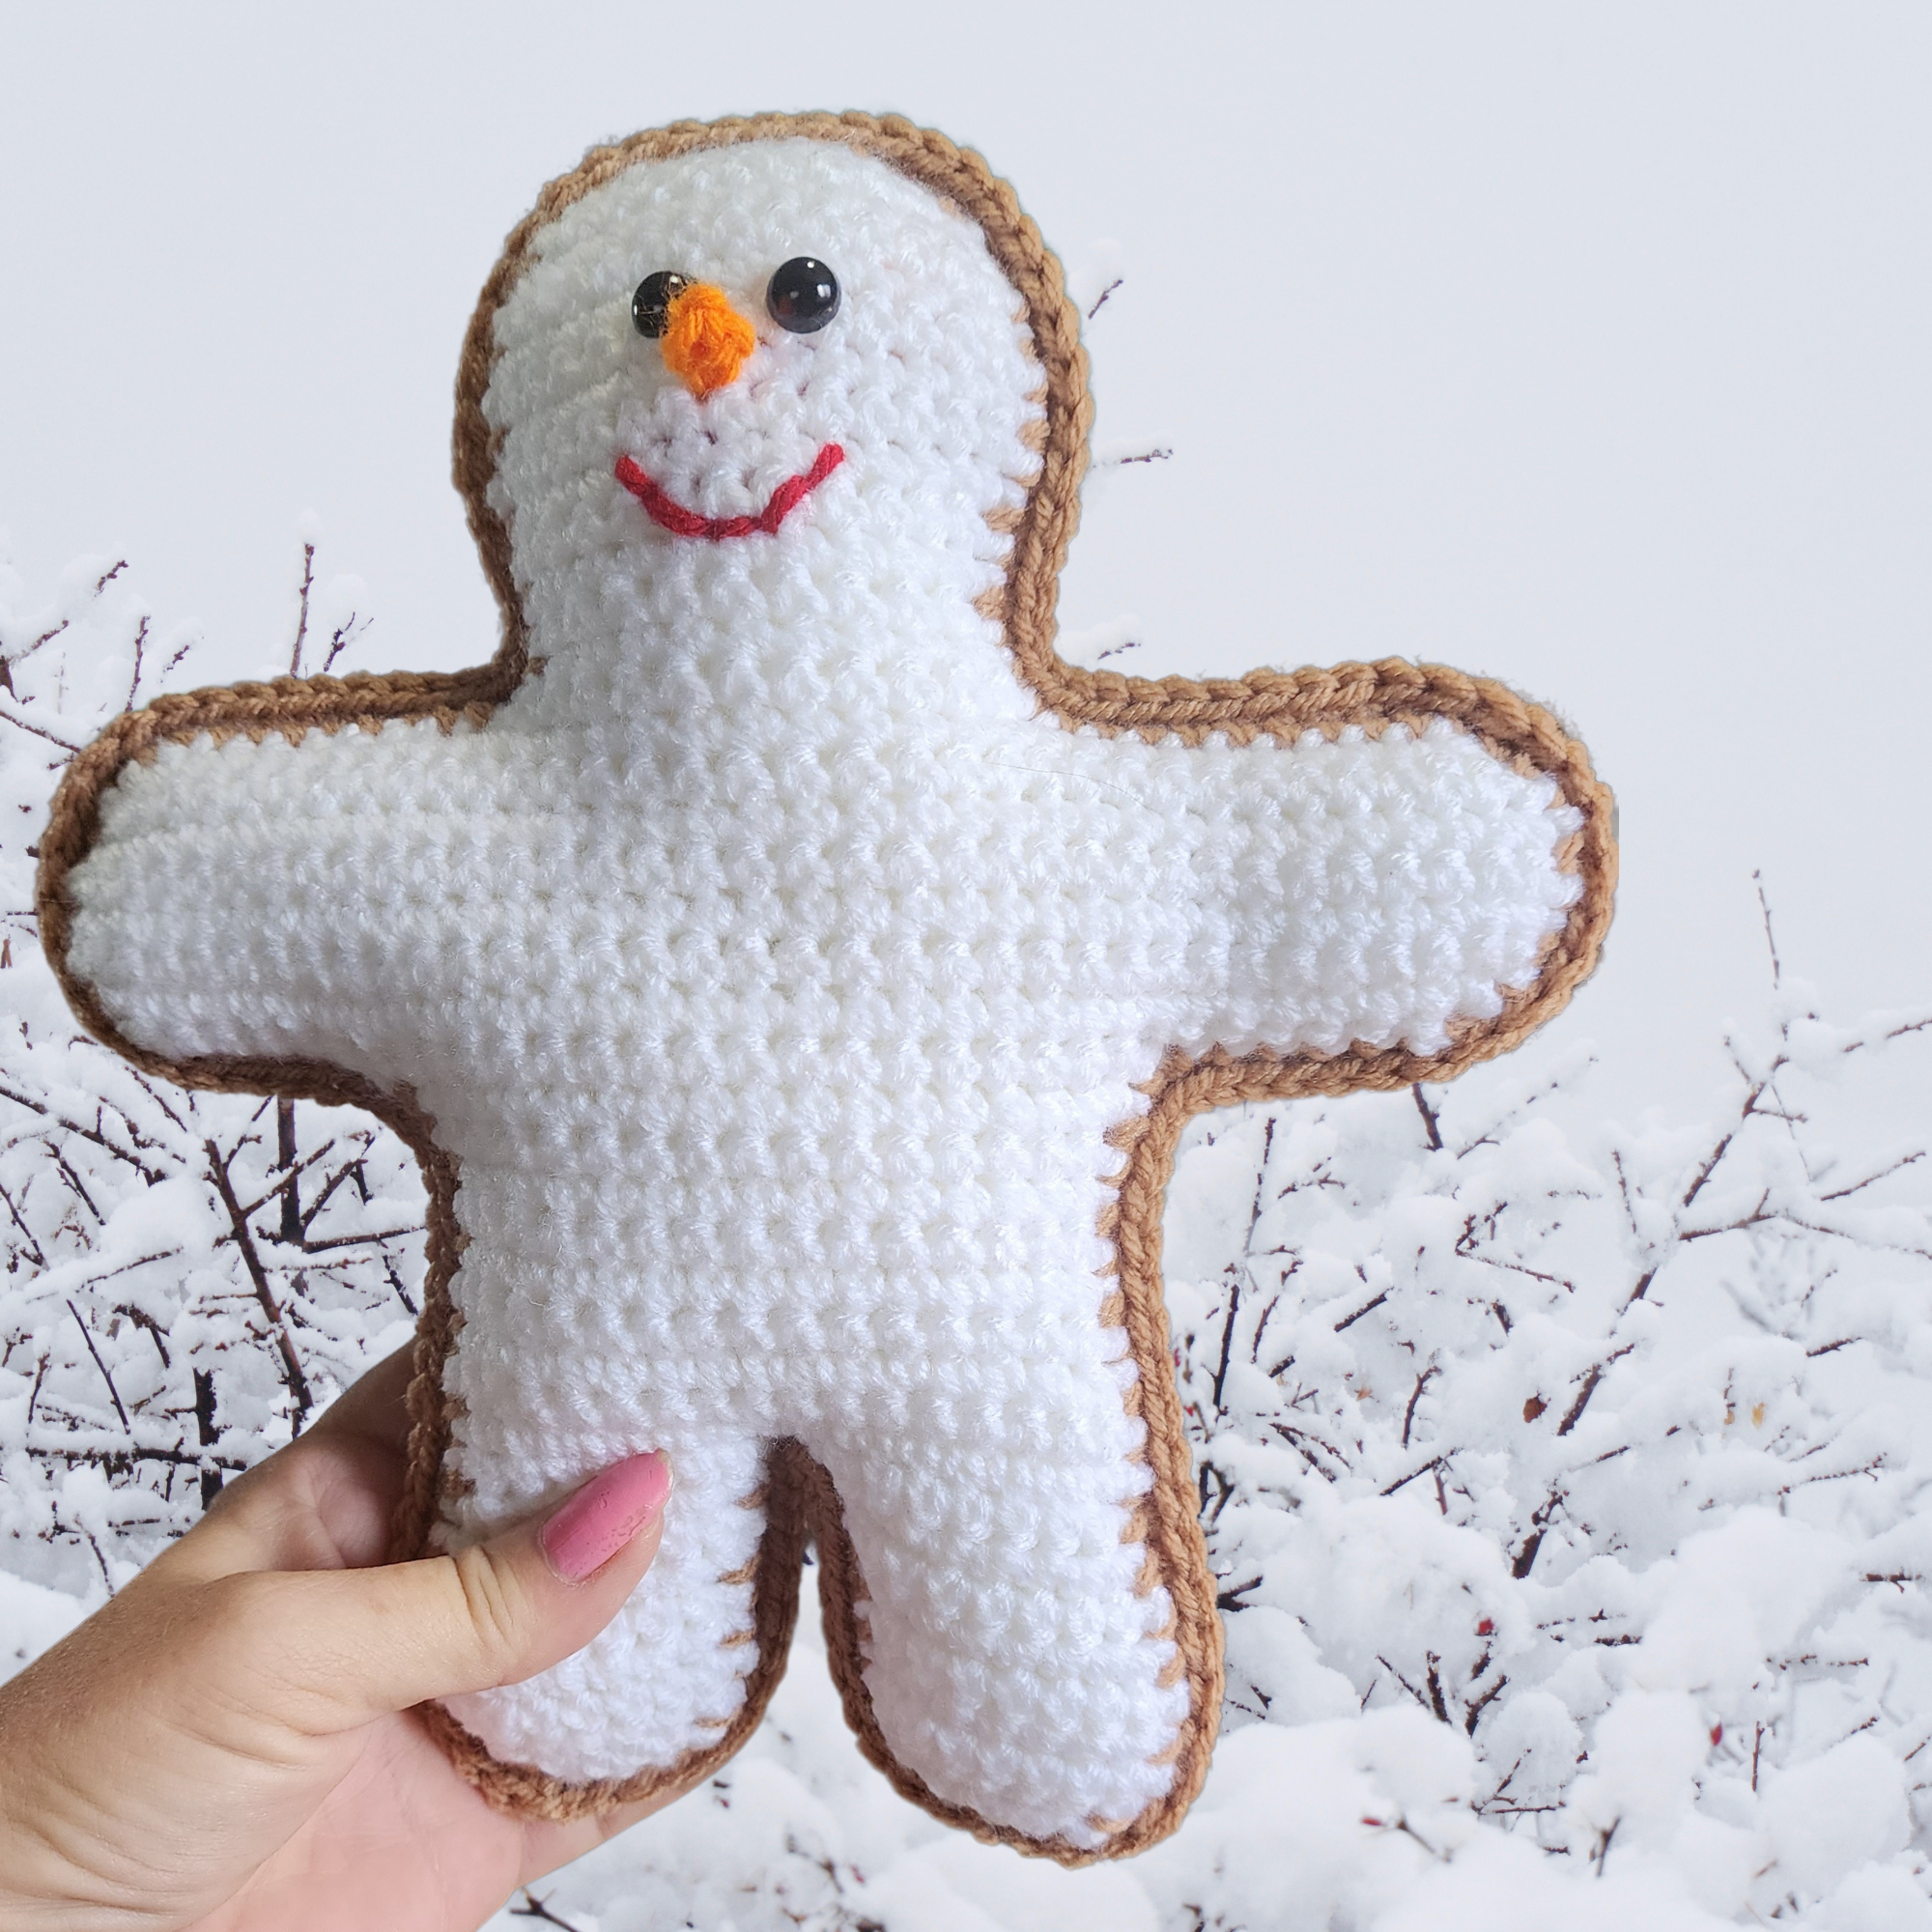
Some crochet projects are cute. Others are cozy. And then there are the ones that mean something. Kane the Kick Cancer Doll was created to be more than just a handmade toy—he’s a symbol of strength, hope, and courage for anyone facing a cancer journey.

Whether you’re stitching Kane for yourself, a loved one, or to donate, this doll is a reminder that even the smallest handmade gift can carry enormous comfort.

The dolls are crocheted with cotton worsted weight yarn, as it makes a softer toy – better for sensitive skin.

KANE DOLL

Materials:

Cotton worsted weight yarn:

100 yards blue

115 yards red

35 yards tan

5 yards yellow

2 yards white

Size G (4.0 mm) crochet hook

Polyfil

10-mm safety eyes

Finished doll measures approximately 7” wide by 11.5” tall.

STITCHES:

dc4tog: yo, (insert hook, yo, pull through, yo, pull through 2 lps) 4 times, yo, pull through all lps.

DIRECTIONS:

FRONT:

Row 1: With red yarn, ch 33, sc in 2nd ch from hook and in each remaining ch (32 sc).

Rows 2-3: Ch 1, turn, sc in each st.

Row 4: Ch 1, turn, dec, sc in next 28 sts, dec (30 sc).

Row 5: Ch 1, turn, dec, sc in next 26 sts, dec (28 sc).

Row 6: Ch 1, turn, dec, sc in next 24 sts, dec (26 sc). Fasten off red.

Row 7: Turn, sk 3 sc, attach blue in 4th sc, ch 1, sc in next 20 sts (20 sc).

Rows 8-22: Ch 1, turn, sc in each st. Attach red yarn at end of Row 22, ch 3.

Row 23: Turn, sc in 2nd ch from hook, sc in next ch, blue sc in next 20 sts, 2 red fsc (24 sc). Attach blue to end of row, ch 2.

Row 24: Turn, blue sc in 2nd ch, red inc in next st, red sc in next st, blue sc in next 20 sts, red sc in next st, red inc in next st, blue fsc (28 sc).

Row 25: Ch 1, turn, blue inc in first st, red sc in next 3 sts, blue sc in next 20 sts, red sc in next 3 sts, blue inc in last st (30 sc).

Row 26: Ch 1, turn, blue inc in first st, blue sc in next st, red sc in next 3 sts, blue sc in next 20 sts, red sc in next 3 sts, blue sc in next st, blue inc in last st (32 sc).

Row 27: Ch 1, turn, blue sc in first 3 sts, red sc in next st, white sc in next 2 sts, red sc in next 20 sts, white sc in next 2 sts, red sc in next st, blue sc in next 3 sts (32 sc).

Row 28: Ch 1, turn, blue sc in first 4 sts, white sc in next 2 sts, red sc in next 20 sts, white sc in next 2 sts, blue sc in last 4 sts (32 sc). Fasten off red.

Rows 29-31: Ch 1, turn, blue sc in first 4 sts, white sc in next 2 sts, blue sc in next 20 sts, white sc in next 2 sts, blue sc in last 4 sts (32 sc).

Row 32: Ch 1, turn, blue sc in first 5 sts, white sc in next st, blue sc in next 20 sts, white sc in next st, blue sc in last 5 sts (32 sc). Fasten off white.

Rows 33-35: Ch 1, turn, blue sc in each st (32 sc). Continue in only blue through Row 40.

Row 36: Ch 1, turn, dec, sc in next 28 sts, dec (30 sc).

Row 37: Ch 1, turn, dec, sc in next 26 sts, dec (28 sc).

Row 38: Ch 1, turn, dec, sc in next 24 sts, dec (26 sc).

Row 39: Ch 1, turn, dec, sc in next 22 sts, dec (24 sc).

Row 40: Ch 1, turn, dec, sc in next 20 sts, dec (22 sc).

Row 41: Ch 1, turn, blue dec, blue sc in next 3 sts, red sc in next 12 sts, blue sc in next 3 sts, blue dec (20 sc). Fasten off blue and red.

Row 42: Turn, sk first 5 sc, attach tan in 6th st, ch 1, sc in same st, sc in next 9 sts (10 sc). Leave last 5 sts unworked. Work in tan only through Row 55.

Row 43: Ch 1, turn, inc, sc in next 8 sts, inc (12 sc).

Row 44: Ch 1, turn, inc, sc in next 10 sts, inc (14 sc).

Row 45: Ch 1, turn, inc, sc in next 12 sts, inc (16 sc).

Rows 46-48: Ch 1, turn, sc in each st (16 sc).

Row 49: (Right side) Ch 1, turn, sc in next 7 sts, dc4tog (nose), sc in next 8 sts.

Rows 50-51: Ch 1, turn, sc in each st (16 sc).

Row 52: Ch 1, turn, dec, sc in next 12 sts, dec (14 sc).

Row 53: Ch 1, turn, dec, sc in next 10 sts, dec (12 sc).

Row 54: Ch 1, turn, dec, sc in next 8 sts, dec (10 sc).

Row 55: Ch 1, turn, dec, sc in next 6 sts, dec (8 sc). Fasten off tan.

Insert eyes at Row 50, 4 sts apart. Use red yarn to embroider mouth in desired shape at Rows 45-46.

BACK:

Repeat Rows 1-48 of front.

Rows 49-51: Ch 1, turn, sc in each st (16 sc).

Row 52: Ch 1, turn, dec, sc in next 12 sts, dec (14 sc).

Row 53: Ch 1, turn, dec, sc in next 10 sts, dec (12 sc).

Row 54: Ch 1, turn, dec, sc in next 8 sts, dec (10 sc).

Row 55: Ch 1, turn, dec, sc in next 6 sts, dec (8 sc). Fasten off tan.

With right sides tog, pin front to back. Attach red yarn at bottom center. Sc through both thicknesses all the way around the dill with 2 sc at corners. Curves may also require 2 sc at some spots. Change colors as needed to match colors of doll. When you get to the head, sk Row 48, 5 dc in Row 49, sk Row 50 (ear). Continue around top of head. On opposite side, sk Row 51, 5 dc in Row 49, sk Row 48, continue in sc around the rest of the doll. Start stuffing at this point and continue to stuff as you close the coll.

With white yarn, make straight sts through both layers around edges of white section. Pull sts tight to create elbows.

With matching yarn, sew a line of straight sts from bottom to Row 16. Pull sts tight to separate legs.

Cape:

Row 1: With red yarn, ch 19, sc in 2nd ch from hook and each remaining ch (18 sc).

Rows 2-10: Ch 1, turn, inc first st, sc across, inc last st (36 sc at end of Row 10).

Rows 11-34: Ch 1, turn, sc in each st. Fasten off yarn at end of Row 34.

Blocking cape is recommended for it to drape nicely. Sew Row 1 of cape to back doll’s neck at Row 41.

Emblem:

Row 1: With yellow yarn, ch 2, 2 sc in 2nd ch from hook.

Row 2: Ch 1, turn, inc twice (4 sc).

Row 3: Ch 1, turn, inc, sc in next 2 sts, inc (6 sc).

Row 4: Ch 1, turn, inc, sc in next 4 sts, inc (8 sc).

Row 5: Ch 1, turn, inc, sc in next 6 sts, inc (10 sc).

Rows 6-8: ch 1, turn, sc in each st. Fasten off yellow.

Attach red yarn to bottom at Row 1 and sc around entire piece with 2 sc in each corner. Join with sl st. Fasten off red leaving 12” length for sewing.

With red yarn, ch 15, working in back lp, sc in 2nd ch and next 13 ch. Fasten off leaving 9” length for sewing. Shape into cancer ribbon and sew to center of emblem.

Sew emblem centered to front at Rows 29-38.

Hat: (30 yards yarn in desired color)

Rnd 1: With blue yarn, ch 2 (or magic ring), 6 sc in 2nd ch from hook. Do not join. Work in continuous rnds throughout hat.

Rnd 2: 2 sc in each st (12 sc).

Rnd 3: *Sc in next st, 2 sc in next st,* repeat around (18 sc).

Rnd 4: *Sc in next 2 sts, 2 sc in next st,* repeat around (24 sc).

Rnd 5: *Sc in next 3 sts, 2 sc in next st,* repeat around (30 sc).

Rnd 6: *Sc in next 4 sts, 2 sc in next st,* repeat around (36 sc).

Rnd 7: *Sc in next 5 sts, 2 sc in next st,* repeat around (42 sc).

Rnd 8: *Sc in next 6 sts, 2 sc in next st,* repeat around (48 sc). Join with sl st.

Rnds 9-11: Ch 1, *fphdc, bphdc,* repeat around. Join with sl st. Fasten off at end of Rnd 11.

Weave in all ends.

cancer warrior doll


PDF for Kane, the Kick Cancer Doll Crochet Pattern


PDF 4 dolls https://ravel.me/kick-cancer-dolls

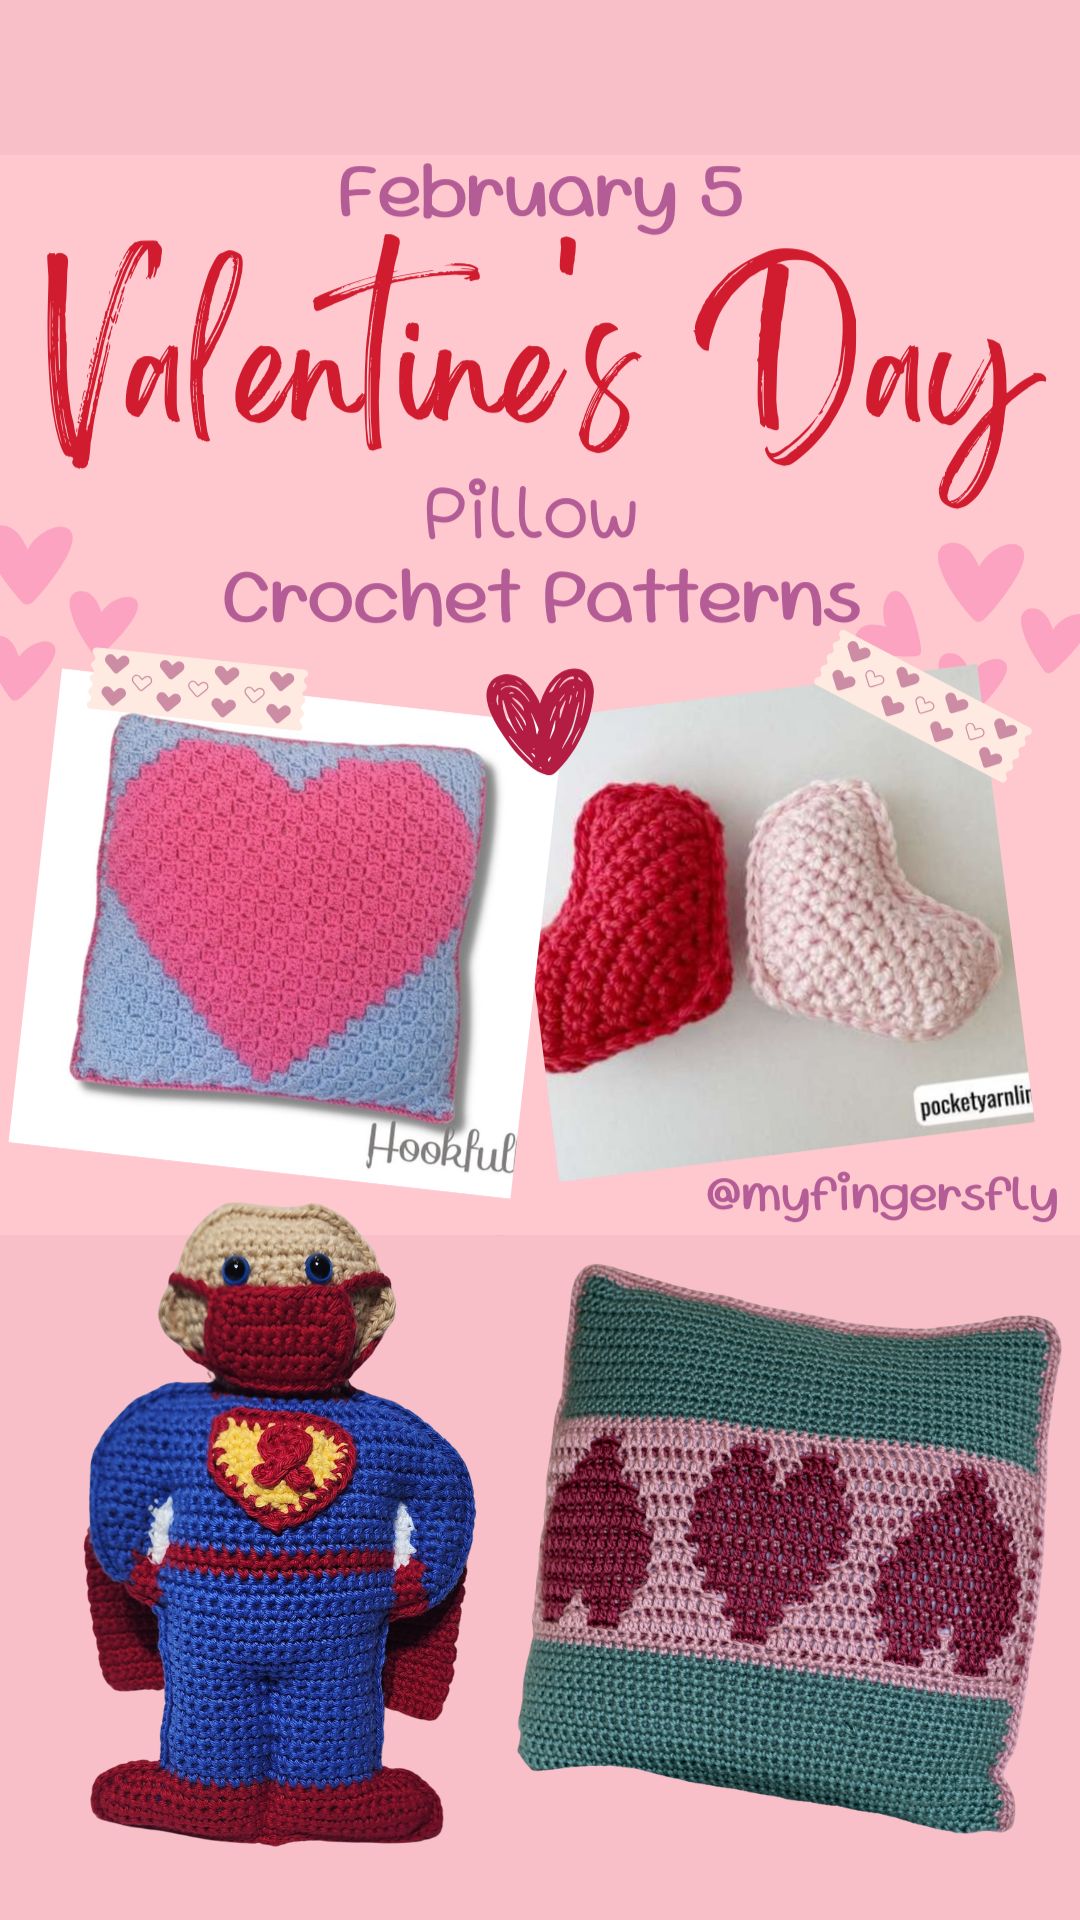
Valentine’s Day Advent Patterns


Simply Love Mosaic Cushion Cover from Elimee Designs

The Simply Love Mosaic Cushion Cover is a small, satisfying project designed as a gentle introduction to overlay mosaic crochet. With just a simple heart-motif mosaic panel, it’s perfect for practicing the basics without feeling overwhelmed.

https://www.elimeedesigns.co.uk/blog/simply-love-mosaic-cushion-cover-crochet-pattern


Venous Lounge Pillow from Mrs Shank Designs

This pattern is fun for advanced beginners and up, and the perfect home decor for Valentine’s Day.


c2c heart


C2C Heart Pillow from Hookfully


lion heart pillow
Lion Heart Pillow, My Fingers Fly


Mini Heart Pillow, Pocket Yarnlings

Free Happy Hearts Coloring Page


ICYMI (In Case You Missed It)

Day 1 – Bedroom Decor

Day 2 – Scarves

Day 3 – Kitchen Crochet

Day 4 – Lip Balm Holder

pink ribbon hat
Pink Ribbon Hat is always a free download. 


Affiliate Links

This post contains affiliate links. This means I may earn a commission should you chose to sign up for a program or make a purchase using my link. It’s okay – I love all of these companies anyways, and you will too!


Amazon affiliate: https://amzn.to/4hkS5Zd

Red Heart Crochet Kit 


Posted on 4 Comments

Frog Snowman Crochet Pattern

December is a magical month that casts a spell of festivity and joy upon us all. For crafters, it’s not just a season of celebration but also a flurry of creative activity. As the year draws to a close, the crafting community comes alive with inspiration, projects, and a shared love for handmade delights.

December kicks off with the spirit of Christmas and various other winter holidays. Crafters find themselves immersed in a world of glitter, ribbons, and ornaments. From handmade wreaths to personalized ornaments, the possibilities are endless. The joy of crocheting holiday decor lies not only in the final product but also in the process of bringing festive cheer to every corner of one’s home.

Crafters know that the most heartfelt gifts are the ones made with love. December becomes a creative marathon as crocheters pour their creativity into creating unique and personalized gifts for loved ones. Whether it’s knitting a cozy scarf, crafting a custom photo album, or baking and decorating delicious treats, the act of giving becomes an art form in itself.

December is not just about creating—it’s also about sharing and selling. Craft fairs and markets pop up, providing crafters with the opportunity to showcase and sell their handmade treasures. These events create a sense of community among crafters and allow them to connect with individuals who appreciate the value of unique, artisanal goods. Today’s free pattern is a no-sew Frog Snowman that works up quickly in bulky yarn and is sure to be a hit at craft markets.

As the year comes to an end, crocheters often take a moment to reflect on their creative journey. December becomes a time for setting new crafting goals, exploring different mediums, and planning for the upcoming year. It’s a chance to celebrate achievements, learn from challenges, and envision the artistic endeavors that lie ahead.

In the whirlwind of holiday festivities, crafters find solace and joy in their creative pursuits. December is not just a month on the calendar; it’s a canvas waiting to be filled with the vibrant colors of imagination and craftsmanship. As the year wraps up, crocheters embrace the opportunity to share their passion, spread warmth through handmade gifts, and set the stage for another year of artistic exploration. Cheers to a December filled with creativity, community, and the magic of crocheting!


Here’s an Advent Calendar to help you keep track of the December frenzy.

Frog Snowman Amigurumi

Materials:

Bernat Blanket yarn –

40 yards white

1 yard orange

1 yard black

Crochet hook size M (9.0 mm)

Yarn needle

Fiberfill

15-mm green safety eyes

Gauge: 4 rows = 2”, 4 sc = 2”

Frog snowman measures approximately 7” tall by 6” wide.

STITCHES:

Invisible decrease: https://youtube.com/shorts/0NC5nXyDvwI?feature=share

Ultimate finish:  https://youtu.be/jVpTr8mId3I

Body:

Rnd 1: With white yarn, ch 10, sc in 2nd ch from hook, sc in next 7 ch, 3 sc in last ch. Working on opposite side of foundation ch, sc in next 7 lps, 2 sc in last lp (20 sc). Do not join. Work in continuous rnds throughout.

Rnd 2: 2 sc in next st, sc in next 7 sts, 2 sc in each of the next 3 sts, sc in next 7 sts, 2 sc in each of the next 2 sts (26 sc).

Rnd 3: Sc in each st.

Rnd 4: *Sc in next st, 2 sc in next st,* sc in next 7 sts, * to * 3 times, sc in next 7 sts, * to * 2 times (32 sc).

Rnds 5-9: Sc in each st.

Rnd 10: Lay piece flat to make sure you’re starting Rnd 10 at the side of the frog. Dec, sc in next 12 sts, dec 2 times, sc in next 12 sts, dec (28 sc).

Rnd 11: Dec, sc in next 10 sts, dec twice, sc in next 10 sts, dec (24 sc).

Rnd 12: Dec, sc in next 8 sts, dec twice, sc in next 8 sts, dec (20 sc). Do not fasten off.

Eyes:

Rnd 13: Dec, sc in next 3 sts, sk 10 sts, sc in next 3 sts, dec (8 sc).

Rnd 14: Sc in each st. Fasten off and close with Ultimate Finish. Insert eye. Stuff body and eye.

Return to Rnd 12 of body for the other eye.

Rnd 13: Dec, sc in next 3 sts, dec, sc in next 3 sts (8 sc).

Rnd 14: Sc in each st. Fasten off and close with Ultimate Finish. Insert eye and finish stuffing. Sew closed the opening between the eyes.

Nose:

NOTE: I could not find orange blanket yarn, so I used 3 strands of worsted held together.

Attach orange yarn at center st of Rnd 11. Ch 1, dc, fasten off. Weave end down through dc and hide ends in body.

Legs:

Mark Rnd 7, 3 sts from each side.

Sew through both thicknesses from marker to bottom of frog.


Use black yarn to make 3 French knots at centers of Rnds 4, 6, and 8.

Weave in all ends.

PDF download available at: Frog Snowman Amigurumi Crochet Pattern

Stuff the Stocking Blog Hop

Day 5 of the Stuff the Stockings blog hop brings us a fun design from @bizzy_crochet

This Santa inspired ice cream cozy is perfect for the ice cream lover in your life! This adorable pattern pays homage to Santa and his merry helpers, complete with a convenient handle for easy indulgence. Keep your hands cozy and your ice cream cold – because every scoop deserves a touch of holiday magic!

The pattern for Santa’s Helper Ice Cream Cozy is forever free to view on the designer’s blog.

For 24 hrs, you can purchase the premium PDF in her Ravelry and Etsy shops for 50% off with the coupon code you’ll find on the blog hop roundup post.

Find the coupon code on the blog hop roundup post : https://www.madamestitch.com/stocking-stuffers-blog-hop-2023

15 Days of Discounts

🎄Check out the 15 Days Of December Discounts Event to grab some amazing deals for 2023🎁
Take a look at Day 1’s Deal from Canoe Mtn Designs 🔔
https://www.reginapdesigns.com/post/december-discounts-event-2023-day-1


Quick Gifts/Cozy Makes Blog Hop

The Quick Gifts/ Cozy Makes Blog Hop, hosted by Straight Hooked is now live! Be sure to check in every day this month for the featured pattern of the day.
Today, you can grab a copy of my Polar Rush Beanie pattern for FREE, or you can use the same code to save $3.99 on the purchase of the Polar Rush Capelet and Beanie mini bundle!

https://www.straighthooked.com/the-quick-gifts-cozy-makes-blog-hop/?v=402f03a963ba


In Case You Missed It

Christmas Tree Ornament
Gingerbread Snowman
Cashew Ornament


Get a free gift tag for wrapping your Angel Rattle.

Christmas Angel Gift Tag


Affiliate Links

This post contains affiliate links. This means I may earn a commission should you chose to sign up for a program or make a purchase using my link. It’s okay – I love all of these companies anyways, and you will too!


Get a $10 credit at Stickermule.

etsy logo

Thinking of opening an Etsy shop? Use this link to get 40 free listings. https://etsy.me/3F3kxwc


Money Saving Offers


Check out this free app that gets you cash back on gas and other errands! Click this link or use promo code 46ZCG to get an extra 15¢/gal bonus the first time you make a purchase. https://upside.app.link/46ZCG

Get $20 off your first Uber Eats order of $25 or more at http://Hungry? Get $20 off your first Uber Eats order of $25 or more. Terms apply. Use my code at checkout: eats-lisaf21461ue https://ubereats.com/feed?promoCode=eats-lisaf21461ue

Hey! Thought you’d like to try Ibotta, a cash back rewards app that I use to make real money every time I shop for groceries, online purchases, and more! Just use my referral code “eugysjd” at registration. Sign up at → https://ibotta.onelink.me/iUfE/8cc13c64?friend_code=eugysjd

Join Rakuten and get $30 cash back. Plus earn money on online purchases.

https://www.rakuten.com/r/LGT111?eeid=28187


Posted on 6 Comments

Christmas Tree Ornament Crochet Pattern

The holiday season is upon us, and one of the most cherished traditions is decorating the Christmas tree. Whether you’re a seasoned pro or a first-timer, selecting and adorning the perfect tree can be a joyful and memorable experience for everyone.

The history of the Christmas tree is a fascinating journey that spans centuries and crosses cultural boundaries. The tradition of bringing evergreen trees into homes and decorating them during the winter season has deep roots in various cultures and has evolved over time. Here is a brief overview of the history of the Christmas tree:

  • The use of evergreen plants during the winter months has ancient origins. Many cultures, including the Egyptians, Romans, and Vikings, used evergreen boughs to symbolize life and renewal during the winter solstice.
  • The tradition of the Christmas tree as we know it today is often traced back to Germany in the Middle Ages. Some accounts suggest that Germanic tribes would bring evergreen trees into their homes and decorate them with candles to ward off evil spirits during the darkest days of winter.
  • A popular legend attributes the introduction of candles on Christmas trees to Martin Luther in the 16th century. The story goes that Luther was inspired by the beauty of stars twinkling through evergreen branches and, to recreate the scene for his family, he added candles to a tree.
  • The tradition of decorating evergreen trees became more widespread in Germany and other parts of Europe during the 16th and 17th centuries. Trees were adorned with not only candles but also with fruits, nuts, and other decorations.
  • The Christmas tree tradition was introduced to England in the 18th century through the marriage of Queen Charlotte, a German princess, to King George III. However, the custom did not immediately gain widespread popularity in England.
  • German immigrants brought the Christmas tree tradition to North America in the 18th and 19th centuries. The first documented Christmas tree in the United States was set up by German settlers in Pennsylvania in the 1830s.
  • The Christmas tree gained more acceptance in England during the 19th century, particularly after Queen Victoria and Prince Albert, who was of German descent, were depicted with their decorated Christmas tree in a popular illustration in the Illustrated London News in 1848.
  • In the 19th century, as the Christmas tree tradition spread, ornaments became more elaborate. Families would use handmade decorations, including paper ornaments, strings of popcorn, and small figurines.
  • The introduction of electric lights in the 20th century replaced candles on Christmas trees, making them safer and more convenient. Additionally, the commercialization of Christmas, with the mass production of ornaments and decorations, contributed to the widespread popularity of Christmas trees.

Today, the Christmas tree is a central and beloved symbol of the holiday season in many parts of the world. Whether adorned with traditional decorations or modern ornaments, the Christmas tree continues to be a cherished tradition that brings joy and festive spirit to homes around the globe.

As the holiday season unfolds, decorating the Christmas tree becomes a heartwarming tradition that brings families and friends together. Whether you opt for the natural aroma of a real tree or the convenience of an artificial one, the joy of adorning it with twinkling lights and cherished ornaments is a universal experience. Happy decorating, and may your Christmas tree be a beacon of joy and festive spirit throughout the season!

Christmas Tree Decoration Crochet Pattern

 Materials:

Sport weight yarn:

50 yards green

10 yards brown

Size F (3.75 mm) crochet hook

Beads

Styrofoam tree 4.17” tall

Gold pipe cleaner

Ribbon


Gauge: 1 crocodile repeat (3 rows) = 1″

Ornament measures approximately 4.5” tall (including tail).

SPECIAL STITCHES:

V-stitch: dc, ch 1, dc in same st

Crocodile stitch: Working from top to bottom of 1st dc of V-stitch of previous row, work 5 fpdc around post of 1st dc, ch 1, turn piece to work around 2nd dc of V-stitch, work 5 fpdc around post of 2nd dc.

Crocodile stitch on YouTube: https://youtu.be/HN_SNZDW21w

Ultimate finish:  https://youtu.be/jVpTr8mId3I

Directions:

Before beginning, thread 27 beads onto yarn. https://youtu.be/BIg1OG9asjY?si=a2UN1jh2DYGgSvTb

Rnd 1: Ch 36, join with sl st. Ch 1, sc in each ct, join with sl st (36 sc).

Rnd 2: Ch 4 (counts as dc plus ch-1), dc in same st (counts as first V-stitch), *sk 2 sts, V-stitch in next st,* repeat around, sk last 2 sts, join with sl st in 3rd ch of beg ch-4 (12 V-stitches).

Rnd 3: *Ch 1, 5 dc around post of 2nd dc of V-stitch, ch 1, insert bead, 5 dc around post of 2nd dc of V-stitch, sl st in center of next V-stitch,* repeat around (6 crocodiles).

Rnd 4: Ch 1, *2 sc across 1st half of crocodile st, 1 sc in center, 2 sc across 2nd half,* repeat around (30 sc).

Rnd 5: Ch 4 (counts as dc plus ch-1), dc in same st (counts as first V-stitch), *sk 2 sts, V-stitch in next st,* repeat around, sk last 2 sts, join with sl st in 3rd ch of beg ch-4 (10 V-stitches).

Rnd 6: *Ch 1, 5 dc around post of 2nd dc of V-stitch, ch 1, insert bead, 5 dc around post of 2nd dc of V-stitch, sl st in center of next V-stitch,* repeat around (5 crocodiles).

Rnd 7: Ch 1, *2 sc across 1st half of crocodile st, 2 sc in center, 2 sc across 2nd half,* repeat around (30 sc).

Rnd 8: Ch 4 (counts as dc plus ch-1), dc in same st (counts as first V-stitch), *sk 2 sts, V-stitch in next st,* repeat around, sk last 2 sts, join with sl st in 3rd ch of beg ch-4 (10 V-stitches).

Rnd 9: *Ch 1, 5 dc around post of 2nd dc of V-stitch, ch 1, insert bead, 5 dc around post of 2nd dc of V-stitch, sl st in center of next V-stitch,* repeat around (5 crocodiles).

Rnd 10: Ch 1, *2 sc across 1st half of crocodile st, 1 sc in center, 2 sc across 2nd half,* repeat around (25 sc).

Rnd 11: Ch 4 (counts as dc plus ch-1), dc in same st (counts as first V-stitch), *sk 2 sts, V-stitch in next st,* repeat around, sk last 3 sts, join with sl st in 3rd ch of beg ch-4 (8 V-stitches).

Rnd 12: *Ch 1, 5 dc around post of 2nd dc of V-stitch, ch 1, insert bead, 5 dc around post of 2nd dc of V-stitch, sl st in center of next V-stitch,* repeat around (4 crocodiles).

Rnd 13: Ch 1, *2 sc across 1st half of crocodile st, 2 sc in center, 2 sc across 2nd half,* repeat around (24 sc).

Rnd 14: Ch 4 (counts as dc plus ch-1), dc in same st (counts as first V-stitch), *sk 2 sts, V-stitch in next st,* repeat around, sk last 2 sts, join with sl st in 3rd ch of beg ch-4 (8 V-stitches).

Rnd 15: *Ch 1, 5 dc around post of 2nd dc of V-stitch, ch 1, insert bead, 5 dc around post of 2nd dc of V-stitch, sl st in center of next V-stitch,* repeat around (4 crocodiles).

Rnd 16: Ch 1, *2 sc across 1st half of crocodile st, 2 sc in center, 2 sc across 2nd half,* repeat around (20 sc).

Rnd 17: Ch 4 (counts as dc plus ch-1), dc in same st (counts as first V-stitch), *sk 2 sts, V-stitch in next st,* repeat around, sk last 3 sts, join with sl st in 3rd ch of beg ch-4 (8 V-stitches).

Rnd 18: *Ch 1, 5 dc around post of 2nd dc of V-stitch, ch 1, insert bead, 5 dc around post of 2nd dc of V-stitch, sl st in center of next V-stitch,* repeat around (3 crocodiles).

Rnd 19: Ch 1, *sc across 1st half of crocodile st, sc in center, sc across 2nd half,* repeat around (9 sc). Join with sl st. Close with Ultimate Finish.

Base:

Turn tree upside down and attach brown yarn in Rnd 1 in any lp. Working in unused lps of foundation ch, sc in each lp. Join with sl st.

Rnd 2: Working in BLO, ch 1, sc in each st. Do not join. Insert cone into tree.

Rnd 3: Working in both lps, sc in each st. Do not join.

Rnd 4: *Dec, sc in next 3 sts,* repeat around (24 sc).

Rnd 5: *Dec, sc in next 2 sts,* repeat around (18 sc).

Rnd 6: *Dec, sc in next st,* repeat around (12 sc).

Rnd 7: Dec around (6 sc). Close bottom with Ultimate Finish.

Weave in all ends.

Bend pipe cleaner into star shape and cut so you have approximately 1” extending down. Insert this part into top of tree.

If using tree as a hanging ornament, cut a piece of ribbon approximately 12” long and fold. Pull through top of tree behind star and tie off for hanger.

PDF is available free when you join My Fingers Fly Crochet Family on Facebook: https://www.facebook.com/groups/875538646117910


More Free Ornament Patterns

Narwhal Ornament
penguin butt ornament
Penguin Butt Ornament
horse butt ornament
Horse Butt Ornament
pug ornament
Pug Ornament

Cyber Sales

All patterns and ebooks in my Ravelry shop are 50% off

https://www.ravelry.com/designers/lisa-ferrel


In Case You Missed It

gingerbread snowman
Gingerbread Snowman
Cashew Ornament


Get a free gift tag for wrapping your Angel Rattle.

Christmas Angel Gift Tag


Airplane Ornament
Northern Lights Slippers
Horny Toad Keychain


Affiliate Links

This post contains affiliate links. This means I may earn a commission should you chose to sign up for a program or make a purchase using my link. It’s okay – I love all of these companies anyways, and you will too!


Posted on 3 Comments

Cashew Ornament Crochet Pattern

Have you ever seen a cashew tree? I follow several nature channels on social media, and recently a photo came across my feed of cashews hanging from a tree. They’re just so adorable; they look like tiny gnomes! I couldn’t resist crocheting one for my husband, because he LOVES cashews. They were so quick and easy, I made 2 ornaments in an evening.

Tomorrow is National Cashew Day, but I’ll be busy cooking all morning. That’s why I’m sharing this pattern with you a day early.


Cashew Ornament
Materials:
Worsted weight yarn –
15 yards MC (red or amber)
10 yards tan
Crochet hook size G (4.00 mm)
Yarn needle
Fiberfill
Pipe cleaner
Ribbon

Gauge: 9 rows = 2”, 8 sc = 2”

Cashew ornament measures approximately 5” tall by 2.5” wide.

STITCHES:
Invisible decrease: https://youtube.com/shorts/0NC5nXyDvwI?feature=share
Ultimate finish: https://youtu.be/jVpTr8mId3I

Cashew Apple:
Rnd 1: With MC yarn, ch 2 (or magic ring), 10 sc in 2nd ch from hook. Do not join. Work in continuous rnds unless otherwise specified.
Rnd 2: *Sc in next st, 2 sc in next st,* repeat around (15 sc).
Rnd 3: Sc in each st.
Rnd 4: *Sc in next 2 sts, 2 sc in next st,* repeat around (20 sc).
Rnd 5: Sc in each st.
Rnd 6: *Sc in next 3 sts, 2 sc in next st,* repeat around (25 sc).
Rnd 7: Sc in each st.
Rnd 8: *Sc in next 4 sts, 2 sc in next st,* repeat around (30 sc).
Rnds 9-12: Sc in each st. Join with sl st at end of Rnd 12.
Rnd 13: Working in BLO, *dec, sc in next 3 sts,* repeat around (24 sc).
Rnd 14: Working in both lps, *dec, sc in next 2 sts,* repeat around (18 sc).
Rnd 15: *Dec, sc in next st,* repeat around (12 sc).
Rnd 16: Dec around (6 sc). Fasten off yarn leaving 12” length for sewing apple to nut.
Close with Ultimate Finish.
Cashew Nut:
Rnd 1: With tan yarn, ch 2 (or magic ring), 6 sc in 2nd ch from hook (6 sc). Do not join.
Rnd 2: Inc around (12 sc).
Rnds 3-4: Sc in each st.
Rnd 5: Inc 6 times, sc in next 6 sts (18 sc).
Rnd 6: Sc in each st.
Rnd 7: Sc in 6 sts, dec 6 times (12 sc).
Rnds 8-9: Sc in each st.
Rnd 10: *Dec, sc in next 2 sts,* repeat
around (9 sc).
Rnds 11-14: Sc in each st.
Cut pipe cleaner to 6” length, fold in half, insert in cashew and stuff around pipe cleaner.
Rnd 15: *Dec, sc in next st*, repeat around (6 sc).
Rnd 16: Sc in each st.
Rnd 17: *Dec, sc in next st,* repeat once (4 sc). Close with Ultimate Finish. Bend nut into curved shape. If needed, weave yarn through Rnds 10, 9,8, 7 and pull tight to curl up the end.
Sew nut to apple.
Weave in all ends.

Ad-free PDF available at Cashew Ornament Crochet Pattern


Download the calendar which contains links to each day’s pattern. Ornament Advent Calendar

Each day in December, I will post a different ornament pattern in my Facebook group. https://www.facebook.com/share/g/1FGmsbZ3jM/

Purchase the bundle of all 24 ornaments for only $9.99

https://www.ravelry.com/redeem/my-fingers-fly-designs?sale=410562


More Free Ornament Patterns

Narwhal Ornament
penguin butt ornament
Penguin Butt Ornament
horse butt ornament
Horse Butt Ornament
pug ornament
Pug Ornament

In Case You Missed It

gingerbread snowman
Gingerbread Snowman


Get a free gift tag for wrapping your Angel Rattle.

Christmas Angel Gift Tag


Airplane Ornament
Northern Lights Slippers
Horny Toad Keychain


Affiliate Links

This post contains affiliate links. This means I may earn a commission should you chose to sign up for a program or make a purchase using my link. It’s okay – I love all of these companies anyways, and you will too!


Posted on 5 Comments

Gingerbread Snowman Cuddler Crochet Pattern

As winter arrives, bringing with it a blanket of snow and a chill in the air, there’s no better way to embrace the season than by crocheting your very own gingerbread snowman doll. This delightful DIY project not only adds a touch of whimsy to your decor but also provides an adorable playmate during winter’s indoor weather.

Materials:

Worsted weight yarn –

95 yards brown

60 yards white

1 yard orange

1 yard red

Crochet hook size G (4.00 mm)

Yarn needle

Fiberfill

8-mm black safety eyes

Gauge: 9 rows = 2”, 8 sc = 2”


Gingerbread snowman measures approximately 10” tall by 9” wide.

Back:

Row 1: With brown yarn, ch 18, sc in 2nd ch from hook and in all remaining ch (17 sc).

Row 2: Ch 1, turn, sc in each st.

Row 3: Ch 1, turn, dec, sc across (16 sc).

Rows 4-8: Ch 1, turn, sc in each st.

Row 9: Ch 1, turn, inc, sc across to last st, inc in last st (18 sc), ch 8.

Row 10: Sc in 2nd ch from hook and in next 6 ch, sc across 18 sts, work 7 fsc (32 sc).

Row 11: Ch 1, turn, inc in first st, sc across to last st, inc in last st (34 sc).

Row 12: Repeat Row 11 (36 sc).

Rows 13-15: Ch 1, turn, sc in each st.

Row 16: Ch 1, turn, dec, sc across to last 2 sts, dec (34 sc).

Row 17: Repeat Row 16 (32 sc).

Row 18: Ch 1, turn, sl st in first 10 sts, sc in next 12 sts, leave last 10 sts unworked (12 sc).

Row 19: Ch 1, turn, dec, sc across to last 2 sts, dec (10 sc).

Row 20: Ch 1, turn, sc in each st.

Row 21: Ch 1, turn, inc in first st, sc across to last st, inc in last st (12 sc).

Row 22: Ch 1, turn, sc in each st.

Row 23: Ch 1, turn, inc in first st, sc across to last st, inc in last st (14 sc).

Rows 24-28: Ch 1, turn, sc in each st.

Row 29: Ch 1, turn, dec, sc across to last 2 sts, dec (12 sc).

Row 30: Ch 1, turn, dec, sc across to last 2 sts, dec (10 sc).

Row 31: Ch 1, turn, dec, sc across to last 2 sts, dec (8 sc). Fasten off brown.

Leg:

Return to Row 1 of back.

Row 1: With wrong side facing, attach yarn at beg of Row 1. Ch 1, sc in next 8 sts. Leave remaining sts unworked.

Row 2: Ch 1, turn, dec, sc in next 5 sts, inc (8 sc).

Row 3: Ch 1, turn, sc in each st.

Row 4: Ch 1, turn, dec, sc in next 5 sts, inc (8 sc).

Rows 5-7: Ch 1, turn, sc in each st.

Row 8: Ch 1, turn, dec, sc in next 4 sts, dec (6 sc).

Row 9: Ch 1, turn, dec, sc in next 2 sts, dec (4 sc). Fasten off.

Other Leg:

Return to Row 1 of back.

Row 1: With wrong side facing, sk 1 st and attach yarn in next st. Ch 1, sc in remaining 8 sts.

Row 2: Ch 1, turn, inc, sc in next 5 sts, dec (8 sc).

Row 3: Ch 1, turn, sc in each st.

Row 4: Ch 1, turn, inc, sc in next 5 sts, dec (8 sc).

Rows 5-7: Ch 1, turn, sc in each st.

Row 8: Ch 1, turn, dec, sc in next 4 sts, dec (6 sc).

Row 9: Ch 1, turn, dec, sc in next 2 sts, dec (4 sc). Do not fasten off.

Edging:

Ch 1, turn, work 1 rnd of sc around entire piece.

Front:

Repeat back and legs with white yarn. Fasten off white yarn when both legs are completed. Before working edging, add face.

Insert safety eyes at Row 26 with 1 st between them.

Nose:

Attach orange yarn in center st of Row 25. Ch 1, dc, fasten off. Weave end through dc and through body. Tie ends tog on back side of piece.

Mouth:

Embroider with red yarn at Rows 22-23.

Edging: Go back to front piece and work edging in brown yarn. Ch 1, do not turn.

Place front on back with wrong sides facing. Sc through both thicknesses. Stuff as you go.

Weave in all ends.

Craft a charming winter wardrobe for your snowman doll using colored felt. Cut out scarves, hats, and any other accessories you desire. Secure them in place with glue or by sewing. Get creative with patterns and colors to make your snowman uniquely yours.


Ad-free PDF available at: Gingerbread Snowman Cuddler Crochet Pattern


In Case You Missed It

Turkey Gift Bag


Get a free gift tag for wrapping your Angel Rattle.

Christmas Angel Gift Tag


Airplane Ornament
Northern Lights Slippers
Horny Toad Keychain


Affiliate Links

This post contains affiliate links. This means I may earn a commission should you chose to sign up for a program or make a purchase using my link. It’s okay – I love all of these companies anyways, and you will too!