Did you know September is National Piano Month? 🎹✨ It’s the perfect time to celebrate the beauty of music and honor the instrument that has inspired countless songs, from classical masterpieces to pop chart-toppers. And what better way for yarn lovers to join in the celebration than with a crochet hook in hand?
This month, I’m excited to share the Piano Ornament Crochet Pattern – a quick, fun project that’s both creative and musical.
🧶 About the Pattern
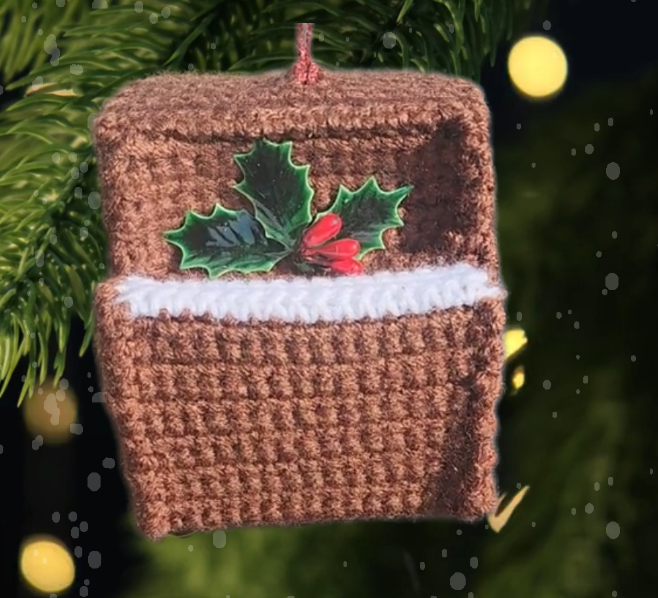
The Piano Ornament Crochet Pattern is a miniature design that captures the charm of this timeless instrument. Whether you hang it on your Christmas tree, gift it to a piano teacher, or add it to your music room décor, this ornament is sure to strike a chord with music lovers.
✨ Pattern Features:
Step-by-step instructions (US crochet terms)
Beginner-friendly and quick to make
Perfect stash-busting project
Finished size makes it ideal for ornaments, gift toppers, or keepsakes (approximately 4” tall by 3.5” wide)
🎁 Perfect Gift Idea
This pattern makes a wonderful handmade gift for:
Piano teachers 🎼 (imagine gifting one at a recital!)
Music students who just reached a new milestone
Friends and family who love music
Your own tree, if you want it to sing with handmade charm this holiday season
📥 Get the Pattern
The Piano Ornament Crochet Pattern is available now as a PDF instant download in my shop. That means you can start crocheting your own little piece of musical décor today!
This September, celebrate National Piano Month by making something that combines your love of music and crochet. 🎹🧶 Handmade ornaments like this add meaning and melody to the holidays – and every stitch will be music to your heart. 💖
Materials:
Sport yarn:
65 yards brown
3 yards white
Size F (3.75 mm) crochet hook
Yarn needle
Black fabric paint or marker
12” length of ribbon or cord
Peel & stick felt
Gauge: 5 sc = 1”, 5 rows = 1”
Directions:
Row 1: (Section 1) With brown yarn, ch 17, sc in 2nd ch from hook and all remaining chs (16 sc).
Rows 2-7: Ch 1, turn, sc in each st.
Row 8: (Section 2) Ch 1, turn, working in BLO, sc in each st.
Rows 9-14: Ch 1, turn, working in both lps, sc in each st.
Row 15: (Section 3) Ch 1, turn, working in FLO, sc in each st.
Rows 16-33: Ch 1, turn, working in both lps, sc in each st.
Row 34: (Section 4) Ch 1, turn, working in BLO, sc in each st.
Rows 35-44: Ch 1, turn, working in both lps, sc in each st.
Row 45: (Section 5) Ch 1, turn, working in FLO, sc in each st.
Rows 46-55: Ch 1, turn, working in both lps, sc in each st.
Row 56: With white yarn, sc in each st.
Row 57: (Section 6) Ch 1, turn, working in FLO, sc in each st. Fasten off white yarn.
Rows 58-65: With brown yarn, ch 1, turn, working in both lps, sc in each st.
Sides: (Make 2)
Row 1: With brown yarn, ch 11, sc in 2nd ch from hook and each remaining ch (10 sc).
Rows 2-12: Ch 1, turn, sc in each st.
Row 13: Ch 1, turn, sc in next 7 sts, leave remaining 3 sts unworked (7 sc).
Rows 14-19: Ch 1, turn, sc in each st. Fasten off at end of Row 19.
Cut a piece of felt for each piano section and 2 pieces for the sides. Peel and stick as you fold sections and sew in place.
Sew Row 1 to Row 59 to start the box. Sew on one side at a time. As you begin to join outline of first side to body of piano, it will begin to take the proper shape.
OPTIONAL:
Use black fabric marker or fabric paint to create black keys on keyboard.
If you would like to use piano as a hanging ornament, cut 12” piece of ribbon and lp through top center of piano. Decorate as desired.
The Piano Ornament pattern is included in the It’s a Wonderful Life Advent Calendar along with 23 other ornament patterns based on the beloved movie.
This post contains affiliate links. This means I may earn a commission should you chose to sign up for a program or make a purchase using my link. It’s okay – I love all of these companies anyways, and you will too!
The October issue of I Like Crochet is now available, and it includes one of my designs – Modern Bowtie Dress.
Subscribe to get a one-year membership to I Like Crochet for only $5
According to the weatherman, it’s still summer, but the beginning of September has us anxiously awaiting the first day of fall. Chunky hats, football season, pumpkin spice everything, and of course, Halloween!
While living in West Texas a few years ago, I would watch a pair of scaled quail waddle down the street in the mornings. Often there were more quail, but they always walked in pairs. Their quiet beauty was the inspiration for the colors of this easy crochet hat pattern.
Materials needed: Lion Hometown USA Super Bulky Yarn
1 skein Bar Harbor Blizzard (color A)
½ skein Anchorage Ice (color B)
Size K and M crochet hooks
Yarn needle
Fur pompom
Gauge: 5 rows = 2”, 6 sts = 2”
Hat measures approximately 22” circumference and 8 1/2” height
Directions:
BRIM:
Row 1: With color A and size K hook, ch 9, sc in 2nd ch from and each of the next 7 ch (8 sc).
Row 2: Working in back loops only, ch 1, turn, sc in each st.
Repeat Row 2 until brim measures approximately 22” (adult female size). Add or remove rows as necessary for correct fit. Do not fasten off.
With right sides together, sew first and last rows together.
HAT:
Rnd 1: With right sides together and size M hook, work 1 sc in each row end. Join with sl st in first sc. (For extra length, add 1-2 rows of sc here.)
Rnd 2: Ch 1, *sc in next 4 sts with color A, sc in next st with color B,* repeat around. Join with sl st.
Rnd 3: Ch 1, *sc in next st with color A, sc in next st with color B, sc in next st with color A* repeat around. Join with sl st.
Rnd 4: Ch 1, *sc in next st with color B, sc in next st with color A,* repeat around. Join with sl st.
Rnd 5: Ch 1, *sc in next st with color A, sc in next st with color B,* repeat around. Join with sl st.
Rnd 6: Ch 1, *sc in next 2 sts with color B, sc in next 2 sts with color A,* repeat around. Join with sl st.
Rnd 7: Ch 1, *sc in next 2 sts with color A, sc in next 2 sts with color B,* repeat around. Join with sl st.
Rnd 8: (Begin decreasing) Ch 1, *sc next 2 sts together with color B, sc in next st with color A, sc in next 2 sts with color B, sc in next st with color A* repeat around. Join with sl st.
Rnd 9: Ch 1, *sc next 2 sts together with color B, sc in next 2 sts with color B, sc in next st with color A* repeat around. Join with sl st. Fasten off color A.
Rnd 10: Ch 1, working only with color B for the remainder of the hat, *sc in next 3 sts, dec over next 2 sts,* repeat around. Join with sl st.
Rnd 11: Ch 1, *sc in next 3 sts, dec over next 2 sts,* repeat around. Join with sl st.
Rnd 12: Ch 1, *sc in next 2 sts, dec over next 2 sts,* repeat around. Join with sl st.
Rnd 13: Ch 1, *sc in next st, dec over next 2 sts,* repeat around. Join with sl st.
Rnd 14: Ch 1, dec around. Join with sl st. Fasten off with 6” length. Use yarn needle to thread this length through remaining sts and pull tight. Weave in all ends.
Sew (or clip) fur pompom to top of hat.
Want more hat patterns? Try the Novelty Hat Crochet Patterns Ebook with 9 unique hat patterns is 50% off through September 30.
Also included in the sale is any hat pattern in my Ravelry shop.
This post contains affiliate links. This means I may earn a commission should you chose to sign up for a program or make a purchase using my link. It’s okay – I love all of these companies anyways, and you will too!
It feels like it took forever, but it’s finally ready! Spooktacular Crochet Patterns Book contains over 30 patterns for Halloween – apparel, accessories, home decor, and toys. Crochet zombies, spiders, ghosts, black cats, monsters, skulls, and snakes from this amazing collection of patterns.
Rnd 1: With Gold, ch 2 (or magic circle), 7 sc in 2nd ch from hook. Do not join.
Rnd 2: 2 sc in each st (14 sc). Do not join.
Rnd 3: *Sc in next st, 2 sc in next st,* repeat around (21 sc). Do not join.
Rnd 4: *Sc in next 2 sts, 2 sc in next st,* twice in Gold, then repeat * to * 5 times in black. Join with sl st. Fasten off Gold.
Rnd 5: Ch 1, turn, sk sl st, *sc in next 3 sts, 2 sc in next st,* 5 times (25 sc).
Rnd 6: Ch 1, turn, *sc in next 4 sts, 2 sc in next st,* sc in next 3 sts, ch 5 for tail, sc in 2nd ch from hook and next 3 ch, sc in next st, 2 sc in next st. Repeat * to * once, sc in next 2 sts, ch 2 for head, in 2nd ch from hook work 6 hdc, picot (ch 3, sl st in 3rd ch), 3 hdc, picot, 3 hdc. Sl st in 1st hdc of head. Sc in next 2 sts, 2 sc in next st, repeat * to * once. Fasten off.
Use green thread to make French knots for eyes. Weave in all ends. Spray with fabric stiffener. Use earring hooks or jump ring and chain to complete your necklace or earrings.
Keychain:
Materials:
3 yards yellow worsted
3 yards black worsted
½ yard green worsted
Size G (4.0 mm) crochet hook
Black felt
Glue
Key ring
Using the same pattern with worsted yarn and G hook, cat measures approximately 3.25”. Glue black felt to the back to make it stiffer. Add key ring.
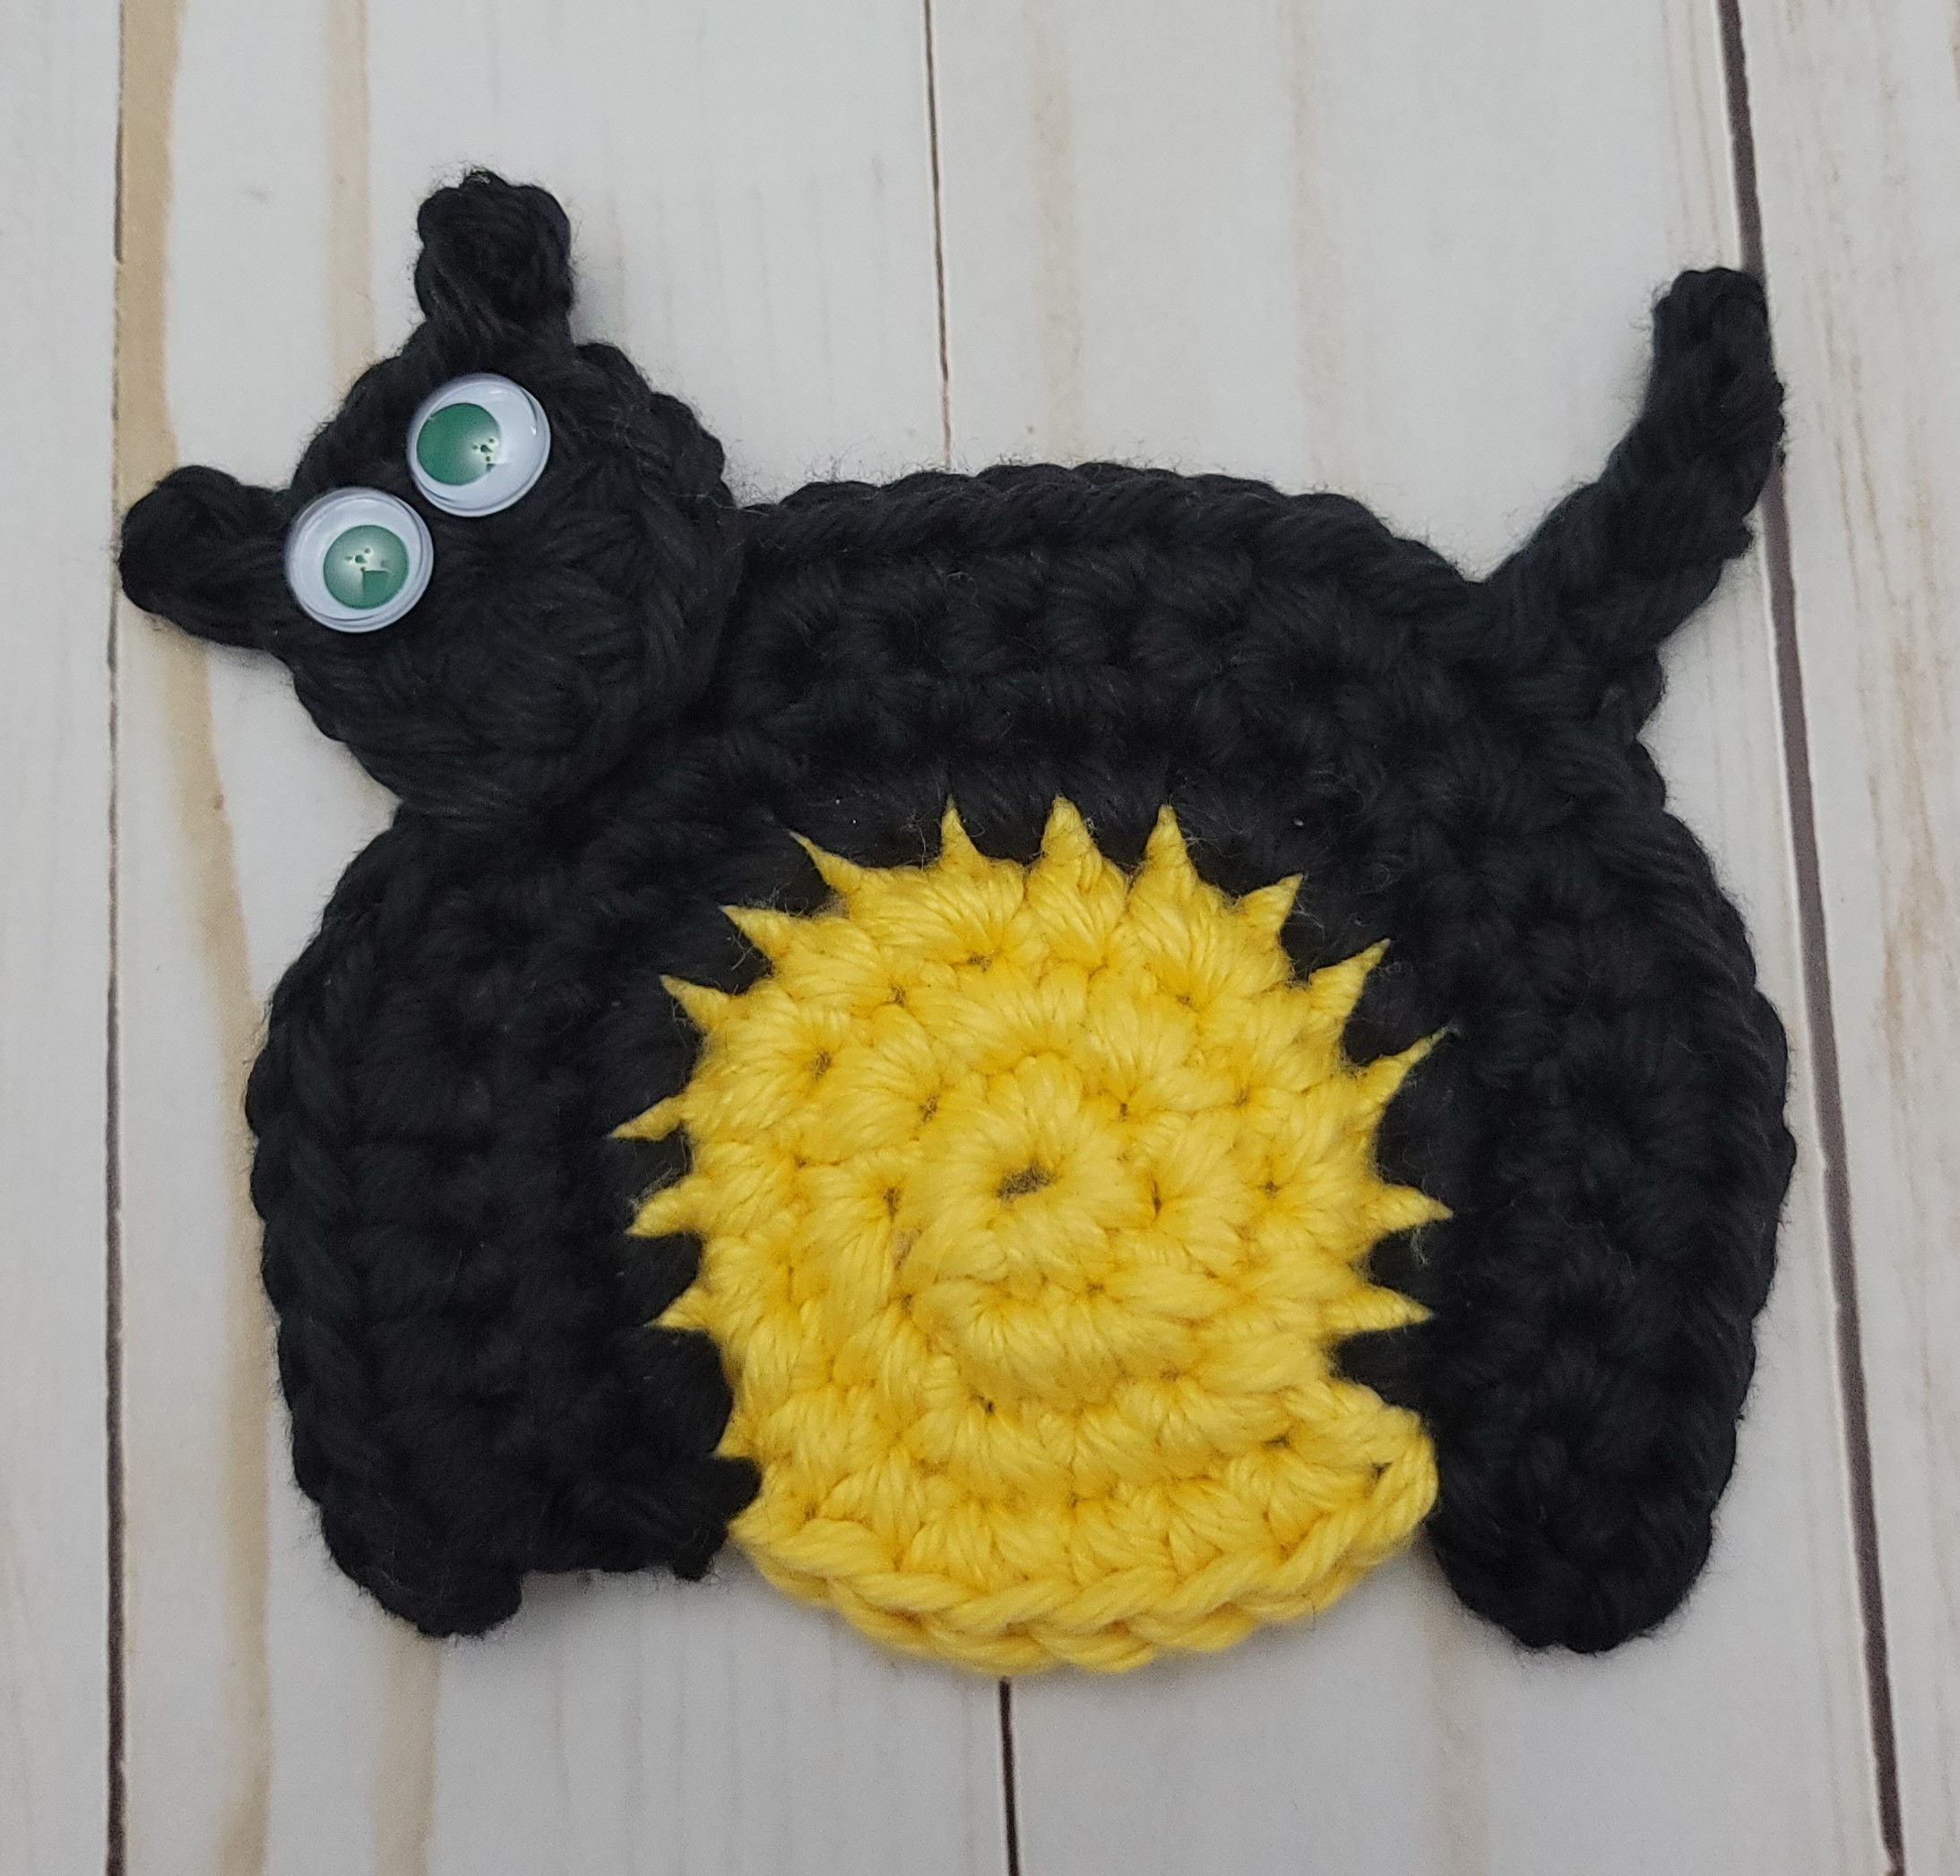
Coaster:
Materials:
9 yards yellow cotton worsted
18 yards black worsted
1 yard green worsted (or googly eyes)
Size I (5.5 mm) crochet hook
Using the same pattern with a double strand of cotton worsted yarn and I hook, cat measures approximately 4”. Use green yarn for eyes or plastic googly eyes (as pictured).
With only three months left in the year, there are still so many things I want to accomplish. By the end of September, I will have a new listing in my shop for a great Christmas gift for crocheters and knitters. In October I will be publishing my first children’s book. Then it will be time to focus on Christmas gifts and my donation box. In the meantime, stay safe and happy crocheting!
Don’t forget the Gnome Election – Make a Republican Gnome or Democrat Gnome to support your candidate.
Used to distinguish new sessions and visits. This cookie is set when the GA.js javascript library is loaded and there is no existing __utmb cookie. The cookie is updated every time data is sent to the Google Analytics server.
30 minutes after last activity
__utmc
Used only with old Urchin versions of Google Analytics and not with GA.js. Was used to distinguish between new sessions and visits at the end of a session.
End of session (browser)
__utmz
Contains information about the traffic source or campaign that directed user to the website. The cookie is set when the GA.js javascript is loaded and updated when data is sent to the Google Anaytics server
6 months after last activity
__utmv
Contains custom information set by the web developer via the _setCustomVar method in Google Analytics. This cookie is updated every time new data is sent to the Google Analytics server.
2 years after last activity
__utmx
Used to determine whether a user is included in an A / B or Multivariate test.
18 months
_ga
ID used to identify users
2 years
_gali
Used by Google Analytics to determine which links on a page are being clicked
30 seconds
_ga_
ID used to identify users
2 years
_gid
ID used to identify users for 24 hours after last activity
24 hours
_gat
Used to monitor number of Google Analytics server requests when using Google Tag Manager
1 minute
_gac_
Contains information related to marketing campaigns of the user. These are shared with Google AdWords / Google Ads when the Google Ads and Google Analytics accounts are linked together.
90 days
__utma
ID used to identify users and sessions
2 years after last activity
__utmt
Used to monitor number of Google Analytics server requests
10 minutes
Marketing cookies are used to follow visitors to websites. The intention is to show ads that are relevant and engaging to the individual user.
Pinterest Tag is a web analytics service that tracks and reports website traffic.
Unique value with which users can be identified by X. Collected information is used to be personalize X services, including X trends, stories, ads and suggestions.
2 years
external_referer
Our Website uses X buttons to allow our visitors to follow our promotional X feeds, and sometimes embed feeds on our Website.
2 years
guest_id
This cookie is set by X to identify and track the website visitor. Registers if a users is signed in the X platform and collects information about ad preferences.