Have you ever seen a cashew tree? I follow several nature channels on social media, and recently a photo came across my feed of cashews hanging from a tree. They’re just so adorable; they look like tiny gnomes! I couldn’t resist crocheting one for my husband, because he LOVES cashews. They were so quick and easy, I made 2 ornaments in an evening.
Tomorrow is National Cashew Day, but I’ll be busy cooking all morning. That’s why I’m sharing this pattern with you a day early.
Cashew Ornament
Materials:
Worsted weight yarn –
15 yards MC (red or amber)
10 yards tan
Crochet hook size G (4.00 mm)
Yarn needle
Fiberfill
Pipe cleaner
Ribbon
Gauge: 9 rows = 2”, 8 sc = 2”
Cashew ornament measures approximately 5” tall by 2.5” wide.
Cashew Apple:
Rnd 1: With MC yarn, ch 2 (or magic ring), 10 sc in 2nd ch from hook. Do not join. Work in continuous rnds unless otherwise specified.
Rnd 2: *Sc in next st, 2 sc in next st,* repeat around (15 sc).
Rnd 3: Sc in each st.
Rnd 4: *Sc in next 2 sts, 2 sc in next st,* repeat around (20 sc).
Rnd 5: Sc in each st.
Rnd 6: *Sc in next 3 sts, 2 sc in next st,* repeat around (25 sc).
Rnd 7: Sc in each st.
Rnd 8: *Sc in next 4 sts, 2 sc in next st,* repeat around (30 sc).
Rnds 9-12: Sc in each st. Join with sl st at end of Rnd 12.
Rnd 13: Working in BLO, *dec, sc in next 3 sts,* repeat around (24 sc).
Rnd 14: Working in both lps, *dec, sc in next 2 sts,* repeat around (18 sc).
Rnd 15: *Dec, sc in next st,* repeat around (12 sc).
Rnd 16: Dec around (6 sc). Fasten off yarn leaving 12” length for sewing apple to nut.
Close with Ultimate Finish.
Cashew Nut:
Rnd 1: With tan yarn, ch 2 (or magic ring), 6 sc in 2nd ch from hook (6 sc). Do not join.
Rnd 2: Inc around (12 sc).
Rnds 3-4: Sc in each st.
Rnd 5: Inc 6 times, sc in next 6 sts (18 sc).
Rnd 6: Sc in each st.
Rnd 7: Sc in 6 sts, dec 6 times (12 sc).
Rnds 8-9: Sc in each st.
Rnd 10: *Dec, sc in next 2 sts,* repeat
around (9 sc).
Rnds 11-14: Sc in each st.
Cut pipe cleaner to 6” length, fold in half, insert in cashew and stuff around pipe cleaner.
Rnd 15: *Dec, sc in next st*, repeat around (6 sc).
Rnd 16: Sc in each st.
Rnd 17: *Dec, sc in next st,* repeat once (4 sc). Close with Ultimate Finish. Bend nut into curved shape. If needed, weave yarn through Rnds 10, 9,8, 7 and pull tight to curl up the end.
Sew nut to apple.
Weave in all ends.
This post contains affiliate links. This means I may earn a commission should you chose to sign up for a program or make a purchase using my link. It’s okay – I love all of these companies anyways, and you will too!
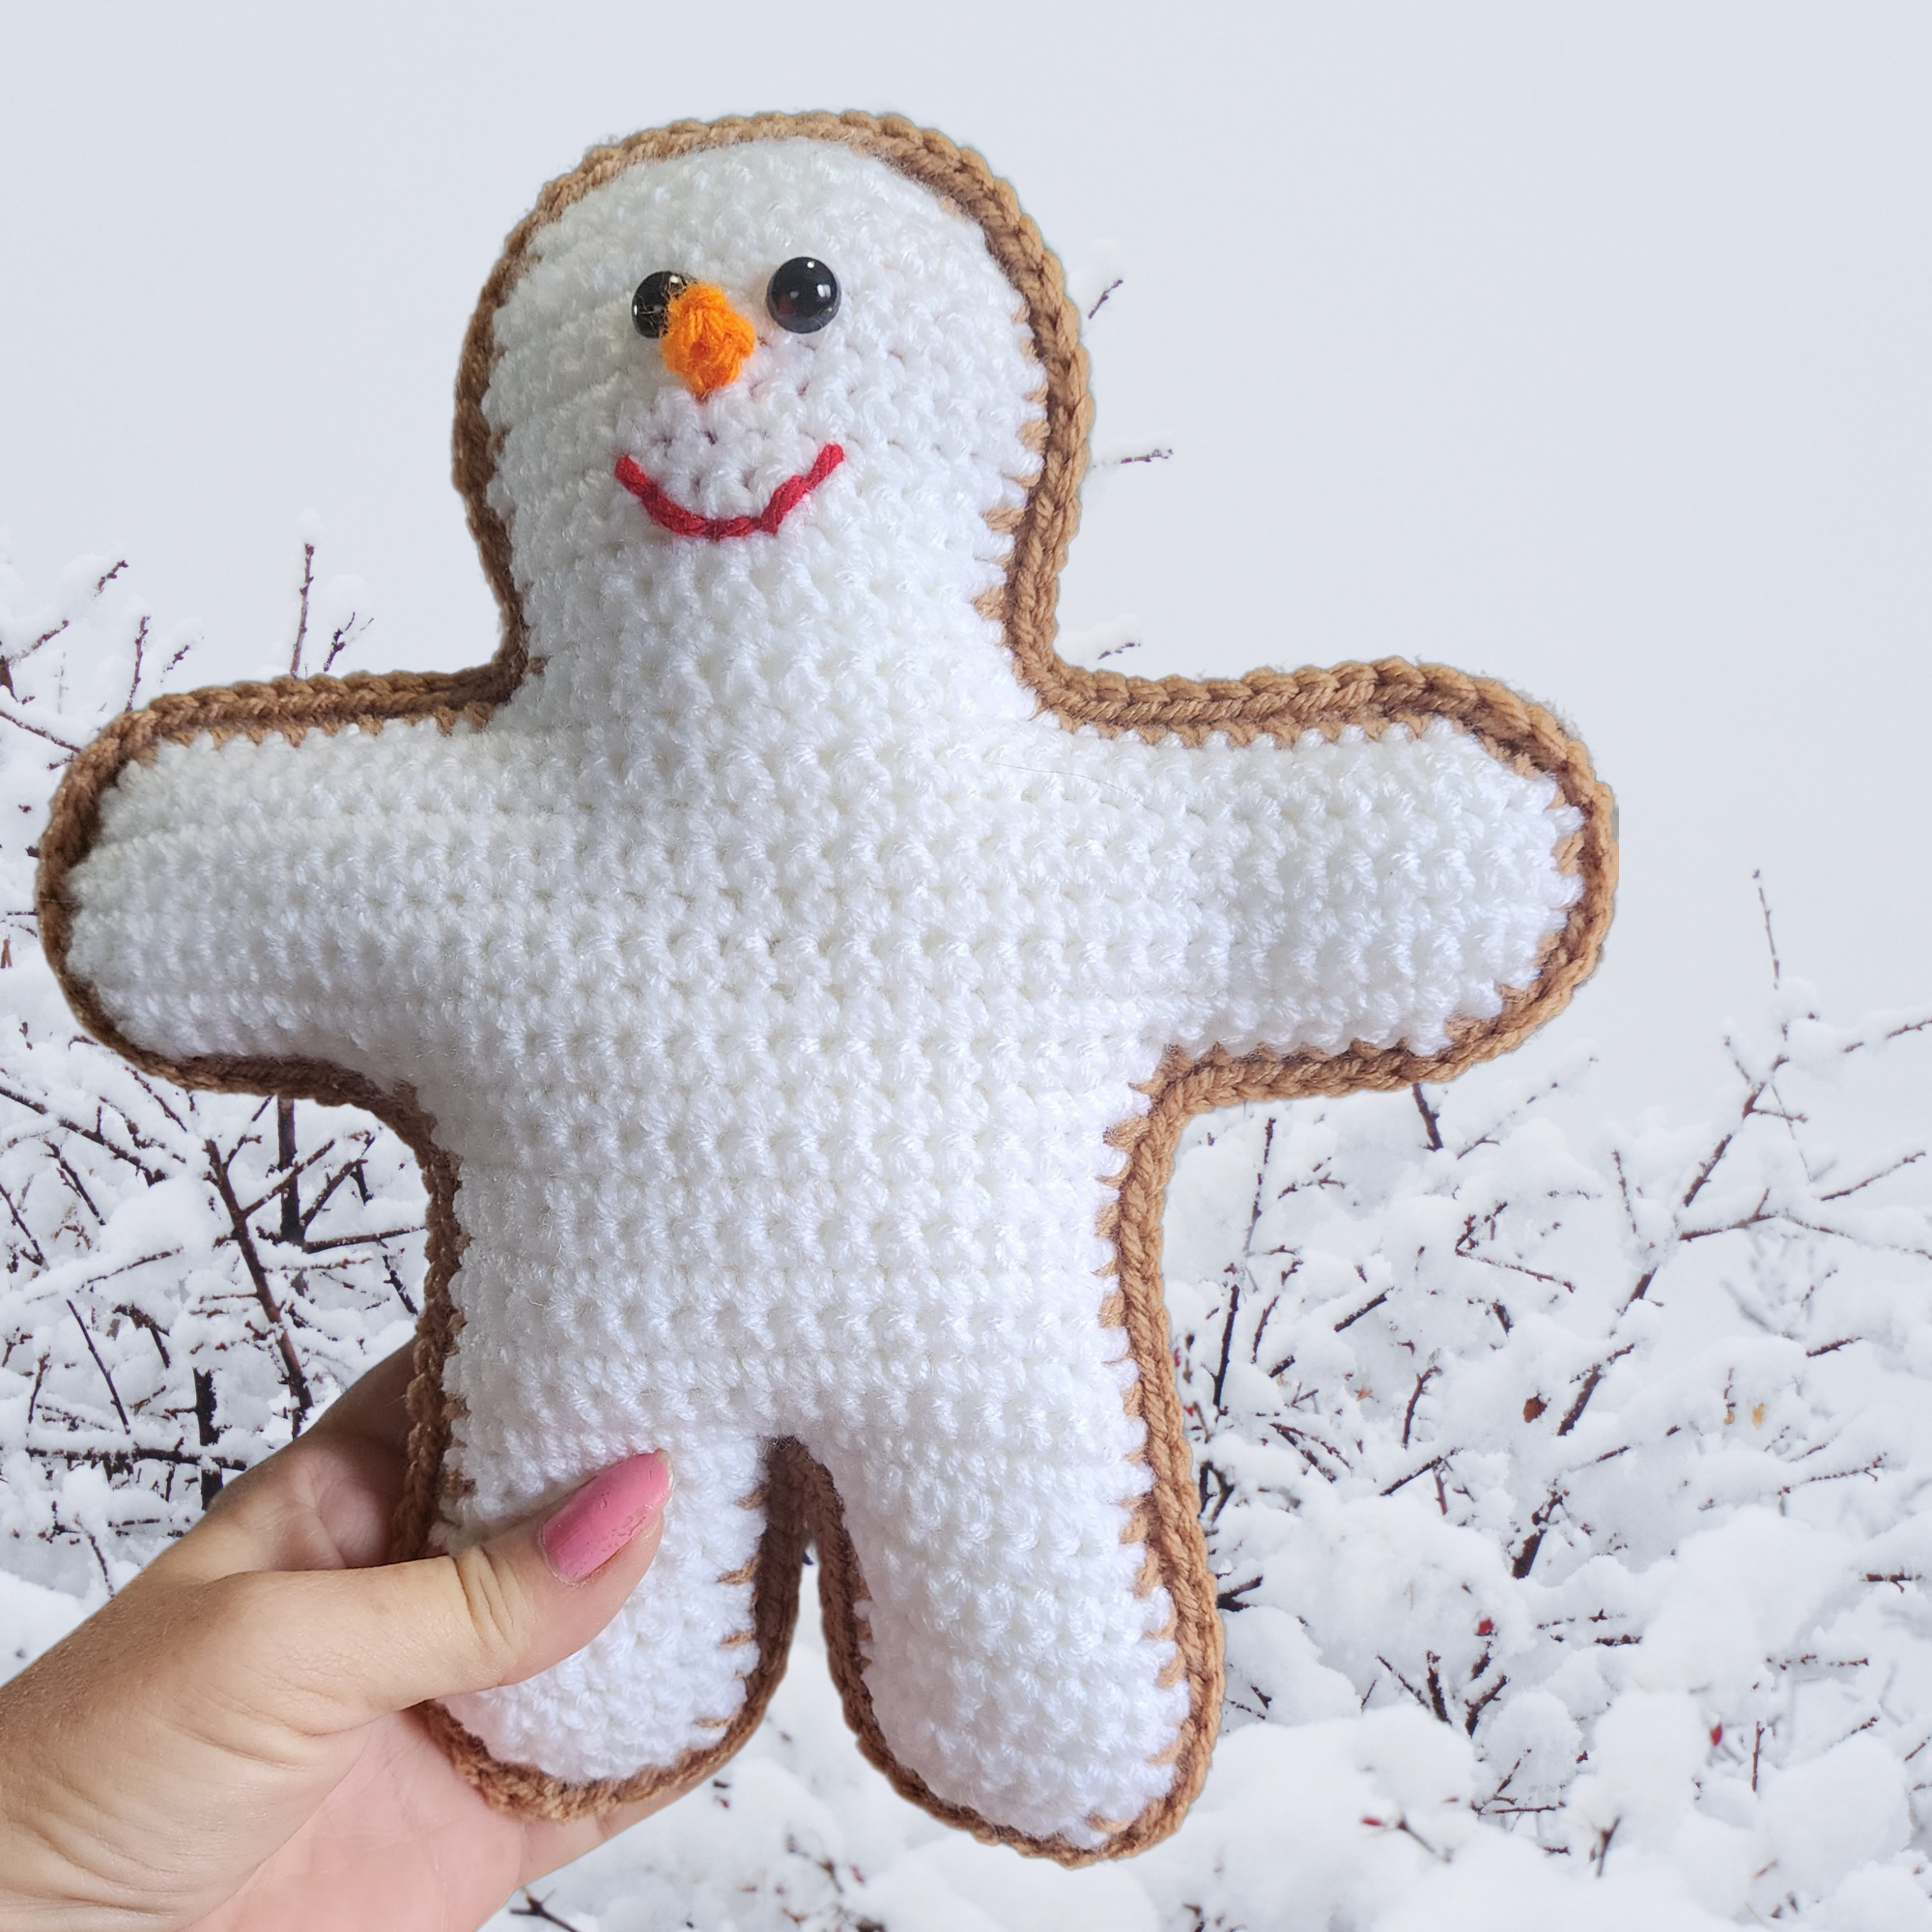
As winter arrives, bringing with it a blanket of snow and a chill in the air, there’s no better way to embrace the season than by crocheting your very own gingerbread snowman doll. This delightful DIY project not only adds a touch of whimsy to your decor but also provides an adorable playmate during winter’s indoor weather.
Materials:
Worsted weight yarn –
95 yards brown
60 yards white
1 yard orange
1 yard red
Crochet hook size G (4.00 mm)
Yarn needle
Fiberfill
8-mm black safety eyes
Gauge: 9 rows = 2”, 8 sc = 2”
Gingerbread snowman measures approximately 10” tall by 9” wide.
Back:
Row 1: With brown yarn, ch 18, sc in 2nd ch from hook and in all remaining ch (17 sc).
Row 2: Ch 1, turn, sc in each st.
Row 3: Ch 1, turn, dec, sc across (16 sc).
Rows 4-8: Ch 1, turn, sc in each st.
Row 9: Ch 1, turn, inc, sc across to last st, inc in last st (18 sc), ch 8.
Row 10: Sc in 2nd ch from hook and in next 6 ch, sc across 18 sts, work 7 fsc (32 sc).
Row 11: Ch 1, turn, inc in first st, sc across to last st, inc in last st (34 sc).
Row 12: Repeat Row 11 (36 sc).
Rows 13-15: Ch 1, turn, sc in each st.
Row 16: Ch 1, turn, dec, sc across to last 2 sts, dec (34 sc).
Row 17: Repeat Row 16 (32 sc).
Row 18: Ch 1, turn, sl st in first 10 sts, sc in next 12 sts, leave last 10 sts unworked (12 sc).
Row 19: Ch 1, turn, dec, sc across to last 2 sts, dec (10 sc).
Row 20: Ch 1, turn, sc in each st.
Row 21: Ch 1, turn, inc in first st, sc across to last st, inc in last st (12 sc).
Row 22: Ch 1, turn, sc in each st.
Row 23: Ch 1, turn, inc in first st, sc across to last st, inc in last st (14 sc).
Rows 24-28: Ch 1, turn, sc in each st.
Row 29: Ch 1, turn, dec, sc across to last 2 sts, dec (12 sc).
Row 30: Ch 1, turn, dec, sc across to last 2 sts, dec (10 sc).
Row 31: Ch 1, turn, dec, sc across to last 2 sts, dec (8 sc). Fasten off brown.
Leg:
Return to Row 1 of back.
Row 1: With wrong side facing, attach yarn at beg of Row 1. Ch 1, sc in next 8 sts. Leave remaining sts unworked.
Row 2: Ch 1, turn, dec, sc in next 5 sts, inc (8 sc).
Row 3: Ch 1, turn, sc in each st.
Row 4: Ch 1, turn, dec, sc in next 5 sts, inc (8 sc).
Rows 5-7: Ch 1, turn, sc in each st.
Row 8: Ch 1, turn, dec, sc in next 4 sts, dec (6 sc).
Row 9: Ch 1, turn, dec, sc in next 2 sts, dec (4 sc). Fasten off.
Other Leg:
Return to Row 1 of back.
Row 1: With wrong side facing, sk 1 st and attach yarn in next st. Ch 1, sc in remaining 8 sts.
Row 2: Ch 1, turn, inc, sc in next 5 sts, dec (8 sc).
Row 3: Ch 1, turn, sc in each st.
Row 4: Ch 1, turn, inc, sc in next 5 sts, dec (8 sc).
Rows 5-7: Ch 1, turn, sc in each st.
Row 8: Ch 1, turn, dec, sc in next 4 sts, dec (6 sc).
Row 9: Ch 1, turn, dec, sc in next 2 sts, dec (4 sc). Do not fasten off.
Edging:
Ch 1, turn, work 1 rnd of sc around entire piece.
Front:
Repeat back and legs with white yarn. Fasten off white yarn when both legs are completed. Before working edging, add face.
Insert safety eyes at Row 26 with 1 st between them.
Nose:
Attach orange yarn in center st of Row 25. Ch 1, dc, fasten off. Weave end through dc and through body. Tie ends tog on back side of piece.
Mouth:
Embroider with red yarn at Rows 22-23.
Edging: Go back to front piece and work edging in brown yarn. Ch 1, do not turn.
Place front on back with wrong sides facing. Sc through both thicknesses. Stuff as you go.
Weave in all ends.
Craft a charming winter wardrobe for your snowman doll using colored felt. Cut out scarves, hats, and any other accessories you desire. Secure them in place with glue or by sewing. Get creative with patterns and colors to make your snowman uniquely yours.
This post contains affiliate links. This means I may earn a commission should you chose to sign up for a program or make a purchase using my link. It’s okay – I love all of these companies anyways, and you will too!
Every November, aviation enthusiasts and professionals across the United States come together to celebrate National Aviation Month. This special month is a time to commemorate the remarkable achievements in the world of aviation, recognize the incredible contributions of pioneers in the field, and inspire the next generation of aviators. In this blog post, we’ll explore the history of aviation, share some fascinating facts, and discuss how you can join in the celebration of National Aviation Month.
The History of Aviation:
National Aviation Month has deep historical roots, dating back to the Wright brothers’ first powered flight in Kitty Hawk, North Carolina, on December 17, 1903. Orville and Wilbur Wright’s groundbreaking achievement marked the beginning of modern aviation and forever changed the way people traveled and connected with one another.
Key Figures and Milestones:
Amelia Earhart: The first female aviator to fly solo across the Atlantic Ocean, Amelia Earhart remains an icon of courage and adventure.
Charles Lindbergh: In 1927, Charles Lindbergh made the historic first non-stop solo transatlantic flight from New York to Paris, becoming an international hero.
The Apollo Program: In 1969, NASA’s Apollo 11 mission saw astronauts Neil Armstrong and Buzz Aldrin become the first humans to walk on the moon.
Commercial Aviation: The introduction of commercial airliners like the Boeing 747 revolutionized air travel, making it more accessible to people worldwide.
Advancements in Space Travel: More recently, the development of reusable rockets by companies like SpaceX has rekindled interest in space exploration and the possibility of interplanetary travel.
Fascinating Facts about Aviation:
The fastest passenger plane, the Concorde, could travel at speeds exceeding 1,350 miles per hour, cutting the time of transatlantic flights in half.
A Boeing 747 is made up of approximately 6 million parts.
The longest non-stop commercial flight, as of my knowledge cutoff date in 2022, was from Singapore to Newark, covering a distance of over 9,500 miles.
There are more planes in the ocean than there are submarines in the sky, highlighting the rarity of underwater aviation.
The Blackbird SR-71, one of the fastest planes ever built, could reach speeds of Mach 3.3, or more than 2,200 miles per hour.
National Aviation Month is a time to celebrate the incredible achievements of aviation pioneers, learn about the history of flight, and embrace the excitement of modern aviation. Whether you’re a seasoned pilot or simply curious about the world of aviation, this month offers numerous opportunities to connect with the aviation community, deepen your knowledge, and appreciate the wonders of human flight. So, spread your wings, and let’s all celebrate the magic of flight during this National Aviation Month!
Rnd 1: Ch 2 (or magic ring), 6 sc in 2nd ch from hook. Do not join. Work in continuous rnds unless otherwise specified.
Rnd 2: 2 sc in each st (12 sc).
Rnd 3: *2 sc in next st, sc in next 3 sts,* repeat around (15 sc).
Rnds 4-11: Sc in each st.
Rnd 12: Inc 3 times, sc in next 12 sts (18 sc).
Rnd 13: *Sc in next st, 2 sc in next st,* 3 times, sc in next 12 sts (21 sc).
Rnd 14: Working in BLO, sc in next 9 sts. Working in both lps, sc in next 12 sts (21 sc). Mark 1st and 9th BLO sts with st marker.
Rnds 15-16: Working in both lps, sc in each st.
Rnd 17: *Dec, sc in next 5 sts,* repeat around (18 sc).
Rnd 18: Sc in each st. Stuff.
Rnd 19: *Dec, sc in next 4 sts,* repeat around (15 sc).
Rnds 20-22: Sc in each st.
Rnd 23: *Dec, sc in next 3 sts,* repeat around (12 sc).
Rnds 24-30: Sc in each st. Fasten off yarn. Finish stuffing. Lay piece flat and sew Rnd 30 closed. You may need to work an additional 1-2 sc so that tail lines up correctly with top of plane.
Cockpit:
Row 1: Attach white yarn to first marked st of Rnd 14 with front of plane facing forward. Sc in this st and in next 8 sts across to 2nd marker (9 sc).
Row 2: Ch 1, turn, dec over first 2 sts, sc in next 5 sts, dec over last 2 sts (7 sc).
Rows 3-5: Ch 1, turn, sc in each st. Fasten off at end of Row 5 with 12” length. Sew Row 5 to Rnd 8 of body and sew sides of cockpit to body of plane.
Wings: (Make 2)
Row 1: With navy yarn, ch 7, sc in 2nd ch and each of the remaining ch (6 sc).
Rows 2-7: Ch 1, turn, inc in first st, sc across (12 sc at end of Row 7). Fasten off with 12” length.
Fold in half and mark a piece of cardboard slightly smaller than half the wing. Sew sides tog with cardboard in the middle. Sew to sides of plane at Rnds 10-15 with angled edge at front.
Tail Fin:
Repeat Rows 1-7 of wing. Mark cardboard in same manner. Sew sides tog with cardboard in the middle. Sew to center of Rnds 25-30 of body with tail fin standing up.
Rear Wings: (Make 2)
Row 1: With navy yarn, ch 5, sc in 2nd ch and each of the remaining ch (4 sc).
Rows 2-4: Ch 1, turn, inc in first st, sc across (7 sc at end of Row 4). Fasten off with 12” length.
Fold in half and mark a piece of cardboard slightly smaller than half the wing. Sew sides tog with cardboard in the middle. Sew to sides of plane with angled edge at front and back of wing even with back of plane.
Weave in all ends.
Glue a star to each side of tail fin and another to top center of plane.
Cut 12” piece of ribbon and lp through top center of plane.
Every year on the first Wednesday in October, National Coffee with a Cop Day brings men and women in uniform together with their communities to connect over a cup of coffee. If you have a member of law enforcement in your family, you’re going to love this new Policeman’s Hat Ornament Crochet Pattern.
This pattern was designed as part of a series for my recent ebook, It’s a Wonderful Life Advent Calendar. The Policeman Hat Ornament symbolizes Bert the Cop, one of George Bailey’s best friends.
Just a few yards of sport or worsted weight yarn are needed for these ornaments. Using your scrap basket, make a few different colors to match the uniforms of different jurisdictions.
Finished ornament measures approximately 2.5″ wide using sport yarn and 3.5” wide using worsted yarn.
Rnd 1: Ch 2 (or magic ring), sc 7 in second ch from hook. Do not join. Work in continuous rnds throughout unless otherwise specified.
Rnd 2: 2 sc in each sc (14 sc).
Rnd 3: *1 sc in next sc, 2 sc in next sc,* repeat around (21 sc).
Rnd 4: *1 sc in next 2 sc, 2 sc in next sc,* repeat around (28 sc).
Rnd 5: *1 sc in next 3 sc, 2 sc in next sc,* repeat around (35 sc).
Rnd 6: *1 sc in next 4 sc, 2 sc in next sc,* repeat around (42 sc).
Rnd 7: *1 sc in next 5 sc, 2 sc in next st,* repeat around (49 sc). Mark felt circle.
Rnd 8: Working in BLO, sc in each sc.
Rnd 9: *Dec, sc in next 5 sc,* repeat around (42 sc).
Rnd 10: *Dec, sc in next 4 sc,* repeat around (35 sc). Insert felt into top of hat and stick (or glue) in place.
Rnd 11: *Dec, sc in next 3 sc,* repeat around (28 sc). (Change colors here for 2-tone hat.)
Rnds 12-13: Sc in each st. Join with sl st at end of Rnd 13. Do not fasten off.
Brim:
Row 14: Ch 1, sc in FLO of next 10 sts, sl st in next st, leave remaining sts unworked (10 sc).
Row 15: Ch 1, turn, sk sl st, dec, sc across (9 sc).
Rows 16-18: Ch 1, turn, dec over first 2 sts, sc across (6 sc at end of Row 18). Fasten off.
Rnd 19: With right side facing, join yarn at back of Rnd 13. Sc in each st to brim, sc in row edges of Rows 14-18, sc in each sc of Rnd 18, sc in other edges of Rows 18-14, sc around remaining sts of Rnd 13. Join with sl st. Fasten off. Weave in all ends.
Measure brim of hat on felt, mark and cut out. Stick (or glue) to inside of brim.
Glue star to front of hat.
Cut 12” piece of ribbon and lp through top center of hat. Decorate as desired.
Download the Ornament Advent Calendar with links to each day’s pattern.
This post contains affiliate links. This means I may earn a commission should you chose to sign up for a program or make a purchase using my link. It’s okay – I love all of these companies anyways, and you will too!
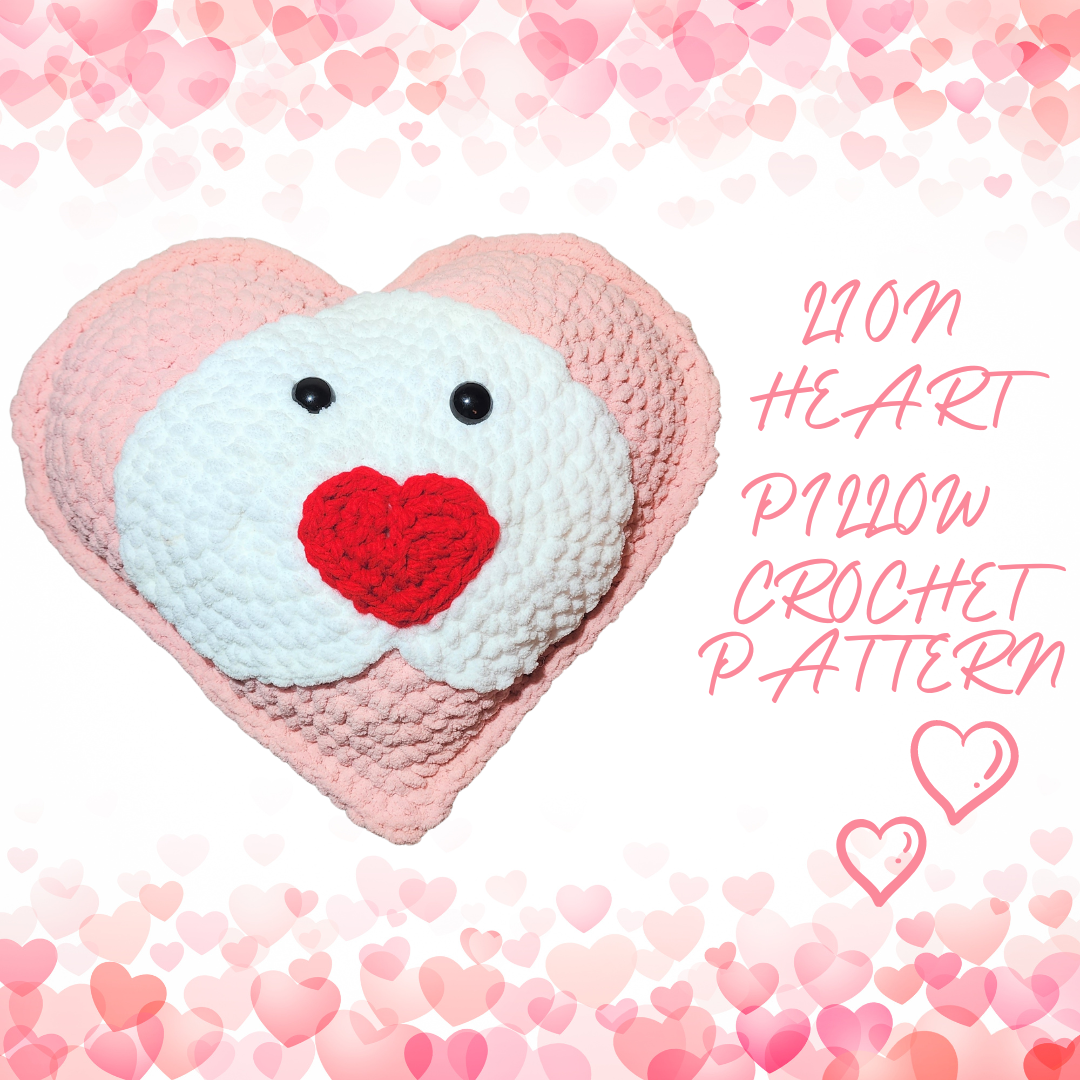
Now that the Christmas holidays are over, and the decorations have been put away for next year (we hope), it’s time to turn our attention to hearts and roses. Valentine’s Day is less than a month away, and I have so many ideas! It’s just so much fun to make cute pink and red animals, I can’t resist. The first Valentine’s Day design for the year is the Lion Heart Pillow, or as I like to call him, King Richard. Using Bernat blanket yarn makes the project go quickly, and he’s just so darned squishy!! Three different sizes of hearts are combined to make this sweet lion pillow for your special someone.
Pillow measures approximately 12” tall by 14” wide.
Gauge: 9 sc = 4”, 8 rows = 4”
Materials:
Bernat Blanket Yarn:
30 yards White
150 yards Pink
2 yards Red
Size M crochet hook
Yarn needle
Fiberfill
20-mm safety eyes
Directions:
MANE:
Rnd 1: With pink yarn, ch 22, 2 sc in 2nd ch from hook, sc in next 9 ch, 3 sc in next ch (2nd sc is center top), sc in next 9 ch, 3 sc in last ch. Working on opposite side of starting ch, sc in next 8 ch, sk 1 ch, sc in next ch (center bottom), sk 1 ch, sc in next 8 ch, sc in last ch (same lp as first ch with 2 sc). Join with sl st. (44 sc)
Rnd 2: Ch 1, 2 sc in first 2 sts, sc in next 8 sts, 3 sc in next st (2nd sc is center), sc in next 8 sts, 2 sc in each of next 3 sts, sc in next 7 sts, sk 1 st, sc in next st (center), sk 1 st, sc in next 7 sts, 2 sc in last st. Join with sl st. (50 sc)
Rnd 3: Ch 1, *sc in next st, 2 sc in next st,* repeat once, sc in next 9 sts, 3 sc in next st (2nd sc is center), sc in next 9 sts, repeat * to * 3 times, sc in next 6 sts, sk 1 st, sc in next st (center), sk 1 st, sc in next 6 sts, repeat * to * once. Join with sl st. (56 sc)
Rnd 4: Ch 1, *sc in next 2 sts, 2 sc in next st,* repeat once, sc in next 10 sts, 3 sc in next st (2nd sc is center), sc in next 10 sts, repeat * to * 3 times, sc in next 5 sts, sk 1 st, sc in next st (center), sk 1 st, sc in next 5 sts, repeat * to * once. Join with sl st. (62 sc)
Rnd 5: Ch 1, *sc in next 3 sts, 2 sc in next st,* repeat once, sc in next 11 sts, 3 sc in next st (2nd sc is center top), sc in next 11 sts, repeat * to * 3 times, sc in next 4 sts, sk 1 st, sc in next st (center), sk 1 st, sc in next 4 sts, repeat * to * once. Join with sl st. (68 sc)
Rnd 6: Ch 1, *sc in next 4 sts, 2 sc in next st,* repeat once, sc in next 12 sts, 3 sc in next st (2nd sc is center), sc in next 12 sts, repeat * to * 3 times, sc in next 3 sts, sk 1 st, sc in next st (center), sk 1 st, sc in next 3 sts, repeat * to * once. Join with sl st. (74 sc)
Rnd 7: Ch 1, *sc in next 5 sts, 2 sc in next st,* repeat once, sc in next 13 sts, 3 sc in next st (2nd sc is center), sc in next 13 sts, repeat * to * 3 times, sc in next 2 sts, sk 1 st, sc in next st (center), sk 1 st, sc in next 2 sts, repeat * to * once. Join with sl st. (80 sc)
Rnd 8: Ch 1, *sc in next 6 sts, 2 sc in next st,* repeat once, sc in next 14 sts, 3 sc in next st (2nd sc is center), sc in next 14 sts, repeat * to * 3 times, sc in next st, sk 1 st, sc in next st (center), sk 1 st, sc in next st, repeat * to * once. Join with sl st. (86 sc)
Rnd 9: Ch 1, *sc in next 7 sts, 2 sc in next st,* repeat once, sc in next 15 sts, 3 sc in next st (2nd sc is center), sc in next 15 sts, repeat * to * 3 times, sk 1 st, sc in next st (center), sk 1 st, repeat * to * once. Join with sl st. (94 sc)
Fasten off pink.
Blocking is preferred to allow pieces to lay flat.
FACE:
Rnd 1: With white yarn, ch 16, 2 sc in 2nd ch from hook, sc in next 6 ch, 3 sc in next ch (2nd sc is center), sc in next 6 ch, 3 sc in last ch. Working on opposite side of starting ch, sc in next 5 ch, sk 1 ch, sc in next ch (center), sk 1 ch, sc in next 5 ch, sc in last ch (same lp as first ch with 2 sc). Join with sl st. (32 sc)
Rnd 2: Ch 1, 2 sc in next 2 sts, sc in next 7 sts, 3 sc in next st (2nd sc is center), sc in next 7 sts, 2 sc in next 3 sts, sc in next 4 sts, sk 1 st, sc in next st (center), sk 1 st, sc in next 4 sts, sc in last st (same as first sc with 2 sc). Join with sl st. (38 sc)
Rnd 3: Ch 1, *sc in next st, 2 sc in next st,* twice, sc in next 8 sts, 3 sc in next st (2nd sc is center), sc in next 8 sts, repeat * to * 3 times, sc in next 3 sts, sk 1 st, sc in next st (center), sk 1 st, sc in next 3 sts, repeat * to * once. Join with sl st. (44 sc)
Rnd 4: Ch 1, *sc in next 2 sts, 2 sc in next st,* twice, sc in next 9 sts, 3 sc in next st (2nd sc is center), sc in next 9 sts, repeat * to * 3 times, sc in next 2 sts, sk 1 st, sc in next st (center), sk 1 st, sc in next 2 sts, repeat * to * once. Join with sl st. (50 sc)
Rnd 5: Ch 1, *sc in next 3 sts, 2 sc in next st,* twice, sc in next 10 sts, 3 sc in next st (2nd sc is center), sc in next 10 sts, repeat * to * 3 times, sc in next st, sk 1 st, sc in next st (center), sk 1 st, sc in next st, repeat * to * once. Join with sl st. (56 sc)
Rnd 6: Ch 1, *sc in next 4 sts, 2 sc in next st,* twice, sc in next 11 sts, 3 sc in next st (2nd sc is center), sc in next 11 sts, repeat * to * 3 times, sk 1 st, sc in next st (center), sk 1 st, repeat * to * once. Join with sl st. (62 sc)
Fasten off white.
NOSE:
Rnd 1: With red yarn, ch 8, 2 sc in 2nd ch from hook, sc in next 2 ch, 3 sc in next ch (2nd sc is center), sc in next 2 ch, 3 sc in last ch. Working on opposite side of starting ch, sc in next ch, sk 1 ch, sc in next ch (center), sk 1 ch, sc in next ch, sc in last ch (same lp as first ch with 2 sc). Join with sl st. (16 sc)
Rnd 2: Ch 1, 2 sc in next 2 sts, sc in next 3 sts, 3 sc in next st, sc in next 3 sts, 2 sc in next 3 sts, sk next st, sc in next st, sk next st, 2 sc in next st. (22 sc) Fasten off red.
Sew red heart (right side up) on the bottom half of the white heart (upside down). Sew white heart (upside down) centered on top of pink heart (right side up). Insert safety eyes at Rnd 3 of white heart, approximately 2” apart.
EDGING:
Place both large hearts wrong sides together and crochet through both pieces to join. Pin in place with one pin marking the center bottom.
Insert hook at st after bottom center marker (through both thicknesses). Sc in this st, sc in next 20 sts, *sc in next st, sc in next 5 sts,* 3 times, sc in next 5 sts, sk 1 st, sc in next st (center top), sk next st, sc in next 5 sts, (sc in next 5 sts, 2 sc in next st,* 3 times. Begin stuffing pillow.
Sc in each remaining st with 3 sc in marked st (center bottom), stuffing as you go. Join with sl st.
Fasten off yarn. Weave in all ends.
ID used to identify users for 24 hours after last activity
24 hours
_gat
Used to monitor number of Google Analytics server requests when using Google Tag Manager
1 minute
_gac_
Contains information related to marketing campaigns of the user. These are shared with Google AdWords / Google Ads when the Google Ads and Google Analytics accounts are linked together.
90 days
__utma
ID used to identify users and sessions
2 years after last activity
__utmt
Used to monitor number of Google Analytics server requests
10 minutes
__utmb
Used to distinguish new sessions and visits. This cookie is set when the GA.js javascript library is loaded and there is no existing __utmb cookie. The cookie is updated every time data is sent to the Google Analytics server.
30 minutes after last activity
__utmc
Used only with old Urchin versions of Google Analytics and not with GA.js. Was used to distinguish between new sessions and visits at the end of a session.
End of session (browser)
__utmz
Contains information about the traffic source or campaign that directed user to the website. The cookie is set when the GA.js javascript is loaded and updated when data is sent to the Google Anaytics server
6 months after last activity
__utmv
Contains custom information set by the web developer via the _setCustomVar method in Google Analytics. This cookie is updated every time new data is sent to the Google Analytics server.
2 years after last activity
__utmx
Used to determine whether a user is included in an A / B or Multivariate test.
18 months
_ga
ID used to identify users
2 years
_gali
Used by Google Analytics to determine which links on a page are being clicked
30 seconds
_ga_
ID used to identify users
2 years
Marketing cookies are used to follow visitors to websites. The intention is to show ads that are relevant and engaging to the individual user.
Pinterest Tag is a web analytics service that tracks and reports website traffic.
Unique value with which users can be identified by X. Collected information is used to be personalize X services, including X trends, stories, ads and suggestions.
2 years
external_referer
Our Website uses X buttons to allow our visitors to follow our promotional X feeds, and sometimes embed feeds on our Website.
2 years
guest_id
This cookie is set by X to identify and track the website visitor. Registers if a users is signed in the X platform and collects information about ad preferences.