Posted on 8 Comments

Lover’s Eye Necklace Crochet Pattern

lover's eye necklace

In 1785, Prince George or Wales commissioned a tiny portrait of his eye and sent it to his beloved, Maria Anne Fitzherbert, to convince her to marry him. It worked, and they were married shortly thereafter. The Prince then commissioned a portrait of Fitzherbert’s eye so that he might have her with him all the time. The tiny portraits became popular in England in the late 18th century. Some commissioned them as a token of affection for their lover, and others used them as a memento of a departed family member.

These necklaces have gained a new popularity with the show Bridgerton. If you follow the show, you have likely noticed that Marina wears a lover’s eye necklace on a strand of pearls.

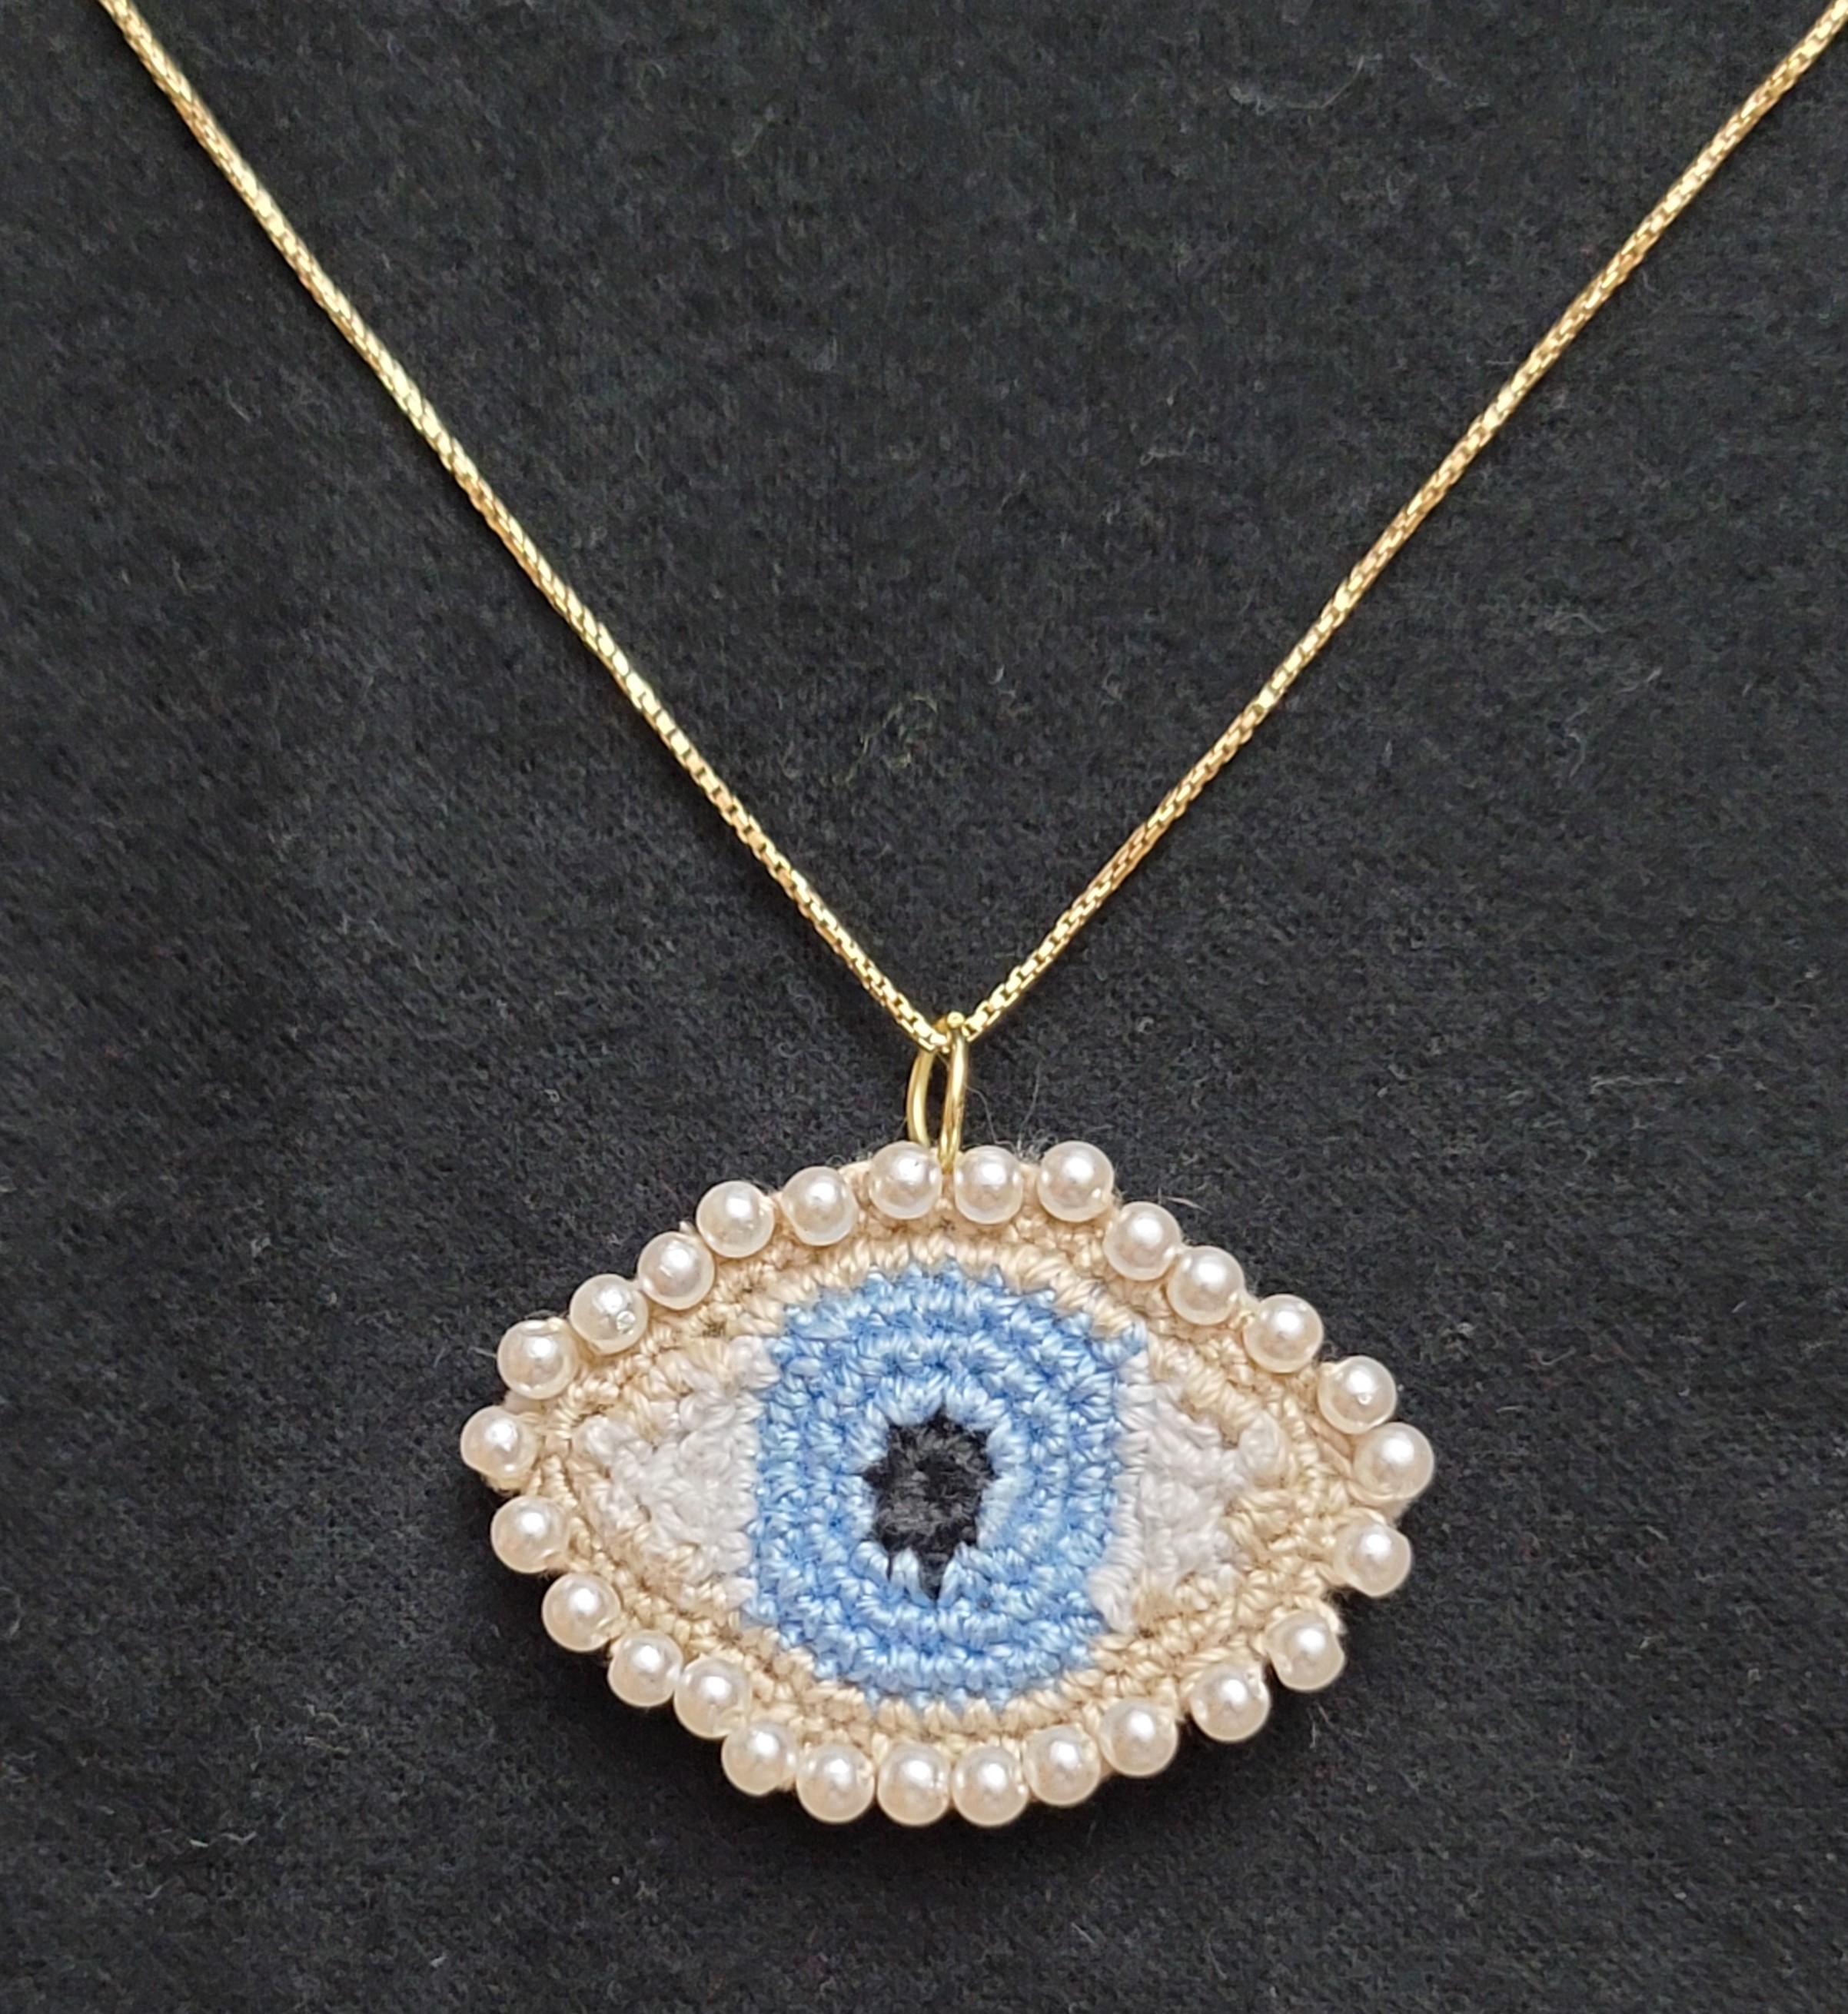
You can crochet your own lover’s eye for a necklace or brooch. This simple pattern takes only an evening to complete and measures approximately 2” wide by 1.25” tall.

lover's eye necklace

Materials:

#10 crochet cotton yarn

4 yards tan

2 yards white

3 yards blue (or desired eye color)

1 yard black

Size 7 steel crochet hook

Crewel needle

28, 4-mm pearl beads

Small piece of tan felt

Jump ring and chain for necklace or pin for brooch

Rnd 1: With black thread, ch 2 (or magic circle), 8 sc in 2nd ch from hook (8 sc). Join with sl st. Fasten off black.

Rnd 2: With blue thread, ch 1, 2 sc in each st (16 sc). Join with sl st.

Rnd 3: Ch 1, *sc in next st, 2 sc in next st,* repeat around. Join with sl st. (24 sc).

Rnd 4: Ch 1, *sc in next 2 sts, 2 sc in next st,* repeat around. Join with sl st. (32 sc). Fasten off blue.

Row 5: Attach white thread, ch 1, sc in same sts, sc in next 6 sts. (7 sc).

Row 6: Ch 1, turn, sc in next 2 sts, work 3 sc tog, sc in next 2 sts (5 sc).

Row 7: Ch 1, turn, sc in next st, work 3 sc tog, sc in next st (3 sc).

Row 8: Ch 1, turn, sc last 3 sts tog. Fasten off white.

Return to Rnd 4, sk 9 sts, and rep Rows 5-8 on the other side of the iris.

lover's eye necklace


Before beginning Rnd 9, thread about 30 beads onto tan thread.

Rnd 9: Attach tan thread at bottom of eye of edge of Row 8 (marked by arrow). Ch 1, sc in same st, sc in ends of Rows 7, 6, and 5. *Working across iris, sc in next 2 sts, 2 sc in next st, sc in next 3 sts, 2 sc in next st, sc in next 2 sts, sc in ends of Rows 5, 6, and 7, 2 sc in end of Row 8.* On top of eye, sc in ends of Rows 8, 7, 6, and 5, rep * to *. Join with sl st (40 sc).

Rnd 10: Ch 1, *2 sc in next st, sc in next 4 sts,* repeat around (48 sc). Join with sl st.

Rnd 11: Ch 1, turn, *sl st in next st including one bead in st, sl st in next st,* repeat around. Join with sl st. Fasten off tan leaving 12” tail. Thread tail through needle and sew in place any beads that are out of line.

To get an ad-free PDF version of the pattern, please visit Lover’s Eye Necklace Crochet Pattern.

More Valentine’s Day Gift Ideas

valentine's day card

Valentine’s Day Card free PDF download

valentine bat


Valentine’s Day Bat Amigurumi


Cupid's Arrow Baby Rattle Crochet Pattern


Cupid’s Arrow Baby Rattle Crochet Pattern


Valentine’s Day Advent Calendar Crochet Patterns – Puppy Love Slippers Crochet Pattern

ICYMI (In Case You Missed It)

puppy love


Puppy Love Dog Toy Crochet Pattern


rabbit crochet patterns


Rabbits/Bunnies


lion heart pillow


Lion Heart Pillow Crochet Pattern


made with love


Carnation Gift Tag


Affiliate Links

This page contains affiliate links. If you choose to purchase after clicking a link, I may receive a commission at no extra cost to you.


Posted on 8 Comments

Snowflake Kitchen Boa Crochet Pattern in Tunisian Stitch

Snowflake Kitchen Boa Crochet Pattern in Tunisian Stitch

If you’ve ever looked at a crochet project and thought, “That almost looks knitted,” chances are it was made using Tunisian crochet.

Tunisian stitch is a beautiful technique that blends the look of knitting with the comfort of crochet — and the best part? It’s much easier to learn than it looks.

If you’re ready to try something new with your yarn, this is a great place to start.


What Is Tunisian Crochet?

Tunisian crochet uses a long hook (similar to a knitting needle with a hook on the end) and works in two steps:

  1. Forward pass – you pick up loops across the row

  2. Return pass – you work those loops back off the hook

Unlike regular crochet, you don’t turn your work after every row. This creates a thicker fabric with gorgeous texture.


Why Crocheters Love Tunisian Stitch

Tunisian crochet is popular because it:

  • Creates a knit-like look

  • Has beautiful texture

  • Makes a warm, sturdy fabric

  • Is perfect for blankets, scarves, hats, and dishcloths

  • Uses familiar crochet motions — just slightly different

It’s a wonderful next step once you’re comfortable with basic crochet stitches.


The Basic Tunisian Simple Stitch (TSS)

The Tunisian Simple Stitch is usually the first stitch beginners learn.

Here’s the basic idea:

  • Insert your hook under the vertical bar

  • Yarn over and pull up a loop

  • Leave the loop on the hook

You repeat this across the row, then work the return pass by yarn over and pulling through loops until one loop remains.

That’s it — you’ve just completed a Tunisian row!

Snowflake Kitchen Boa Crochet Pattern in Tunisian Stitch


I made several styles of kitchen boas for Christmas gifts, and this is one that can brighten up your kitchen throughout the winter. If you’re well versed in Tunisian stitch, this will be a simple project for you. If you’ve never done it before, this is the perfect easy project to learn Tunisian or afghan stitch. There’s also a YouTube tutorial to help you through it. https://youtu.be/_4QHPqtdys4

Materials:

I Love This Cotton worsted weight yarn

3.5 oz blue

1 oz. white

Crochet hook size G (4.0 mm)

Yarn needle

8” x 20” (20 cm x 51 cm) Kitchen Towel

Needle and Thread


Directions:

Row 1: With blue yarn, ch 20, Tunisian st in 2nd ch and each rem ch (19 sc). This should measure approximately 4” across.

Row 2: Work in Tunisian st until piece measures 37”. Bind off blue yarn. When sewn to both sides of the kitchen towel, the boa will measure approximately 68”. If shorter or longer boa is needed, adjust the length of the crocheted piece.

Work snowflake pattern in white yarn using cross-stitch (or duplicate st if you prefer). Skip 2 rows and work another snowflake above it. Repeat 2 snowflakes on opposite end.

Snowflake Chart
Cross-Stitch Chart


Cut towel in half and serge or zigzag raw edges. Fold edges to middle and sew edge.

Fold edges again to middle and sew in place. This will give you a width of approximately 4”.

Hand sew or machine sew this edge of towel to back side of crocheted piece.

Block boa and weave in all ends.

PDF download is available at Snowflake Kitchen Boa Crochet Pattern in Tunisian Stitch


January’s New Designs

Pink Power Pillow Crochet Pattern - Rainbow Power Pillow Crochet Pattern
Pink Power Pillow Crochet Pattern – Rainbow Power Pillow Crochet Pattern


Lover's Eye Necklace Crochet Pattern

Lover’s Eye Necklace Crochet Pattern


Coming Soon

February will be an amazing month for blog roundups including:


Affiliate Links

This post contains affiliate links. This means I may earn a commission should you chose to sign up for a program or make a purchase using my link. It’s okay – I love all of these companies anyways, and you will too!

Lion Brand Yarn
Black Friday Sale – up to 70% off bundles


Amazon affiliate: https://amzn.to/4hkS5Zd