Posted on — 4 Comments

🦥 Crochet Slow and Sip Happy: Sloth Tumbler Boot Crochet Pattern

🦥 Crochet Slow and Sip Happy: Sloth Tumbler Boot Pattern

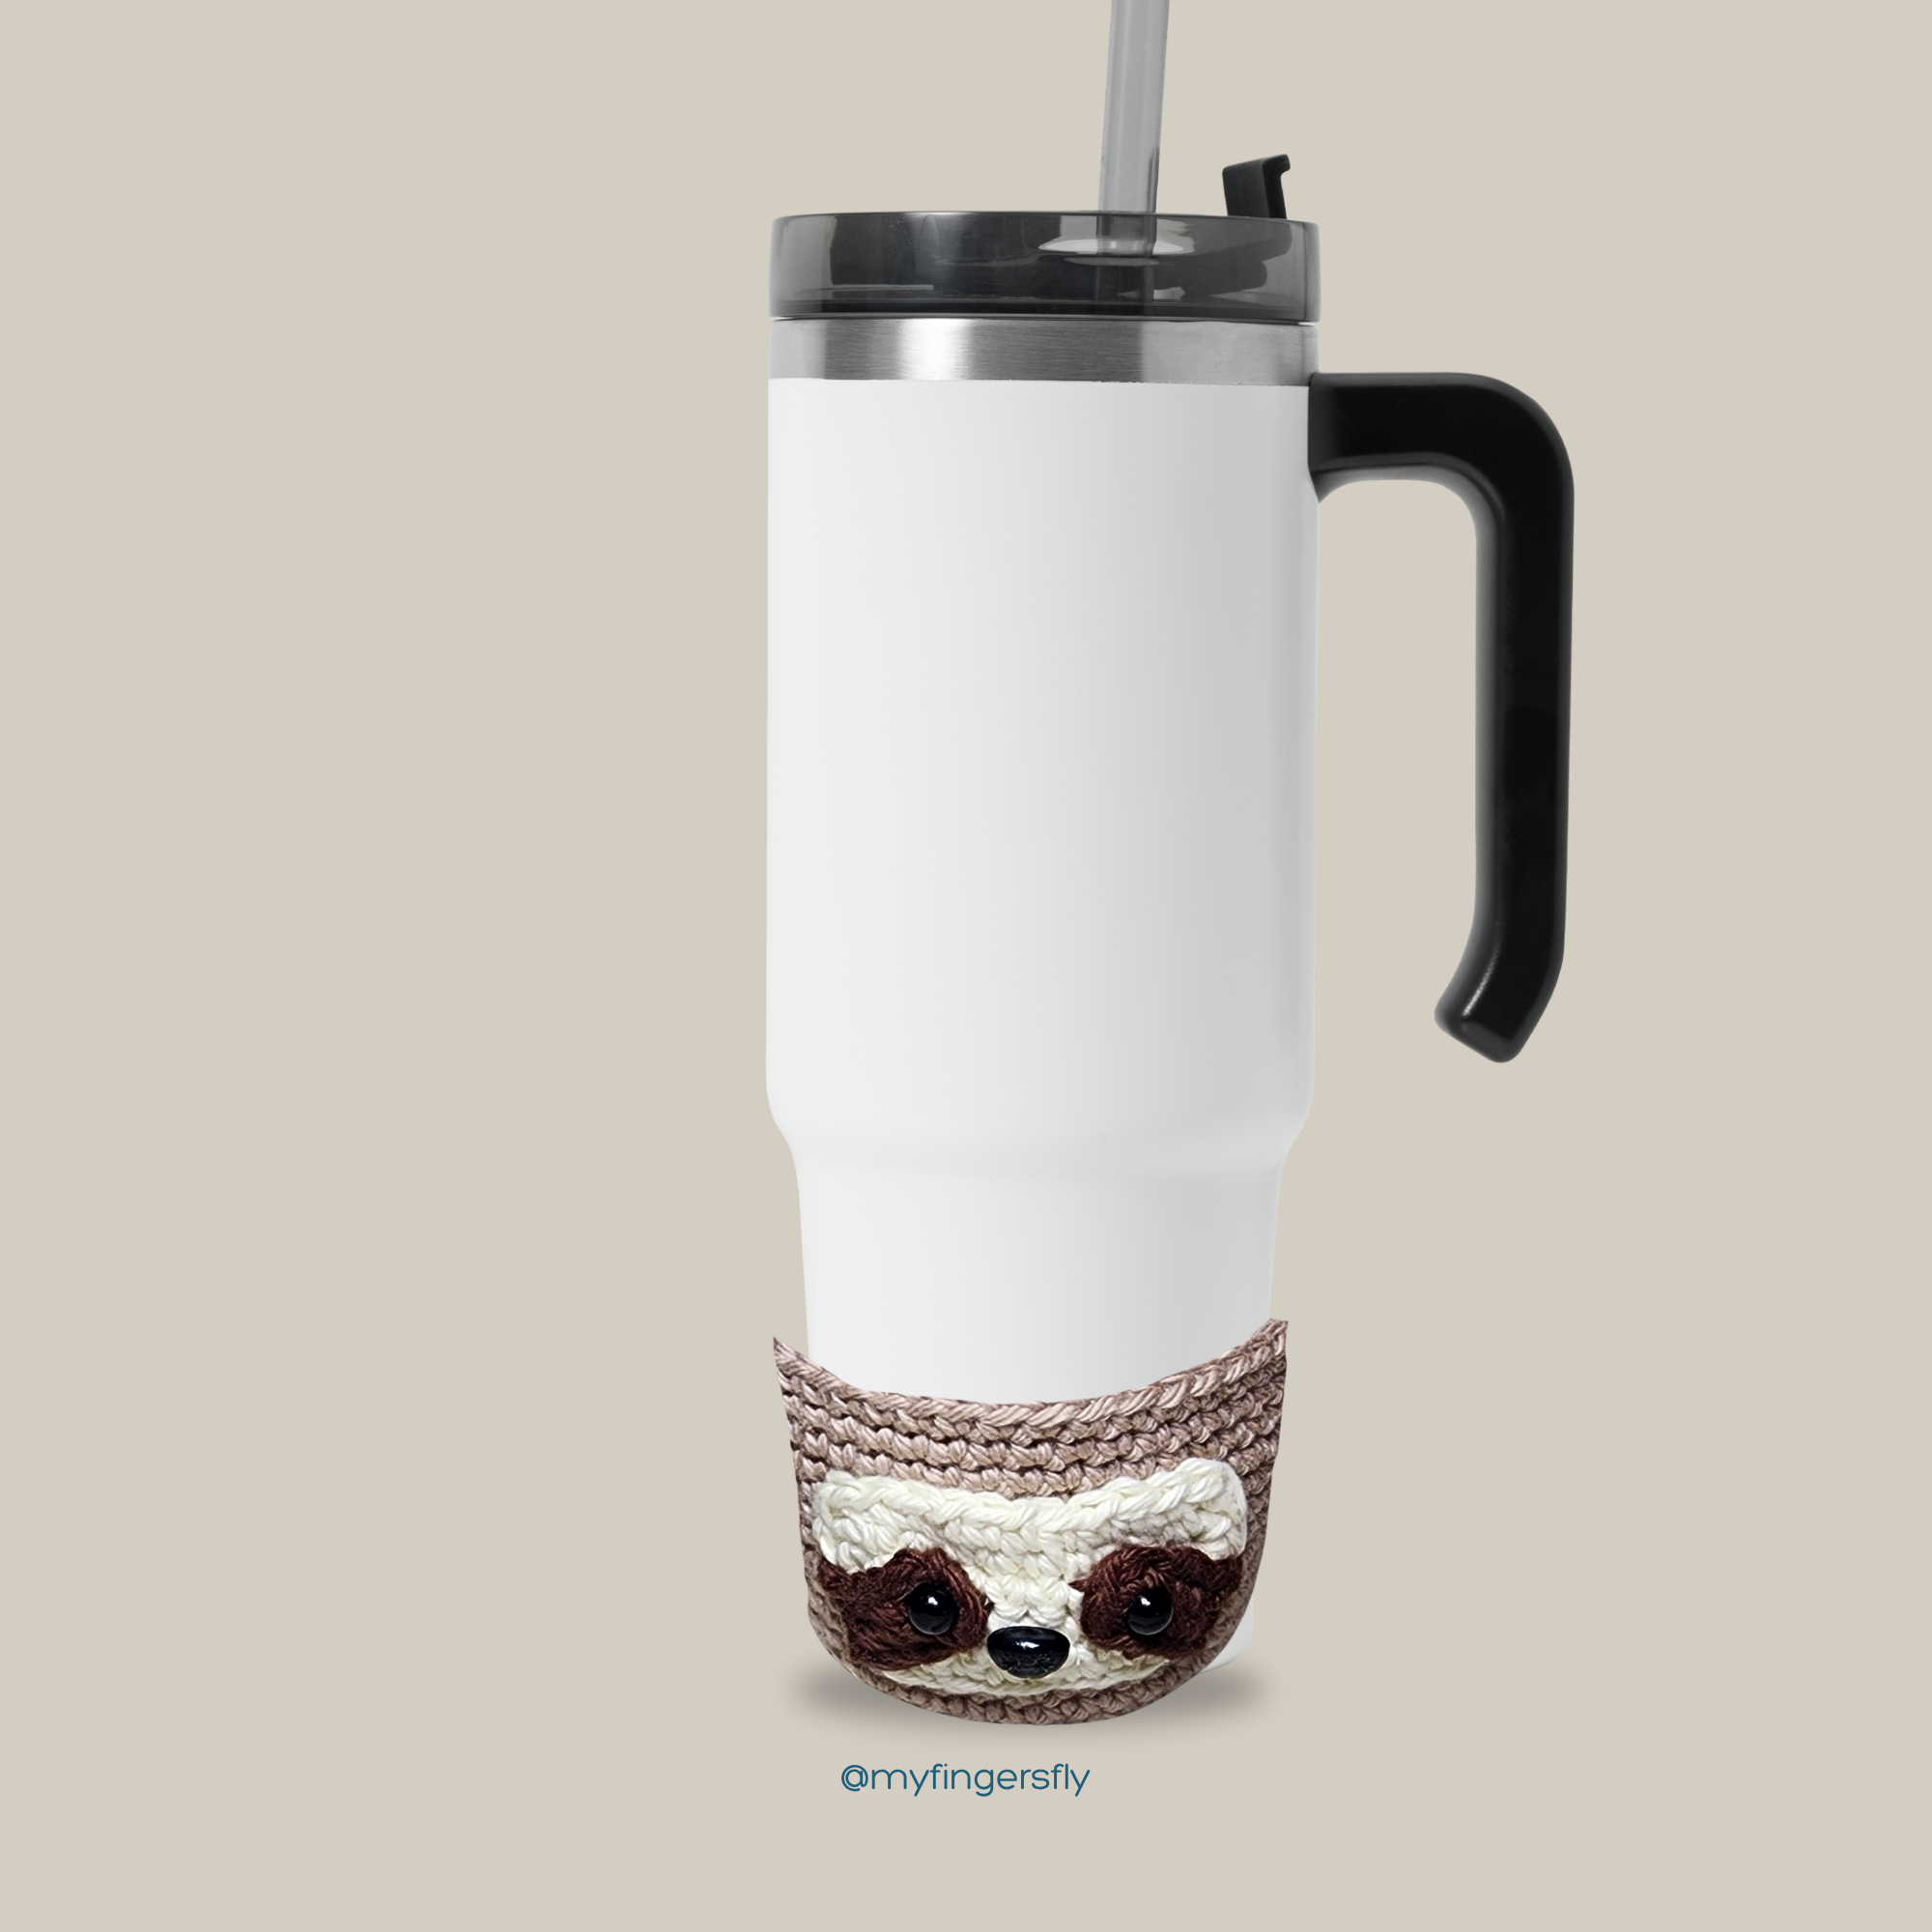
There’s nothing better than relaxing with your favorite drink—unless, of course, it’s paired with an adorable crochet sloth! Meet your new favorite handmade accessory: the Sloth Tumbler Boot, a cozy, cute way to dress up your cup.

Whether you’re heading out with your iced coffee or enjoying tea at your desk, this little sloth is ready to hang out and keep things cozy.

What Is a Tumbler Boot?

A tumbler boot is a snug sleeve that fits the bottom of your tumbler or water bottle, helping to prevent scratches, absorb condensation, and add a personal touch. This sloth version brings plenty of personality—with floppy arms, a sweet sleepy face, and a charming handmade feel.

✨ What You’ll Love About This Pattern:

  • Beginner-Friendly: This pattern uses basic stitches, so it’s perfect for confident beginners or anyone wanting a quick, satisfying project.

  • Fits Standard Tumblers: Designed for most 16–20 oz tumblers. Tumbler boot measures approximately 2.25” tall by 3” diameter across bottom. It slightly tapers up to fit tumbler and measures 3.5” diameter across top.

  • Makes a Great Gift: Sloth fans, teachers, teens, and crochet lovers will adore this thoughtful handmade touch.

🧵 Materials You’ll Need:

  • Cotton worsted weight yarn (in sloth-inspired colors)

  • Size G (4.0 mm) crochet hook

  • Safety eyes and safety nose or black yarn for embroidery

  • Yarn needle and scissors

💡 Ideas for Use:

  • Match your boot to the seasons—use bright colors for summer or earthy tones for fall.

  • Make a few for your next craft fair.

  • Personalize it with embroidery or initials.


Ready to Crochet Your Sloth Buddy?
You can grab the PDF of the Sloth Tumbler Boot Crochet Pattern at this link: Sloth Tumbler Boot Crochet Pattern

Start stitching up some slow-sippin’ cuteness today. Don’t forget to tag me in your creations—I love seeing your handmade sloths in the wild! 🦥💕

Materials:

Cotton worsted weight yarn:

70 yards tan

7 yards ivory

2 yards brown

Size G (4.0 mm) crochet hook

Yarn needle

8-mm black safety eyes

10-mm black safety nose


Gauge: 5 rows = 1”, 4 sc = 1”

Directions:

Head:

Rnd 1: With tan yarn, ch 2 (or magic ring), sc 6 in second ch from hook. Do not join. Work in continuous rnds throughout unless otherwise specified.

Rnd 2: 2 sc in each sc (12 sc).

Rnd 3: *1 sc in next sc, 2 sc in next sc,* repeat around (18 sc).

Rnd 4: *1 sc in next 2 sc, 2 sc in next sc,* repeat around (24 sc).

Rnd 5: *1 sc in next 3 sc, 2 sc in next sc,* repeat around (30 sc).

Rnd 6: *1 sc in next 4 sc, 2 sc in next sc,* repeat around (36 sc). Join with sl st.

Rnd 7: Working in BLO, sc in each st.

Rnd 8: Working in both loops, sc in each sc around.

Rnd 9: *Sc in next 11 sts, 2 sc in next st,* repeat twice (39 sc).

Rnds 10-12: Sc in each st.

Rnd 13: *Sc in next 12 sts, 2 sc in next st,* repeat twice (42 sc).

Rnds 14-16: Sc in each st.

Rnd 17: *Sc in next 13 sts, 2 sc in next st,* repeat twice (45 sc).

Rnds 18-20: Sc in each st. Join with sl st at end of Rnd 20. Fasten off tan yarn.

Face:

Row 1: With ivory yarn, ch 12, sc in 2nd ch from hook and in each remaining ch (11 sc).

Row 2: Ch 1, turn, sc in each st.

Rows 3-4: Ch 1, turn, dec over first 2 sts, sc across to last 2 sts, dec (7 sc at end of Row 4).

Ch 1, turn, sc around entire piece with 2 sc in each corner. Join with sl st. Fasten off ivory yarn leaving 12” length for sewing.

Eye patches: (Make 2)

Rnd 1: With brown yarn, ch 5, sc in second ch from hook, sc in next 2 ch, 4 sc in last ch. Working on opposite side of foundation ch, sc in next 3 ch. Fasten off brown. Insert safety eyes into last ch of Rnd 1 at base of 4 sc. After securing backs on eyes, the stem will need to be trimmed or burned to allow eye to sit flush to face.

Sew eye patches to face with edges matching edge of face and curved portion toward center of face.


Insert safety nose between eyes and burn (or trim) backs in the same manner as eyes.


Sew face to head at Rnds 10-17.


Zoo Blog Hop Day 12 – Sloth


ICYMI (In Case You Missed It)

Cat Keychain
Bearded Monkey Amigurumi
Octopus Vent Clip
Saturn Doll Amigurumi


Affiliate Links

This post contains affiliate links. This means I may earn a commission should you chose to sign up for a program or make a purchase using my link. It’s okay – I love all of these companies anyways, and you will too!


I’m so proud to have my designs featured on Lion Brand Yarn Pattern Marketplace. Not only can you purchase great designs, but you can also purchase the yarn and supplies you need to make them.

Baby Gator Amigurumi Crochet Pattern: https://shrsl.com/4wth3


Amazon affiliate: https://amzn.to/4hkS5Zd
Best Seller on Amazon Haul


https://amzn.to/4joumZG


Posted on — Leave a comment

Saturn Amigurumi is the Weekly Featured Pattern

When you think of planets with a little extra flair, Saturn is probably the first that comes to mind — and for good reason. With its iconic rings and mysterious moons, Saturn stands out as one of the most fascinating planets in our solar system. This week’s weekly featured pattern celebrates the sixth planet from the sun with this adorable Saturn Doll. Please head over to the link below to receive the pattern link and coupon code. This sale will run until June 15, 2025

outer space gift tag


Outer Space Gift Tags


Outer Space Patterns


koala crochet pattern


Zoo Blog Hop Day 9 – Koalas

🐨 Koala Day in the Zoo Crochet Blog Hop – Let’s Get Wild with Yarn!

Welcome to Koala Day in the Zoo Blog Hop — where each day we’re celebrating a different animal you’d find at the zoo… in the softest, squishiest way possible: with yarn! 🧶🦓🦁🐨

Today’s spotlight animal is one of the cuddliest, calmest creatures of them all — the koala!

Cute and cuddly, these Koala Patterns are sure to please your family. Choose from 3 adorable plush toys or an eyeglass holder (or make them all). There’s also a dot-to-dot worksheet for some summer fun!

Zoo Blog Hop Day 9 – Koalas

Facebook Contest

Don’t forget about the contest we’re having over on Facebook.
To enter, visit the blog hop and crochet any of the amazing designs you find there – over 80 designs from 17 indie designers from which to choose. Post a photo of your make in My Fingers Fly Family group on Facebook. The photo with the most likes at the end of the month wins!!
Winner will get a choice of one free ebook from my Ravelry shop.

ICYMI (In Case You Missed It)

First Aid Kit Baby Rattle
Cat Keychain
Bearded Monkey Amigurumi
Octopus Vent Clip


Affiliate Links

This post contains affiliate links. This means I may earn a commission should you chose to sign up for a program or make a purchase using my link. It’s okay – I love all of these companies anyways, and you will too!


I’m so proud to have my designs featured on Lion Brand Yarn Pattern Marketplace. Not only can you purchase great designs, but you can also purchase the yarn and supplies you need to make them.

Tutti Frutti Poncho Crochet Pattern: https://shrsl.com/4wswp


Amazon affiliate: https://amzn.to/4hkS5Zd
Best Seller on Amazon Haul


https://amzn.to/4joumZG


Posted on — 2 Comments

First Aid Kit Baby Rattle Crochet Pattern – National American Red Cross Founder’s Day

Honoring a Legacy of Compassion: American Red Cross Founder’s Day

Every year on May 21, we celebrate American Red Cross Founder’s Day, a moment to reflect on the legacy of one of the most impactful humanitarian organizations in the world—and to honor the remarkable woman who started it all: Clara Barton.

Who Was Clara Barton?

Born in 1821, Clara Barton was a nurse, educator, and fierce humanitarian. During the Civil War, she became known as the “Angel of the Battlefield” for her tireless efforts tending to wounded soldiers. But her work didn’t end when the war did. Inspired by the International Red Cross in Europe, Barton worked relentlessly to bring a similar organization to the United States.

Her dream became a reality on May 21, 1881, when she founded the American Red Cross. Under her leadership, the organization provided aid during natural disasters, war, and times of personal crisis. She served as its president until 1904, leaving behind a powerful legacy of service, compassion, and advocacy.

Briefcase Baby Rattle Crochet Pattern

To honor Clara Barton and all the military medics who have followed in her footsteps, today’s free pattern is the First Aid Kit Baby Rattle. This easy pattern works up quickly using a few yards from your scrap basket. Add a rattle insert for a baby toy or just use stuffing to use as a doll suitcase.

PDF available at First Aid Kit Baby Rattle or Briefcase Baby Rattle Crochet Pattern


Rattle pattern is also included in the Military Baby Sweater Crochet Pattern.

Baby Military Sweater Crochet Pattern


Materials:

I Love This Yarn Sport Weight

40 yards Dark Olive

5 yards white

3 yards red

Size F (3.75 mm) crochet hook

Rattle insert

Yarn needle

Fiberfill

Directions: 

CASE:

Row 1: With olive yarn, ch 22, sc in 2nd ch from hook and each ch across (21 sc), ch 1, turn.

Rows 2-16: Sc in each sc, ch 1, turn.

Row 17: Working in back loops only, sc across, ch 1, turn.

Rows 18-20: Repeat Row 2.

Row 21: Repeat Row 17.

Rows 22-36: Repeat Row 2.

EDGING:

Row 1: Ch 1, sc in 2nd ch from hook and each ch across (4 sc), ch 1, turn.

Row 2: Sc in each sc across, ch 1, turn.

Repeat Row 2 until piece measures long enough to stretch around 3 open sides of case (approximately 10”).

The case is shaped like a taco and will be front, back and bottom of first aid kit. Wrap edging around so that it covers the open spaces of sides and top and sew in place.

CROSS:

Row 1: With white, ch 10, sc in 2nd ch from hook and in each of next 2 ch, with red sc in each of next 3 st, with thie sc in each of next 3 sc, ch 1, turn.

Rows 2-3: Sc with white in white sc, sc with red in red sc, ch 1, turn.

Rows 4-6: Sc in red across all sts, ch 1, turn.

Rows 7-9: Repeat Row 2, ch 1, turn.

Turn to work down side. Work around all 4 sides in sc, making 3 sc in each corner and keeping in color scheme. There will be a little white showing through the bottom of red where the beginning ch is. Fasten off leaving lengths of both red and white for sewing. Sew to center of case and use a couple extra red sts to cover white spots. For extra strength, sew around edges twice.

HANDLE:

Rnd 1: With olive yarn, leave length for sewing, ch 8, join. Sc in each ch around. Do not join.

Rnd 2: 2 sc in each ch around (8 sc). Continue to work even on 8 sc until handle measures approximately 4”. Join, end off yarn leaving 12” length for sewing. Stuff handle firmly with fiberfill and sew each end to top of case.

More Baby Projects

starfish baby rattle
Starfish Baby Rattle, My Fingers Fly
Sunshine Baby Hat, My Fingers Fly
Royal Baby Sweater Crochet Pattern, Newborn-3M, 6M or 9M sizes with Scepter Rattle
Royal Baby Sweater with Scepter Rattle


It’s a Girl Gift Tag
It’s a Boy Gift Tag


ICYMI (In Case You Missed It)

Elephant Mandala Coloring Page
Bearded Monkey Amigurumi
Octopus Vent Clip
Hammer Baby Rattle


Affiliate Links

This post contains affiliate links. This means I may earn a commission should you chose to sign up for a program or make a purchase using my link. It’s okay – I love all of these companies anyways, and you will too!


Amazon affiliate: https://amzn.to/4hkS5Zd
Best Seller on Amazon Haul


https://amzn.to/4joumZG


Posted on — 5 Comments

Fabulous Flamingo 🦩 Toilet Paper Cover – Free Crochet Pattern

Brighten up your bathroom with a splash of tropical flair! This Flamingo Toilet Paper Cover crochet pattern is a fun, quirky project that’s both decorative and practical. Whether you’re aiming for kitschy charm or a cheerful pop of color, this crochet flamingo will keep your spare roll stylishly under wraps.

What You’ll Need:

  • Worsted weight yarn in pink (225 yards), black (3 yards), and white (5 yards)

  • Crochet hook size G/4.0 mm

  • Stitch markers

  • Yarn needle

  • Fiberfill stuffing

  • Plastic safety eyes 10-mm

  • Scissors

  • Flexible foam curler (available on Amazon https://amzn.to/4iJlfSb)
  • Large roll of toilet paper
  • Pipe cleaner

Pattern Overview:

Base & Body
The base is worked in rounds of crocodile stitches to form the flamingo’s “fluffy” cover and fit snugly over a large toilet paper roll.

Neck & Head
The head and long neck are crocheted separately and lightly stuffed, then curved and sewn onto the body.

🌴 Tips & Customization:

  • Use a variegated pink yarn for a feathered effect.

  • Add a tiny bow or a flower crown for extra personality.

  • Make a matching flamingo-themed hand towel or rug!

📷 Share Your Creation!

We’d love to see your flamingo bathroom friend! Share your finished piece on social media with the hashtag #FlamingoTPCover and tag us so we can admire your work.

Gauge: 6 crocodile st rows = 4”

Special Stitches:

V-stitch: dc, ch 1, dc in same sp

Crocodile st: Working around the post of the first dc of V-stitch of previous rnd, work 5 dc around this post. Ch 1, turn to work on other side of V-stitch. Work 5 dc around 2nd post of V-stitch.

YouTube Tutorial

Invisible decrease: https://youtube.com/shorts/0NC5nXyDvwI?feature=share

Ultimate finish:  https://youtu.be/jVpTr8mId3I

Directions:

BODY:

Rnd 1: With pink yarn, ch 66, join to form a ring. Be careful not to twist. Sc in each ch (66 sc). Join with sl st.

Rnd 2: Ch 4, dc in first st (counts as first V-stitch), *sk 2 sts, V-stitch in next st,* repeat around (22 V-stitches). Join with sl st in 3rd ch of ch-4.

Rnd 3: *Crocodile st in V-stitch, V-stitch in next V-stitch,* repeat around (11 crocodile sts).

Rnd 4: Ch 4, dc in center of V-stitch (counts as first V-stitch), V-stitch in center of crocodile st, V-stitch in next V-stitch,* repeat around (22 V-stitches).

Rnds 5-15: Repeat Rnds 3-4 until there are 8 rows of crocodile stitches (or length needed to cover roll of toilet paper), ending with Rnd 3.

Rnd 16: Ch 4, dc in first V-stitch, (*dc in crocodile st, V-stitch in V-stitch,* 2 time, V-stitch in crocodile stitch, sk V-stitch, V-stitch in crocodile st, v-stitch in V-stitch, V-stitch in crocodile stitch, sk V-stitch), repeat ( to ), V-stitch in last crocodile st, join with sl st (18 V-stitches).

Rnd 17: Repeat Rnd 3 (9 crocodile sts).

Rnd 18: Ch 4, dc in first V-stitch, *V-stitch in crocodile st, V-stitch in V-stitch, V-stitch in crocodile st, sk V-stitch,* 4 times, V-stitch in last crocodile st (14 V-stitches).

Rnd 19: Repeat Rnd 3 (7 crocodile sts).

Rnd 20: Ch 1, sk V-stitch, *V-stitch in crocodile st, V-stitch in V-stitch, V-stitch in crocodile st, sk V-stitch,* 3 times, V-stitch in last crocodile st (10 V-stitches). Join with sl st in first dc of first V-stitch.

Rnd 21: Repeat Rnd 3 (5 crocodile sts).

Rnd 22: Ch 4, dc in V-stitch, *V-stitch in crocodile st, sk V-stitch,* repeat around (6 V-stitches).

Rnd 23: Repeat Rnd 3 (3 crocodile sts). Join.

Rnd 24: Ch 1, 2 sc across each crocodile st. Join with sl st. Fasten off and close with ult fin.

HEAD:

Rnd 1: With black yarn, ch 2 (or magic ring), 3 sc in 2nd ch from hook. Do not join. Work in continuous rnds throughout head and neck.

Rnd 2: 2 sc in first st, sc in next 2 sts (4 sc).

Rnd 3: *Sc in next st, 2 sc in next st,* repeat once (6 sc).

Rnds 4-5: Sc in each st.

Rnd 6: *Sc in next st, 2 sc in next st,* repeat twice (9 sc).

Rnd 7: Sc in each st. Join with sl st. Fasten off black yarn.

Rnd 8: With white yarn, sc in each st.

Rnd 9: *Sc in next 2 sts, 2 sc in next st,* repeat around (12 sc).

Rnds 10-12: Sc in each st. Join with sl st at end of Rnd 12. Fasten off white yarn.

Rnd 13: With pink yarn, 2 sc in each st (24 sc).

Rnds 14-15: Sc in each st.

Rnd 16: *Sc in next 3 sts, 2 sc in next st,* repeat around (30 sc).

Rnds 17-19: Sc in each st.

Fold pipe cleaner twice so it measures approximately 3”. Insert into beak and stuff around it. Insert eyes at Rnd 15, 8 sts apart.

Rnd 20: *Inv dec, sc in next 3 sts,* repeat around (24 sc).

Rnd 21: *Inv dec, sc in next 2 sts,* repeat around (18 sc).

Rnd 22: Sc in each st.

Rnd 23: *Inv dec, sc in next 4 sts,* repeat around (15 sc).

Rnd 24: Sc in each st. Mark last st in rnd.

Repeat Rnd 24 until neck measures 5” from marker. Join with sl st. Fasten off pink leaving 12” length for sewing.

Trim curler to 4.5”. Insert into neck and stuff lightly around curler. Bend last 2” of neck and sew to center of body at Rnds 23-24.

For added support sew neck to Rnd 21 of body.

PDF available at: Flamingo Toilet Paper Cover Crochet Pattern

To get a free PDF, join us in the My Fingers Fly Crochet Family Facebook group:

https://www.facebook.com/share/g/1FBuUiWTBh/

More Products for Flamingo Lovers


mother's day crochet patterns


Free crochet patterns for Mother’s Day

Crochet Patterns for Mom


Weekly Featured Pattern

Get 50% off of the newest design from Jo’s Crafty Hook, the Lacey Wrap Crochet Pattern until May 4, 2025 as part of Crochet Designer Community Weekly Featured Pattern.
This airy, lacy wrap would look beautiful using Spring or Summer colors of ombre or varigated yarn.
Copy and paste the link below 👇 to get the Coupon Code needed to get 50% off


Pet Appreciation Blog Hop

To celebrate National Pet Appreciation Month 🐶 🐱 from May 1-15, 2025 you will find NEW pet crochet patterns daily FREE for 24 hours!

We have a GREAT group of crochet designers participating this year.  You will find NEW designs that you can make to celebrate the love you receive from your pets.

Make sure you check out Jo’s Crafty Hook every day from May 1 to May 15 to get your freebie!!

2025 Pet Appreciation Blog Hop · Jo’s Crafty Hook

ICYMI (In Case You Missed It)

Easter Advent Crochet Patterns

Crochet Bucket List free download


Affiliate Links

This post contains affiliate links. This means I may earn a commission should you chose to sign up for a program or make a purchase using my link. It’s okay – I love all of these companies anyways, and you will too!


Amazon affiliate: https://amzn.to/4hkS5Zd
Best Seller on Amazon Haul


https://amzn.to/4joumZG


Posted on — Leave a comment

Take a Chance… With Crochet! | Celebrate National Take a Chance Day

Every April 23rd, we’re encouraged to step out of our comfort zones and try something new—it’s National Take a Chance Day! Whether it’s finally trying that bold lipstick, signing up for a dance class, or starting a business, this day is all about possibility and courage.

But what if your big leap is a little closer to home—like on your couch, with a ball of yarn and a crochet hook in hand?

Take a Chance… On That Crochet Pattern You’ve Been Eyeing.

We all have that one pattern we’ve been saving for “someday.” Maybe it’s a delicate lace shawl, a plush amigurumi animal, or a complex tapestry crochet bag. National Take a Chance Day is the perfect excuse to stop waiting and start hooking.

👉 Tip: Start with something small but bold—like a new stitch technique or a color combo you wouldn’t normally choose.

Step Out of Your Comfort Yarn

Do you always reach for soft pastels or stick to worsted weight? Today’s the day to try a chunky wool, a bright neon, or even that fancy hand-dyed skein you’ve been hoarding. Life’s too short for boring yarn!

Try a Crochet First

Take a chance on:

It’s not about perfection—it’s about growth.

My “Take a Chance” Crochet Story

As I reflect on how I’ve taken leaps in my life, one that stands out is the day I stopped just following crochet patterns—and started designing my own.

It was equal parts exciting and terrifying. I had been crocheting for a while, following other people’s beautiful patterns, admiring their creativity, and thinking, “Maybe one day…”

Then one day, I did.

The First Stitch of Something New

Texas Horny Toad Crochet PatternI still remember the exact moment I decided to try designing. I had an idea for a horny toad plush toy, my favorite animal from my childhood. It wasn’t in any pattern I could find, so I thought, Why not try to make it myself?

Was it perfect? No. Did I rip it out a dozen times? Absolutely. But did I learn and grow and fall even more in love with crochet? 100% yes. It’s still my most popular pattern.

The Lessons I Learned

Taking the chance to design crochet patterns taught me a few important things:

  • You don’t have to be an expert to start. You just have to start.

  • Mistakes are part of the process. They lead to better ideas.

  • Your creative voice matters. Even if it feels small at first.

Designing taught me how to trust my instincts, play with stitches, and most importantly—believe that what I create can bring joy to others, too.

Since that first design, I’ve slowly started building a library of patterns—each one a reminder of that first brave step. Some are simple baby rattles, others are fun seasonal pieces, and I’m even dreaming up a few larger projects.

Every new design is still a chance I take. And it’s always worth it.

So today, grab that hook and go for it. Whether it’s a stitch you’ve never tried or a project you’ve been too nervous to start—take a chance. Crochet is more forgiving than you think, and every stitch brings you one step closer to something amazing.

What will you take a chance on today? Drop a comment or tag me in your project—I’d love to cheer you on!

Happy crocheting and happy National Take a Chance Day!

Crochet Bucket List

Free download

Weekly Featured Pattern

It’s a new week and that means a new Weekly Featured Pattern from the Crochet Designer Community!
Grab my Sleepy Baby/Angel Plush crochet pattern for 50% OFF Monday April 21st, ’til midnight(EST) on Sunday April 28th using the coupon code located on the Crochet Designer Community page.
📣“Create your own adorable Angel or Baby companion with this easy-to-follow pattern that provides detailed, low sew, instructions with helpful photos to bring your friend to life. Finished baby should measure approximately 8” tall but size will vary depending on yarn and tension & can be made with or without the wings.”

No-Sew Amigurumi Crochet Made Easy

The ebook includes EVERYTHING a beginner to advanced crocheter can learn about No-Sew Amigurumi Crochet:
– 30 Patterns – 27 exclusive patterns only in this ebook
– 9 Tips Tutorials (Best Yarn, Tools, Removing Holes, Many No-Sew Tips, Magic Ring Tip, etc)
– 15+ Video Tutorials
This amazing ebook is regularly $34.99 but until 4/23/25 you can use coupon code NOSEW15 for $15 off making the price $19.99

https://lisamff–nickishomemadecrafts.thrivecart.com/no-sew-amigurumi-made-easy/

ICYMI (In Case You Missed It)

Easter Advent Crochet Patterns


Affiliate Links

This post contains affiliate links. This means I may earn a commission should you chose to sign up for a program or make a purchase using my link. It’s okay – I love all of these companies anyways, and you will too!


Amazon affiliate: https://amzn.to/4hkS5Zd
Best Seller on Amazon Haul


https://amzn.to/4joumZG