Spring is in the air, flowers are blooming, and Easter is just around the corner! Along with colorful eggs and chocolate bunnies, lambs and goats often make an appearance during this season. Whether you see them in farm petting zoos, Easter decorations, or even on traditional dinner tables, these animals have a deep-rooted connection to Easter celebrations.
Lambs have long been associated with Easter, particularly in Christian traditions. In the Bible, Jesus is often referred to as the “Lamb of God,” symbolizing sacrifice, purity, and renewal. Many cultures serve lamb as part of their Easter feast, continuing a tradition that dates back to Passover in Jewish history.
Beyond religious symbolism, lambs also represent new beginnings. Spring is lambing season, making these adorable baby animals a perfect symbol of rebirth and fresh starts—just like Easter itself!
While goats aren’t as commonly linked to Easter as lambs, they are still a big part of springtime celebrations. Baby goats, or “kids,” are born around the same time as lambs and bring energy and fun to the season. Their playful, mischievous nature embodies the joy of Easter and the excitement of warmer days ahead.
On farms and in petting zoos, both lambs and goats are popular attractions for families celebrating Easter. Many people visit farms to see the newborn animals, feed them, and take part in Easter egg hunts set against a picturesque rural backdrop.

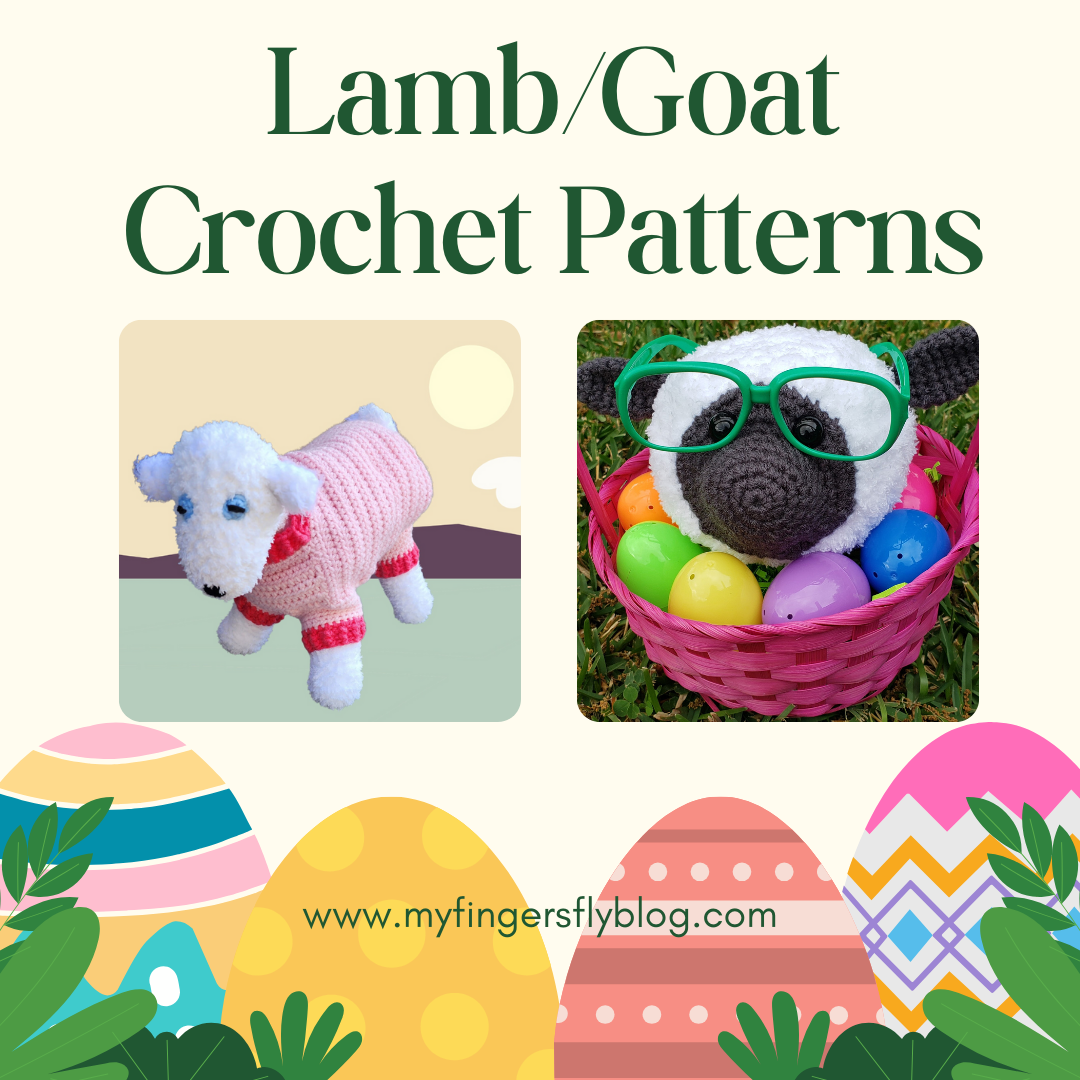
Lamb Eyeglass Holder Crochet Pattern


Baby Goat in Pajamas
Materials:
Goat
Bernat Pipsqueak yarn:
300 yards
Worsted weight yarn:
190 yards MC
140 yards CC
2 yards pale blue
2 yards black
Size G (4.0 mm) crochet hook
Yarn needle
Fiberfill
Foam curlers
Stitch markers are highly recommended
Pajamas
Worsted weight yarn:
150 yards MC
35 yards CC
Measurements: 9” tall at shoulder, 10.5” tall at rump, 12” chest circumference, 11” back length
STITCHES:
Invisible decrease: https://youtube.com/shorts/0NC5nXyDvwI?feature=share
Ultimate finish: https://youtu.be/jVpTr8mId3I
Directions:
BODY:
Rnd 1: With Pipsqueak yarn and G hook, ch 2 (or magic circle), 6 sc in 2nd ch from hook. Do not join. Work in continuous rnds throughout.
Rnd 2: 2 sc in each sc around (12 sc).
Rnd 3: *Sc in next sc, 2 sc in next sc,* repeat around (18 sc).
Rnd 4: *Sc in next 2 sc, 2 sc in next sc,* repeat around (24 sc).
Rnd 5: *Sc in next 3 sc, 2 sc in next sc,* repeat around (30 sc).
Rnd 6: *Sc in next 4 sc, 2 sc in next sc,* repeat around (36 sc).
Rnd 7: *Sc in next 5 sc, 2 sc in next sc,* repeat around (42 sc).
Rnd 8: *Sc in next 6 sc, 2 sc in next sc,* repeat around (48 sc).
Rnd 9: *Sc in next 7 sc, 2 sc in next sc,* repeat around (54 sc).
Rnd 10: *Sc in next 8 sc, 2 sc in next sc,* repeat around (60 sc).
Rnd 11: Sc in each st. Repeat Rnd 11 until piece measures 9” long.
Dec Rnd 1: *Dec, sc in next 8 sts,* repeat around (54 sc).
Dec Rnd 2: *Dec, sc in next 7 sts,* repeat around (48 sc).
Dec Rnd 3: *Dec, sc in next 6 sts,* repeat around (42 sc).
Dec Rnd 4: *Dec next 2 sc, sc next 5 sc,* repeat around (36 sc).
Dec Rnd 5: *Dec next 2 sc, sc next 4 sc,* repeat around (30 sc).
Dec Rnd 6: *Dec next 2 sc, sc next 3 sc,* repeat around (24 sc).
Dec Rnd 7: *Dec next 2 sc, sc next 2 sc,* repeat around (18 sc). Turn body inside out so that more fluffy back side of sts becomes the outside of goat. Stuff body.
Dec Rnd 8: *Dec next 2 sc, sc next sc,* repeat around (12 sc).
Dec Rnd 9: *Dec next 2 sc around (6 sc).
Fasten off. Finish stuffing and use ultimate finish to close.
FRONT LEGS: (Make 2)
Rnd 1: With Pipsqueak yarn and G hook, ch 2 (or magic circle), 5 sc in 2nd ch from hook. Do not join. Work in continuous rnds throughout.
Rnd 2: 2 sc in each sc around (10 sc).
Rnd 3: *Sc in next sc, 2 sc in next sc,* repeat around (15 sc).
Rnd 4: *Sc in next 2 sc, 2 sc in next sc,* repeat around (20 sc).
Rnd 5: Sc in each st.
Repeat Rnd 5 until front leg measures 5.5” tall.
Stuff legs firmly with foam curler and Fiberfill to give support to body. Sew front legs to bottom of body at Rnds 7-14 approximately 1-2 sts apart.
BACK LEGS: (Make 2)
Rnd 1: With Pipsqueak yarn and G hook, ch 2 (or magic circle), 5 sc in 2nd ch from hook. Do not join. Work in continuous rnds throughout.
Rnd 2: 2 sc in each sc around (10 sc).
Rnd 3: *Sc in next sc, 2 sc in next sc,* repeat around (15 sc).
Rnd 4: *Sc in next 2 sc, 2 sc in next sc,* repeat around (20 sc).
Rnd 5: Sc in each st.
Repeat Rnd 5 until front leg measures 6.5” tall.
Stuff legs firmly with foam curler and Fiberfill to give support to body. Sew back legs to bottom of body at point where dec rnds begin, approximately 1-2 sts apart.
NECK:
Rnd 1: With Pipsqueak yarn, ch 30. Join with sl st being careful not to twist ch. Sc in each st around (30 sc).
Rnd 2: Ch 1, dec, sc in next 28 sts (29 sc). Join with sl st.
Rnd 3: Ch 1, dec, sc in next 27 sts (28 sc). Join with sl st.
Rnd 4: Ch 1, dec, sc in next 26 sts (27 sc). Join with sl st.
Rnd 5: Ch 1, dec, sc in next 25 sts (26 sc). Join with sl st.
Rnd 6: Ch 1, dec, sc in next 24 sts (25 sc). Join with sl st.
Rnds 7-9: Ch 1, sc in each st. Join with sl st. Fasten off at end of Rnd 9 with 12” length for sewing.
Position neck at front end of body and sew in place.
HEAD:
Rnd 1: With Pipsqueak yarn and G hook, ch 2 (or magic circle), 6 sc in 2nd ch from hook. Do not join. Work in continuous rnds throughout.
Rnd 2: 2 sc in each sc around (12 sc).
Rnd 3: *Sc in next sc, 2 sc in next sc,* repeat around (18 sc).
Rnd 4: *Sc in next 2 sc, 2 sc in next sc,* repeat around (24 sc).
Rnd 5: *Sc in next 3 sc, 2 sc in next sc,* repeat around (30 sc).
Rnds 6-7: Sc in each st.
Rnd 8: *Sc in next 8 sc, 2 sc in next sc,* repeat around (30 sc).
Rnd 9: *Sc in next 4 sc, 2 sc in next sc,* repeat around (36 sc).
Rnd 10: *Sc in next 5 sc, 2 sc in next sc,* repeat around (42 sc).
Rnd 11: *Sc in next 6 sc, 2 sc in next sc,* repeat around (48 sc).
Rnds 12-15: Sc in each st. Stuff head.
Rnd 16: *Dec next 2 sc, sc next 6 sc,* repeat around (42 sc).
Rnd 17: *Dec next 2 sc, sc next 5 sc,* repeat around (36 sc).
Rnd 18: *Dec next 2 sc, sc next 4 sc,* repeat around (30 sc).
Rnd 19: *Dec next 2 sc, sc next 3 sc,* repeat around (24 sc).
Rnd 20: *Dec next 2 sc, sc next 2 sc,* repeat around (18 sc). Stuff head.
Rnd 21: *Dec next 2 sc, sc next sc,* repeat around (12 sc).
Rnd 22: *Dec next 2 sc around (6 sc). Fasten off. Finish stuffing and close with ultimate finish.
Sit head on top of neck opening. Stuff neck and sew head to neck.
EYES: (Make 2)
With blue worsted yarn, ch 2 (or magic ring), 6 sc in 2nd ch from hook. Join with sl st. Fasten off yarn with 6” length for sewing.
With black yarn, embroider straight sts across the eyes for horizontal pupils. Sew eyes to head.
NOSE:
Using black worsted yarn, embroider straight sts to make triangle-shaped nose at end of head.
EARS: (Make 2)
Rnd 1: With Pipsqueak yarn, ch 2 (or magic ring), 6 sc in 2nd ch from hook. Do not join.
Rnd 2: *Sc in next st, 2 sc in next st,* repeat around (9 sc).
Rnds 3-4: Sc in each st. Join with sl st at end of Rnd 4. Fasten off leaving 12” length for sewing. Sew ears to sides of head.
TAIL:
Rnd 1: With Pipsqueak yarn, ch 2 (or magic ring), 6 sc in 2nd ch from hook. Do not join.
Rnd 2: *Sc in next st, 2 sc in next st,* repeat around (9 sc).
Rnd 3: *Sc in next 2 sts, 2 sc in next st,* repeat around (12 sc).
Rnds 4-7: Sc in each st. Fasten off at end of Rnd 7 with 12” length for sewing.
Sew tail to back of body where it begins to curve downward.
Pajamas:
Materials Needed:
Worsted weight yarn:
150 yards MC
35 yards CC
Size G (4.0 mm) crochet hook (or size needed to obtain gauge)
Yarn needle
Gauge: 8 hdc = 2”, 6 rows hdc = 2”
Measurements:
Chest circumference: 17.5”
Back waist length: 8”
BACK:
Row 1: (Neck edge) With MC yarn, ch 48. Hdc in 2nd ch from hook and each ch across (47 hdc).
Rows 2-21: Ch 1, turn. Ch 1, hdc in each st across.
Row 22: Ch 1, turn, hdc next 18 sts, sl st in next st. Leave remaining sts unworked.
Row 23: Ch 1, turn, sk sl st, sl st in next 6 sts, hdc in next 12 sts.
Row 24: Ch 1, turn, hdc in next 6 sts, sl st in next st. Fasten off.
Return to Row 21, sk 9 sts from sl st. Attach yarn in next st.
Row 22: Ch 1, hdc in next 18 sts.
Row 23: Ch 1, turn, hdc in next 12 sts, sl st in next st.
Row 24: Ch 1, turn, sk sl st, sl st in next 6 sts, ch 1, hdc in next 6 sts.
Row 25: (working across both sides)
Ch 1, turn, hdc in next 6 sts, hdc in 6 sl sts of Row 23, hdc in next 6 sts of Row 22, hdc in next 9 sts of Row 21, hdc in 6 sl sts of Row 22, hdc in next 6 sts of Row 23, hdc in next 6 sts of Row 24. Fasten off.
BELLY:
Row 1: (Neck edge) Ch 20, hdc in 2nd ch and each ch across (19 hdc).
Rows 2-8: Ch 1, turn, hdc in each st.
Row 9: Ch 1, turn, sl st in net 4 hdc, hdc in next 11 sts. Leave remaining sts unworked.
Row 10: Ch 1, turn, sl st in next 3 sts, hdc in next 5 sts, leave remaining sts unworked.
Rows 11-15: Ch 1, turn, hdc in each st (5 hdc).
Row 16: Ch 1, turn, hdc in 6 sts, ch 7.
Row 17: Turn, hdc in 2nd ch and next 5 ch, hdc in 5 hdc, work 6 fhdc (17 hdc).
Rows 18-20: Ch 1, turn, hdc in each st. Fasten off at end of Row 20.
ASSEMBLY:
With right sides tog, sew left side of belly to one end of Row 1 of back.
Sew right side of belly to other end of Row 1 of back.
Sk 7 rows of back and sew Rows 17-20 of belly to next 4 rows of back (on both sides).
FRONT LEGS:
Rnd 1: Attach MC yarn at one leg hole. Work 30 hdc evenly spaced around leg hole. Join with sl st.
Rnd 2: Ch 1, *dec, hdc next 4 sts,* repeat around (25 hdc).
Rnds 3-4: Ch 1, hdc in each st. Join with sl st. Fasten off MC at end of Rnd 4.
Rnd 5: Attach cc. Ch 1, hdc in each st. Join with sl st.
Rnds 6-7: Ch 1, *fp hdc, bp hdc,* repeat around. Join with sl st. Fasten off at end of Rnd 7.
Repeat on other side.
BACK LEGS:
Rnd 1: Mark beg of Row 18. With MC yarn, ch 21, hdc in 2nd ch and each remaining ch (20 hdc). Starting at marker, work 10 hdc evenly spaced across ends of Rows 18-25. Join with sl st in first hdc.
Rnd 2: Ch 1, hdc in each st. Join with sl st (30 hdc).
Rnd 3: Ch 1, *dec, hdc next 4 sts,* repeat around (25 hdc).
Rnds 4-5: Ch 1, hdc in each st. Join with sl st. Fasten off MC at end of Rnd 5.
Rnd 6: Attach cc. Ch 1, hdc in each st. Join with sl st.
Rnds 7-8: Ch 1, *fp hdc, bp hdc,* repeat around. Join with sl st. Fasten off at end of Rnd 8.
Repeat on other side.
COLLAR:
Working in leftover lps of foundation ch of back and belly, attach CC yarn in last st of back piece.
Rnd 1: Ch 1, work hdc dec over this st and first st of belly piece. Continue in hdc across Row 1 of belly. Work hdc dec over last lp of belly and first lp of back. Continue in hdc across lps of back (42 hdc).
Rnds 2-3: Ch 1, *fp hdc, bp hdc,* repeat around. Join with sl st. Fasten off at end of Rnd 3.
 Today only – 50% off the PDF including photos at each step: Baby Goat with Pajamas Crochet Pattern

Today’s free download is Lamb Birthday Gift Tags.
ICYMI (In Case You Missed It)


Affiliate Links
This post contains affiliate links. This means I may earn a commission should you chose to sign up for a program or make a purchase using my link. It’s okay – I love all of these companies anyways, and you will too!


[…] Day 4 – Lambs and Goats […]
[…] Day 4 – Lambs and Goats […]
[…] Day 4 – Lambs and Goats […]
[…] Baby Goat with Pajamas […]