Easter Donkey Crochet Pattern: A Unique Farmyard Twist for Spring
When you think of Easter crochet, bunnies and chicks usually steal the spotlight—but this year, why not add something a little different (and extra adorable) to your handmade collection?
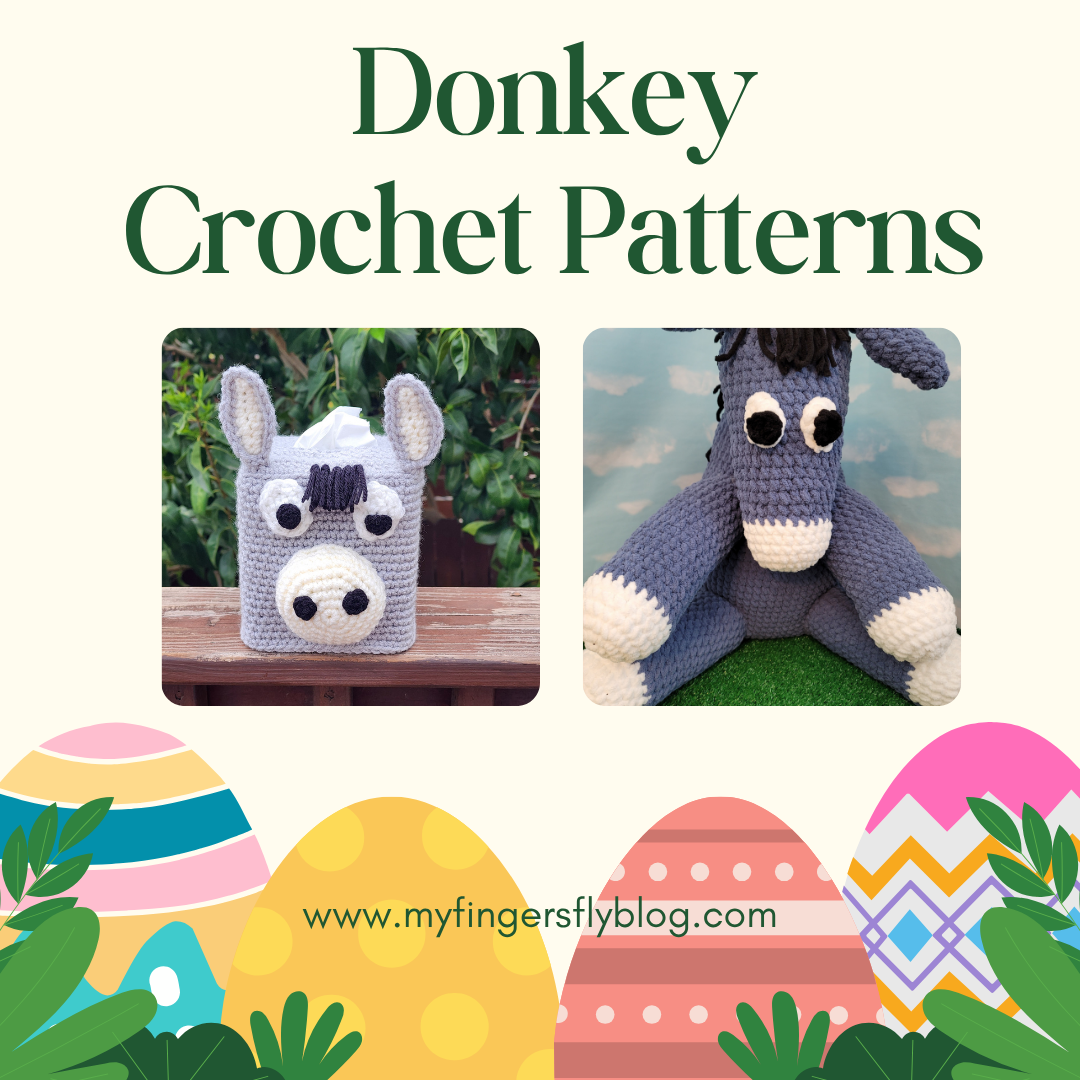
Meet the Easter Donkey—a sweet, whimsical project that brings charm, personality, and a touch of farmhouse flair to your spring décor 🧶💛
🌸 Why an Easter Donkey?
Donkeys have long been a gentle, humble symbol associated with the Easter season, making them a meaningful and unique addition to your crochet lineup. Plus, let’s be honest… they’re just too cute to pass up!
This pattern is perfect if you:
Love farm animal crochet 🐄
Want something different from the usual Easter makes
Enjoy creating conversation-starting décor
Need a fun, giftable project
Today’s free download is a bookmark depicting Palm Sunday, when Jesus rode a donkey into Jerusalem.
Finished donkey measures approximately 8” tall (including ears), fits standard 4”x4”x5” tissue box
Directions:
BOX:
Row 1: With MC yarn, ch 17, sc in 2nd ch from hook and in each remaining ch (16 sc).
Rows 2-7: Ch 1, turn, sc in each sc (16 sc).
Row 8: Ch 1, turn, sc in first 3 sts. Leave remaining sts unworked.
Row 9: Ch 1, turn, sc in each st. Fasten off yarn.
Go back to Row 7 to work other side of slit.
Row 8: Sk 10 sc, sc in last 3 sc.
Row 9: Ch 1, turn, sc in each st, ch 10, sl st on other side Row 8. Fasten off yarn.
Row 10: Turn, join MC yarn, ch 1, sc in 3 sc, sc in 10 ch, sc in 3 sc (16 sc).
Rows 11-16: Ch 1, turn, sc in each st. At the end of Row 16, the piece should be long enough to cover the top of the tissue box. Now begin working in rnds.
Rnd 1: Ch 1, turn, sc around all 4 sides with 2 sc in corners. Join with sl st.
Rnd 2: Working in BLO, sc in each st.
Rnd 3: Working in both lps, sc in each st.
Repeat Rnd 3 until box measures 5” tall or tall enough to cover tissue box (approximately 22 rnds).
MUZZLE:
Rnd 1: With CC, ch 2 (or magic ring), 6 sc in 2nd ch from hook. Do not join. Work in continuous rnds throughout.
Rnd 2: 2 sc in each st (12 sc).
Rnd 3: *Sc in next st, 2 sc in next st (18 sc).
Rnd 4: *Sc in next 2 sts, 2 sc in next st (24 sc).
Rnd 5: *Sc in next 3 sts, 2 sc in next st (30 sc).
Rnd 6: *Sc in next 4 sts, 2 sc in next st (36 sc).
Rnds 7-8: Sc in each st. Join with sl st at end of Rnd 8. Fasten off CC with 12” length for sewing.
Stuff muzzle and sew centered on face with bottom 2 rnds above bottom row of box and top of muzzle at approximately Rnd 10 of box.
NOSTRILS: (Make 2)
With black yarn, ch 2 (or magic ring), 6 sc in 2nd ch from hook. Join with sl st. Fasten off leaving 6” length for sewing.
Sew nostrils to upper half of muzzle at Rnds 3-4.
EARS: (Make 2)
Row 1: With CC yarn, ch 10, sc in 2nd ch from hook, sc in next 2 ch, hdc in next 3 ch, sc in next 2 ch, 3 sc in last ch. Working on opposite side of foundation ch, sc in next 2 ch, hdc in next 3 ch, sc in last 3 ch (19 sts). Fasten off CC.
Repeat Row 1 with MC yarn. Do not fasten off.
Row 2: Ch 1, turn, place CC ear on top of MC ear and work through both layers. Sc in 3 sts, hdc in 3 sts, sc in 2 sts, 2 sc in next 3 sts, sc in 2 sts, hdc in 3 sts, sc in 3 sts (21 sts).
Fasten off yarn leaving 9” length for sewing.
Fold bottom of ears and sew to top corners of box.
EYES: (Make 2)
Rnd 1: With white yarn, ch 4, 2 hdc in 2nd ch, hdc in next ch, 4 hdc in last ch. Working on opposite side of ch, hdc next ch, 2 hdc in last ch (8 sc). Do not join.
Rnd 2: 2 sc in next st, sc in next st, 2 sc in next 3 sts, sc in next st, 2 sc in next 2 sts (14 sc).
Fasten off leaving 9” length for sewing.
PUPILS:
With black yarn, ch 2 (or magic ring), 6 sc in 2nd ch. Join with sl st. Fasten off leaving 6” length.
Sew pupils to bottom half of eyes. Sew eyes to face above muzzle approximately 1” apart.
MANE:
Cut at least ten 5” pieces of black yarn. In center 5 sts at front of face between the ears, pull through 2 pieces at a time. Fold 2 pieces in half, insert hook in st, grab yarn and pull through st. Then pull through loop just made and pull tightly. Trim mane. More strands can be added if a thicker mane is desired.
This post contains affiliate links. This means I may earn a commission should you chose to sign up for a program or make a purchase using my link. It’s okay – I love all of these companies anyways, and you will too!
Celebrate Easter with an adorable crocheted Bunny!
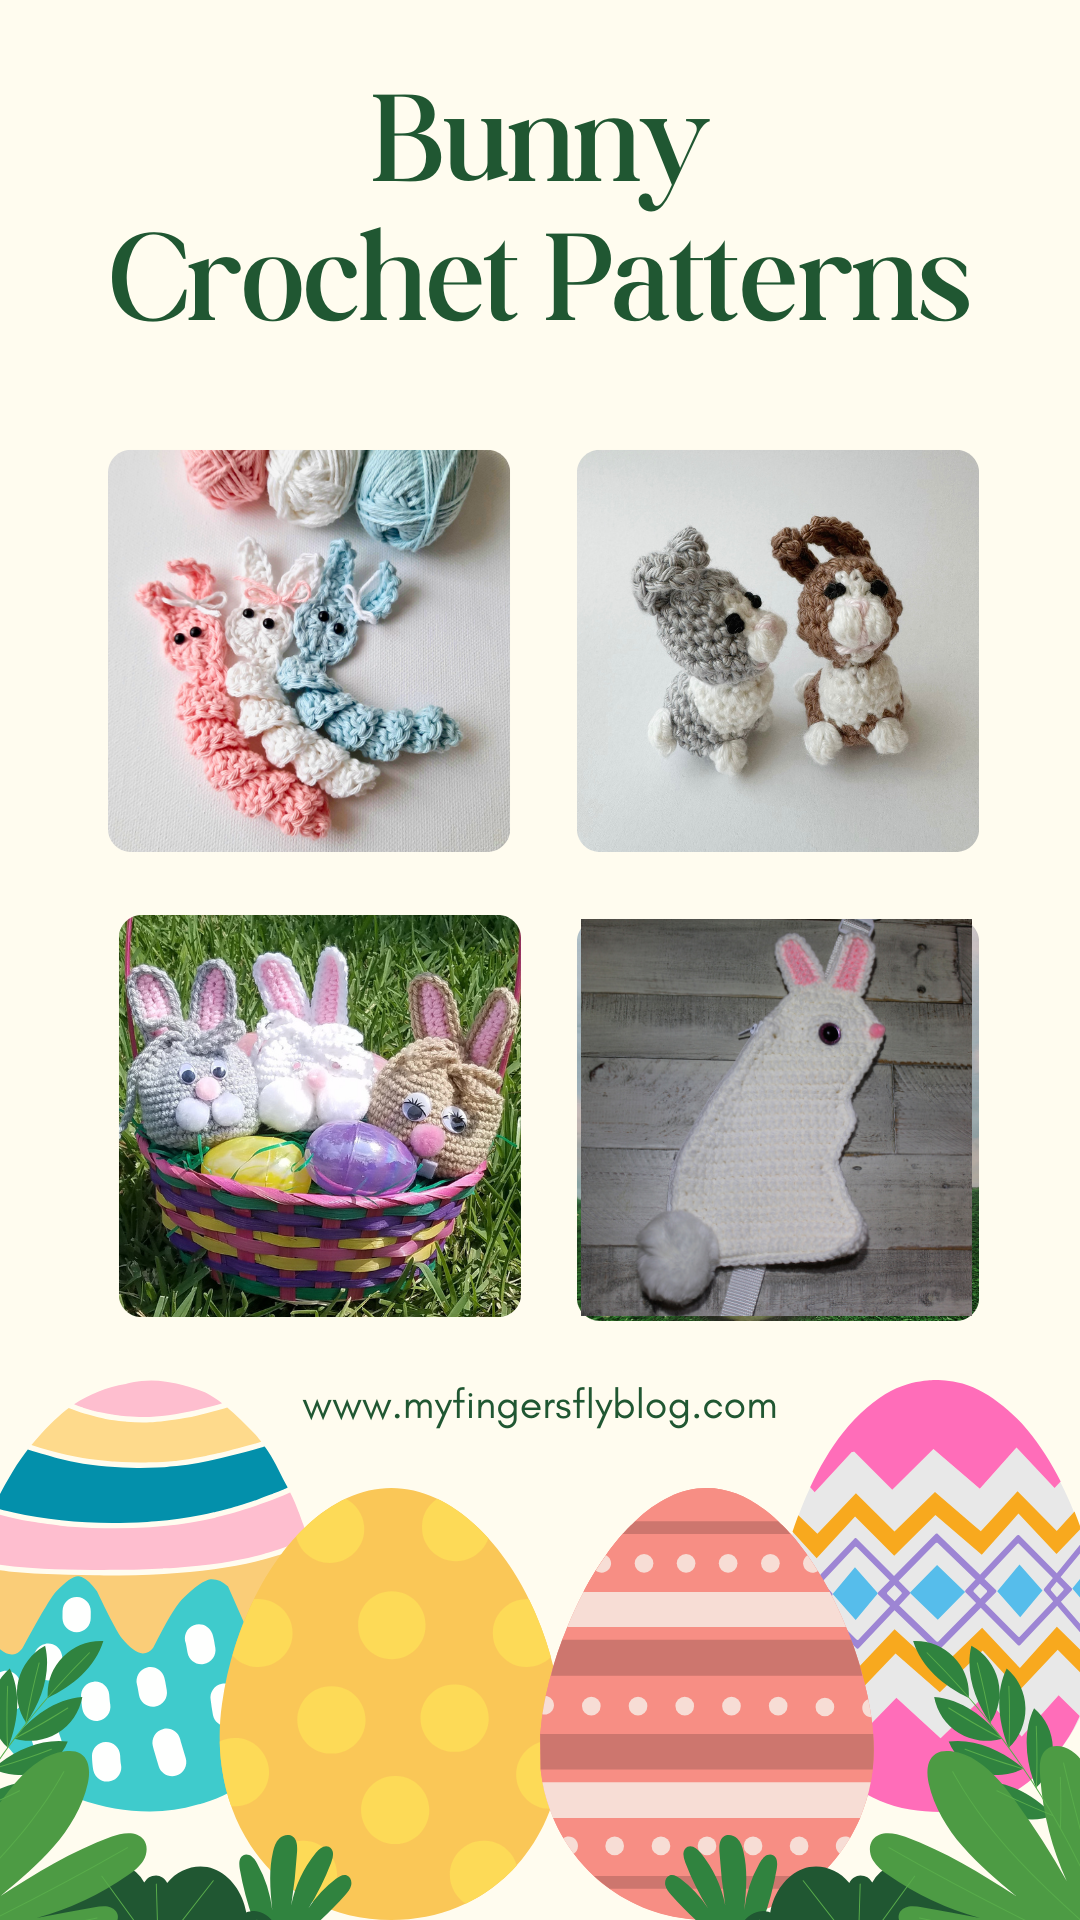
Easter is the perfect time to get busy crocheting, and what better way to celebrate than with a handmade Easter Bunny? Whether you’re looking for a charming gift, festive decor, or just a fun project to enjoy, crocheting your own Easter Bunny is a delightful choice.
Today’s feature is bunnies of all types – from tiny amigurumi to a bunny bobblehead to an adorable sling bag. Each bunny is more adorable than the next, and all patterns are free to view on the designers’ blogs.
Share Your Bunny Creations. We’d love to see your Easter bunnies! Tag your photos on social media using #EasterBunnyCraft and inspire others to get creative.
Row 13: Ch 1, turn, dec, sc in next 13 sts, inc (16 sc).
Row 14: Ch 1, turn, sc in each st.
Row 15: Ch 1, turn, dec, sc in next 13 sts, inc (16 sc).
Row 16: Ch 1, turn, sc in each st.
Row 17: Ch 1, turn, dec, sc in next 13 sts, inc (16 sc).
Row 18: Ch 1, turn, sc in each st.
Row 19: Ch 1, turn, dec, sc in next 12 sts, dec (14 sc).
Row 20: Ch 1, turn, sc in each st.
Row 21: Ch 1, turn, dec, sc in next 12 sts (13 sc).
Row 22: Ch 1, turn, inc in first st, sc in next 10 sts, dec (13 sc).
Row 23: Ch 1, turn, dec, sc in next 10 sts, inc (13 sc).
Row 24: Ch 1, turn, sc in each st.
Row 25: Ch 1, turn, dec, sc in next 10 sts, inc (13 sc).
Row 26: Ch 1, turn, sc in each st.
Row 27: Ch 1, turn, dec, sc in next 10 sts, inc (13 sc).
Row 28: Ch 1, turn, sc in 11 sts, dec (12 sc).
Row 29: Ch 1, turn, inc in first st, sc in next 10 sts, inc in next st (14 sc).
Row 30: Ch 1, turn, sc in 12 sts, dec (13 sc).
Row 31: Ch 1, turn, dec, sc in next 9 sts, dec (11 sc).
Row 32: Ch 1, turn, sc in each st.
Row 33: Ch 1, turn, dec, sc in next 7 sts, dec (9 sc).
Row 34: Ch 1, turn, dec, sc in next 5 sts, dec (7 sc).
Row 35: Ch 1, turn, dec, sc in next 3 sts, dec (5 sc). Fasten off yarn.
If using a sewing machine, it’s easier to sew webbing to back of bunny before assembling the bag. Cut polyester webbing 52-60” long.
Sew with 5” of webbing extending off the top of the bunny.
Turn over and place other bunny piece on top. Pin together and mark Rows 4 & 30. The distance between markers should be approximately 7” to fit zipper.
Attach MC at Row 30, sc along edges of rows of top bunny piece to Row 5. At Row 4, sc through both layers from Row 4 to Row 1 with 2 sc in Row 1. Continue around bottom using unused lps of foundation ch with 2 sc in last lp. Continue up the front and head of bunny with 2 sc in any corner to help maintain the shape. Continue through both layers around head until you reach marker at Row 30. Join with sl st in first sc of rnd. On back bunny piece, sc through edges of Rows 5-29. Join with sl st at Row 4. Fasten off yarn.
EARS: (Make 2)
Row 1: With CC yarn, ch 8, sc in 2nd ch from hook, sc in next 5 ch, 3 sc in last ch. Working on opposite side of foundation ch, sc in next 6 chs. Fasten off CC.
Repeat Row 1 with MC yarn. Do not fasten off.
Row 2: Ch 1, turn, place CC ear on top of MC ear and work through both layers. Sc in 6 sts, 2 sc in next 3 sts, sc in next 6 sts, sl st in same sp as last sc. Fasten off leaving 9” length for sewing. Sew ears to top of head.
Sew ½” pompom at end of Row 30. Insert safety eye at Row 30, 6 sts from nose. Sew zipper to 7” slot in back of bunny. Sew white pompom below zipper.
Thread female clip on 5” piece of webbing above bunny and sew the end in place.
Insert slide clip on other end of webbing. Insert male clip on end and thread end of webbing back through slide clip.
For 2 weeks leading up to Easter, we will feature free Easter patterns on the blog for your holiday crafting. Over 40 designs with a different theme every day. Be sure to visit every day to experience all the beautiful patterns from some of the best indie designers. There will also be a new free download each day with a different theme – coloring pages, gift tags, activities for children, and so many more.
Download a copy of the calendar so you can print it as your daily reminder. Each date on the calendar will contain a link to that day’s blog post.
This post contains affiliate links. This means I may earn a commission should you chose to sign up for a program or make a purchase using my link. It’s okay – I love all of these companies anyways, and you will too!
Hop Into Spring: Creative Easter Basket Ideas for Every Bunny
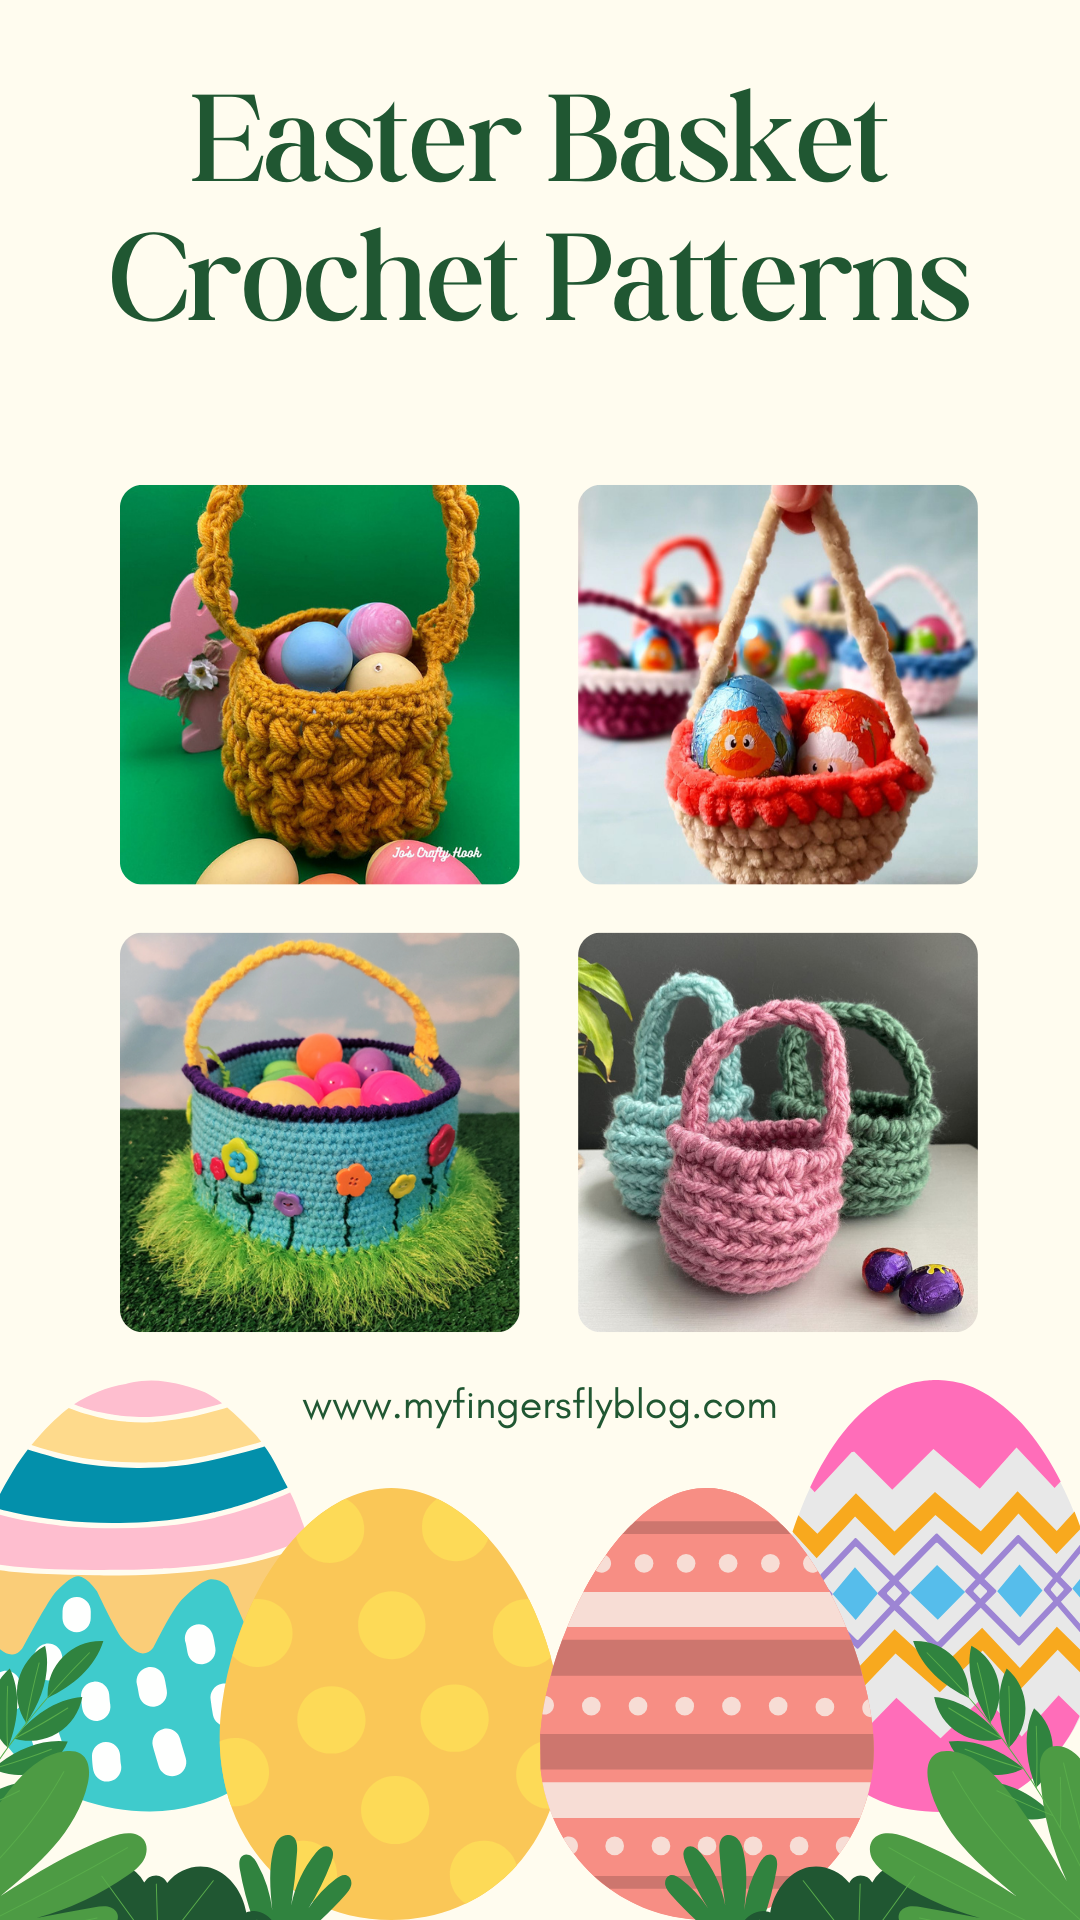
Easter is right around the corner, and that means it’s time to start thinking about those charming little baskets filled with goodies, surprises, and a whole lot of joy. Whether you’re creating one for your child, a friend, or even a furry family member, Easter baskets are the perfect way to celebrate the season of renewal and love.
Easter is a time to celebrate joy, rebirth, and connection—what better way to do that than with a little surprise tucked into a handmade basket? Whether simple or elaborate, what matters most is the love behind it.
Chicken Easter Basket
Materials:
Yarn Bee Fur the Moment yarn:
110-120 yards
Worsted weight yarn:
3 yards red
2 yards yellow
Size L (8.0 mm) and G (4.0 mm) crochet hooks
Yarn needle
Gallon plastic bucket (I used one ice cream bucket and one from Dollar Tree)
12-mm wiggle eyes
Polyfil
Popsicle stick
Stitch markers are highly recommended for this type of yarn
Finished basket measures approximately 8” wide by 6-7” tall, depending on size of bucket used.
Gauge: 5 sc = 2”, 4 rows = 2”
Directions:
Row 1: With Fur the Moment yarn and L hook, ch 2 (or magic ring), 7 sc in 2nd ch from hook. Do not join. Work in continuous rnds unless otherwise specified.
Rnd 2: 2 sc in each st (14 sc).
Rnd 3: *Sc in next st, 2 sc in next st,* repeat around (21 sc).
Rnd 4: *Sc in next 2 sts, 2 sc in next st,* repeat around (28 sc).
Rnd 5: *Sc in next 3 sts, 2 sc in next st,* repeat around (35 sc).
Rnd 6: *Sc in next 4 sts, 2 sc in next st,* repeat around (42 sc).
Rnd 7: *Sc in next 5 sts, 2 sc in next st,* repeat around (49 sc).
Rnd 8: *Sc in next 6 sts, 2 sc in next st,* repeat around (56 sc).
Rnd 9: *Sc in next 13 sts, 2 sc in next st,* repeat around (60 sc).
Rnd 10: Sc in each st.
Repeat Rnd 10 until piece measures as tall as the bucket. (I used 2 different buckets; and they were different heights.) Then work 1 more rnd in sc. The extra rnd will be used to glue along top of bucket.
Join with a sl st. Do not fasten off.
Tail:
Row 1: Ch 1, turn, sk sl st, sc in next 8 sts.
Row 2: Ch 1, turn, dec, sc in next 4 sts, dec (6 sc).
Row 3: Ch 1, turn, dec, sc in next 2 sts, dec (4 sc).
Row 4: Ch 1, turn, dec twice (2 sc). Fasten off.
Head:
Rnd 1: With Fur the Moment yarn and L hook, ch 2, 6 sc in 2nd ch from hook. Do not join. Work head in continuous rnds.
Rnd 2: 2 sc in each st (12 sc).
Rnds 3-6: Sc in each st.
Rnd 7: *Sc in next st, 2 sc in next st,* repeat around (18 sc).
Rnds 8-10: Sc in each st. Join with sl st at end of Rnd 10. Fasten off yarn leaving 12” length for sewing.
Comb:
With red worsted yarn and size G hook, attach yarn at top of head, sc, *ch 3, sc next st,* 2 times, ch 3, sl st. Fasten off yarn and pull both ends inside head. Tie in a knot for extra security.
Beak:
Rnd 1: With yellow worsted yarn and size G hook, ch 2 (or magic ring), 3 sc in 2nd ch from hook. Do not join.
Rnd 2: 2 sc in first st, sc in next 2 sts (4 sc).
Rnd 3: 2 sc in first st, sc in next 3 sts (5 sc). Join with sl st. Fasten off yarn leaving 6” length. Sew beak to front of head. Glue eyes above beak.
Stuff head semi-firmly. Leave enough room at bottom to fold Rnd 10 of head flat. Insert half of the popsicle stick into head. Sew head closed with half the popsicle stick extending down.
Mark center front of basket opposite the center of the tail.
Sew head to top of last rnd of body with popsicle stick at center front between the chicken and the bucket.
Wings: (Make 2)
Row 1: With Pipsqueak yarn, ch 11, sc in 2nd ch from hook and in each remaining ch (10 sc).
Row 2: Ch 1, turn, dec over first 2 sts, sc in next 8 sts (9 sc).
Row 3: Ch 1, turn, sc in next 7 sts, dec over next 2 sts (8 sc).
Row 4: Ch 1, turn, dec over first 2 sts, sc in next 6 sts (7 sc). Fasten off leaving 9” length for sewing.
Sew Row 4 and front edge of wing to side of chicken approximately 2 rnds from top edge with angled edge (at back) and Row 1 hanging free.
This basket is perfect for Easter. You can fill it with all kinds of goodies for the kiddies. It would also be a great accent piece to your Home Decor.
Flower Basket from My Fingers FlyDesigned with spring in mind, this pattern features a sturdy, easy-to-carry basket adorned with sweet crochet flowers and grass—perfect for holding treats, eggs, or a special gift.
This post contains affiliate links. This means I may earn a commission should you chose to sign up for a program or make a purchase using my link. It’s okay – I love all of these companies anyways, and you will too!
When we think of Easter, we often picture lilies, sunrise services, and perhaps a bunny or two. But one of the most quietly powerful symbols of Easter is the humble donkey.
In the days leading up to Easter, Jesus entered Jerusalem not on a horse of war, but on a donkey — a creature of peace and humility. This wasn’t just a random detail; it fulfilled an ancient prophecy (Zechariah 9:9) and set the tone for the kind of kingdom Jesus was building — one grounded in gentleness, love, and grace.
Donkeys may not be flashy, but they’re strong, steady, and faithful — much like the spirit of Easter itself. They carry burdens, walk with the weary, and don’t ask for applause. In many ways, they remind us to slow down, stay grounded, and carry love wherever we go.
This Easter, as we celebrate new life and fresh hope, let’s remember the donkey — a quiet hero in the greatest story ever told.
Today’s free download is a bookmark depicting Palm Sunday, when Jesus rode a donkey into Jerusalem.
Finished donkey measures approximately 23” tall (sitting), 18” wide
NOTE: Ch-2 method to start a circle is preferred over magic ring when using blanket yarn. The bulkiness of the yarn prevents the hole that worsted sometimes leaves when using the ch-2 method.
BODY:
Rnd 1: With blue yarn, ch 2 (or magic ring), 8 sc in 2nd ch from hook. Do not join. Work in continuous rnds throughout.
Rnd 2: 2 sc in each sc around (16 sc).
Rnd 3: *Sc in next sc, 2 sc in next sc,* repeat around (24 sc).
Rnd 4: *Sc in next 2 sc, 2 sc in next sc,* repeat around (32 sc).
Rnd 5: *Sc in next 3 sc, 2 sc in next sc,* repeat around (40 sc).
Rnd 6: *Sc in next 4 sc, 2 sc in next sc,* repeat around (48 sc).
Rnd 7: *Sc in next 5 sc, 2 sc in next sc,* repeat around (56 sc).
Rnd 8: *Sc in next 6 sc, 2 sc in next sc,* repeat around (64 sc).
Rnd 9: *Sc in next 7 sc, 2 sc in next sc,* repeat around (72 sc).
Rnd 10: *Sc in next 8 sc, 2 sc in next sc,* repeat around (80 sc).
Rnds 11-23: Sc in each st.
Rnd 24: *Dec next 2 sc, sc next 8 sc,* repeat around (72 sc).
Rnds 25-26: Sc in each st.
Rnd 27: *Dec next 2 sc, sc next 7 sc,* repeat around (64 sc).
Rnds 28-29: Sc in each st.
Rnd 30: *Dec next 2 sc, sc next 6 sc,* repeat around (56 sc).
Rnds 31-32: Sc in each st.
Rnd 33: *Dec next 2 sc, sc next 5 sc,* repeat around (48 sc).
Rnds 34-35: Sc in each st.
Begin stuffing body.
Rnd 36: *Dec next 2 sc, sc next 4 sc,* repeat around (40 sc).
Rnds 37-38: Sc in each st.
Rnd 39: *Dec next 2 sc, sc next 3 sc,* repeat around (32 sc).
Rnds 40-41: Sc in each st.
Rnd 42: *Dec next 2 sc, sc next 2 sc,* repeat around (24 sc).
Rnds 43-44: Sc in each st.
Rnd 45: *Dec next 2 sc, sc next sc,* repeat around (16 sc).Fasten off blue yarn leaving 12” length for sewing on the head. The neck of the body remains open but will be covered when you sew on the head. Finish stuffing body.
LEGS: (Make 4)
Rnd 1: With white yarn, ch 2 (or magic ring), 8 sc in 2nd ch from hook. Do not join. Work in continuous rnds throughout.
Rnd 2: 2 sc in each sc around (16 sc).
Rnd 3: *Sc in next sc, 2 sc in next sc,* repeat around (24 sc).
Rnds 4-6: Sc in each st. Join with sl st at end of Rnd 6 and fasten off white.
Rnd 7: Join blue yarn, sc in each st. Do not join.
Rnds 8-22: Sc in each st. At end of Rnd 22, join with sl st. Fasten off blue leaving length for sewing.
Stuff legs firmly. Sew 2 back legs to bottom of body at front, spacing them about 3” apart at approximately Rnds 12-18. Sew 2 front legs to top body at front, approximately Rnds 30-35 with 1.5” to 2” spacing between the legs.
HEAD:
Rnd 1: With white yarn, ch 2 (or magic ring), 8 sc in 2nd ch from hook. Do not join. Work in continuous rnds throughout.
Rnd 2: 2 sc in each sc around (16 sc).
Rnd 3: *Sc in next sc, 2 sc in next sc,* repeat around (24 sc).
Rnds 4-7: Sc in each sc. At end of Rnd 7, join with sl st and fasten off white yarn.
Rnd 8: Join blue yarn, sc in each st.
Rnd 9: *Sc in next 5 sc, 2 sc in next sc,* repeat around (28 sc).
Rnds 10-12: Sc in each sc.
Rnd 13: *Sc in next 6 sc, 2 sc in next sc,* repeat around (32 sc).
Rnds 14-16: Sc in each sc.
Rnd 17: *Sc in next 7 sc, 2 sc in next sc,* repeat around (36 sc).
Rnds 18-20: Sc in each sc.
Rnd 21: *Sc in next 8 sc, 2 sc in next sc,* repeat around (40 sc).
Rnds 22-25: Sc in each sc.
Rnd 26: *Dec next 2 sc, sc next 3 sc,* repeat around (32 sc). Stuff head.
Rnd 27: *Dec next 2 sc, sc next 2 sc,* repeat around (24 sc).
Rnd 28: *Dec next 2 sc, sc next sc,* repeat around (16 sc).
Rnd 30: *Dec next 2 sc around (8 sc). Join with sl st. Fasten off. Finish stuffing and use ultimate finish to close. Sew Rnds 17-23 of head over opening at top of body. The head should cover the entire neck opening. Sew around twice for a stronger seam. Weave in all ends.
Row 1: With blue yarn, ch 6, sc in 2nd ch and next 4 ch (5 sc).
Rows 2-12: Ch 1, turn, sc in each st. Fasten off at end of Row 12 leaving a 12” length for sewing. Fold the tail in half lengthwise and sew sides together. Cut 5 pieces of black yarn 9” long. Fold each piece in half, insert hook into end of tail, pull through loop, pull ends through loop. Repeat around the tail. Sew tail to back of donkey at Rnd 10.
EARS: (Make 2)
Rnd 1: Ch 2 (or magic ring), 6 sc in 2nd ch from hook. Do not join. Work in continuous rnds throughout.
Rnd 2: *Sc in next st, 2 sc in next st (9 sc).
Rnds 3-4: Sc in each st.
Rnd 5: *Sc in next 2 sts, 2 sc in next st,* repeat around (12 sc).
Rnds 6-7: Sc in each st.
Rnd 8: *Sc in next 3 sts, 2 sc in next st,* repeat around (15 sc).
Rnds 9-10: Sc in each st.
Rnd 11: *Dec over next 2 sts, sc in next 4 sts,* repeat once, dec over next 2 sts, sc around (12 sc).
Rnds 12-13: Sc in each st. At end of Rnd 13, join with a sl st and fasten off yarn leaving 12” length for sewing. Fold bottom of ear (Rnd 13) in half and sew to head at Rnd 25 spacing ears approximately 3.5” apart.
EYES: (Make 2)
With white yarn, ch 4, 2 hdc in 2nd ch, hdc in next ch, 4 hdc in last ch. Working on opposite side of ch, hdc next ch, 2 hdc in last ch. Join with sl st. Fasten off leaving length for sewing.
PUPILS:
With black yarn, ch 2 (or magic ring), 6 sc in 2nd ch. Join with sl st. Fasten off leaving length for sewing.
Sew pupils to bottom half of eyes. Sew eyes to head at Rnds 14-18 approximately 1” apart.
MANE:
Cut 9” pieces of black yarn. Starting at front of face just below the years, pull through 2 pieces at a time, making 2 rows going down the neck and top 4 rnds of body. Fold 2 pieces in half, insert hook in st, grab yarn and pull through st. Then pull through loop just made and pull tightly.
CROSS:
Mark a line on the back of the donkey from the tail to 4 rnds below the mane, then another line going across the shoulders. Following markings, work sc in surface crochet in black. Weave in all ends.
Full tutorial for Archie the Donkey available on Youtube.
This post contains affiliate links. This means I may earn a commission should you chose to sign up for a program or make a purchase using my link. It’s okay – I love all of these companies anyways, and you will too!
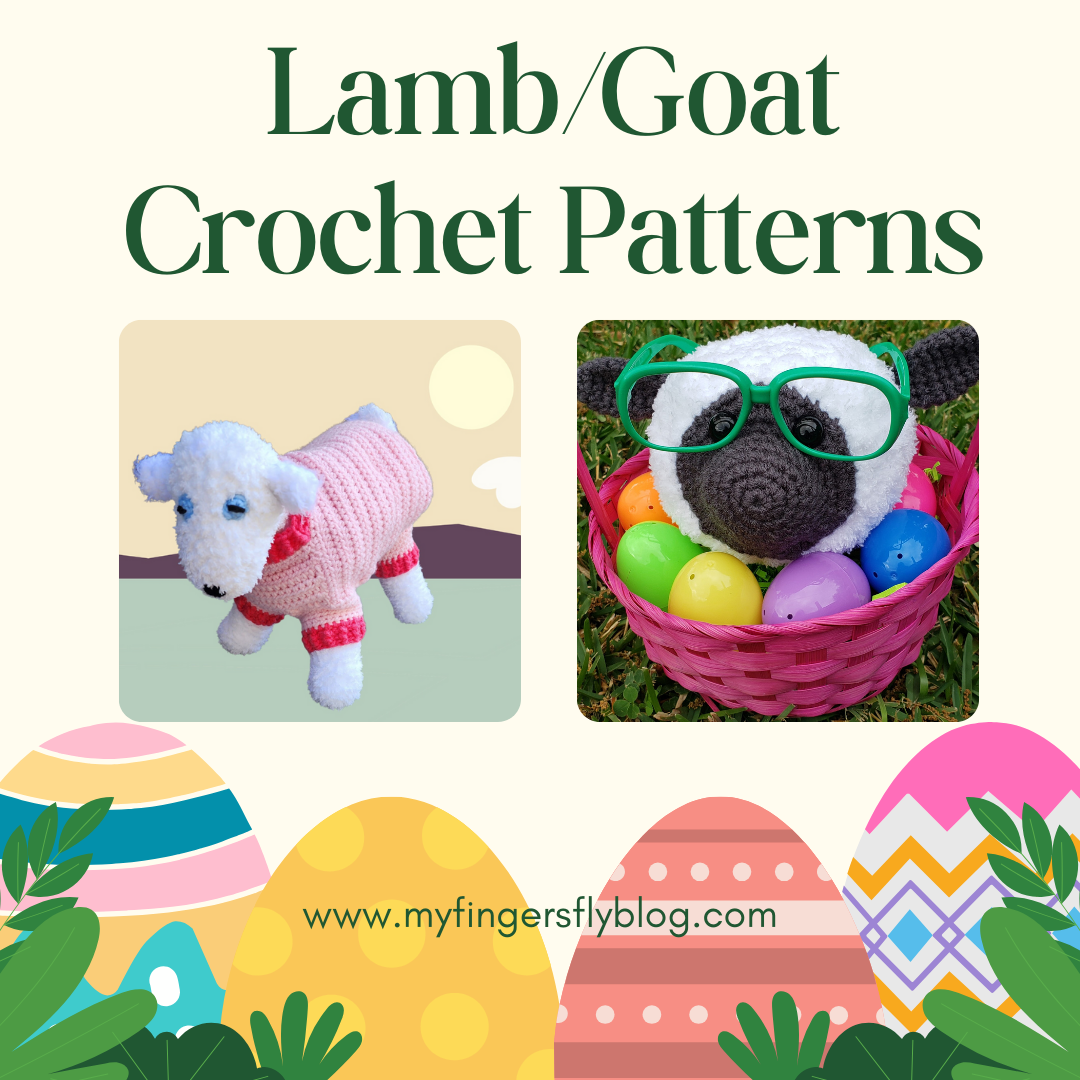
Spring is in the air, flowers are blooming, and Easter is just around the corner! Along with colorful eggs and chocolate bunnies, lambs and goats often make an appearance during this season. Whether you see them in farm petting zoos, Easter decorations, or even on traditional dinner tables, these animals have a deep-rooted connection to Easter celebrations.
Lambs have long been associated with Easter, particularly in Christian traditions. In the Bible, Jesus is often referred to as the “Lamb of God,” symbolizing sacrifice, purity, and renewal. Many cultures serve lamb as part of their Easter feast, continuing a tradition that dates back to Passover in Jewish history.
Beyond religious symbolism, lambs also represent new beginnings. Spring is lambing season, making these adorable baby animals a perfect symbol of rebirth and fresh starts—just like Easter itself!
While goats aren’t as commonly linked to Easter as lambs, they are still a big part of springtime celebrations. Baby goats, or “kids,” are born around the same time as lambs and bring energy and fun to the season. Their playful, mischievous nature embodies the joy of Easter and the excitement of warmer days ahead.
On farms and in petting zoos, both lambs and goats are popular attractions for families celebrating Easter. Many people visit farms to see the newborn animals, feed them, and take part in Easter egg hunts set against a picturesque rural backdrop.
Rnd 1: With Pipsqueak yarn and G hook, ch 2 (or magic circle), 6 sc in 2nd ch from hook. Do not join. Work in continuous rnds throughout.
Rnd 2: 2 sc in each sc around (12 sc).
Rnd 3: *Sc in next sc, 2 sc in next sc,* repeat around (18 sc).
Rnd 4: *Sc in next 2 sc, 2 sc in next sc,* repeat around (24 sc).
Rnd 5: *Sc in next 3 sc, 2 sc in next sc,* repeat around (30 sc).
Rnd 6: *Sc in next 4 sc, 2 sc in next sc,* repeat around (36 sc).
Rnd 7: *Sc in next 5 sc, 2 sc in next sc,* repeat around (42 sc).
Rnd 8: *Sc in next 6 sc, 2 sc in next sc,* repeat around (48 sc).
Rnd 9: *Sc in next 7 sc, 2 sc in next sc,* repeat around (54 sc).
Rnd 10: *Sc in next 8 sc, 2 sc in next sc,* repeat around (60 sc).
Rnd 11: Sc in each st. Repeat Rnd 11 until piece measures 9” long.
Dec Rnd 1: *Dec, sc in next 8 sts,* repeat around (54 sc).
Dec Rnd 2: *Dec, sc in next 7 sts,* repeat around (48 sc).
Dec Rnd 3: *Dec, sc in next 6 sts,* repeat around (42 sc).
Dec Rnd 4: *Dec next 2 sc, sc next 5 sc,* repeat around (36 sc).
Dec Rnd 5: *Dec next 2 sc, sc next 4 sc,* repeat around (30 sc).
Dec Rnd 6: *Dec next 2 sc, sc next 3 sc,* repeat around (24 sc).
Dec Rnd 7: *Dec next 2 sc, sc next 2 sc,* repeat around (18 sc). Turn body inside out so that more fluffy back side of sts becomes the outside of goat. Stuff body.
Dec Rnd 8: *Dec next 2 sc, sc next sc,* repeat around (12 sc).
Dec Rnd 9: *Dec next 2 sc around (6 sc).
Fasten off. Finish stuffing and use ultimate finish to close.
FRONT LEGS: (Make 2)
Rnd 1: With Pipsqueak yarn and G hook, ch 2 (or magic circle), 5 sc in 2nd ch from hook. Do not join. Work in continuous rnds throughout.
Rnd 2: 2 sc in each sc around (10 sc).
Rnd 3: *Sc in next sc, 2 sc in next sc,* repeat around (15 sc).
Rnd 4: *Sc in next 2 sc, 2 sc in next sc,* repeat around (20 sc).
Rnd 5: Sc in each st.
Repeat Rnd 5 until front leg measures 5.5” tall.
Stuff legs firmly with foam curler and Fiberfill to give support to body. Sew front legs to bottom of body at Rnds 7-14 approximately 1-2 sts apart.
BACK LEGS: (Make 2)
Rnd 1: With Pipsqueak yarn and G hook, ch 2 (or magic circle), 5 sc in 2nd ch from hook. Do not join. Work in continuous rnds throughout.
Rnd 2: 2 sc in each sc around (10 sc).
Rnd 3: *Sc in next sc, 2 sc in next sc,* repeat around (15 sc).
Rnd 4: *Sc in next 2 sc, 2 sc in next sc,* repeat around (20 sc).
Rnd 5: Sc in each st.
Repeat Rnd 5 until front leg measures 6.5” tall.
Stuff legs firmly with foam curler and Fiberfill to give support to body. Sew back legs to bottom of body at point where dec rnds begin, approximately 1-2 sts apart.
NECK:
Rnd 1: With Pipsqueak yarn, ch 30. Join with sl st being careful not to twist ch. Sc in each st around (30 sc).
Rnd 2: Ch 1, dec, sc in next 28 sts (29 sc). Join with sl st.
Rnd 3: Ch 1, dec, sc in next 27 sts (28 sc). Join with sl st.
Rnd 4: Ch 1, dec, sc in next 26 sts (27 sc). Join with sl st.
Rnd 5: Ch 1, dec, sc in next 25 sts (26 sc). Join with sl st.
Rnd 6: Ch 1, dec, sc in next 24 sts (25 sc). Join with sl st.
Rnds 7-9: Ch 1, sc in each st. Join with sl st. Fasten off at end of Rnd 9 with 12” length for sewing.
Position neck at front end of body and sew in place.
HEAD:
Rnd 1: With Pipsqueak yarn and G hook, ch 2 (or magic circle), 6 sc in 2nd ch from hook. Do not join. Work in continuous rnds throughout.
Rnd 2: 2 sc in each sc around (12 sc).
Rnd 3: *Sc in next sc, 2 sc in next sc,* repeat around (18 sc).
Rnd 4: *Sc in next 2 sc, 2 sc in next sc,* repeat around (24 sc).
Rnd 5: *Sc in next 3 sc, 2 sc in next sc,* repeat around (30 sc).
Rnds 6-7: Sc in each st.
Rnd 8: *Sc in next 8 sc, 2 sc in next sc,* repeat around (30 sc).
Rnd 9: *Sc in next 4 sc, 2 sc in next sc,* repeat around (36 sc).
Rnd 10: *Sc in next 5 sc, 2 sc in next sc,* repeat around (42 sc).
Rnd 11: *Sc in next 6 sc, 2 sc in next sc,* repeat around (48 sc).
Rnds 12-15: Sc in each st. Stuff head.
Rnd 16: *Dec next 2 sc, sc next 6 sc,* repeat around (42 sc).
Rnd 17: *Dec next 2 sc, sc next 5 sc,* repeat around (36 sc).
Rnd 18: *Dec next 2 sc, sc next 4 sc,* repeat around (30 sc).
Rnd 19: *Dec next 2 sc, sc next 3 sc,* repeat around (24 sc).
Rnd 20: *Dec next 2 sc, sc next 2 sc,* repeat around (18 sc). Stuff head.
Rnd 21: *Dec next 2 sc, sc next sc,* repeat around (12 sc).
Rnd 22: *Dec next 2 sc around (6 sc). Fasten off. Finish stuffing and close with ultimate finish.
Sit head on top of neck opening. Stuff neck and sew head to neck.
EYES: (Make 2)
With blue worsted yarn, ch 2 (or magic ring), 6 sc in 2nd ch from hook. Join with sl st. Fasten off yarn with 6” length for sewing.
With black yarn, embroider straight sts across the eyes for horizontal pupils. Sew eyes to head.
NOSE:
Using black worsted yarn, embroider straight sts to make triangle-shaped nose at end of head.
EARS: (Make 2)
Rnd 1: With Pipsqueak yarn, ch 2 (or magic ring), 6 sc in 2nd ch from hook. Do not join.
Rnd 2: *Sc in next st, 2 sc in next st,* repeat around (9 sc).
Rnds 3-4: Sc in each st. Join with sl st at end of Rnd 4. Fasten off leaving 12” length for sewing. Sew ears to sides of head.
TAIL:
Rnd 1: With Pipsqueak yarn, ch 2 (or magic ring), 6 sc in 2nd ch from hook. Do not join.
Rnd 2: *Sc in next st, 2 sc in next st,* repeat around (9 sc).
Rnd 3: *Sc in next 2 sts, 2 sc in next st,* repeat around (12 sc).
Rnds 4-7: Sc in each st. Fasten off at end of Rnd 7 with 12” length for sewing.
Sew tail to back of body where it begins to curve downward.
Pajamas:
Materials Needed:
Worsted weight yarn:
150 yards MC
35 yards CC
Size G (4.0 mm) crochet hook (or size needed to obtain gauge)
Yarn needle
Gauge: 8 hdc = 2”, 6 rows hdc = 2”
Measurements:
Chest circumference: 17.5”
Back waist length: 8”
BACK:
Row 1: (Neck edge) With MC yarn, ch 48. Hdc in 2nd ch from hook and each ch across (47 hdc).
Rows 2-21: Ch 1, turn. Ch 1, hdc in each st across.
Row 22: Ch 1, turn, hdc next 18 sts, sl st in next st. Leave remaining sts unworked.
Row 23: Ch 1, turn, sk sl st, sl st in next 6 sts, hdc in next 12 sts.
Row 24: Ch 1, turn, hdc in next 6 sts, sl st in next st. Fasten off.
Return to Row 21, sk 9 sts from sl st. Attach yarn in next st.
Row 22: Ch 1, hdc in next 18 sts.
Row 23: Ch 1, turn, hdc in next 12 sts, sl st in next st.
Row 24: Ch 1, turn, sk sl st, sl st in next 6 sts, ch 1, hdc in next 6 sts.
Row 25: (working across both sides)
Ch 1, turn, hdc in next 6 sts, hdc in 6 sl sts of Row 23, hdc in next 6 sts of Row 22, hdc in next 9 sts of Row 21, hdc in 6 sl sts of Row 22, hdc in next 6 sts of Row 23, hdc in next 6 sts of Row 24. Fasten off.
BELLY:
Row 1: (Neck edge) Ch 20, hdc in 2nd ch and each ch across (19 hdc).
Rows 2-8: Ch 1, turn, hdc in each st.
Row 9: Ch 1, turn, sl st in net 4 hdc, hdc in next 11 sts. Leave remaining sts unworked.
Row 10: Ch 1, turn, sl st in next 3 sts, hdc in next 5 sts, leave remaining sts unworked.
Rows 11-15: Ch 1, turn, hdc in each st (5 hdc).
Row 16: Ch 1, turn, hdc in 6 sts, ch 7.
Row 17: Turn, hdc in 2nd ch and next 5 ch, hdc in 5 hdc, work 6 fhdc (17 hdc).
Rows 18-20: Ch 1, turn, hdc in each st. Fasten off at end of Row 20.
ASSEMBLY:
With right sides tog, sew left side of belly to one end of Row 1 of back.
Sew right side of belly to other end of Row 1 of back.
Sk 7 rows of back and sew Rows 17-20 of belly to next 4 rows of back (on both sides).
FRONT LEGS:
Rnd 1: Attach MC yarn at one leg hole. Work 30 hdc evenly spaced around leg hole. Join with sl st.
Rnd 2: Ch 1, *dec, hdc next 4 sts,* repeat around (25 hdc).
Rnds 3-4: Ch 1, hdc in each st. Join with sl st. Fasten off MC at end of Rnd 4.
Rnd 5: Attach cc. Ch 1, hdc in each st. Join with sl st.
Rnds 6-7: Ch 1, *fp hdc, bp hdc,* repeat around. Join with sl st. Fasten off at end of Rnd 7.
Repeat on other side.
BACK LEGS:
Rnd 1: Mark beg of Row 18. With MC yarn, ch 21, hdc in 2nd ch and each remaining ch (20 hdc). Starting at marker, work 10 hdc evenly spaced across ends of Rows 18-25. Join with sl st in first hdc.
Rnd 2: Ch 1, hdc in each st. Join with sl st (30 hdc).
Rnd 3: Ch 1, *dec, hdc next 4 sts,* repeat around (25 hdc).
Rnds 4-5: Ch 1, hdc in each st. Join with sl st. Fasten off MC at end of Rnd 5.
Rnd 6: Attach cc. Ch 1, hdc in each st. Join with sl st.
Rnds 7-8: Ch 1, *fp hdc, bp hdc,* repeat around. Join with sl st. Fasten off at end of Rnd 8.
Repeat on other side.
COLLAR:
Working in leftover lps of foundation ch of back and belly, attach CC yarn in last st of back piece.
Rnd 1: Ch 1, work hdc dec over this st and first st of belly piece. Continue in hdc across Row 1 of belly. Work hdc dec over last lp of belly and first lp of back. Continue in hdc across lps of back (42 hdc).
Rnds 2-3: Ch 1, *fp hdc, bp hdc,* repeat around. Join with sl st. Fasten off at end of Rnd 3.
This post contains affiliate links. This means I may earn a commission should you chose to sign up for a program or make a purchase using my link. It’s okay – I love all of these companies anyways, and you will too!
Used to distinguish new sessions and visits. This cookie is set when the GA.js javascript library is loaded and there is no existing __utmb cookie. The cookie is updated every time data is sent to the Google Analytics server.
30 minutes after last activity
__utmc
Used only with old Urchin versions of Google Analytics and not with GA.js. Was used to distinguish between new sessions and visits at the end of a session.
End of session (browser)
__utmz
Contains information about the traffic source or campaign that directed user to the website. The cookie is set when the GA.js javascript is loaded and updated when data is sent to the Google Anaytics server
6 months after last activity
__utmv
Contains custom information set by the web developer via the _setCustomVar method in Google Analytics. This cookie is updated every time new data is sent to the Google Analytics server.
2 years after last activity
__utmx
Used to determine whether a user is included in an A / B or Multivariate test.
18 months
_ga
ID used to identify users
2 years
_gali
Used by Google Analytics to determine which links on a page are being clicked
30 seconds
_ga_
ID used to identify users
2 years
_gid
ID used to identify users for 24 hours after last activity
24 hours
_gat
Used to monitor number of Google Analytics server requests when using Google Tag Manager
1 minute
_gac_
Contains information related to marketing campaigns of the user. These are shared with Google AdWords / Google Ads when the Google Ads and Google Analytics accounts are linked together.
90 days
__utma
ID used to identify users and sessions
2 years after last activity
__utmt
Used to monitor number of Google Analytics server requests
10 minutes
Marketing cookies are used to follow visitors to websites. The intention is to show ads that are relevant and engaging to the individual user.
Pinterest Tag is a web analytics service that tracks and reports website traffic.
Unique value with which users can be identified by X. Collected information is used to be personalize X services, including X trends, stories, ads and suggestions.
2 years
external_referer
Our Website uses X buttons to allow our visitors to follow our promotional X feeds, and sometimes embed feeds on our Website.
2 years
guest_id
This cookie is set by X to identify and track the website visitor. Registers if a users is signed in the X platform and collects information about ad preferences.
 Today’s free download is a bookmark depicting Palm Sunday, when Jesus rode a donkey into Jerusalem.


 Red Heart Crochet Kit


 Today only – 50% off the PDF including photos at each step:
