Posted on 1 Comment

Easter Advent Day 5 – Donkey

Easter Donkey Crochet Pattern: A Unique Farmyard Twist for Spring

When you think of Easter crochet, bunnies and chicks usually steal the spotlight—but this year, why not add something a little different (and extra adorable) to your handmade collection?

Meet the Easter Donkey—a sweet, whimsical project that brings charm, personality, and a touch of farmhouse flair to your spring décor 🧶💛


🌸 Why an Easter Donkey?

Donkeys have long been a gentle, humble symbol associated with the Easter season, making them a meaningful and unique addition to your crochet lineup. Plus, let’s be honest… they’re just too cute to pass up!

This pattern is perfect if you:

  • Love farm animal crochet 🐄
  • Want something different from the usual Easter makes
  • Enjoy creating conversation-starting décor
  • Need a fun, giftable project

Today’s free download is a bookmark depicting Palm Sunday, when Jesus rode a donkey into Jerusalem.

Palm Sunday Bookmark

There is also a Mandala Donkey Coloring Page

Mandala Donkey


Archie the Donkey Crochet Pattern using Bernat Blanket Yarn


Archie the Donkey including YouTube tutorial

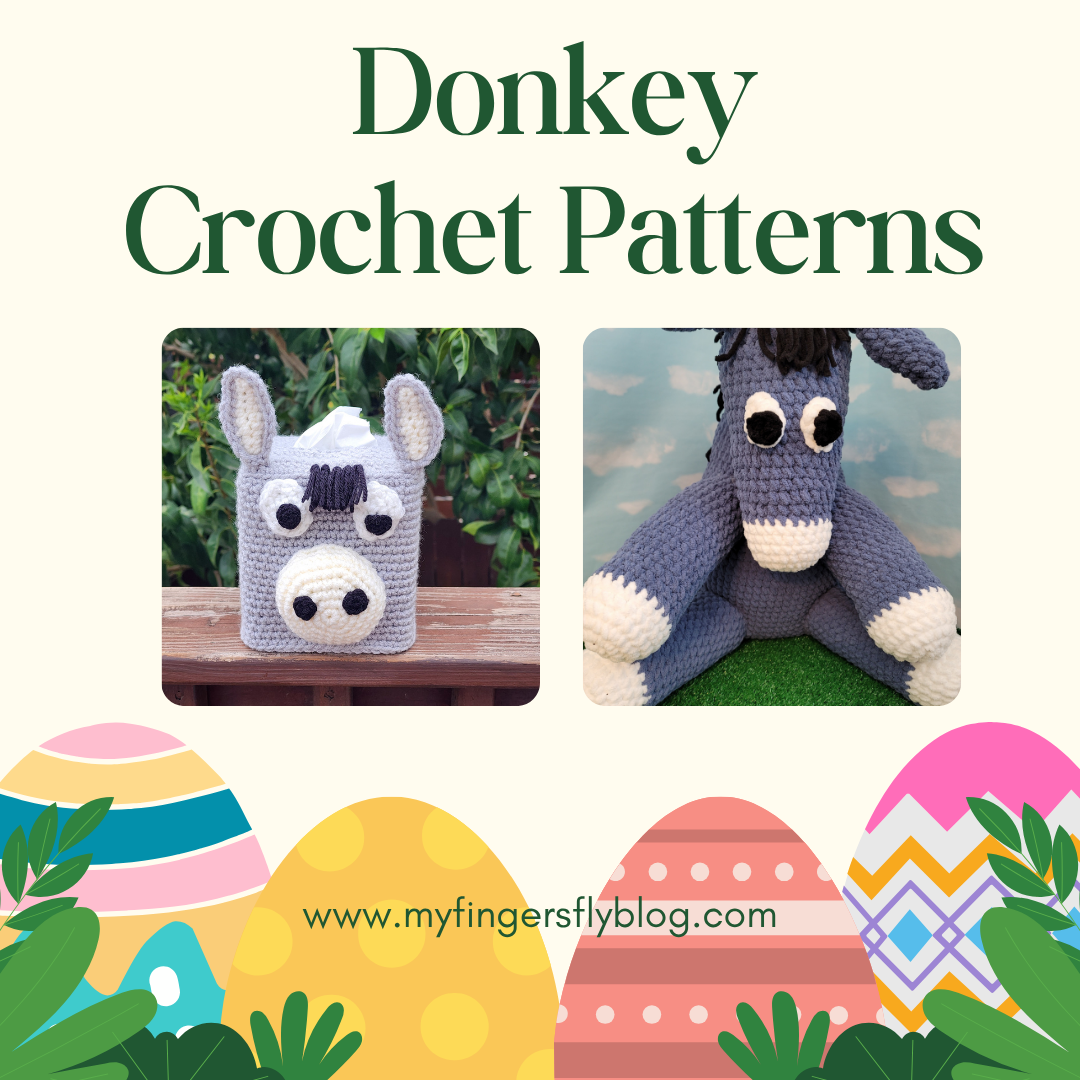
Donkey Tissue Box Cover

Materials:

Worsted weight yarn –

130 yards MC

15 yards CC

5 yards white

10 yards black

Size G (4.0 mm) crochet hook

Small amount of Fiberfill


Gauge 8 sc = 2”, 8 rows sc = 2”


Finished donkey measures approximately 8” tall (including ears), fits standard 4”x4”x5” tissue box

Directions:

BOX:

Row 1: With MC yarn, ch 17, sc in 2nd ch from hook and in each remaining ch (16 sc).

Rows 2-7: Ch 1, turn, sc in each sc (16 sc).

Row 8: Ch 1, turn, sc in first 3 sts. Leave remaining sts unworked.

Row 9: Ch 1, turn, sc in each st. Fasten off yarn.

Go back to Row 7 to work other side of slit.

Row 8: Sk 10 sc, sc in last 3 sc.

Row 9: Ch 1, turn, sc in each st, ch 10, sl st on other side Row 8. Fasten off yarn.

Row 10: Turn, join MC yarn, ch 1, sc in 3 sc, sc in 10 ch, sc in 3 sc (16 sc).

Rows 11-16: Ch 1, turn, sc in each st. At the end of Row 16, the piece should be long enough to cover the top of the tissue box. Now begin working in rnds.

Rnd 1: Ch 1, turn, sc around all 4 sides with 2 sc in corners. Join with sl st.

Rnd 2: Working in BLO, sc in each st.

Rnd 3: Working in both lps, sc in each st.

Repeat Rnd 3 until box measures 5” tall or tall enough to cover tissue box (approximately 22 rnds).

MUZZLE:

Rnd 1: With CC, ch 2 (or magic ring), 6 sc in 2nd ch from hook. Do not join. Work in continuous rnds throughout.

Rnd 2: 2 sc in each st (12 sc).

Rnd 3: *Sc in next st, 2 sc in next st (18 sc).

Rnd 4: *Sc in next 2 sts, 2 sc in next st (24 sc).

Rnd 5: *Sc in next 3 sts, 2 sc in next st (30 sc).

Rnd 6: *Sc in next 4 sts, 2 sc in next st (36 sc).

Rnds 7-8: Sc in each st. Join with sl st at end of Rnd 8. Fasten off CC with 12” length for sewing.

Stuff muzzle and sew centered on face with bottom 2 rnds above bottom row of box and top of muzzle at approximately Rnd 10 of box.

NOSTRILS: (Make 2)

With black yarn, ch 2 (or magic ring), 6 sc in 2nd ch from hook. Join with sl st. Fasten off leaving 6” length for sewing.

Sew nostrils to upper half of muzzle at Rnds 3-4.

EARS: (Make 2)

Row 1: With CC yarn, ch 10, sc in 2nd ch from hook, sc in next 2 ch, hdc in next 3 ch, sc in next 2 ch, 3 sc in last ch. Working on opposite side of foundation ch, sc in next 2 ch, hdc in next 3 ch, sc in last 3 ch (19 sts). Fasten off CC.

Repeat Row 1 with MC yarn. Do not fasten off.

Row 2: Ch 1, turn, place CC ear on top of MC ear and work through both layers. Sc in 3 sts, hdc in 3 sts, sc in 2 sts, 2 sc in next 3 sts, sc in 2 sts, hdc in 3 sts, sc in 3 sts (21 sts).

Fasten off yarn leaving 9” length for sewing.

Fold bottom of ears and sew to top corners of box.

EYES: (Make 2)

Rnd 1: With white yarn, ch 4, 2 hdc in 2nd ch, hdc in next ch, 4 hdc in last ch. Working on opposite side of ch, hdc next ch, 2 hdc in last ch (8 sc). Do not join.

Rnd 2: 2 sc in next st, sc in next st, 2 sc in next 3 sts, sc in next st, 2 sc in next 2 sts (14 sc).

Fasten off leaving 9” length for sewing.

PUPILS:

With black yarn, ch 2 (or magic ring), 6 sc in 2nd ch. Join with sl st. Fasten off leaving 6” length.

Sew pupils to bottom half of eyes. Sew eyes to face above muzzle approximately 1” apart.

MANE:

Cut at least ten 5” pieces of black yarn. In center 5 sts at front of face between the ears, pull through 2 pieces at a time. Fold 2 pieces in half, insert hook in st, grab yarn and pull through st. Then pull through loop just made and pull tightly. Trim mane. More strands can be added if a thicker mane is desired.


PDF available at Donkey Tissue Box Cover Crochet Pattern

Pattern is 50% off for one day only

More Farm Animals

Farm Animals

ICYMI (In Case You Missed It)

Day 1 – Bunnies

Day 2 – Chicks

Day 3 – Ducks

Day 4 – Lambs and Goats


Day 6 – Baskets 

Day 7 – Easter Eggs

Day 8 – Clothing


Day 9 – Accessories


Day 10 – Crochet for Children

Day 11 – Crochet for Baby

Day 12 – Home Decor

Day 13 – Flowers


Day 14 – Miscellaneous


Affiliate Links

This post contains affiliate links. This means I may earn a commission should you chose to sign up for a program or make a purchase using my link. It’s okay – I love all of these companies anyways, and you will too!


Amazon affiliate: https://amzn.to/4hkS5Zd
Easter Eggs prefilled with Colorful Wind-Up Jumping Bunnies and Chicks


Happy Easter Mouse! book (from the author of If You Give a Mouse a Cookie)


Posted on 4 Comments

Easter Advent – Donkey

The Humble Donkey and the Heart of Easter

When we think of Easter, we often picture lilies, sunrise services, and perhaps a bunny or two. But one of the most quietly powerful symbols of Easter is the humble donkey.

In the days leading up to Easter, Jesus entered Jerusalem not on a horse of war, but on a donkey — a creature of peace and humility. This wasn’t just a random detail; it fulfilled an ancient prophecy (Zechariah 9:9) and set the tone for the kind of kingdom Jesus was building — one grounded in gentleness, love, and grace.

Donkeys may not be flashy, but they’re strong, steady, and faithful — much like the spirit of Easter itself. They carry burdens, walk with the weary, and don’t ask for applause. In many ways, they remind us to slow down, stay grounded, and carry love wherever we go.

This Easter, as we celebrate new life and fresh hope, let’s remember the donkey — a quiet hero in the greatest story ever told.

Today’s free download is a bookmark depicting Palm Sunday, when Jesus rode a donkey into Jerusalem.

Palm Sunday Bookmark

Donkey Mandala coloring page
Donkey Tissue Cover crochet pattern


Archie the Donkey Crochet Pattern using Bernat Blanket Yarn


Archie the Donkey

Materials:

Bernat Blanket yarn –

24 oz. Country Blue

3 oz. white

2 oz. black

Size M (9.0 mm) crochet hook

Yarn needle

5 lbs. Fiberfil

Gauge 2 sc = 1”, 2 rows sc = 1”

Finished donkey measures approximately 23” tall (sitting), 18” wide

NOTE: Ch-2 method to start a circle is preferred over magic ring when using blanket yarn. The bulkiness of the yarn prevents the hole that worsted sometimes leaves when using the ch-2 method.

BODY:

Rnd 1: With blue yarn, ch 2 (or magic ring), 8 sc in 2nd ch from hook. Do not join. Work in continuous rnds throughout.

Rnd 2: 2 sc in each sc around (16 sc).

Rnd 3: *Sc in next sc, 2 sc in next sc,* repeat around (24 sc).

Rnd 4: *Sc in next 2 sc, 2 sc in next sc,* repeat around (32 sc).

Rnd 5: *Sc in next 3 sc, 2 sc in next sc,* repeat around (40 sc).

Rnd 6: *Sc in next 4 sc, 2 sc in next sc,* repeat around (48 sc).

Rnd 7: *Sc in next 5 sc, 2 sc in next sc,* repeat around (56 sc).

Rnd 8: *Sc in next 6 sc, 2 sc in next sc,* repeat around (64 sc).

Rnd 9: *Sc in next 7 sc, 2 sc in next sc,* repeat around (72 sc).

Rnd 10: *Sc in next 8 sc, 2 sc in next sc,* repeat around (80 sc).

Rnds 11-23: Sc in each st.

Rnd 24: *Dec next 2 sc, sc next 8 sc,* repeat around (72 sc).

Rnds 25-26: Sc in each st.

Rnd 27: *Dec next 2 sc, sc next 7 sc,* repeat around (64 sc).

Rnds 28-29: Sc in each st.

Rnd 30: *Dec next 2 sc, sc next 6 sc,* repeat around (56 sc).

Rnds 31-32: Sc in each st.

Rnd 33: *Dec next 2 sc, sc next 5 sc,* repeat around (48 sc).

Rnds 34-35: Sc in each st.

Begin stuffing body.

Rnd 36: *Dec next 2 sc, sc next 4 sc,* repeat around (40 sc).

Rnds 37-38: Sc in each st.

Rnd 39: *Dec next 2 sc, sc next 3 sc,* repeat around (32 sc).

Rnds 40-41: Sc in each st.

Rnd 42: *Dec next 2 sc, sc next 2 sc,* repeat around (24 sc).

Rnds 43-44: Sc in each st.

Rnd 45: *Dec next 2 sc, sc next sc,* repeat around (16 sc).Fasten off blue yarn leaving 12” length for sewing on the head. The neck of the body remains open but will be covered when you sew on the head. Finish stuffing body.

LEGS: (Make 4)

Rnd 1: With white yarn, ch 2 (or magic ring), 8 sc in 2nd ch from hook. Do not join. Work in continuous rnds throughout.

Rnd 2: 2 sc in each sc around (16 sc).

Rnd 3: *Sc in next sc, 2 sc in next sc,* repeat around (24 sc).

Rnds 4-6: Sc in each st. Join with sl st at end of Rnd 6 and fasten off white.

Rnd 7: Join blue yarn, sc in each st. Do not join.

Rnds 8-22: Sc in each st. At end of Rnd 22, join with sl st. Fasten off blue leaving length for sewing.

Stuff legs firmly. Sew 2 back legs to bottom of body at front, spacing them about 3” apart at approximately Rnds 12-18. Sew 2 front legs to top body at front, approximately Rnds 30-35 with 1.5” to 2” spacing between the legs.

HEAD:

Rnd 1: With white yarn, ch 2 (or magic ring), 8 sc in 2nd ch from hook. Do not join. Work in continuous rnds throughout.

Rnd 2: 2 sc in each sc around (16 sc).

Rnd 3: *Sc in next sc, 2 sc in next sc,* repeat around (24 sc).

Rnds 4-7: Sc in each sc. At end of Rnd 7, join with sl st and fasten off white yarn.

Rnd 8: Join blue yarn, sc in each st.

Rnd 9: *Sc in next 5 sc, 2 sc in next sc,* repeat around (28 sc).

Rnds 10-12: Sc in each sc.

Rnd 13: *Sc in next 6 sc, 2 sc in next sc,* repeat around (32 sc).

Rnds 14-16: Sc in each sc.

Rnd 17: *Sc in next 7 sc, 2 sc in next sc,* repeat around (36 sc).

Rnds 18-20: Sc in each sc.

Rnd 21: *Sc in next 8 sc, 2 sc in next sc,* repeat around (40 sc).

Rnds 22-25: Sc in each sc.

Rnd 26: *Dec next 2 sc, sc next 3 sc,* repeat around (32 sc). Stuff head.

Rnd 27: *Dec next 2 sc, sc next 2 sc,* repeat around (24 sc).

Rnd 28: *Dec next 2 sc, sc next sc,* repeat around (16 sc).

Rnd 30: *Dec next 2 sc around (8 sc). Join with sl st. Fasten off. Finish stuffing and use ultimate finish to close. Sew Rnds 17-23 of head over opening at top of body. The head should cover the entire neck opening. Sew around twice for a stronger seam. Weave in all ends.

Ultimate Finish Technique –  https://youtu.be/jVpTr8mId3I

TAIL:

Row 1: With blue yarn, ch 6, sc in 2nd ch and next 4 ch (5 sc).

Rows 2-12: Ch 1, turn, sc in each st. Fasten off at end of Row 12 leaving a 12” length for sewing. Fold the tail in half lengthwise and sew sides together. Cut 5 pieces of black yarn 9” long. Fold each piece in half, insert hook into end of tail, pull through loop, pull ends through loop. Repeat around the tail. Sew tail to back of donkey at Rnd 10.

EARS: (Make 2)

Rnd 1: Ch 2 (or magic ring), 6 sc in 2nd ch from hook. Do not join. Work in continuous rnds throughout.

Rnd 2: *Sc in next st, 2 sc in next st (9 sc).

Rnds 3-4: Sc in each st.

Rnd 5: *Sc in next 2 sts, 2 sc in next st,* repeat around (12 sc).

Rnds 6-7: Sc in each st.

Rnd 8: *Sc in next 3 sts, 2 sc in next st,* repeat around (15 sc).

Rnds 9-10: Sc in each st.

Rnd 11: *Dec over next 2 sts, sc in next 4 sts,* repeat once, dec over next 2 sts, sc around (12 sc).

Rnds 12-13: Sc in each st. At end of Rnd 13, join with a sl st and fasten off yarn leaving 12” length for sewing. Fold bottom of ear (Rnd 13) in half and sew to head at Rnd 25 spacing ears approximately 3.5” apart.

EYES: (Make 2)

With white yarn, ch 4, 2 hdc in 2nd ch, hdc in next ch, 4 hdc in last ch. Working on opposite side of ch, hdc next ch, 2 hdc in last ch. Join with sl st. Fasten off leaving length for sewing.

PUPILS:

With black yarn, ch 2 (or magic ring), 6 sc in 2nd ch. Join with sl st. Fasten off leaving length for sewing.

Sew pupils to bottom half of eyes. Sew eyes to head at Rnds 14-18 approximately 1” apart.

MANE:

Cut 9” pieces of black yarn. Starting at front of face just below the years, pull through 2 pieces at a time, making 2 rows going down the neck and top 4 rnds of body. Fold 2 pieces in half, insert hook in st, grab yarn and pull through st. Then pull through loop just made and pull tightly.

CROSS:

Mark a line on the back of the donkey from the tail to 4 rnds below the mane, then another line going across the shoulders. Following markings, work sc in surface crochet in black. Weave in all ends.

Full tutorial for Archie the Donkey available on Youtube.

More Farm Animals

Farm Animals

ICYMI (In Case You Missed It)

Day 1 – Bunnies

Day 2 – Chicks

Day 3 – Ducks

Day 4 – Lambs and Goats


Day 6 – Baskets 

Day 7 – Easter Eggs

Day 8 – Clothing


Day 9 – Accessories


Day 10 – Crochet for Children

Day 11 – Crochet for Baby

Day 12 – Home Decor

Day 13 – Flowers


Day 14 – Miscellaneous


Affiliate Links

This post contains affiliate links. This means I may earn a commission should you chose to sign up for a program or make a purchase using my link. It’s okay – I love all of these companies anyways, and you will too!


Amazon affiliate: https://amzn.to/4hkS5Zd
Easter Eggs prefilled with Colorful Wind-Up Jumping Bunnies and Chicks


Happy Easter Mouse! book (from the author of If You Give a Mouse a Cookie)


Posted on 4 Comments

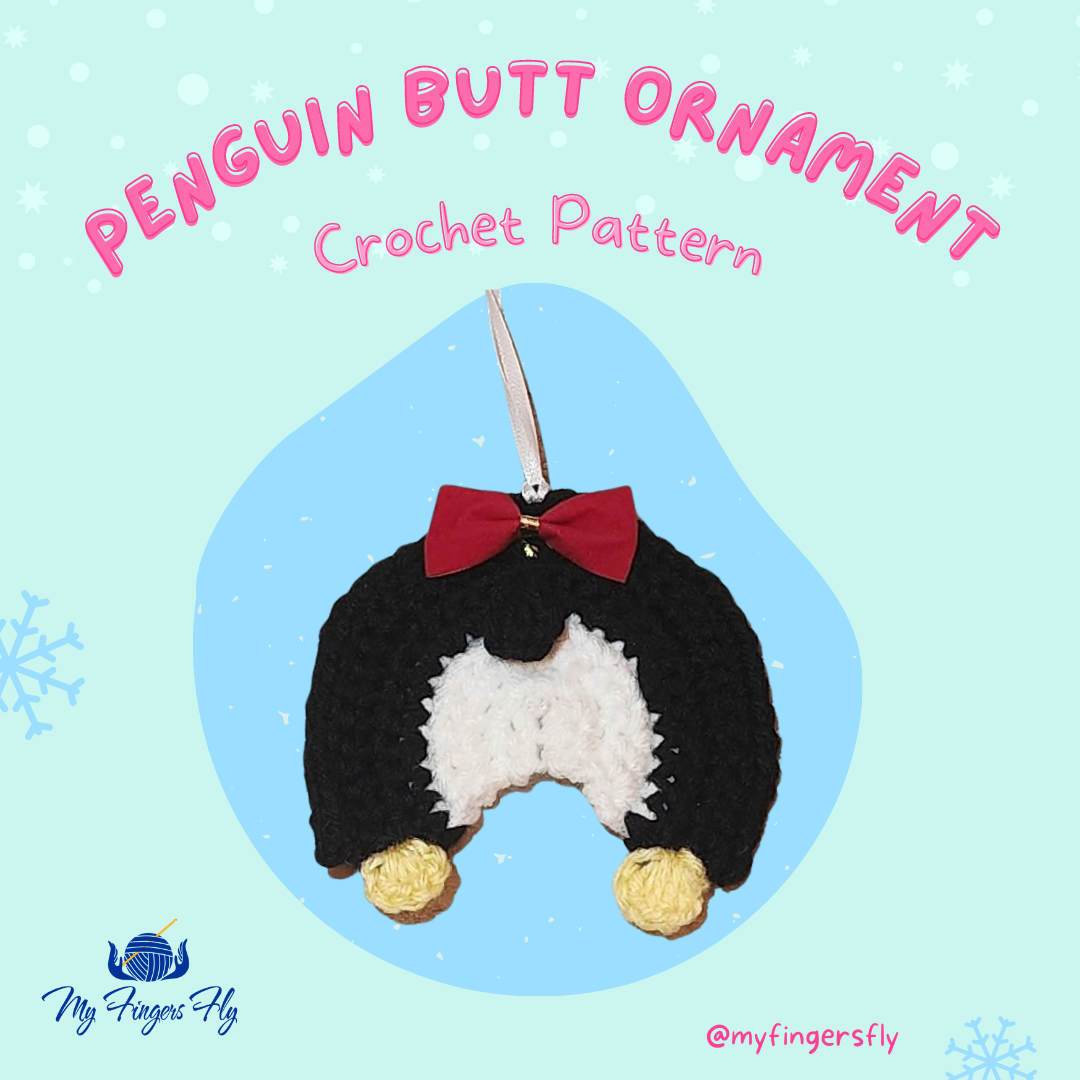
Penguin Butt Ornament Crochet Pattern

penguin butt ornament

Day 8 of the Ornament Advent Calendar

Penguin Butt Ornament crochet pattern is always free on the blog.

Download the calendar with links to all 24 patterns at Ornament Advent Calendar

Get all 24 ornaments in this great bundle for only $9.99 on Ravelry.

https://www.ravelry.com/redeem/my-fingers-fly-designs?sale=410562

Penguin Butt Ornament

Materials:

Worsted weight yarn:

8 yards black (MC)

5 yards white (CC)

2 yards yellow

2 yards pink (optional for heart)

Size G (4.0 mm) crochet hook

Ribbon

Gauge: 8 sc = 2″, 8 rows = 2″

Ornament measures 3.75” wide by 3.5” tall

Directions:

Row 1: With white yarn, ch 3, sc in 2nd ch from hook, 4 sc in next ch. Working on opposite side of starting ch, sc in last lp (6 sc).

Row 2: Ch 1, turn, sc in first st, 2 sc in each of next 4 sts, sc in next st (10 sc).

Row 3: Ch 1, turn, 2 sc in first st, *2 sc in next st, sc in next st,* 4 times, 2 sc in last st (16 sc).

Row 4: Ch 1, turn, 2 sc in first st, sc in next st, *2 sc in next st, sc in next 2 sts,* 4 times, sc in next st, 2 sc in last st (22 sc). Fasten off white.

Row 5: Attach MC yarn, ch 1, turn, sc in next 3 sts, *2 sc in next st, sc in next 3 sts,* 4 times, sc in next 3 sts (26 sc).

Row 6: Ch 1, turn, sc in next 3 sts, *2 sc in next st, sc in next 4 sts* 4 times, sc in next 3 sts (30 sc).

Row 7: Ch 1, turn, sc in next 3 sts, *2 sc in next st, sc in next 5 sts* 4 times, sc in next 3 sts (34 sc).

Row 8: Ch 1, turn, sc in next 3 sts, *2 sc in next st, sc in next 6 sts,* 4 times, sc in next 3 sts (38 sc). Fasten off yarn. Weave in all ends.

Tail:

Insert hook into center st of Row 5. Ch 2, dc, ch 2, sl st in same sp.

Heart: (optional)

With pink yarn, ch 3, in 3rd ch from hook work 3 dc, 2 hdc, ch 1, 2 hdc, 3 dc, ch 2, sl st in same sp. Pull center tight. Fasten off yarn leaving 9” length. Sew centered on white portion.

Feet:

Attach yellow yarn to end of Row 7, ch 1, 4 hdc, ch 1, sl st in same st. Repeat on other side of Row 7.

Add a bow to the tail for decoration.

Cut a piece of ribbon approximately 12” long and fold. Pull through top of ornament and tie off for hanger.

NOTE:

Ornament can also be made with bulky yarn such as Bernat Pipsqueak (same yardage). Use yellow worsted even when using fluffy yarn.

Ornament measures 4” wide by 3.75” tall with Bernat Pipsqueak yarn.

penguin butt ornament


PDF Download: Penguin Butt Ornament Crochet Pattern

More Penguin Ideas

penguin dot to dot
Penguin Dot to Dot
penguin ski mask
Penguin Ski Mask
penguin gift bag
Penguin Gift Bag
penguin amigurumi
Baby Penguin Amigurumi


Animal Butt Ornament Crochet Patterns

Goat Butt Ornament
polar bear butt ornament
Polar Bear Butt Ornament
horse butt ornament
Horse Butt Ornament
reindeer butt ornament
Reindeer Butt Ornament


National Crossword Solvers Day

crossword puzzle


Do you like crossword puzzles? Here’s a crochet-themed crossword for you.

Crochet Crossword Puzzle

ICYMI (In Case You Missed It)

polar bear butt ornament


Polar Bear Butt Ornament Crochet Pattern


reindeer butt ornament


Reindeer Butt Ornament Crochet Pattern


penguin gift bag


Penguin Gift Bag Crochet Pattern


Christmas gift tag


Christmas Gift Tags


WISH LIST


Crocheter’s Christmas Wish List

Affiliate Links

This page contains affiliate links. If you choose to purchase after clicking a link, I may receive a commission at no extra cost to you.


Posted on 1 Comment

Penguin Bookmark – Free Download

penguin bookmark

Are you ready for another penguin? Only 2 more days until the big Penguin Treasure Hunt. Friday will be my feature day in the Hidden Treasures Blog Hop, and boy do I have a lot of penguin treasures for you! Be sure to come back on Friday to get all the penguins.

penguin bookmark


Today’s freebie is a Penguin Bookmark to download for all the books you will be gifting this year. Make sure to print one for yourself, too.

Penguin Bookmark

More Penguin Ideas

penguin dot to dot
Penguin Dot to Dot
penguin ski mask
Penguin Ski Mask
penguin gift bag
Penguin Gift Bag
penguin amigurumi
Baby Penguin Amigurumi


ICYMI (In Case You Missed It)

polar bear butt ornament


Polar Bear Butt Ornament Crochet Pattern


reindeer butt ornament


Reindeer Butt Ornament Crochet Pattern


penguin gift bag


Penguin Gift Bag Crochet Pattern


Christmas gift tag


Christmas Gift Tags


WISH LIST


Crocheter’s Christmas Wish List

Affiliate Links

This page contains affiliate links. If you choose to purchase after clicking a link, I may receive a commission at no extra cost to you.


Posted on 1 Comment

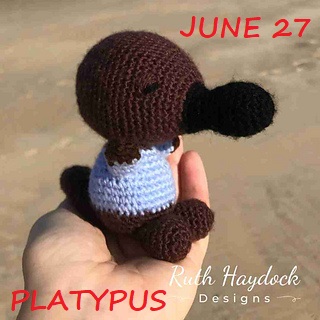
Zoo Blog Hop Day 27 – Platypus

platypus crochet pattern
It’s unofficial Platypus celebration day at Ruth Haydock Designs. Pam the Playtpus loves sunny days and blue skys. She also loves to swim in calm rivers and won’t touch the sea.
Pam is a really quick crochet pattern made with small amounts of yarn.  As she’s Australian, her blue top is actually a “rashie,” a rashie is a top for sun protection so she can continue to spend lots of time outdoors. Isn’t she adorable!

platypus crochet pattern


Platypus Bookmark


animal crochet patterns

Want even more animals to crochet? A to Z Animal Crochet Patterns Ebook

Prior Zoo Animal Posts

Fish crochet patterns

World Reef Awareness Day

owl crochet patterns

Owl Crochet Patterns

bat crochet patterns

Bat Crochet Patterns

cat crochet patterns

8 Cat Crochet Patterns Plus 2 Addi Patterns

bear crochet patterns

4 Bear Crochet Patterns

butterfly crochet

3 Butterfly Patterns

axolotl crochet

2 Axolotl Patterns

marine life crochet

World Oceans Day – 4 Whales and 4 Turtles

Koalas

lion crochet pattern

Zoo Blog Hop Day 10 – Lions

penguin crochet patterns

Zoo Blog Hop Day 11 – 4 Cuddly Penguins


Zoo Blog Hop Day 12 – Jack the Sloth


unicorn crochet pattern

Zoo Blog Hop Day 13 – Mystical, Magical Unicorns!

alligator crochet patterns

Zoo Blog Hop Day 14 – Alligators!

rabbit crochet patterns

Zoo Blog Hop Day 15 – Bunnies!

deer crochet pattern

Zoo Blog Hop Day 16 – Deer and Moose

seahorse crochet pattern

Zoo Blog Hop Day 17 – Seahorse

beaver crochet patterns

Zoo Blog Hop Day 18 – Beaver

monkey crochet pattern

Zoo Blog Hop Day 19 – Monkeys


eagle crochet patterns


Zoo Blog Hop Day 20 – Eagles


giraffe crochet patterns


Zoo Blog Hop Day 21 – Giraffes


zebra crochet patterns


Zoo Blog Hop Day 22 – Zebra


sheep crochet patterns


Zoo Blog Hop Day 23 – Sheep


elephant crochet patterns


Zoo Blog Hop Day 24 – Elephants


dog crochet patterns


Zoo Blog Hop Day 25 – Dogs

cow amigurumi


Zoo Blog Hop Day 26 – Cows

mouse crochet pattern


Zoo Blog Hop Day 28 – Mouse


fox crochet patterns


Zoo Blog Hop Day 29 – Fox


Final Day of Zoo Blog Hop – Birds


Affiliate Links:

This post contains affiliate links. If you use these links to buy something, we may earn a commission. Thanks for helping support my crochet blog.

FLASH SALE FRIDAY – Up to 50% off clearance items

Lion Brand Yarn
VIRTUAL SIDEWALK SALE – up to 40% off