Posted on — 5 Comments

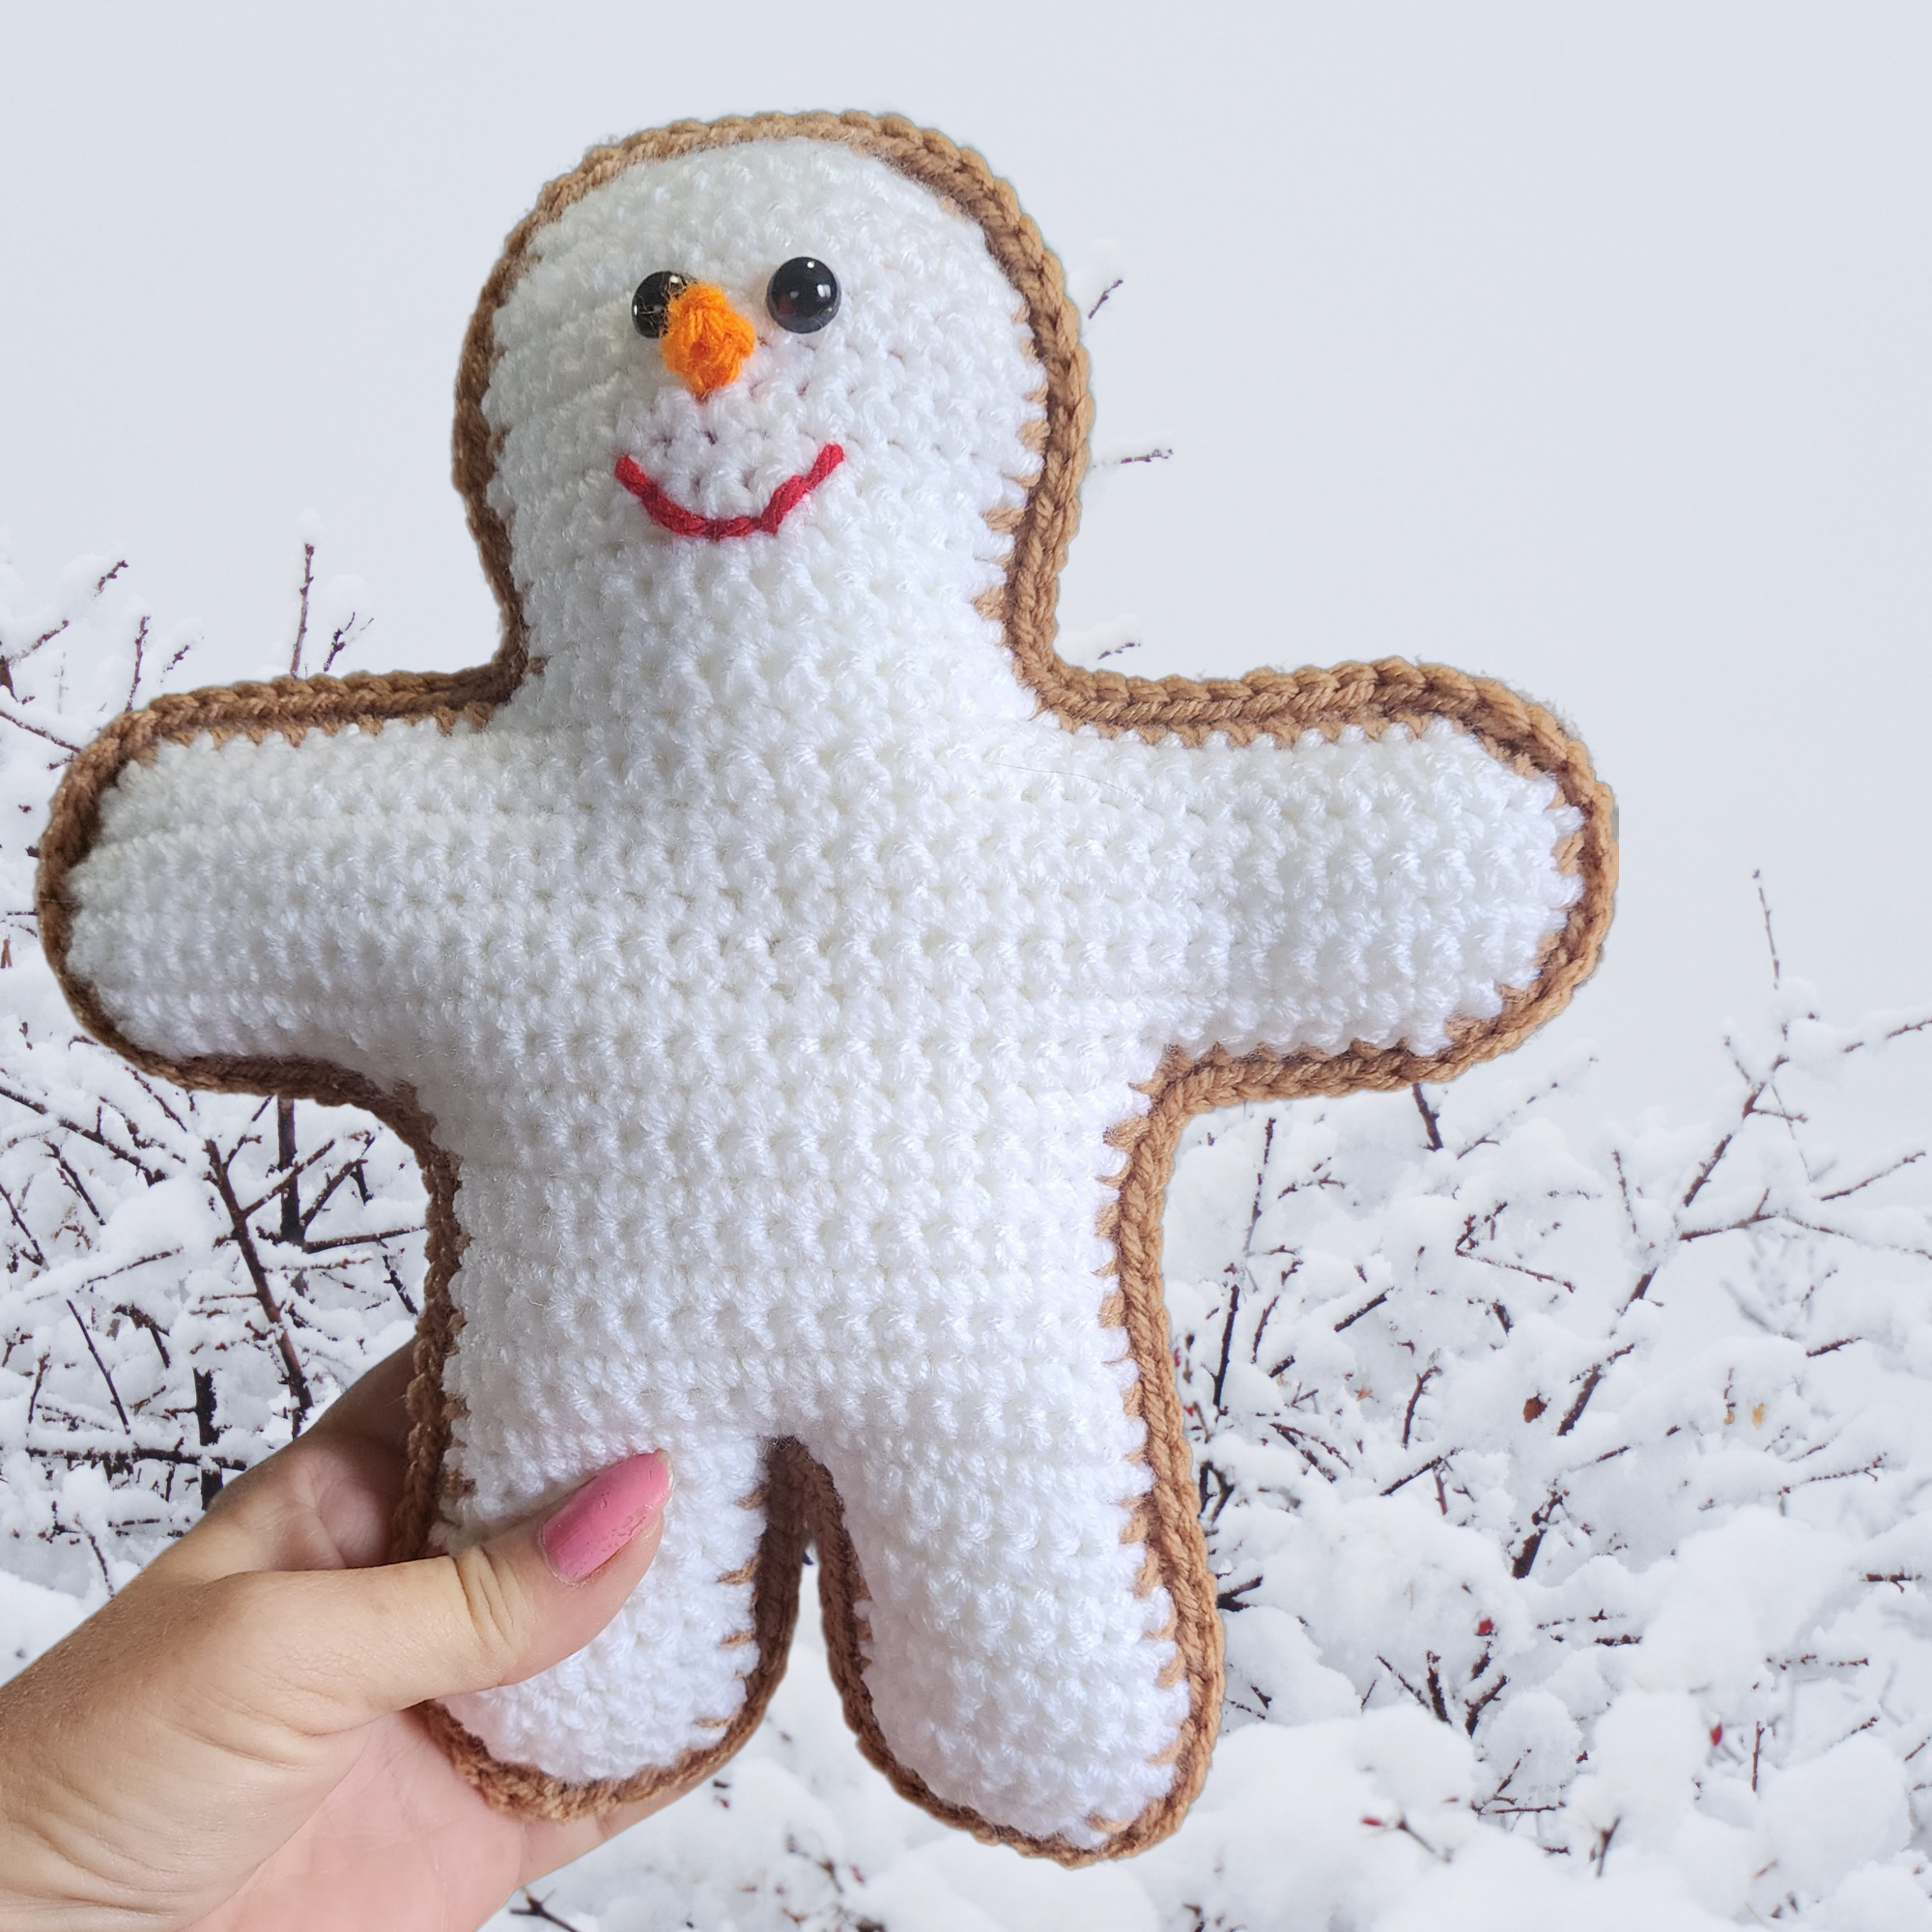
Gingerbread Snowman Cuddler Crochet Pattern

As winter arrives, bringing with it a blanket of snow and a chill in the air, there’s no better way to embrace the season than by crocheting your very own gingerbread snowman doll. This delightful DIY project not only adds a touch of whimsy to your decor but also provides an adorable playmate during winter’s indoor weather.

Materials:

Worsted weight yarn –

95 yards brown

60 yards white

1 yard orange

1 yard red

Crochet hook size G (4.00 mm)

Yarn needle

Fiberfill

8-mm black safety eyes

Gauge: 9 rows = 2”, 8 sc = 2”


Gingerbread snowman measures approximately 10” tall by 9” wide.

Back:

Row 1: With brown yarn, ch 18, sc in 2nd ch from hook and in all remaining ch (17 sc).

Row 2: Ch 1, turn, sc in each st.

Row 3: Ch 1, turn, dec, sc across (16 sc).

Rows 4-8: Ch 1, turn, sc in each st.

Row 9: Ch 1, turn, inc, sc across to last st, inc in last st (18 sc), ch 8.

Row 10: Sc in 2nd ch from hook and in next 6 ch, sc across 18 sts, work 7 fsc (32 sc).

Row 11: Ch 1, turn, inc in first st, sc across to last st, inc in last st (34 sc).

Row 12: Repeat Row 11 (36 sc).

Rows 13-15: Ch 1, turn, sc in each st.

Row 16: Ch 1, turn, dec, sc across to last 2 sts, dec (34 sc).

Row 17: Repeat Row 16 (32 sc).

Row 18: Ch 1, turn, sl st in first 10 sts, sc in next 12 sts, leave last 10 sts unworked (12 sc).

Row 19: Ch 1, turn, dec, sc across to last 2 sts, dec (10 sc).

Row 20: Ch 1, turn, sc in each st.

Row 21: Ch 1, turn, inc in first st, sc across to last st, inc in last st (12 sc).

Row 22: Ch 1, turn, sc in each st.

Row 23: Ch 1, turn, inc in first st, sc across to last st, inc in last st (14 sc).

Rows 24-28: Ch 1, turn, sc in each st.

Row 29: Ch 1, turn, dec, sc across to last 2 sts, dec (12 sc).

Row 30: Ch 1, turn, dec, sc across to last 2 sts, dec (10 sc).

Row 31: Ch 1, turn, dec, sc across to last 2 sts, dec (8 sc). Fasten off brown.

Leg:

Return to Row 1 of back.

Row 1: With wrong side facing, attach yarn at beg of Row 1. Ch 1, sc in next 8 sts. Leave remaining sts unworked.

Row 2: Ch 1, turn, dec, sc in next 5 sts, inc (8 sc).

Row 3: Ch 1, turn, sc in each st.

Row 4: Ch 1, turn, dec, sc in next 5 sts, inc (8 sc).

Rows 5-7: Ch 1, turn, sc in each st.

Row 8: Ch 1, turn, dec, sc in next 4 sts, dec (6 sc).

Row 9: Ch 1, turn, dec, sc in next 2 sts, dec (4 sc). Fasten off.

Other Leg:

Return to Row 1 of back.

Row 1: With wrong side facing, sk 1 st and attach yarn in next st. Ch 1, sc in remaining 8 sts.

Row 2: Ch 1, turn, inc, sc in next 5 sts, dec (8 sc).

Row 3: Ch 1, turn, sc in each st.

Row 4: Ch 1, turn, inc, sc in next 5 sts, dec (8 sc).

Rows 5-7: Ch 1, turn, sc in each st.

Row 8: Ch 1, turn, dec, sc in next 4 sts, dec (6 sc).

Row 9: Ch 1, turn, dec, sc in next 2 sts, dec (4 sc). Do not fasten off.

Edging:

Ch 1, turn, work 1 rnd of sc around entire piece.

Front:

Repeat back and legs with white yarn. Fasten off white yarn when both legs are completed. Before working edging, add face.

Insert safety eyes at Row 26 with 1 st between them.

Nose:

Attach orange yarn in center st of Row 25. Ch 1, dc, fasten off. Weave end through dc and through body. Tie ends tog on back side of piece.

Mouth:

Embroider with red yarn at Rows 22-23.

Edging: Go back to front piece and work edging in brown yarn. Ch 1, do not turn.

Place front on back with wrong sides facing. Sc through both thicknesses. Stuff as you go.

Weave in all ends.

Craft a charming winter wardrobe for your snowman doll using colored felt. Cut out scarves, hats, and any other accessories you desire. Secure them in place with glue or by sewing. Get creative with patterns and colors to make your snowman uniquely yours.


Ad-free PDF available at: Gingerbread Snowman Cuddler Crochet Pattern


In Case You Missed It

Turkey Gift Bag


Get a free gift tag for wrapping your Angel Rattle.

Christmas Angel Gift Tag


Airplane Ornament
Northern Lights Slippers
Horny Toad Keychain


Affiliate Links

This post contains affiliate links. This means I may earn a commission should you chose to sign up for a program or make a purchase using my link. It’s okay – I love all of these companies anyways, and you will too!


Posted on — 2 Comments

Eyeball Trick-or-Treat Bag Crochet Pattern

eyeball treat bags

Looking for a Halloween project that’s equal parts spooky and fun? The Eyeball Trick-or-Treat Bag Crochet Pattern is here to make your Halloween eye-conic! 👀 Whether you’re crafting for little monsters, Halloween parties, or just love creepy-cute crochet, this bag is the perfect blend of fright and delight.

👁️ Why You’ll Love It

This isn’t your ordinary candy bag! The round, eyeball-inspired design features colorful iris details, bold contrast stitching, and 3 versions — ready to hold all your Halloween treasures. It’s a playful and practical project that brings a wink (and maybe a scare) to your handmade holiday.

🧶 What You’ll Need

You’ll just need a few yarn colors (white, black, and your favorite “eye” color), a crochet hook, and a little Halloween spirit. The pattern includes step-by-step instructions, making it perfect for confident beginners and up.

🍭 Perfect For

  • Trick-or-treating with a twist

  • Halloween décor

  • Fun handmade gifts for spooky season fans

  • Adding a creepy-cute flair to your crochet collection

🕸️ Grab the Pattern

Ready to keep an eye on your candy this Halloween? Download the Eyeball Trick-or-Treat Bag Crochet Pattern [link to pattern] and start stitching your way to spooky sweetness today! 🎃🧶

Because nothing says “handmade Halloween” like a bag that’s watching your treats! 👁️💀🍬


Finished bag measures approximately 5 tall (including ears) by 3” wide.

Materials:

Worsted weight yarn

1 oz. MC (black for monster, white for bloodshot, yellow for wolf)

A few yards CC (yellow for monster, blue and black for bloodshot, green and black for wolf)

A few yards red sport yarn for bloodshot eye

Crochet hook size H (5.0 mm)

Directions:

Rnd 1: With MC yarn, ch 2. Sc 6 in second ch from hook. Do not join.

Rnd 2: 2 sc in each sc (12 sc).

Rnd 3: *1 sc in next sc, 2 sc in next sc,* repeat around (18 sc).

Rnd 4: *1 sc in next 2 sc, 2 sc in next sc*, repeat around (24 sc).

Rnd 5: *1 sc in next 3 sc, 2 sc in next sc*, repeat around (30 sc).

Rnd 6: *1 sc in next 4 sc, 2 sc in next sc,* repeat around (36 sc).

Rnds 7-14: Work even on 36 sc.

Rnd 15: *Dec, sc in next 4 sc,* repeat around (30 sc).

Rnd 16: *Dec, sc in next 3 sc,* repeat around (24 sc).

Rnd 17: Work even on 24 sc. Join.

Rnd 18: *Sc, ch 1, skip 1 sc,* repeat around. Join. Finish off black.

Drawstring:

With MC yarn, make a chain 12″ long and knot both ends. Pull through loops made in Rnd 17 of bag.

Monster Eyes: (Make 2)

Row 1: With yellow yarn, ch 2, 3 sc in 2nd ch from hook.

Row 2: Ch 1, turn, inc in first sc, sc in next sc, inc in last sc (5 sc).

Row 3: Ch 1, turn, inc in first sc, sc in next 3 sc, inc in last sc (7 sc). Fasten off leaving 9” length.

Use black to make straight st for pupils. Sew eyes to black bag.


Bloodshot Eyes:

Iris:

Rnd 1: With blue yarn (or desired color for eye), ch 2 (or magic circle), 6 sc in 2nd ch. Do not join.

Rnd 2: 2 sc in each sc (12 sc). Do not join.

Rnd 3: *sc in next sc, 2 sc in next sc,* repeat around. Join with sl st. Fasten off leaving 9” length for sewing.

Pupil:

With black yarn, ch 2 (or magic circle), 6 sc in 2nd ch. Join with sl st. Fasten off leaving 4” length for sewing. Sew pupil to center of iris, and sew iris to center front of white bag. Use red sport yarn to embroider squiggly lines extending from the iris outward.

Wolf Eyes:

Rnd 1: With green yarn, ch 2 (or magic circle), 6 sc in 2nd ch. Do not join.

Rnd 2: 2 sc in each sc (12 sc). Do not join.

Rnd 3: *sc in next sc, 2 sc in next sc,* repeat around. Join with sl st. Fasten off leaving 9” length for sewing.

Use black yarn to embroider pupil from top to bottom of eye. Sew eyes to center front of yellow bag.


Weave in all ends.

More Treat Bags

Witch’s Hat Treat Bag
Witch’s Cauldron Treat Bag
Bat Treat Bag


Bundle of 5 different Halloween treat bags

https://www.ravelry.com/redeem/my-fingers-fly-designs?sale=369351


halloween treat bag

In Case You Missed It

Frankenstein Tumbler Boot
Horny Toad Keychain


Food Crochet Patterns


Cats and Kittens


Links

This page contains affiliate links. If you choose to purchase after clicking a link, I may receive a commission at no extra cost to you.


Posted on — 8 Comments

Horny Toad Keychain Crochet Pattern

When I began my journey as a crochet designer 8 years ago, my first published design was the Horny Toad Amigurumi crochet pattern. To this day, it is still my favorite and most popular design. Since today is National Reptile Awareness Day, I decided to create a new horny toad design, a no-sew keychain pattern.
Materials:
Worsted weight yarn:
14 yards MC
1 yards of desired color for mouth
Size G (4.0 mm) crochet hook
Yarn needle
Fiberfill
Keychain
Finished horny toad measures approximately 3.5” tall by 3.5” wide (including spikes).
Gauge: 9 rows = 2”, 4 sc = 1”STITCHES:
Invisible decrease: https://youtube.com/shorts/0NC5nXyDvwI?feature=share
Ultimate finish: https://youtu.be/jVpTr8mId3I

Directions:
Rnd 1: With MC yarn, ch 2 (or magic ring), 6 sc in second ch from hook. Do not join. Work in continuous rnds unless otherwise specified.
Rnd 2: 2 sc in each sc (12 sc).
Rnd 3: *1 sc in next sc, 2 sc in next sc,* repeat around (18 sc).
Rnd 4: *1 sc in next 2 sc, 2 sc in next sc,* repeat around (24 sc).
Rnd 5: *1 sc in next 3 sc, 2 sc in next sc,* repeat around (30 sc).
Rnds 6-7: Sc in each st. Mark beg of Rnd 7.
Rnd 8: *Dec over next 2 sts, sc in next 3 sts,* repeat around times (24 sc).
Rnd 9: *Dec over next 2 sts, sc in next 2 sts,* repeat around (18 sc).
Rnd 10: *Dec over next 2 sts, sc in next st,* repeat around (12 sc).
Rnd 11: Dec around (6 sc). Join with sl st. Close with Ultimate Finish.
Eyes: (Make 2)
Mark Rnd 2 with 4 markers evenly spaced. Insert MC yarn at bottom marker, ch 1, work 3 dc in same sp, pull up lp in 3rd dc, insert hook into top of first dc, pull through lp (small popcorn). Sl st in top marker on same side.
Repeat on marked sts on opposite side of face.
Spikes:


Mark Rnd 7 on both sides even with bottoms of eyes (should be 19 sts). Join cc yarn at first marker with right side facing. *Sc ch 3, sl st in 3rd ch, sk 1 st,* repeat 2 times for a total of 3 small spikes.
*Sc, ch 4, sl st in 2 nd ch, sc in 3rd and 4th chs, sk 1 st on head,* repeat 2 times for a total of 3 large spikes.
*Sc ch 3, sl st in 3rd ch, sk 1 st,* repeat 2 times for 3 more small spikes. Sl st in next sc on head.
Fasten off yarn.

Weave in all ends.
Glue googly eyes in place so they are partially hidden by popcorn sts.
Alternatively, insert safety eyes through center of popcorn sts with eye facing toward outer edge and eye backing hidden by popcorn st.
Use CC yarn to embroider mouth at Rnd 5. Add beaded ch at center of Rnd 7.

If you would like the ad-free PDF version, you can purchase it here: Horny Toad Keychain No-Sew Crochet Pattern

More Horny Toads

Texas Horny Toad Crochet Pattern
horny toad hats
Horny Toad Hat Crochet Pattern
Horny Toad Coin Purse Crochet Pattern
Horny Toad Coin Purse
Texas Horny Toad Crochet Patterns Ebook

National Reptile Awareness Day


Roundup of free Reptile Crochet Patterns

In Case You Missed It


Witch’s Cauldron Trick-or-Treat Bag Crochet Pattern


Cats and Kittens


To download the free PDF, join My Fingers Fly Crochet Family on Facebook.

https://www.facebook.com/groups/875538646117910

Affiliate Links

This page contains affiliate links. If you choose to purchase after clicking a link, I may receive a commission at no extra cost to you.


Posted on — 4 Comments

Witch’s Cauldron Trick-or-Treat Bag Crochet Pattern

When I was in first grade, Miss Thelma always had a witch mannequin set up in the corner of the classroom. One by one, the students were allowed to enter the enclosure and get a piece of “scorpion stew” from her cauldron. The stew was peanut butter bar candy, and every Halloween I have to buy a bag as a tribute to Miss Thelma.

These cute little bags take less than 40 yards of yarn, and you can crochet several in an evening. They’re great for coworker gifts, teacher gifts, and of course, trick-or-treat bags.

Decorate with plastic bugs or eyes, add some wisps of “smoke” to the top of the brew, or use glow-in-the-dark yarn for an extra spooky treat.

PDF available at: Witch’s Cauldron Trick or Treat Bag Crochet Pattern


Materials:

Worsted weight yarn:

22 yards MC (black)

10 yards of desired color for brew

Size H (5.0 mm) crochet hook

Yarn needle

Candy to fill

Decorations as desired

Finished bag measures approximately 3.5” tall by 3.5” wide.


Gauge: 9 rows = 2”, 4 sc = 1”


STITCHES:

Invisible decrease: https://youtube.com/shorts/0NC5nXyDvwI?feature=share


Directions:

Rnd 1: With MC yarn, ch 2 (or magic ring), 6 sc in second ch from hook. Do not join. Work in continuous rnds unless otherwise specified.

Rnd 2: 2 sc in each sc (12 sc).

Rnd 3: *1 sc in next sc, 2 sc in next sc,* repeat around (18 sc).

Rnd 4: *1 sc in next 2 sc, 2 sc in next sc,* repeat around (24 sc).

Rnd 5: *1 sc in next 3 sc, 2 sc in next sc,* repeat around (30 sc).

Rnd 6: *1 sc in next 4 sc, 2 sc in next sc,* repeat around (36 sc).

Rnd 7: *1 sc in next 5 sc, 2 sc in next sc,* repeat around (42 sc).

Rnds 8-10: Sc in each st.

Rnd 11: *Dec, sc in next 5 sts,* repeat around (36 sc).

Rnds 12-13: Sc in each st. Join with sl st at end of Rnd 13.

Rnd 14: Working in FLO, *sc in next 2 sts, inc in next st,* repeat around (48 sc). Join with sl st. Fasten off black yarn.

Rnd 15: Working in BLO, attach CC yarn and sc in each st (36 sc).

Rnd 16: Sc in each st.

Rnd 17: *Dec over next 2 sc, sc in next 4 sts,* repeat around (30 sc).

Rnd 18: Sc in each st.

Rnd 19: *Dec over next 2 sts, sc in next 3 sts,* repeat around times (24 sc).  Join with sl st.

Rnd 20: *Sc, ch 1, skip 1 sc, repeat. Join. Fasten off CC yarn.

Drawstring: Using CC yarn, make a chain 12″ long and knot both ends. Pull through loops made in Rnd 20.

Decorate as desired by gluing plastic eyes, bugs, etc. on top of brew. To make steam rising from brew, cut 4” long pieces of matching CC yarn or smoke-colored yarn (black or gray) and pull through sts on brew, as many as you would like. Then use dog brush to comb yarn out into wispy strands.


More Treat Bags

Witch’s Hat Treat Bag
eyeball treat bags
Eyeball Treat Bag
Bat Treat Bag
Catrin & Catrina Treat Bags


In Case You Missed It


Cats and Kittens


To download the free PDF, join My Fingers Fly Crochet Family on Facebook.

https://www.facebook.com/groups/875538646117910

Affiliate Links

This page contains affiliate links. If you choose to purchase after clicking a link, I may receive a commission at no extra cost to you.


Posted on — Leave a comment

Global Cat Day

Global Cat Day is an annual event that celebrates and promotes the welfare of cats around the world, typically observed on October 16 each year. The day serves as an opportunity for cat lovers to raise awareness about the well-being of cats and to appreciate the companionship and joy that cats bring to our lives.

People celebrate World Cat Day in various ways, such as by adopting a cat from a shelter, volunteering at a local animal rescue organization, donating to cat-related charities, or simply spending quality time with their feline friends. It’s also a day to learn more about cat care, responsible pet ownership, and the issues affecting cats, including overpopulation, feral cat colonies, and the importance of spaying and neutering.

For crocheters, it’s the perfect day to make a few cat amigurumi or other cat-themed projects. Here’s a roundup of some of the cutest free cat crochet patterns on the internet.

simple cat amigurumi

Have you been searching for a quick and easy free crochet cat pattern that is perfect for beginners? Look no further! We have just the pattern for you – this adorable kitty cat amigurumi crochet pattern.

This free amigurumi pattern from Hooked on Patterns is designed to be straightforward and manageable even for those who are new to crochet. Whether you are a seasoned crafter or just starting out, you can learn how to crochet a cute cat using basic crochet stitches. You’ll be amazed at how quickly you can create your very own cuddly crochet kitty.

This simple free pattern is quick and easy, so you’ll be churning out these little kittens in no time! You only need to know how to make a magic ring, slip stitch, single crochet, increase by working sc into the same stitch, and decrease by working sc through the front loops only of 2 stitches.

https://hookedonpatterns.com/crochet-blog/free-crochet-cat-pattern


mini kitty amigurumi

This Mini Kitty Amigurumi from Loops and Love Crochet is worked from the bottom up. The legs, body, and head are made as one piece and then the arms and ears are sewn on at the end.

When finished, your Mini Kitty Amigurumi will measure approximately 6.5 inches tall!

https://www.loopsandlovecrochet.com/2020/03/01/mini-kitty-amigurumi-free-crochet-pattern/


cute catsby


The Cute Catsby from Sweet Softies

https://www.sweetsofties.com/2021/02/catsby.html


cat amigurumi


Kimono Kitty Doll from Sweet Softies

https://www.sweetsofties.com/2021/03/kimono-kitty.html


kitten pixie


Kitten Pixie from Sweet Softies

https://www.sweetsofties.com/2020/08/kitten-pixie.html


catnap kitties


Catnap Kitties from Sweet Softies

https://www.sweetsofties.com/2021/02/catnap-kitties.html


cat amigurumi


Jiji the Black Cat Amigurumi from Once Upon a Cheerio 

Quick and easy pattern for Halloween allows you to change to cotton thread to make black cat jewelry as well.


black cat potholder

Just a couple of changes to the Black Cat Keychain turn this design into a

Black Cat Potholder


Sir Purrsalot Coloring Page
Christmas Cat Gift Bags
Easy Cat Keychain
Cat Friendship Bracelet
Cute Cat Coloring Book


50% off on Global Cat Day

Ravelry: Furry Felines Crochet Patterns ebook

Celebrate your love of cats with this delightful Furry Felines Crochet Patterns eBook! Packed with charming designs, this digital collection is purr-fect for crochet lovers who can’t resist whiskers, paws, and playful personalities. Whether you’re making cuddly toys, home décor, or fun little gifts, this eBook will keep you inspired stitch after stitch.

What’s Inside:
* 16 cat-inspired crochet patterns in one convenient PDF
* Step-by-step written instructions (US crochet terms)
* Helpful photos and YouTube videos to guide you along the way
* Patterns range from quick beginner projects to more detailed designs

In Case You Missed It


To download the free PDF, join My Fingers Fly Crochet Family on Facebook.

https://www.facebook.com/groups/875538646117910

Affiliate Links

This page contains affiliate links. If you choose to purchase after clicking a link, I may receive a commission at no extra cost to you.


Save money this holiday season!

Sign up for Amazon Prime and get free shipping on thousands of items.

https://amzn.to/3ZyZe0t