This post contains affiliate links. This means I may earn a commission should you chose to sign up for a program or make a purchase using my link. It’s okay – I love all of these companies anyways, and you will too!
Looking for a fun and functional crochet project for your horse? This Simple Horse Ear Bonnet Crochet Pattern from Start Crochet is perfect for keeping your horse stylish, comfortable, and protected from pesky flies or distractions during rides.
This post contains affiliate links. This means I may earn a commission should you chose to sign up for a program or make a purchase using my link. It’s okay – I love all of these companies anyways, and you will too!
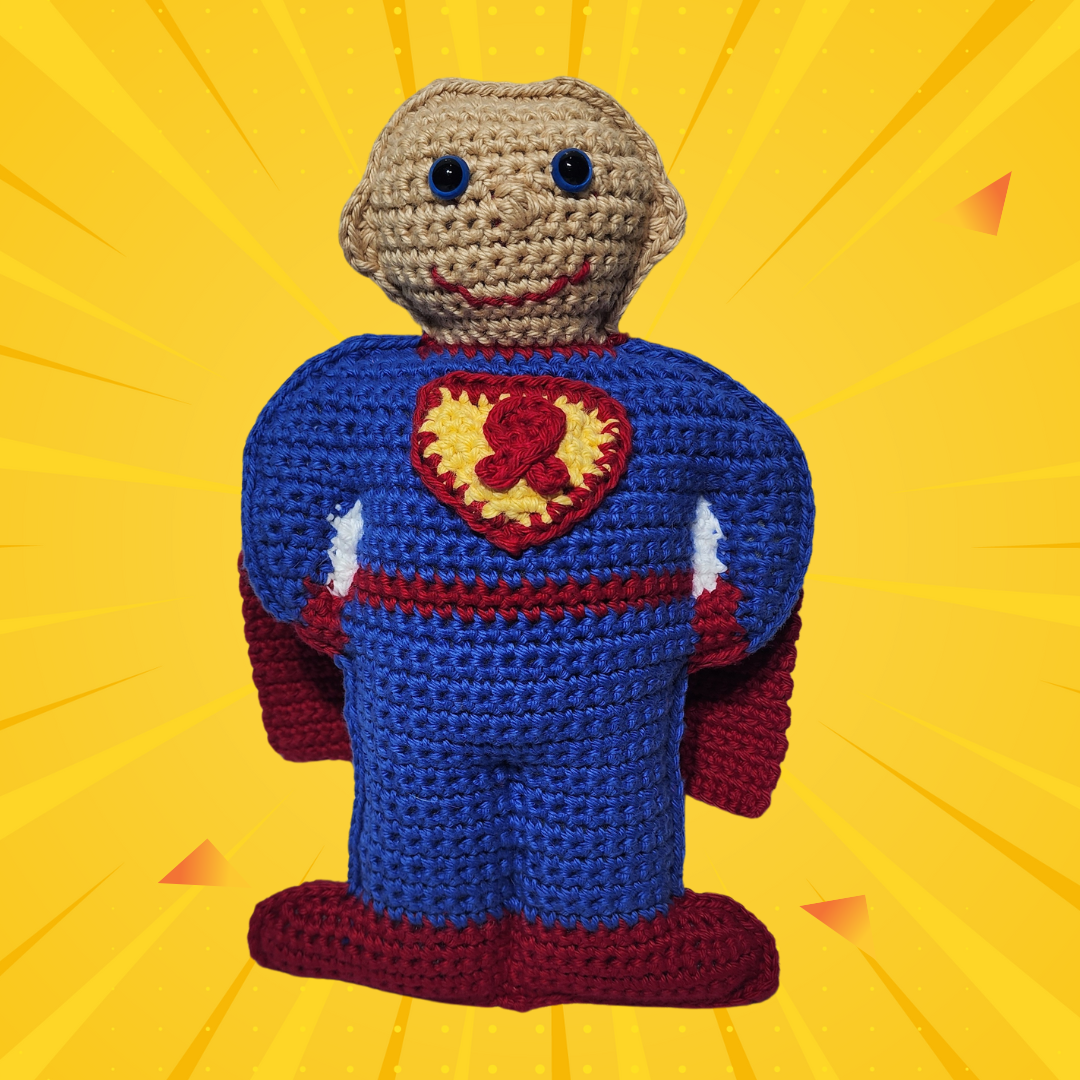
Some crochet projects are cute. Others are cozy. And then there are the ones that mean something. Kane the Kick Cancer Doll was created to be more than just a handmade toy—he’s a symbol of strength, hope, and courage for anyone facing a cancer journey.
Whether you’re stitching Kane for yourself, a loved one, or to donate, this doll is a reminder that even the smallest handmade gift can carry enormous comfort.
The dolls are crocheted with cotton worsted weight yarn, as it makes a softer toy – better for sensitive skin.
KANE DOLL
Materials:
Cotton worsted weight yarn:
100 yards blue
115 yards red
35 yards tan
5 yards yellow
2 yards white
Size G (4.0 mm) crochet hook
Polyfil
10-mm safety eyes
Finished doll measures approximately 7” wide by 11.5” tall.
STITCHES:
dc4tog: yo, (insert hook, yo, pull through, yo, pull through 2 lps) 4 times, yo, pull through all lps.
DIRECTIONS:
FRONT:
Row 1: With red yarn, ch 33, sc in 2nd ch from hook and in each remaining ch (32 sc).
Rows 2-3: Ch 1, turn, sc in each st.
Row 4: Ch 1, turn, dec, sc in next 28 sts, dec (30 sc).
Row 5: Ch 1, turn, dec, sc in next 26 sts, dec (28 sc).
Row 6: Ch 1, turn, dec, sc in next 24 sts, dec (26 sc). Fasten off red.
Row 7: Turn, sk 3 sc, attach blue in 4th sc, ch 1, sc in next 20 sts (20 sc).
Rows 8-22: Ch 1, turn, sc in each st. Attach red yarn at end of Row 22, ch 3.
Row 23: Turn, sc in 2nd ch from hook, sc in next ch, blue sc in next 20 sts, 2 red fsc (24 sc). Attach blue to end of row, ch 2.
Row 24: Turn, blue sc in 2nd ch, red inc in next st, red sc in next st, blue sc in next 20 sts, red sc in next st, red inc in next st, blue fsc (28 sc).
Row 25: Ch 1, turn, blue inc in first st, red sc in next 3 sts, blue sc in next 20 sts, red sc in next 3 sts, blue inc in last st (30 sc).
Row 26: Ch 1, turn, blue inc in first st, blue sc in next st, red sc in next 3 sts, blue sc in next 20 sts, red sc in next 3 sts, blue sc in next st, blue inc in last st (32 sc).
Row 27: Ch 1, turn, blue sc in first 3 sts, red sc in next st, white sc in next 2 sts, red sc in next 20 sts, white sc in next 2 sts, red sc in next st, blue sc in next 3 sts (32 sc).
Row 28: Ch 1, turn, blue sc in first 4 sts, white sc in next 2 sts, red sc in next 20 sts, white sc in next 2 sts, blue sc in last 4 sts (32 sc). Fasten off red.
Rows 29-31: Ch 1, turn, blue sc in first 4 sts, white sc in next 2 sts, blue sc in next 20 sts, white sc in next 2 sts, blue sc in last 4 sts (32 sc).
Row 32: Ch 1, turn, blue sc in first 5 sts, white sc in next st, blue sc in next 20 sts, white sc in next st, blue sc in last 5 sts (32 sc). Fasten off white.
Rows 33-35: Ch 1, turn, blue sc in each st (32 sc). Continue in only blue through Row 40.
Row 36: Ch 1, turn, dec, sc in next 28 sts, dec (30 sc).
Row 37: Ch 1, turn, dec, sc in next 26 sts, dec (28 sc).
Row 38: Ch 1, turn, dec, sc in next 24 sts, dec (26 sc).
Row 39: Ch 1, turn, dec, sc in next 22 sts, dec (24 sc).
Row 40: Ch 1, turn, dec, sc in next 20 sts, dec (22 sc).
Row 41: Ch 1, turn, blue dec, blue sc in next 3 sts, red sc in next 12 sts, blue sc in next 3 sts, blue dec (20 sc). Fasten off blue and red.
Row 42: Turn, sk first 5 sc, attach tan in 6th st, ch 1, sc in same st, sc in next 9 sts (10 sc). Leave last 5 sts unworked. Work in tan only through Row 55.
Row 43: Ch 1, turn, inc, sc in next 8 sts, inc (12 sc).
Row 44: Ch 1, turn, inc, sc in next 10 sts, inc (14 sc).
Row 45: Ch 1, turn, inc, sc in next 12 sts, inc (16 sc).
Rows 46-48: Ch 1, turn, sc in each st (16 sc).
Row 49: (Right side) Ch 1, turn, sc in next 7 sts, dc4tog (nose), sc in next 8 sts.
Rows 50-51: Ch 1, turn, sc in each st (16 sc).
Row 52: Ch 1, turn, dec, sc in next 12 sts, dec (14 sc).
Row 53: Ch 1, turn, dec, sc in next 10 sts, dec (12 sc).
Row 54: Ch 1, turn, dec, sc in next 8 sts, dec (10 sc).
Row 55: Ch 1, turn, dec, sc in next 6 sts, dec (8 sc). Fasten off tan.
Insert eyes at Row 50, 4 sts apart. Use red yarn to embroider mouth in desired shape at Rows 45-46.
BACK:
Repeat Rows 1-48 of front.
Rows 49-51: Ch 1, turn, sc in each st (16 sc).
Row 52: Ch 1, turn, dec, sc in next 12 sts, dec (14 sc).
Row 53: Ch 1, turn, dec, sc in next 10 sts, dec (12 sc).
Row 54: Ch 1, turn, dec, sc in next 8 sts, dec (10 sc).
Row 55: Ch 1, turn, dec, sc in next 6 sts, dec (8 sc). Fasten off tan.
With right sides tog, pin front to back. Attach red yarn at bottom center. Sc through both thicknesses all the way around the dill with 2 sc at corners. Curves may also require 2 sc at some spots. Change colors as needed to match colors of doll. When you get to the head, sk Row 48, 5 dc in Row 49, sk Row 50 (ear). Continue around top of head. On opposite side, sk Row 51, 5 dc in Row 49, sk Row 48, continue in sc around the rest of the doll. Start stuffing at this point and continue to stuff as you close the coll.
With white yarn, make straight sts through both layers around edges of white section. Pull sts tight to create elbows.
With matching yarn, sew a line of straight sts from bottom to Row 16. Pull sts tight to separate legs.
Cape:
Row 1: With red yarn, ch 19, sc in 2nd ch from hook and each remaining ch (18 sc).
Rows 2-10: Ch 1, turn, inc first st, sc across, inc last st (36 sc at end of Row 10).
Rows 11-34: Ch 1, turn, sc in each st. Fasten off yarn at end of Row 34.
Blocking cape is recommended for it to drape nicely. Sew Row 1 of cape to back doll’s neck at Row 41.
Emblem:
Row 1: With yellow yarn, ch 2, 2 sc in 2nd ch from hook.
Row 2: Ch 1, turn, inc twice (4 sc).
Row 3: Ch 1, turn, inc, sc in next 2 sts, inc (6 sc).
Row 4: Ch 1, turn, inc, sc in next 4 sts, inc (8 sc).
Row 5: Ch 1, turn, inc, sc in next 6 sts, inc (10 sc).
Rows 6-8: ch 1, turn, sc in each st. Fasten off yellow.
Attach red yarn to bottom at Row 1 and sc around entire piece with 2 sc in each corner. Join with sl st. Fasten off red leaving 12” length for sewing.
With red yarn, ch 15, working in back lp, sc in 2nd ch and next 13 ch. Fasten off leaving 9” length for sewing. Shape into cancer ribbon and sew to center of emblem.
Sew emblem centered to front at Rows 29-38.
Hat: (30 yards yarn in desired color)
Rnd 1: With blue yarn, ch 2 (or magic ring), 6 sc in 2nd ch from hook. Do not join. Work in continuous rnds throughout hat.
Rnd 2: 2 sc in each st (12 sc).
Rnd 3: *Sc in next st, 2 sc in next st,* repeat around (18 sc).
Rnd 4: *Sc in next 2 sts, 2 sc in next st,* repeat around (24 sc).
Rnd 5: *Sc in next 3 sts, 2 sc in next st,* repeat around (30 sc).
Rnd 6: *Sc in next 4 sts, 2 sc in next st,* repeat around (36 sc).
Rnd 7: *Sc in next 5 sts, 2 sc in next st,* repeat around (42 sc).
Rnd 8: *Sc in next 6 sts, 2 sc in next st,* repeat around (48 sc). Join with sl st.
Rnds 9-11: Ch 1, *fphdc, bphdc,* repeat around. Join with sl st. Fasten off at end of Rnd 11.
The Simply Love Mosaic Cushion Cover is a small, satisfying project designed as a gentle introduction to overlay mosaic crochet. With just a simple heart-motif mosaic panel, it’s perfect for practicing the basics without feeling overwhelmed.
This post contains affiliate links. This means I may earn a commission should you chose to sign up for a program or make a purchase using my link. It’s okay – I love all of these companies anyways, and you will too!
Sunflowers in Snow Scarf: A Cozy Crochet Pattern for Winter
Winter’s wonderland takes center stage every January with the celebration of World Snow Day. This global event, organized by the International Ski Federation, aims to encourage outdoor fun in the snow while fostering a love for winter activities among children and families. Whether you’re an avid skier, a snowball fight champion, or simply a lover of the season’s serene beauty, World Snow Day offers something for everyone.
Personally, I don’t like the cold, so I prefer to watch the snow from indoors. Currently living in Texas, it’s not an issue very often.
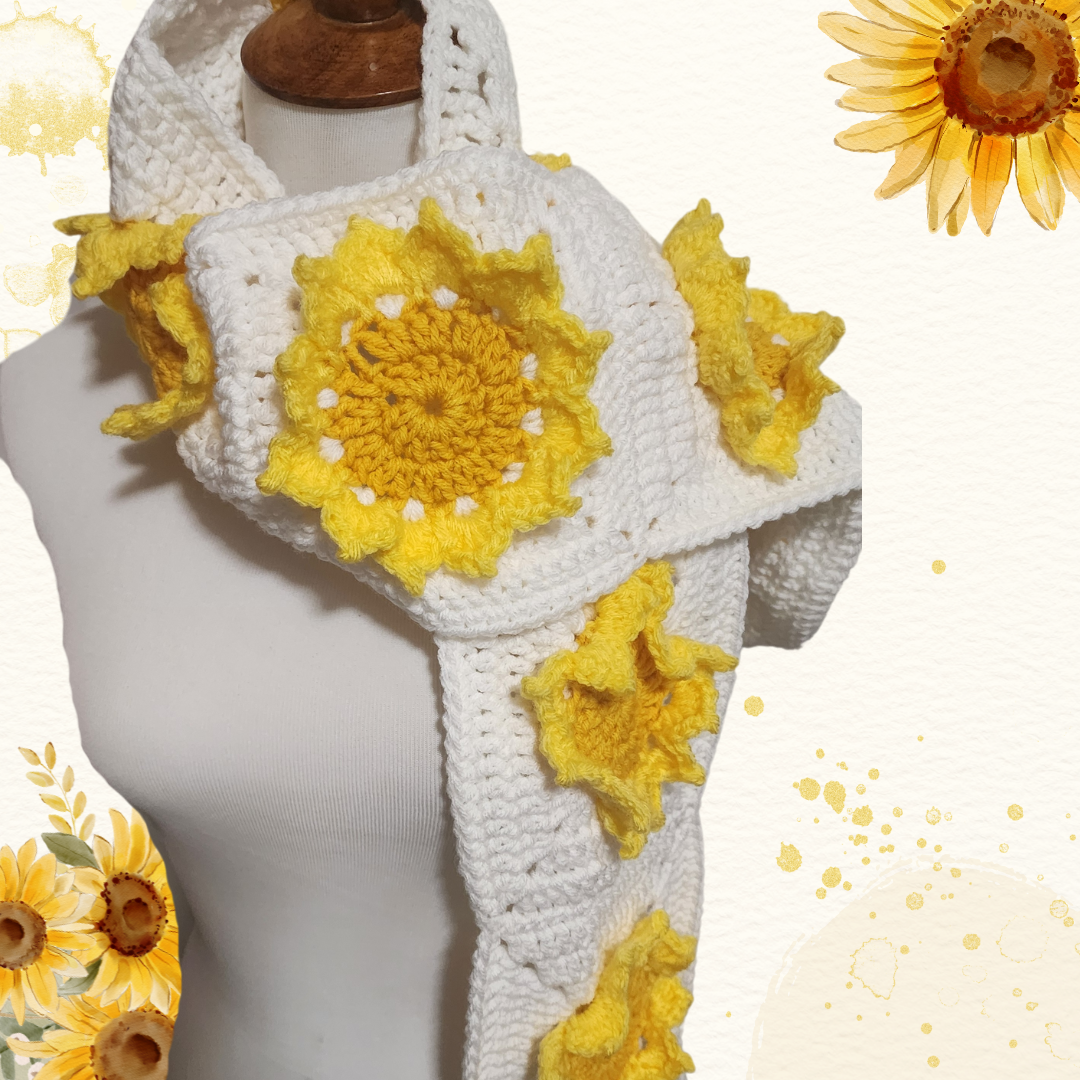
When the frosty chill of winter surrounds us, what better way to stay warm and cheerful than with a cozy scarf inspired by the sunny warmth of summer? The “Sunflowers in Snow” crochet scarf pattern combines the brightness of sunflowers with the crisp beauty of a snowy landscape. Perfect for gifting or adding a pop of sunshine to your winter wardrobe, this pattern is both beginner-friendly and endlessly customizable.
Materials:
Worsted weight yarn:
300 yards white
100 yards yellow
60 yards gold
Size I (5.5 mm) crochet hook
Finished scarf measures approximately 6.5” wide by 65” long. Add or decrease squares to adjust length of scarf.
To add extra squares for a longer scarf, each sunflower granny square uses approximately 30 yards
white, 10 yards yellow, and 6 yards gold.
DIRECTIONS:
Rnd 1: With gold yarn, ch 4, join with sl st. Ch 3 (counts as first dc), 11 dc in ring. Join with sl st
in top of beg ch-3 (12 dc).
Rnd 2: Ch 3 (counts as first dc), dc in top of ch-3, 2 dc in each of the next 11 dc, join with sl st in
top of beg ch-3 (24 dc). Fasten off gold yarn.
Rnd 3: Join yellow yarn with sl st in first st, *ch 3, sk next st, sl st in next st,* repeat around (12
ch-3 sps). Join with sl st.
Rnd 4: Sl st to join Rnd 3 counts as first sl st of Rnd 4. *In ch-3 sp, work 3 dc, ch 2, sl st I 2nd ch,
3 dc. Sl st in next sl st,* repeat around. Join with sl st in first sl st of Rnd 4 (12 petals). Fasten off
yellow yarn.
Rnd 5: With white yarn working behind yellow rows in skipped sts of Rnd 2, ch 3, 2 dc in
skipped st, 3 dc in next skipped st, 3 dc, ch 2, 3 dc in next skipped st, *3 dc in each of the next 2
skipped sts, 3 dc, ch 2, 3 dc I next skipped st,* repeat 2 times.
Rnds 6-7: Ch 3 (counts as first dc), *dc in each dc to end of row, 2 dc, ch 2, 2 dc in ch-2 sp,*
repeat around. After fourth corner is made, dc in each dc, join with sl st in beg ch-3. Fasten off
white leaving 12” length for sewing.
Joining Granny Squares:
YouTube Tutorial:
With right sides tog, pick up both lps in top piece and bottom piece all the way across one
side. Starting at ch-2 sp in corner, sew tog 2nd ch of both sides. Sew tog each dc and ch sp along
the side, ending with sewing tog first ch in ch-2 sp. Join all squares in a single row in the same
manner.
Border:
YouTube Tutorial:
Join white yarn at any point on the edge of the scarf. Dc in each dc, dc in each ch-1 sp including
at the seams where you will dc in 1 ch on each side of the seam. At the corner, work 3 dc, ch 2,
3 dc in the corner ch-2 space. Occasionally lay your scarf flat to be sure the edging is not
stretching or buckling. If necessary, adjust by adding or removing sts. Work all 4 sides in the
same manner, joining with a sl st in the beg ch 3.
January 19 – The Waffle Puzzle Infinity Scarf from Keju Crochet Design is a crochet infinity scarf pattern easy for beginners to make. This infinity scarf is worked up using the Waffle stitch.
This post contains affiliate links. This means I may earn a commission should you chose to sign up for a program or make a purchase using my link. It’s okay – I love all of these companies anyways, and you will too!
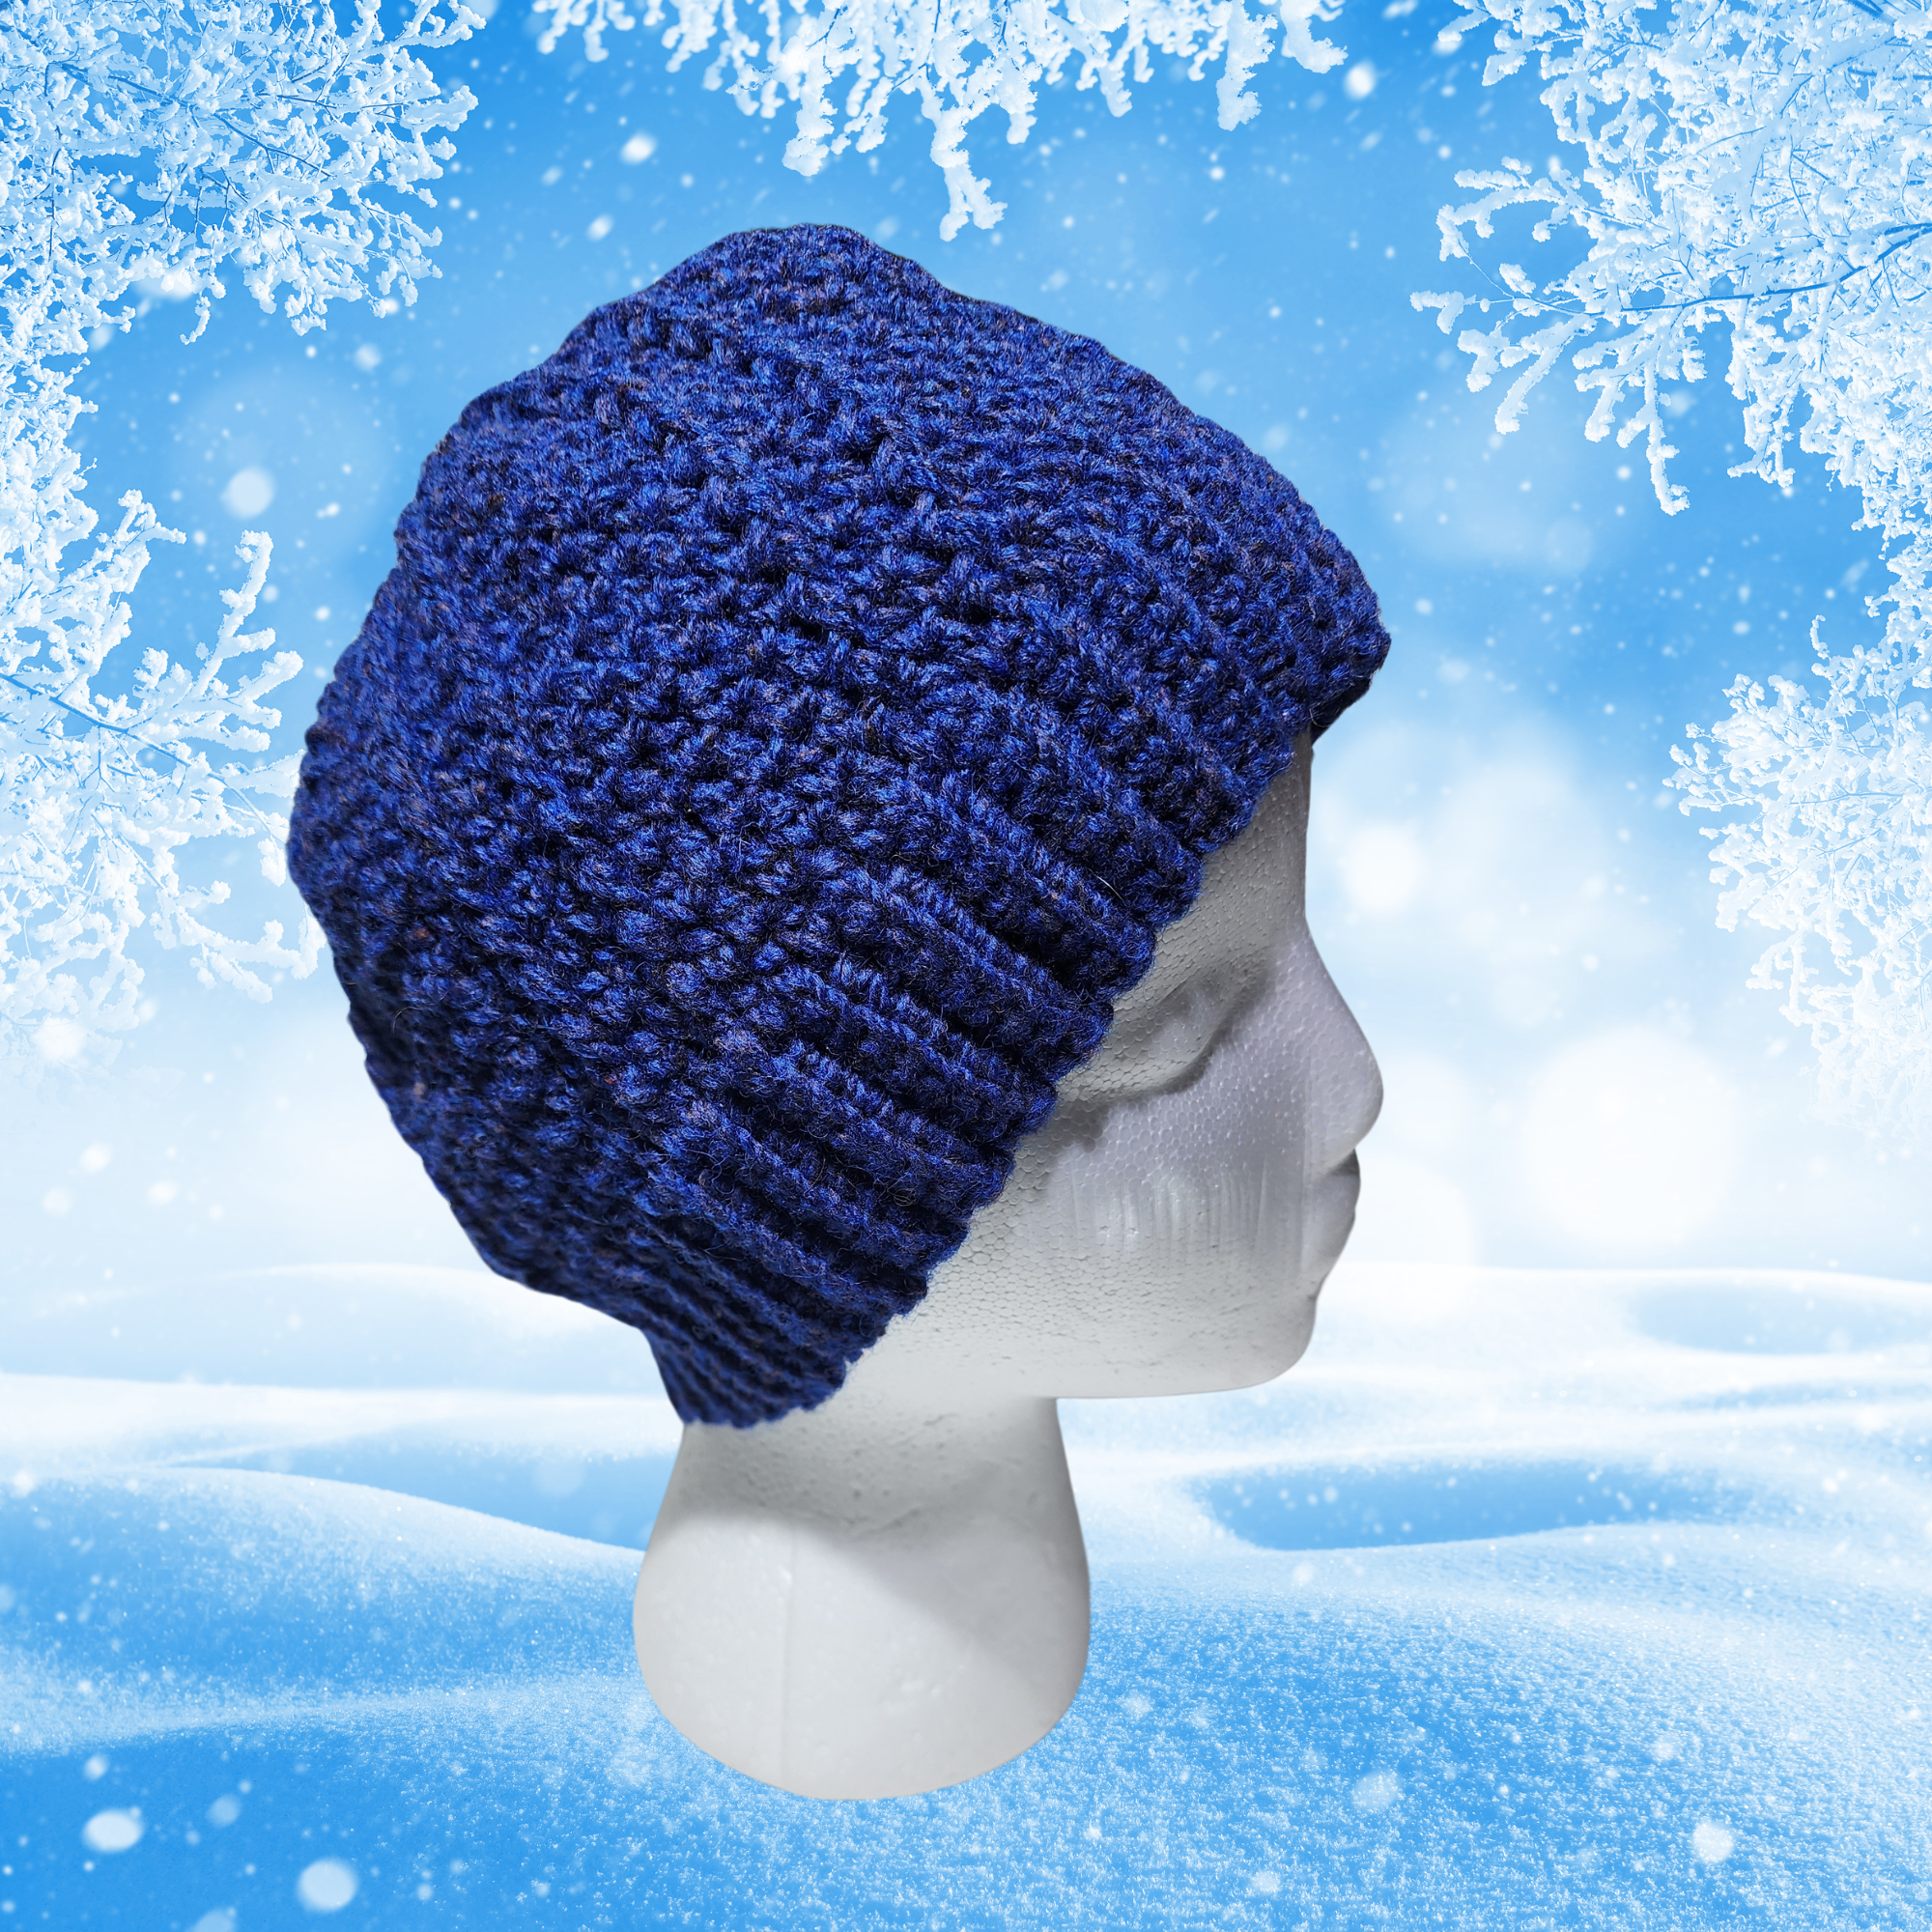
Gear up for your next winter adventure with the Ski Slope Hat crochet pattern. This charming design combines functionality with style, keeping you warm and fashionable on the slopes or during chilly outings. Crafted with worsted weight yarn and textured stitches, this hat provides comfort and insulation against the cold while showcasing your crochet skills. The pattern features a unique design resembling the ski tracks going down the mountain, making it a perfect accessory for winter sports enthusiasts or anyone seeking a touch of alpine charm. Whether you’re hitting the slopes or strolling through snowy landscapes, this hat will be your go-to companion for staying snug and stylish all season long.
The pattern incorporates textured stitches, adding visual interest and depth to the hat. The unique design resembles the ski tracks you create as you swish down the mountain.
Easily adjustable pattern allows you to customize the men’s size and color to suit your preferences:
* Medium (size 7 1/8) 22.5” circumference, 8.5” height
* Large (size 7 3/8) 23” circumference, 9:” height
* XL (size 7 ½) 23.5” circumference, 9.5” height
Size Medium is free to view on the blog. The full PDF with all 3 sizes is on sale for National Hat Day for only $2.00:
Leave an 8” length of yarn at beginning for sewing ribbing closed.
Row 1: With G hook, ch1 9, sc in 2nd ch from hook and in remaining 7 ch (8 sc).
Rows 2-80: Ch 1, turn, working in BLO, sc in each st. At end of last row, do not fasten off. Use 8” length from beginning to sew Row 1 to last row.
Hat: Switch to size H hook. Ch 1, hdc in each row end around (80 hdc). Join with sl st. Do not turn.
Rows 2-7 [9,11]: Ch 1, hdc in next 6 sts, *fpdc in next st, hdc in next 2 sts, fpdc in next st, hdc in next 6 sts,* repeat around. Hdc in remaining sts(80 sts). Join with sl st. Do not turn.
Because crochet sts are slightly offset, the raised sts (fpdc) will move slightly to the left with each round creating the ski tracks.
Row 8: Ch 1, hdc in next 2 sts, dec over next 2 sts, hdc in next 2 sts, *fpdc in next st, hdc in next 2 sts, fpdc in next st, hdc in next 2 sts, dec over next 2 sts, hdc in next 2 sts,* repeat around, hdc in remaining sts (72 sts). Join with sl st. Do not turn.
Row 9: Ch 1, hdc in next 2 sts, dec over next 2 sts, hdc in next st, *fpdc in next st, hdc in next 2 sts, fpdc in next st, hdc in next 2 sts, dec over next 2 sts, hdc in next st,* repeat around, hdc in remaining sts (64 sts). Join with sl st. Do not turn.
Row 10: Ch 1, hdc in next st, dec over next 2 sts, hdc in next st, *fpdc in next st, hdc in next 2 sts, fpdc in next st, hdc in next st, dec over next 2 sts, hdc in next st,* repeat around, hdc in remaining sts (56 sts). Join with sl st. Do not turn.
Row 11: Ch 1, hdc in next st, dec over next 2 sts, *fpdc in next st, hdc in next 2 sts, fpdc in next st, hdc in next st, dec over next 2 sts,* repeat around, hdc in remaining sts (48 sts). Join with sl st. Do not turn.
Row 12: Ch 1, dec over next 2 sts, *fpdc in next st, hdc in next 2 sts, fpdc in next st, dec over next 2 sts,* repeat around, hdc in remaining sts (40 sts). Join with sl st. Do not turn.
Row 13: Ch 1, hdc in next st, *fpdc in next st, dec over next 2 sts, fpdc in next st, hdc in next st,* repeat around, hdc in remaining sts (32 sts). Join with sl st. Do not turn.
Row 14: Ch 1, *sk hdc, fp dc in next st,* repeat around (16 fpdc). Join with sl st. Close with ult fin.
This post contains affiliate links. This means I may earn a commission should you chose to sign up for a program or make a purchase using my link. It’s okay – I love all of these companies anyways, and you will too!
Contains information related to marketing campaigns of the user. These are shared with Google AdWords / Google Ads when the Google Ads and Google Analytics accounts are linked together.
90 days
__utma
ID used to identify users and sessions
2 years after last activity
__utmt
Used to monitor number of Google Analytics server requests
10 minutes
__utmb
Used to distinguish new sessions and visits. This cookie is set when the GA.js javascript library is loaded and there is no existing __utmb cookie. The cookie is updated every time data is sent to the Google Analytics server.
30 minutes after last activity
__utmc
Used only with old Urchin versions of Google Analytics and not with GA.js. Was used to distinguish between new sessions and visits at the end of a session.
End of session (browser)
__utmz
Contains information about the traffic source or campaign that directed user to the website. The cookie is set when the GA.js javascript is loaded and updated when data is sent to the Google Anaytics server
6 months after last activity
__utmv
Contains custom information set by the web developer via the _setCustomVar method in Google Analytics. This cookie is updated every time new data is sent to the Google Analytics server.
2 years after last activity
__utmx
Used to determine whether a user is included in an A / B or Multivariate test.
18 months
_ga
ID used to identify users
2 years
_gali
Used by Google Analytics to determine which links on a page are being clicked
30 seconds
_ga_
ID used to identify users
2 years
_gid
ID used to identify users for 24 hours after last activity
24 hours
_gat
Used to monitor number of Google Analytics server requests when using Google Tag Manager
1 minute
Marketing cookies are used to follow visitors to websites. The intention is to show ads that are relevant and engaging to the individual user.
Pinterest Tag is a web analytics service that tracks and reports website traffic.
Unique value with which users can be identified by X. Collected information is used to be personalize X services, including X trends, stories, ads and suggestions.
2 years
external_referer
Our Website uses X buttons to allow our visitors to follow our promotional X feeds, and sometimes embed feeds on our Website.
2 years
guest_id
This cookie is set by X to identify and track the website visitor. Registers if a users is signed in the X platform and collects information about ad preferences.


 Red Heart Crochet Kit
 Safety Eye Tool