Posted on Leave a comment

Carnation Gift Tag – Free Download

made with love

The flower for January birthdays is the Carnation, scientific name Dianthus (of Zeus). The ancient Greeks called it “the flower of the gods.” They have a slightly spicy scent, sort of like cloves. Each time I smell a carnation, the scent carries me back to high school – school dance corsages made of red and pink carnations. Today’s free download is a Carnation Gift Tag for the January birthdays.

made with love

More Gift Tags


Gift Tags to Download


ICYMI (In Case You Missed It)

smores pillow


Smores Pillow Crochet Pattern


Unicorn Bobblehead Crochet Pattern


Unicorn Bobblehead Crochet Pattern


crochet resolutions


2023 Crochet Resolutions


year in review


2022 Year in Review


gnome ornament


Skinny Gnome Ornament Crochet Pattern


Affiliate Links

This page contains affiliate links. If you choose to purchase after clicking a link, I may receive a commission at no extra cost to you.


Posted on 6 Comments

Smores Pillow Crochet Pattern

smores pillow

I have a niece who has never liked sweets from the time she was a baby. The one exception is smores – she LOVES smores. Any time they visit us during cold weather, I make sure to have all the ingredients on hand so they kids can roast marshmallows in the fireplace to make smores. This Christmas I crocheted her a Smores Pillow. It turned out so cute!


Materials:
Bernat Blanket Yarn:
7 oz. White
15 oz. Almond
5 oz. Baby Sand
1 yard Pink
Size M (9.0 mm) crochet hook
Yarn needle
24-mm safety eyes
Fiberfill
2 pieces Poly Foam 1” x 12” x 12”

Gauge: 7 sts = 3”, 6 rows = 3”

Pillow measures approximately 12” tall.

Directions:
MARSHMALLOW:
Rnd 1: With White yarn, ch 2, 7 sc in 2nd ch. Do not join. Work in continuous rnds unless otherwise noted.
Rnd 2: 2 sc in each st (14 sc).
Rnd 3: *Sc in next st, 2 sc in next st,* repeat around (21 sc).
Rnd 4: *Sc in next 2 sts, 2 sc in next st,* repeat around (28 sc).
Rnd 5: *Sc in next 3 sts, 2 sc in next st,* repeat around (35 sc).
Rnd 6: *Sc in next 4 sts, 2 sc in next st,* repeat around (42 sc).
Rnd 7: *Sc in next 5 sts, 2 sc in next st,* repeat around (49 sc).
Rnd 8: *Sc in next 6 sts, 2 sc in next st,* repeat around (56 sc). Join with sl st.
Rnd 9: Working in BLO, sc in each st.
Rnds 10-25: Working in both lps, sc in each st. Join with sl st at end of Rnd 25.
Rnd 26: Working in BLO, *sc in next 6 sts, dec over next 2 sts,* repeat around (49 sc).
Rnd 27: Working in both lps, *sc in next 5 sts, dec over next 2 sts,* repeat around (42 sc).
Rnd 28: *Sc in next 4 sts, dec over next 2 sts,* repeat around (35 sc).
Insert eyes at Rnd 18, approximately 6 sts apart.
Stuff marshmallow but not too firmly. Excess stuffing will pouf out the top and bottom.
Rnd 29: *Sc in next 3 sts, dec over next 2 sts,* repeat around (28 sc).
Rnd 30: *Sc in next 2 sts, dec over next 2 sts,* repeat around (21 sc).
Rnd 31: *Sc in next st, dec over next 2 sts,* repeat around (14 sc). Finish stuffing.
Rnd 32: Dec 7 times (7 sc). Fasten off white yarn leaving a 6” length. Insert length into yarn needle and pull up remaining 7 sts, tighten to close.

CHOCOLATE: (Make 2 pieces)
Rnd 1: With Baby Sand yarn, ch 2, 7 sc in 2nd ch. Do not join. Work in continuous rnds unless otherwise noted.
Rnd 2: 2 sc in each st (14 sc).
Rnd 3: *Sc in next st, 2 sc in next st,* repeat around (21 sc).
Rnd 4: *Sc in next 2 sts, 2 sc in next st,* repeat around (28 sc).
Rnd 5: *Sc in next 3 sts, 2 sc in next st,* repeat around (35 sc).
Rnd 6: *Sc in next 4 sts, 2 sc in next st,* repeat around (42 sc).
Rnd 7: *Sc in next 5 sts, 2 sc in next st,* repeat around (49 sc).
Rnd 8: *Sc in next 6 sts, 2 sc in next st,* repeat around (56 sc).
Rnd 9: *Sc in next 7 sts, 2 sc in next st,* repeat around (63 sc). Join with sl st.
Rnd 10: Working in BLO, sc in each st.
Rnd 11: Working in both lps, *sl st, sc, hdc, dc, hdc, sc, sl st,* repeat around. Join with sl st.
Fasten off yarn leaving 12” length for sewing.
Sew one piece to top and the other piece to the bottom of marshmallow.

GRAHAM CRACKERS: (Make 2)
Row 1: With Almond yarn, ch 27, sc in 2nd ch from hook and each ch across (26 sc).
Row 2: Ch 1, turn, sc in each st.
Rows 3-50: Repeat Row 2 until piece measures 26” long. Finished piece should measure approximately 13” x 26”.
Lay piece flat and place 1 piece of poly foam on one half of top. Fold other half over and sew 3 sides together.
Sew one graham cracker centered on bottom of the Smores and the other centered on top of the Smores.
Embroider mouth with Pink yarn at Rows 11-14.
Weave in all ends.

PDF download (including assembly photos): Smores Pillow Crochet Pattern

ICYMI (In Case You Missed It)

Unicorn Bobblehead Crochet Pattern


Unicorn Bobblehead Crochet Pattern


crochet resolutions


2023 Crochet Resolutions


year in review


2022 Year in Review


gnome ornament


Skinny Gnome Ornament Crochet Pattern


Affiliate Links

This page contains affiliate links. If you choose to purchase after clicking a link, I may receive a commission at no extra cost to you.

Posted on 8 Comments

Unicorn Bobblehead Crochet Pattern

Unicorn Bobblehead Crochet Pattern

National Bobblehead Day

Do you like bobbleheads? My husband collects them, mostly of sports figures. When we travel, though, we do try to find one from any new city that we visit. We have a Royal Guard bobblehead from London and an Al Capone bobblehead from San Francisco.

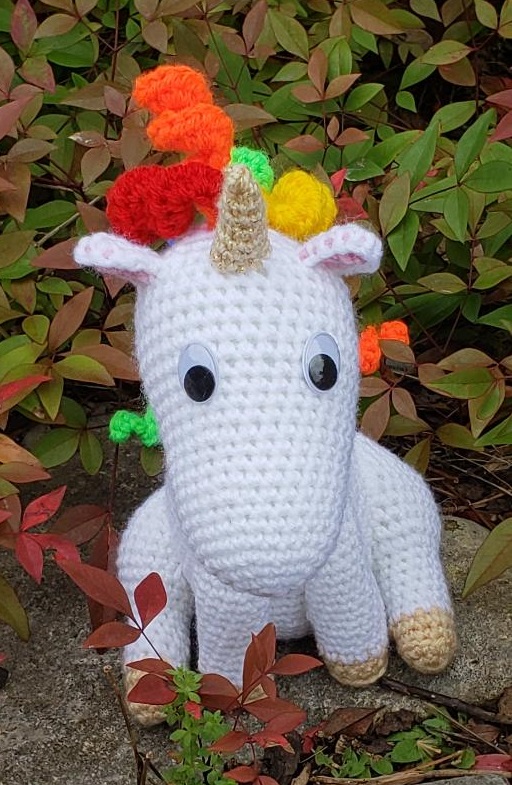
I decided to make a unicorn bobblehead, just to see if a crochet bobblehead was possible. The resulting unicorn is just too cute. I hope you enjoy it too. This design requires wire and a wooden dowel for assembly, so it’s not suitable as a children’s toy. It would make a great decor item for a little girl’s room or a nursery.

https://youtu.be/HKgVhh-ORkM

Materials:

Sport weight (or baby weight) yarn

1.5 oz. white

0.1 oz. tan

Small amounts, pink, red, orange, yellow, green, blue, purple, gold

Size E (3.5 mm) crochet hook

Yarn needle

Fiberfil

Two 15-mm oval googly eyes

20-gauge craft wire

3/16” wooden dowel

Gauge (E hook) 5 sc = 1”, 7 rows sc = 1”

Finished unicorn bobblehead measures approximately 8” tall (including horn), 4” wide, 7” long (nose to tail)

Directions:

BODY:

Rnd 1: With white yarn, ch 2, 6 sc in 2nd ch from hook. Do not join. Work in continuous rnds throughout unless otherwise noted.

Rnd 2: 2 sc in each sc around (12 sc).

Rnd 3: *Sc in next sc, 2 sc in next sc,* repeat around (18 sc).

Rnd 4: *Sc in next 2 sc, 2 sc in next sc,* repeat around (24 sc).

Rnd 5: *Sc in next 3 sc, 2 sc in next sc,* repeat around (30 sc).

Rnd 6: *Sc in next 4 sc, 2 sc in next sc,* repeat around (36 sc).

Rnd 7: *Sc in next 5 sc, 2 sc in next sc,* repeat around (42 sc).

Rnd 8: *Sc in next 6 sc, 2 sc in next sc,* repeat around (48 sc).

Rnd 9: *Sc in next 7 sc, 2 sc in next sc,* repeat around (54 sc).

Rnd 10: In back loops only, sc in each st.

Rnd 11: In both loops, sc in each st.

Rnd 12: *Sc next 7 sts, dec,* repeat twice, sc in rem sts (51 sc).

Rnd 13: Sc in each st.

Rnd 14: *Sc next 6 sts, dec,* repeat twice, sc in rem sts (48 sc).

Rnd 15: Sc in each st.

Rnd 16: *Sc next 5 sts, dec,* repeat twice, sc in rem sts (45 sc).

Rnd 17: Sc in each st.

Rnd 18: *Sc next 4 sts, dec,* repeat twice, sc in rem sts (42 sc).

Rnd 19: Sc in each st.

Rnd 20: *Sc in next 5 sts, dec,* repeat around (36 sc).

Rnds 21-23: Sc in each st.

Rnd 24: *Sc in next 4 sts, dec,* repeat around (30 sc).

Rnds 25-27: Sc in each st.

Rnd 28: *Sc in next 3 sts, dec,* repeat around (24 sc).

Rnds 29-31: Sc in each st.

Rnd 32: *Sc in next 2 sts, dec,* repeat around (18 sc).

Rnds 33-34: Sc in each st.

Rnd 35: Dec around (12 sc). Join with sl st. Fasten off leaving 12” length for sewing.

Wrap approximately 1.5” of dowel with craft wire to create spring. Remove spring and set aside.

Insert dowel into neck opening and mark it ¼” longer than body. Cut to this length and insert spring on the ¼” that will extend from body. Secure spring to dowel with glue. Stuff body firmly and insert dowel into body. Using length of yarn left at fasten off, thread through sts of Rnd 35 and pull tight to close opening around dowel. If desired, run a bead of glue around Rnd 35 to reinforce.

FRONT LEGS: (Make 2)

Rnd 1: With tan yarn, ch 2, 6 sc in 2nd ch from hook. Do not join. Work in continuous rnds throughout unless otherwise noted.

Rnd 2: 2 sc in each sc around (12 sc).

Rnd 3: In BLO, sc in each st.

Rnd 4: In both loops, sc in each st. Fasten off tan.

Rnds 5-18: Attach white yarn, sc in each st. Fasten off leaving length for sewing.

BACK LEGS: (Make 2)

Repeat Rnds 1-10 of front legs.

Rnd 11: *Sc in next st, inc in next st,* repeat around (18 sc).

Rnd 12: *Sc in next 2 sts, inc in next st,* repeat around (24 sc).

Rnds 13-16: Sc in each st.

Rnd 17: *Sc in next 2 sts, dec,* repeat round (18 sc).

Rnd 18: Sc in each st.

Rnd 19: *Sc in next st, dec,* repeat around (12 sc).

Stuff legs lightly and sew a back leg on each side of body. Sew front legs to front of body between back legs with bottom edge of leg at Rnd 10.

HEAD:

Rnd 1: With white yarn and G hook, ch 2, 6 sc in 2nd ch from hook. Do not join. Work in continuous rnds throughout unless otherwise noted.

Rnd 2: 2 sc in each sc around (12 sc).

Rnd 3: *Sc in next sc, 2 sc in next sc,* repeat around (18 sc).

Rnd 4: *Sc in next 2 sc, 2 sc in next sc,* repeat around (24 sc).

Rnds 5-7: Sc in each st.

Rnd 8: *Sc in next 7 sc, 2 sc in next sc,* repeat around (27 sc).

Rnds 9-11: Sc in each st.

Rnd 12: *Sc in next 8 sc, 2 sc in next sc,* repeat around (30 sc).

Rnds 13-15: Sc in each st.

Rnd 16: *Sc in next 4 sc, 2 sc in next sc,* repeat around (36 sc).

Rnds 17-18: Sc in each st.

Rnd 19: Ch 1, sk 1 st, sc in rem sts.

Rnd 20: Sc in ch-1 space, sc in rem sts.

Rnds 21:22: Sc in each st.

Insert dowel into ch-1 sp and mark ¼” extending out of head. Cut at mark and set dowel aside.

Rnd 23: *Sc next 4 sc, dec,* repeat around (30 sc).

Rnd 24: *Sc next 3 sc, dec,* repeat around (24 sc).

Rnd 25: *Sc next 2 sc, dec,* repeat around (18 sc). Stuff head.

Rnd 26: *Sc next sc, dec,* repeat around (12 sc).

Rnd 27: *Dec around (6 sc).

Rnd 28: Repeat Rnd 27 (3 sc). Fasten off. Finish stuffing and sew closed. Insert dowel into ch-1 sp and other end of dowel into spring extending from body. Do not glue in place yet.

NECK:

Rnd 1: Ch 24, join with sl st in 1st ch to form ring. Sc in each ch around (24 sc). Do not join. Work in continuous rnds throughout unless otherwise noted.

Rnds 2-8: Sc in each st. Measure neck to ensure it is long enough to cover top of body and spring. Add more rows as needed. Join with sl st. Fasten off. Sew Rnd 1 of neck to bottom of head.

EARS: (Make 2)

With pink yarn, ch 4, sc in 2nd ch from hook, sc in next ch, 3 sc in last ch. Working on opposite side of starting ch, sc in each of next 2 ch (7 sc). Fasten off pink.

Repeat with white yarn but do not fasten off. Ch 1, turn. Holding wrong sides together (1 pink and 1 white), working through both pieces, sc in each of 1st 3 sc, 3 sc next sc, sc in each of next 3 sc. Fasten off leaving length for sewing. Sew 1 ear to each side of head at Rnd 23.

HORN:

Rnd 1: With gold yarn, ch 2, 3 sc in 2nd ch from hook. Do not join. Work in continuous rnds throughout unless otherwise noted.

Rnd 2: 2 sc in 1st st, sc in remaining sc (4 sc).

Rnds 3-8: Repeat Rnd 2 (10 sc at end of Rnd 8).

Fasten off leaving length for sewing. Stuff horn and sew to middle of forehead between ears.

MANE:

With red yarn, ch 11, 3 hdc in 2nd ch from hook and each rem ch. Fasten off. Repeat with orange, yellow, green, blue, and purple yarn. Attach pieces of mane to back of head starting under the horn, making a line down the back of the head.

TAIL:

With red yarn, ch 11, 3 sc in 2nd ch from hook and each rem ch. Fasten off. Repeat with orange, yellow, green, blue, and purple yarn. Combine pieces of tail and attach to bottom of body at Rnd 10.

PDF Download (including assembly photos): Unicorn Bobblehead Crochet Pattern


ICYMI (In Case You Missed It)

crochet resolutions


2023 Crochet Resolutions


year in review


2022 Year in Review


gnome ornament


Skinny Gnome Ornament Crochet Pattern


Penguin Treasure Map

Click on each photo on the PDF of the Treasure Map to find 8 more penguins.


Affiliate Links

This page contains affiliate links. If you choose to purchase after clicking a link, I may receive a commission at no extra cost to you.

 

Posted on 1 Comment

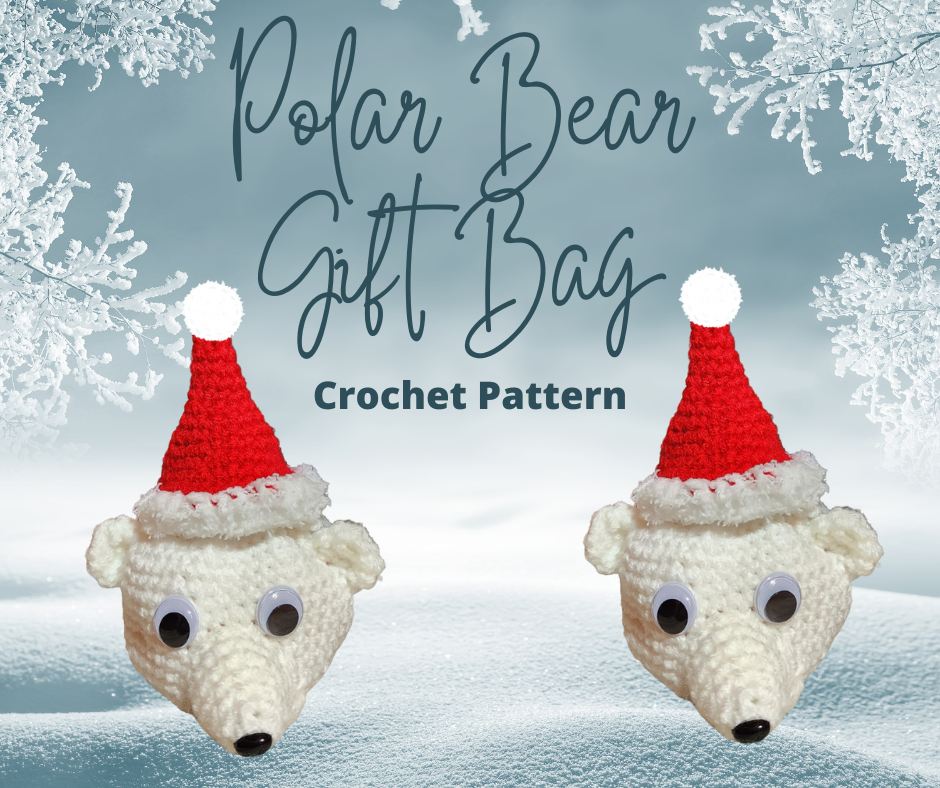
Polar Bear Gift Bag Crochet Pattern

polar bear gift bag

Are you ready for another Christmas gift bag pattern? Each year I make these small gift bags for my husband’s coworkers and fill them with candy for him to give out at the office. This year I just couldn’t resist creating a new design – polar bear gift bag. I hope you enjoy making it as much as I did.

Materials:
Small amounts of worsted yarn – white and red
A few yards of white Pipsqueak yarn
Crochet hook size H
12-mm safety nose
18-mm wiggly eyes
1” white pompom

Finished bag measures approximately 4” tall by 3” wide (not including ears).

Directions:
Rnd 1: With white yarn, ch 2. Sc 6 in second ch from hook. Do not join.
Rnd 2: 2 sc in each sc (12 sc).
Rnd 3: *1 sc in next sc, 2 sc in next sc,* repeat around (18 sc).
Rnd 4: *1 sc in next 2 sc, 2 sc in next sc,* repeat around (24 sc).
Rnd 5: *1 sc in next 3 sc, 2 sc in next sc,* repeat around (30 sc).
Rnd 6: *1 sc in next 4 sc, 2 sc in next sc,* repeat around (36 sc).
Rnd 7: *1 sc in next 5 sc, 2 sc in next sc,* repeat around (42 sc).
Rnds 8-16: Sc in each st.
Rnd 17: *Dec, sc in next 5 sc,* repeat around (36 sc).
Rnd 18: *Dec, sc in next 4 sc,* repeat around (30 sc).
Rnd 19:*Dec, sc in next 3 sc,* repeat around (24 sc).
Rnd 20: *Sc, ch 1, skip 1 sc,* repeat around. Join with sl st. Fasten off.
Drawstring: Using white yarn, make a chain 12″ long and knot both ends. Pull through loops made in Rnd 20.
SNOUT:
Rnd 1: With white yarn, ch 2. Sc 6 in second ch from hook. Do not join.
Rnd 2: *1 sc in next sc, 2 sc in next sc,* repeat around (9 sc).
Rnd 3: *1 sc in next 2 sc, 2 sc in next sc,* repeat around (12 sc).
Rnd 4: *1 sc in next 3 sc, 2 sc in next sc,* repeat around (15 sc).
Rnd 5: *1 sc in next 4 sc, 2 sc in next sc,* repeat around (18 sc).
Rnd 6: Sc in each st. Join with sl st. Fasten off white leaving 9” length for sewing.
Insert safety nose in tip of snout. Stuff snout and sew to face at Rnds 6-11.
EARS: (Make 2)
With white yarn, ch 5. Sc in 2nd ch from hook and next 2 ch, 3 sc in last ch. Working on opposite side of chain, sc in each of next 3 ch.
Fasten off and make another piece the same.
Holding both pieces together, sc through both pieces. Sc in each of 1st 4 sc, 3 sc in next sc, sc in each of next 4 sc. Fasten off leaving length for sewing. Sew an ear to each side of head at Rnds 12-15. Weave in all ends.
Santa Hat:
Rnd 1: With red yarn, ch 2. Sc 3 in second ch from hook. Do not join.
Rnd 2: 2 sc in each sc (6 sc).
Rnd 3: Sc in each st.
Rnd 4: *1 sc in next sc, 2 sc in next sc,* repeat around (9 sc).
Rnd 5: Sc in each st.
Rnd 6: *1 sc in next 2 sc, 2 sc in next sc,* repeat around (12 sc).
Rnd 7: Sc in each st.
Rnd 8: *1 sc in next 4 sc, 2 sc in next sc,* repeat around (18 sc).
Rnd 9: Sc in each st.
Rnd 10: *1 sc in next 5 sc, 2 sc in next sc,* repeat around (24 sc).
Rnd 11: Sc in each st. Join. Fasten off red.
Rnd 12: Turn to wrong side. Attach white eyelash or Pipsqueak yarn and work 1 sc in each st.
Rnd 13: Sc in each st. Join with sl st. Fasten off white. Weave in all ends. Sew white pompom to top of hat.
If you don’t have either of these yarns, you can use white worsted yarn and loop st around.
Cut a piece of red yarn about 6” long. Fold and thread through Rnd 11 of hat. Attach to Rnd 18 of head and tie to secure hat to polar bear.
Glue on(or sew on) eyes above snout.

PDF Download: Polar Bear Gift Bag Crochet Pattern

More Christmas Crochet Patterns

Christmas Patterns


Free Christmas Patterns


ICYMI (In Case You Missed It)

gnome ornament


Skinny Gnome Ornament Crochet Pattern


Penguin Treasure Map

Click on each photo on the PDF of the Treasure Map to find 8 more penguins.


polar bear butt ornament


Polar Bear Butt Ornament Crochet Pattern


reindeer butt ornament


Reindeer Butt Ornament Crochet Pattern


Christmas gift tag


Christmas Gift Tags


Affiliate Links

This page contains affiliate links. If you choose to purchase after clicking a link, I may receive a commission at no extra cost to you.


Posted on 6 Comments

Skinny Gnome Ornament Crochet Pattern

gnome ornament

Gnomes have been depicted in literature as far back as 1566 in A Book on Nymphs, Sylphs, Pygmies, and Salamanders, and on the Other Spirits by Paracelsus. They are said to guard the precious stones and minerals of the earth and can move through the soil as easily as humans move through air. Sometimes they are depicted as small, intelligent, and helpful to humans. Other stories show them as hot-tempered and combatant. J.R.R. Tolkein’s gnomes are tall and beautiful, but all authors seemed to agree that gnomes are immortal.  In L. Frank Baum’s book The Life and Adventures of Santa Claus, gnomes created the sleigh bells for Santa Claus‘ reindeer. Maybe that explains why Christmas Gnomes have become so popular over the last few years.

Crochet some skinny gnome decorations for your Christmas tree. Make a few to liven up your gift wrapping. Finished size is approximately 5″ tall x 1.5″ wide, and instructions are included to lengthen the ornament if you would prefer. Each ornament takes just a few yards of worsted and eyelash yarn, so they’re a great stash buster or bazaar item.

Materials:

Worsted weight yarn

6 yards MC

4 yards CC

Eyelash yarn 4 yards

Crochet hook size G (4.0 mm)

Yarn needle

½” pompom

10” silver or gold ribbon

Small amount of stuffing

Directions:

Rnd 1: With MC, ch 2 (or magic circle), 6 sc in 2nd ch from hook. Do not join. Work in continuous rnds throughout unless otherwise specified.

Rnd 2: 2 sc in each st (12 sc).

Rnds 3-10: Sc in each st. Join with sl st at end of Rnd 10. Fasten off MC. Stuff. (If a taller ornament is desired, add extra rnds here.)

Rnd 11: Attach eyelash yarn, sc in each st. Do not join.

Rnds 12-15: Sc in each st. Join with sl st at end of Rnd 15. Fasten off eyelash. Stuff.

Rnd 16: Attach CC yarn, sc in each st. Do not join.

Rnd 17: Sc in each st.

Rnd 18: *Sc in next 2 sts, dec over next 2 sts,* repeat twice (9 sc).

Rnds 19-20: Sc in each st. Stuff.

Rnd 21: *Sc in next st, dec over next 2 sts,* repeat twice (6 sc).

Rnds 22-23: Sc in each st.

Rnd 24: *Sc in next st, dec over next 2 sts,* repeat once (4 sc). Fasten off CC leaving 6” length. Close with ultimate finish.

Sew or glue pompom in middle of eyelash rnds. Fold ribbon in half and insert through st at top of hat. Pull through and tie ends in a knot.

PDF Download:  Skinny Gnome Ornament Crochet Pattern


Christmas Gnome Gift Tag – free download

Christmas Gnome Gift Tag


Download the calendar with links to all 24 patterns

Christmas Ornament Advent Calendar – A Handmade Countdown to Holiday Magic

Purchase the bundle of all 24 patterns on Ravelry for only $9.99

https://www.ravelry.com/redeem/my-fingers-fly-designs?sale=410562

More Christmas Crochet Patterns

Christmas Patterns


Free Christmas Patterns


ICYMI (In Case You Missed It)


Penguin Treasure Map

Click on each photo on the PDF of the Treasure Map to find 8 more penguins.


polar bear butt ornament


Polar Bear Butt Ornament Crochet Pattern


reindeer butt ornament


Reindeer Butt Ornament Crochet Pattern


Christmas gift tag


Christmas Gift Tags


Affiliate Links

This page contains affiliate links. If you choose to purchase after clicking a link, I may receive a commission at no extra cost to you.