Posted on — Leave a comment

A Little Christmas Peppermint Magic: Crocheting with a Purpose

One of the things I love most about crochet is that it gives us the opportunity to make something special for someone else. This Christmas, my crochet group has decided to put our hooks to work for a wonderful cause. We’re making lap blankets and shawls to donate to a local retirement home, hoping to bring a little extra warmth and holiday cheer to the residents.

It’s the perfect opportunity to combine two of my personal crochet goals for 2026!

At the beginning of the year, I set a goal to downsize my ever-growing yarn stash. If you’re a crocheter, you probably understand that this is easier said than done! Somehow, yarn seems to multiply when we’re not looking. I decided it was time to put some of those forgotten skeins to good use, so I pulled out all my Christmas-colored yarn and started looking for inspiration.

My other goal for 2026 was to learn some new stitches and techniques. I wanted to challenge myself a little rather than automatically reaching for the same familiar patterns and stitches. That’s when I started thinking about spirals.

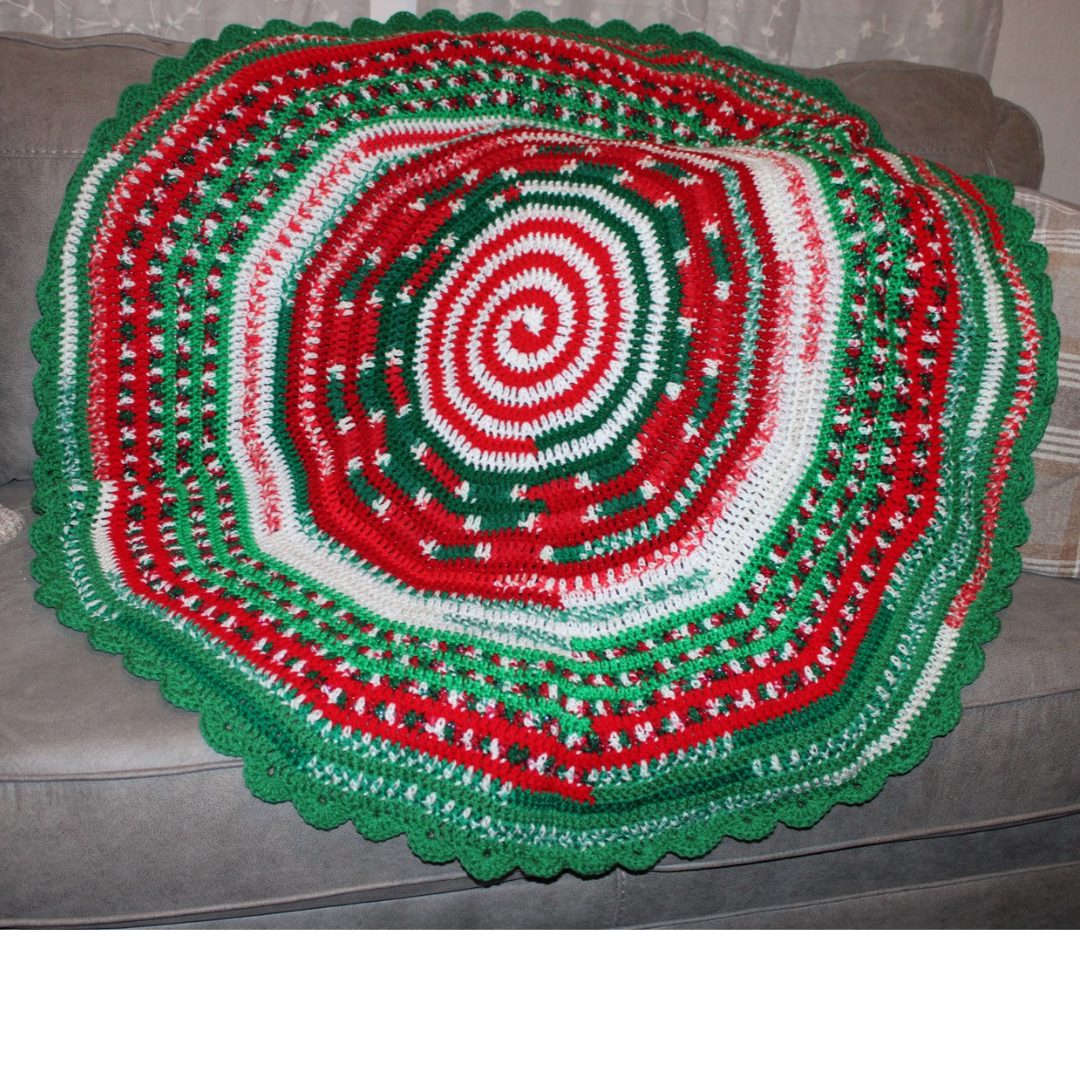
I thought a spiral design worked in traditional Christmas colors would be beautiful. Red and white twisting together immediately brought peppermint candy to mind! You know those classic red-and-white peppermint swirls that show up everywhere during the holidays? That’s exactly the look I had in mind.

And so, a little Christmas peppermint inspiration turned into my next crochet adventure!

I love how the colors work together, and the spiral adds visual interest without needing an overly complicated design. It’s also a fun way to practice a new technique while making something useful and meaningful.

The best part? Every skein of Christmas yarn I use is one less skein taking up space in my stash, and every finished blanket or shawl will help make someone’s Christmas a little cozier.

It’s a win-win!

Do you crochet for charity? I’d love to hear about the projects you’ve made for nursing homes, hospitals, shelters, or other organizations. And if you’re working on downsizing your yarn stash, tell me: Are you actually using up your yarn, or does it seem to magically replenish itself?

Come join our Facebook community and show off your charity makes! Plus, you can stay up to date on everything happening! Share your latest projects, connect with fellow crocheters, ask questions, and find plenty of inspiration along the way.

We’d love to have you stitch along with us!

https://www.facebook.com/share/g/1CYyuWsXEd/

Happy hooking!

Candy Cane Lapghan

Blanket measures 48″ diameter and uses approximately 1080 yards of worsted weight yarn with a K (6.5 mm) hook.

Directions:

Rnd 1: Start with color B and make a magic ring. Ch 1, sc, hdc, 4 dc, then pull up lp in last dc to use on next rnd. Attach color A in magic ring, ch 1, sc, hdc, 4 dc, pull up lp in last dc (12 sts). Tighten magic ring. Do not join rnds.

Rnd 2: With Color B, pick up lp and work 2 dc in each st. Pull up lp in last dc. Go back to color A and pick up lp, work 2 dc in each st (24 dc). Pull up lp in last dc.

Rnd 3: With Color B, pick up lp and work *1 dc in next st, 2 dc in next st,* 6 times. Pull up lp in last dc. Go back to color A and pick up lp, *1 dc in next st, 2 dc in next st,* 6 times (36 dc). Pull up lp in last dc.


Rnd 4: With Color B, pick up lp and work *1 dc in next 2 sts, 2 dc in next st,* 6 times. Pull up lp in last dc. Go back to color A and pick up lp, *1 dc in next 2 sts, 2 dc in next st,* 6 times (48 dc). Pull up lp in last dc.

Rnd 5: With Color B, pick up lp and work *1 dc in next 3 sts, 2 dc in next st,* 6 times. Pull up lp in last dc. Go back to color A and pick up lp, *1 dc in next 3 sts, 2 dc in next st,* 6 times (60 dc). Pull up lp in last dc.

Rnd 6: With Color B, pick up lp and work *1 dc in next 4 sts, 2 dc in next st,* 6 times. Pull up lp in last dc. Go back to color A and pick up lp, *1 dc in next 4 sts, 2 dc in next st,* 6 times (72 dc). Pull up lp in last dc.

Rnd 7: With Color B, pick up lp and work *1 dc in next 5 sts, 2 dc in next st,* 6 times. Pull up lp in last dc. Go back to color A and pick up lp, *1 dc in next 5 sts, 2 dc in next st,* 6 times (84 dc). Pull up lp in last dc.

Rnd 8: With Color B, pick up lp and work *1 dc in next 6 sts, 2 dc in next st,* 6 times. Pull up lp in last dc. Go back to color A and pick up lp, *1 dc in next 6 sts, 2 dc in next st,* 6 times (96 dc). Pull up lp in last dc.

Rnd 9: With Color B, pick up lp and work *1 dc in next 7 sts, 2 dc in next st,* 6 times. Pull up lp in last dc. Go back to color A and pick up lp, *1 dc in next 7 sts, 2 dc in next st,* 6 times (108 dc). Pull up lp in last dc.

Rnd 10: With Color B, pick up lp and work *1 dc in next 8 sts, 2 dc in next st,* 6 times. Pull up lp in last dc. Go back to color A and pick up lp, *1 dc in next 8 sts, 2 dc in next st,* 6 times (120 dc). Pull up lp in last dc.

Continue to work in same manner switching colors and increasing 12 dc each rnd until your blanket reaches desired size.

On last rnd of Color B after last dec, work dc, hdc, sc, sl st. Fasten off yarn. Continue with Color A to make one complete rnd. Then work dc, hdc, sc, sl st to finish rnd.

Edging:

Continuing with Color A, *sk 2 sts, 7 dc in next st, sk 2 sts, sl st in next st,* repeat around. Join with sl st. Fasten off yarn.

More Blankets

Butterfly Scrap Blanket
Kitten in Teacup C2C Afghan
Miles the Jazzy Elephant blanket pattern


ICYMI (In Case You Missed It)

Diagonal Skinny Scarf Crochet Pattern
Letter to Santa
Snow Bunny Wrist Warmers
Zombie Pug Amigurumi
Wolf Pack Coloring Page
Kookum Doll


Affiliate Links

This post contains affiliate links. If you use these links to buy something, we may earn a commission. Thanks for helping support my crochet blog. 

Lion Brand Yarn

20% off Parfait Yarn


Posted on — Leave a comment

Crochet a Kookum Doll for Native American Heritage Month

A few years ago I attended a fiber festival in Edmonton – wow! There were so many beautiful things, I couldn’t fit everything I wanted into my suitcase. I did get a beautiful pair of Kookum earrings from Particular Possum, a Cree Indigenous artisan based out of Edmonton. Her beadwork jewelry is exquisite!! She graciously gave me permission to turn her earring design into a doll.

The term “Kookum” represents the cherished role of grandmothers in Cree families. This doll will hopefully be a cherished member of your little one’s family. This would be a beautiful birthday gift for your little girl.


Materials:

Worsted weight yarn –

DRESS:

60 yards fuchsia

50 yards pink

30 yards purple

5 yards tan

10 yards black

2 yards white

Crochet hook size G (4.0 mm)

Yarn needle

Fiberfill


Gauge: 8 rows = 2”, 8 sc = 2”

 Doll measures approximately 15” tall by 9” wide.

STITCHES:

Popcorn: work 5 dc in same sp, pull up lp in last dc, insert hook through top of first dc and pull through lp.


TWO-TONE DRESS DIRECTIONS:

FRONT:

Row 1: With fuchsia ch 26, sc in 2nd ch from hook and next 24 sc (25 sc).

Rows 2-5: Ch 1, turn, 2 sc in first st, sc across (29 sc at end of Row 5).

Rows 6-7: Ch 1, turn, dec over first 2 sts, sc across (27 sc at end of Row 7).

Row 8: Ch 1, turn, sc in each st. Fasten off fuchsia.

Row 9: If skirt is 2 colors: Attach pink yarn, ch 1, turn, dec over first 2 sts, *dc in st of Row 7, sc in st of Row 8,* repeat across (26 sc).

If skirt is 1 color: Ch 1, turn, dec over first 2 sts, sc across (26 sc).

Row 10: Ch 1, turn, dec over first 2 sts, sc across (25 sc).

Row 11: Ch 1, turn, sc in each st.

Rows 12-13: Ch 1, turn, dec over first 2 sts, sc across (23 sc).

Rows 14-15: Ch 1, turn, sc in each st.

Rows 16-17: Ch 1, turn, dec over first 2 sts, sc across (21 sc).

Rows 18-19: Ch 1, turn, sc in each st.

Rows 20-21: Ch 1, turn, dec over first 2 sts, sc across (19 sc).

Rows 22-23: Ch 1, turn, sc in each st.

Rows 24-25: Ch 1, turn, dec over first 2 sts, sc across (17 sc).

Row 26: Ch 1, turn, sc in each st. Fasten off pink.

Row 27: Ch 1, turn, 2 tan sc, 13 purple sc, 2 tan sc (17 sc).

Row 28: Ch 1, turn, 3 tan sc, 11 purple sc, 3 tan sc (17 sc).

Row 29: Ch 1, turn, 1 fuchsia sc, 1 tan sc, 1 white sc, 11 pink sc, 1 white sc, 1 tan sc, 1 fuchsia sc (17 sc).

Row 30: Ch 1, turn, 2 fuchsia sc, 1 white sc, 11 pink, 1 white sc, 2 fuchsia sc (17 sc).

Row 31: Ch 1, turn, inc fuchsia, 1 fuchsia sc, 1 white sc, 11 pink sc, 1 white sc, 1 fuchsia sc, inc fuchsia (19 sc).

Row 32: Ch 1, turn, inc fuchsia, 1 fuchsia sc, 2 white sc, 11 pink sc, 2 white sc, 1 fuchsia sc, inc fuchsia (21 sc).

Row 33: Ch 1, turn, 3 fuchsia sc, 2 white sc, 11 pink sc, 2 white sc, 3 fuchsia sc (21 sc).

Row 34: Ch 1, turn, inc fuchsia, 1 fuchsia sc, 3 white sc, 11 pink sc, 3 white sc, 1 fuchsia sc, inc fuchsia (23 sc).

Row 35: Ch 1, turn, dec fuchsia, 2 fuchsia sc, 2 white sc, 11 pink sc, 2 white sc, 2 fuchsia sc, dec fuchsia (21 sc).

Row 36: Ch 1, turn, dec fuchsia, 2 fuchsia sc, 1 white sc, 11 pink sc, 1 white sc, 2 fuchsia sc, dec fuchsia (19 sc).

Row 37: Ch 1, turn, dec fuchsia, 2 fuchsia sc, 11 pink sc, 2 fuchsia sc, dec fuchsia (17 sc).

Row 38: Ch 1, turn, 3 fuchsia sc, 11 pink sc, 3 fuchsia sc.

Row 39: Ch 1, turn, dec fuchsia, 1 fuschia sc, 3 pink sc, 5 tan sc, 3 pink sc, 1 fuchsia sc, dec fuchsia (15 sc).

Row 40: Ch 1, turn, dec fuchsia, 2 pink sc, 7 tan sc, 2 pink sc, dec fuchsia (13 sc).

Rows 41-44: Ch 1, turn, 3 black sc, 7 tan sc, 3 black sc (13 sc).

Row 45: Ch 1, turn, dec black, 2 black sc, 5 tan sc, 2 black sc, dec black (11 sc).

Row 46: Ch 1, turn, dec black, 7 black sc, dec black (9 sc).

Row 47: Ch 1, turn, dec black, 5 black sc, dec black (7 sc).

Row 48: Ch 1, turn, dec black, 3 black sc, dec black (5 sc). Fasten off black.

BACK:

Row 1: With fuchsia ch 26, sc in 2nd ch from hook and next 24 sc (25 sc).

Rows 2-5: Ch 1, turn, 2 sc in first st, sc across (29 sc at end of Row 5).

Rows 6-7: Ch 1, turn, dec over first 2 sts, sc across (27 sc at end of Row 7).

Row 8: Ch 1, turn, sc in each st. Fasten off fuchsia.

Row 9: If skirt is 2 colors: Attach pink yarn, ch 1, turn, dec over first 2 sts, *dc in st of Row 7, sc in st of Row 8,* repeat across (26 sc).

If skirt is 1 color: Ch 1, turn, dec over first 2 sts, sc across (26 sc).

Row 10: Ch 1, turn, dec over first 2 sts, sc across (25 sc).

Row 11: Ch 1, turn, sc in each st.

Rows 12-13: Ch 1, turn, dec over first 2 sts, sc across (23 sc).

Rows 14-15: Ch 1, turn, sc in each st.

Rows 16-17: Ch 1, turn, dec over first 2 sts, sc across (21 sc).

Rows 18-19: Ch 1, turn, sc in each st.

Rows 20-21: Ch 1, turn, dec over first 2 sts, sc across (19 sc).

Rows 22-23: Ch 1, turn, sc in each st.

Rows 24-25: Ch 1, turn, dec over first 2 sts, sc across (17 sc).

Row 26: Ch 1, turn, sc in each st. Fasten off pink.

Row 27: Ch 1, turn, 2 tan sc, 13 purple sc, 2 tan sc (17 sc).

Row 28: Ch 1, turn, 3 tan sc, 11 purple sc, 3 tan sc (17 sc).

Row 29: Ch 1, turn, 1 fuchsia sc, 1 tan sc, 1 white sc, 11 pink sc, 1 white sc, 1 tan sc, 1 fuchsia sc (17 sc).

Row 30: Ch 1, turn, 2 fuchsia sc, 1 white sc, 11 pink, 1 white sc, 2 fuchsia sc (17 sc).

Row 31: Ch 1, turn, inc fuchsia, 1 fuchsia sc, 1 white sc, 11 pink sc, 1 white sc, 1 fuchsia sc, inc fuchsia (19 sc).

Row 32: Ch 1, turn, inc fuchsia, 1 fuchsia sc, 2 white sc, 11 pink sc, 2 white sc, 1 fuchsia sc, inc fuchsia (21 sc).

Row 33: Ch 1, turn, 3 fuchsia sc, 2 white sc, 11 pink sc, 2 white sc, 3 fuchsia sc (21 sc).

Row 34: Ch 1, turn, inc fuchsia, 1 fuchsia sc, 3 white sc, 11 pink sc, 3 white sc, 1 fuchsia sc, inc fuchsia (23 sc).

Row 35: Ch 1, turn, dec fuchsia, 2 fuchsia sc, 2 white sc, 11 pink sc, 2 white sc, 2 fuchsia sc, dec fuchsia (21 sc).

Row 36: Ch 1, turn, dec fuchsia, 2 fuchsia sc, 1 white sc, 11 pink sc, 1 white sc, 2 fuchsia sc, dec fuchsia (19 sc).

Row 37: Ch 1, turn, dec fuchsia, 2 fuchsia sc, 11 pink sc, 2 fuchsia sc, dec fuchsia (17 sc).

Row 38: Ch 1, turn, 3 fuchsia sc, 11 pink sc, 3 fuchsia sc.

Row 39: Ch 1, turn, dec fuchsia, 1 fuschia sc, 11 pink sc, 1 fuchsia sc, dec fuchsia (15 sc).

Row 40: Ch 1, turn, dec fuchsia, 11 pink sc,  dec fuchsia (13 sc).

Rows 41-44: Ch 1, turn, 13 black sc (13 sc).

Row 45: Ch 1, turn, dec black, 9 black sc, dec black (11 sc).

Row 46: Ch 1, turn, dec black, 7 black sc, dec black (9 sc).

Row 47: Ch 1, turn, dec black, 5 black sc, dec black (7 sc).

Row 48: Ch 1, turn, dec black, 3 black sc, dec black (5 sc). Fasten off black.

EDGING:

Rnd 1: Place dolls together with wrong sides facing. Sc through both thicknesses all the way around, placing 2 sc in corners and curves. Change colors as needed to match colors on the doll. Stuff doll as you go.

Rnd 2: Attach purple yarn and work *popcorn st,* ch 1, sk 1 st,* around entire doll. When working a corner or curve (head, bottom corners, elbows), extra popcorns will be needed. At these points, do not sk 1 st. Join with sl st in first popcorn. Fasten off purple.

Rnd 3: With fuchsia yarn, repeat Rnd 2. Change to pink yarn at shoulder and change back to fuchsia at opposite shoulder. Join with sl st in first popcorn st. Fasten off yarn.

Weave in (or hide) all ends.

BRAID: (Make 2)

Cut six 10” pieces of black yarn. Pull through Row 41 of front. Braid and tie off with a matching piece of yarn.

HEART: (Make 4)

With desired color of yarn, ch 4. In 4th ch from hook, work 2 dc, 2 hdc, 1 sc, ch 1, 1 sc, 2 hdc, 2 dc, ch 3, sl st in same sp. Fasten off leaving 9” length for sewing. Sew one to top of dress and 3 at bottom of dress just above the color change.


The ad-free PDF includes 2 color versions – one wears a pink dress, and the other uses separate shades of turquoise for skirt and shirt.

Each Kookum doll has black braids and is surrounded by 2 rows of popcorn stitches to represent the beading of the original earrings.

Kookum Doll Crochet Pattern


Get this amazing bundle of 5 cuddler patterns for only $5.00 on Ravelry.

Elf, Toy Soldier, Kookum, Gingerbread Snowman, and Astronaut – perfect for holiday gifts!

https://www.ravelry.com/redeem/my-fingers-fly-designs?sale=441250

ICYMI (In Case You Missed It)

Diagonal Skinny Scarf Crochet Pattern
Snow Bunny Wrist Warmers
Plague Doctor Mask
Zombie Pug Amigurumi
Wolf Pack Coloring Page
Cinderella Carriage Bucket


Affiliate Links

This post contains affiliate links. If you use these links to buy something, we may earn a commission. Thanks for helping support my crochet blog. 

Lion Brand Yarn

20% off Parfait Yarn


Posted on — 1 Comment

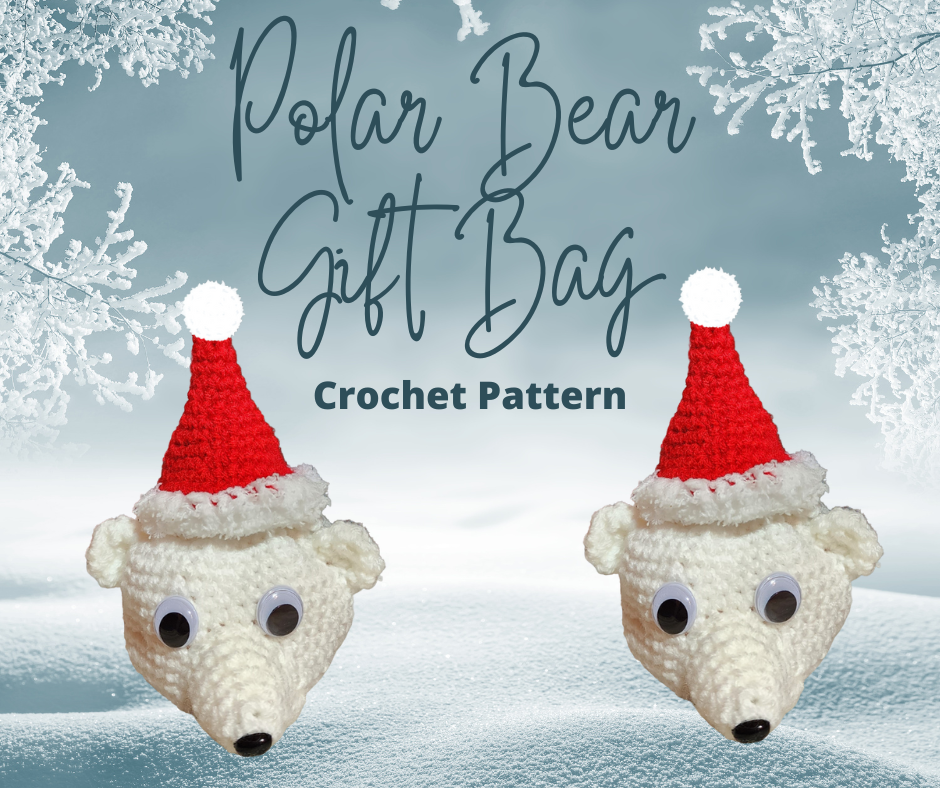
Polar Bear Gift Bag Crochet Pattern

polar bear gift bag

Are you ready for another Christmas gift bag pattern? Each year I make these small gift bags for my husband’s coworkers and fill them with candy for him to give out at the office. This year I just couldn’t resist creating a new design – polar bear gift bag. I hope you enjoy making it as much as I did.

Materials:
Small amounts of worsted yarn – white and red
A few yards of white Pipsqueak yarn
Crochet hook size H
12-mm safety nose
18-mm wiggly eyes
1” white pompom

Finished bag measures approximately 4” tall by 3” wide (not including ears).

Directions:
Rnd 1: With white yarn, ch 2. Sc 6 in second ch from hook. Do not join.
Rnd 2: 2 sc in each sc (12 sc).
Rnd 3: *1 sc in next sc, 2 sc in next sc,* repeat around (18 sc).
Rnd 4: *1 sc in next 2 sc, 2 sc in next sc,* repeat around (24 sc).
Rnd 5: *1 sc in next 3 sc, 2 sc in next sc,* repeat around (30 sc).
Rnd 6: *1 sc in next 4 sc, 2 sc in next sc,* repeat around (36 sc).
Rnd 7: *1 sc in next 5 sc, 2 sc in next sc,* repeat around (42 sc).
Rnds 8-16: Sc in each st.
Rnd 17: *Dec, sc in next 5 sc,* repeat around (36 sc).
Rnd 18: *Dec, sc in next 4 sc,* repeat around (30 sc).
Rnd 19:*Dec, sc in next 3 sc,* repeat around (24 sc).
Rnd 20: *Sc, ch 1, skip 1 sc,* repeat around. Join with sl st. Fasten off.
Drawstring: Using white yarn, make a chain 12″ long and knot both ends. Pull through loops made in Rnd 20.
SNOUT:
Rnd 1: With white yarn, ch 2. Sc 6 in second ch from hook. Do not join.
Rnd 2: *1 sc in next sc, 2 sc in next sc,* repeat around (9 sc).
Rnd 3: *1 sc in next 2 sc, 2 sc in next sc,* repeat around (12 sc).
Rnd 4: *1 sc in next 3 sc, 2 sc in next sc,* repeat around (15 sc).
Rnd 5: *1 sc in next 4 sc, 2 sc in next sc,* repeat around (18 sc).
Rnd 6: Sc in each st. Join with sl st. Fasten off white leaving 9” length for sewing.
Insert safety nose in tip of snout. Stuff snout and sew to face at Rnds 6-11.
EARS: (Make 2)
With white yarn, ch 5. Sc in 2nd ch from hook and next 2 ch, 3 sc in last ch. Working on opposite side of chain, sc in each of next 3 ch.
Fasten off and make another piece the same.
Holding both pieces together, sc through both pieces. Sc in each of 1st 4 sc, 3 sc in next sc, sc in each of next 4 sc. Fasten off leaving length for sewing. Sew an ear to each side of head at Rnds 12-15. Weave in all ends.
Santa Hat:
Rnd 1: With red yarn, ch 2. Sc 3 in second ch from hook. Do not join.
Rnd 2: 2 sc in each sc (6 sc).
Rnd 3: Sc in each st.
Rnd 4: *1 sc in next sc, 2 sc in next sc,* repeat around (9 sc).
Rnd 5: Sc in each st.
Rnd 6: *1 sc in next 2 sc, 2 sc in next sc,* repeat around (12 sc).
Rnd 7: Sc in each st.
Rnd 8: *1 sc in next 4 sc, 2 sc in next sc,* repeat around (18 sc).
Rnd 9: Sc in each st.
Rnd 10: *1 sc in next 5 sc, 2 sc in next sc,* repeat around (24 sc).
Rnd 11: Sc in each st. Join. Fasten off red.
Rnd 12: Turn to wrong side. Attach white eyelash or Pipsqueak yarn and work 1 sc in each st.
Rnd 13: Sc in each st. Join with sl st. Fasten off white. Weave in all ends. Sew white pompom to top of hat.
If you don’t have either of these yarns, you can use white worsted yarn and loop st around.
Cut a piece of red yarn about 6” long. Fold and thread through Rnd 11 of hat. Attach to Rnd 18 of head and tie to secure hat to polar bear.
Glue on(or sew on) eyes above snout.

PDF Download: Polar Bear Gift Bag Crochet Pattern

More Christmas Crochet Patterns

Christmas Patterns


Free Christmas Patterns


ICYMI (In Case You Missed It)

gnome ornament


Skinny Gnome Ornament Crochet Pattern


Penguin Treasure Map

Click on each photo on the PDF of the Treasure Map to find 8 more penguins.


polar bear butt ornament


Polar Bear Butt Ornament Crochet Pattern


reindeer butt ornament


Reindeer Butt Ornament Crochet Pattern


Christmas gift tag


Christmas Gift Tags


Affiliate Links

This page contains affiliate links. If you choose to purchase after clicking a link, I may receive a commission at no extra cost to you.


Posted on — 6 Comments

Skinny Gnome Ornament Crochet Pattern

gnome ornament

Gnomes have been depicted in literature as far back as 1566 in A Book on Nymphs, Sylphs, Pygmies, and Salamanders, and on the Other Spirits by Paracelsus. They are said to guard the precious stones and minerals of the earth and can move through the soil as easily as humans move through air. Sometimes they are depicted as small, intelligent, and helpful to humans. Other stories show them as hot-tempered and combatant. J.R.R. Tolkein’s gnomes are tall and beautiful, but all authors seemed to agree that gnomes are immortal.  In L. Frank Baum’s book The Life and Adventures of Santa Claus, gnomes created the sleigh bells for Santa Claus‘ reindeer. Maybe that explains why Christmas Gnomes have become so popular over the last few years.

Crochet some skinny gnome decorations for your Christmas tree. Make a few to liven up your gift wrapping. Finished size is approximately 5″ tall x 1.5″ wide, and instructions are included to lengthen the ornament if you would prefer. Each ornament takes just a few yards of worsted and eyelash yarn, so they’re a great stash buster or bazaar item.

Materials:

Worsted weight yarn

6 yards MC

4 yards CC

Eyelash yarn 4 yards

Crochet hook size G (4.0 mm)

Yarn needle

½” pompom

10” silver or gold ribbon

Small amount of stuffing

Directions:

Rnd 1: With MC, ch 2 (or magic circle), 6 sc in 2nd ch from hook. Do not join. Work in continuous rnds throughout unless otherwise specified.

Rnd 2: 2 sc in each st (12 sc).

Rnds 3-10: Sc in each st. Join with sl st at end of Rnd 10. Fasten off MC. Stuff. (If a taller ornament is desired, add extra rnds here.)

Rnd 11: Attach eyelash yarn, sc in each st. Do not join.

Rnds 12-15: Sc in each st. Join with sl st at end of Rnd 15. Fasten off eyelash. Stuff.

Rnd 16: Attach CC yarn, sc in each st. Do not join.

Rnd 17: Sc in each st.

Rnd 18: *Sc in next 2 sts, dec over next 2 sts,* repeat twice (9 sc).

Rnds 19-20: Sc in each st. Stuff.

Rnd 21: *Sc in next st, dec over next 2 sts,* repeat twice (6 sc).

Rnds 22-23: Sc in each st.

Rnd 24: *Sc in next st, dec over next 2 sts,* repeat once (4 sc). Fasten off CC leaving 6” length. Close with ultimate finish.

Sew or glue pompom in middle of eyelash rnds. Fold ribbon in half and insert through st at top of hat. Pull through and tie ends in a knot.

PDF Download:  Skinny Gnome Ornament Crochet Pattern


Christmas Gnome Gift Tag – free download

Christmas Gnome Gift Tag


Download the calendar with links to all 24 patterns

Christmas Ornament Advent Calendar – A Handmade Countdown to Holiday Magic

Purchase the bundle of all 24 patterns on Ravelry for only $9.99

https://www.ravelry.com/redeem/my-fingers-fly-designs?sale=410562

More Christmas Crochet Patterns

Christmas Patterns


Free Christmas Patterns


ICYMI (In Case You Missed It)


Penguin Treasure Map

Click on each photo on the PDF of the Treasure Map to find 8 more penguins.


polar bear butt ornament


Polar Bear Butt Ornament Crochet Pattern


reindeer butt ornament


Reindeer Butt Ornament Crochet Pattern


Christmas gift tag


Christmas Gift Tags


Affiliate Links

This page contains affiliate links. If you choose to purchase after clicking a link, I may receive a commission at no extra cost to you.


Posted on — Leave a comment

White Elephant Exchange Gift Tag

white elephant gift tag

Are you doing a white elephant gift exchange this year? Our family does it every year, and we have so much fun with it.

  1. Invite your guests and tell them to bring a wrapped white elephant gift. Be sure to set a dollar amount limit so that everyone’s gift is the same in value. Often these are gag gifts. (Our family doesn’t allow liquor bottles or gift cards; that’s too easy!)
  2. Each gift should be wrapped. No name tag is needed on the gift, because you don’t yet know who will get it.
  3. Have a designated place for the guests to place their white elephant gifts as they arrive.
  4. Once you know how many gifts/guests there are, write numbers (For example, 1-15 if there are 15 guests) on individual slips of paper. Place each number in a bowl.
  5. Each person draws a number from the bowl.
  6. The player with number 1 gets to choose the first gift. They unwrap the gift in front of everyone.
  7. The player with number 2 goes next. They can either choose the gift player #1 unwrapped or choose a wrapped gift.
  8. If they choose player #1’s gift, player #1 gets to choose a new gift.
  9. The unwrapping and stealing continue until every gift has been claimed.
  10. Designate the number of times a gift can be stolen, usually 2-3 times.

white elephant gift tag

Although gift tags on the gifts are not required, I have a cute White Elephant Gift Tag for you to download if you want to make your white elephant wrapping extra special.

White Elephant Gift Tag


gift tags to download

More Gift Tags to Download


Beer Mug Earflap Hat Crochet Pattern (Women's and Men's Sizes)

A couple of years ago, I made a Beer Mug Hat for the family white elephant gift exchange, and it turned out to be the gift that everyone wanted!

Beer Mug Earflap Hat Crochet Pattern (Women’s and Men’s Sizes)


Remaining Paperback Books are 50% off through 12/15/2022

Do Unicorns Live Forever?
advent calendar
Advent Calendar Crochet Patterns
Crochet - Texas Style Crochet Patterns Ebook
Crochet – Texas Style Crochet Patterns 
It’s a Wonderful Life Advent Calendar

National Gingerbread House Day

Gingerbread House Ornament Crochet Pattern
gingerbread house gift bag
Gingerbread House Gift Bag Crochet Pattern

ICYMI (In Case You Missed It)


Penguin Treasure Map

Click on each photo on the PDF of the Treasure Map to find 8 more penguins.


polar bear butt ornament


Polar Bear Butt Ornament Crochet Pattern


reindeer butt ornament


Reindeer Butt Ornament Crochet Pattern


Christmas gift tag


Christmas Gift Tags


Affiliate Links

This page contains affiliate links. If you choose to purchase after clicking a link, I may receive a commission at no extra cost to you.