Posted on 1 Comment

Easter Advent – Accessories

Handmade with Love: Crochet Easter Accessories to Brighten Your Spring

Spring is in the air, and you know what that means — it’s time for pastel colors, bunny ears, and all things Easter! Whether you’re crafting for your little ones, decorating the house, or creating cute gifts for friends, crochet Easter accessories add that sweet handmade touch to the season.

Here are some adorable and easy crochet ideas to hop into this Easter.

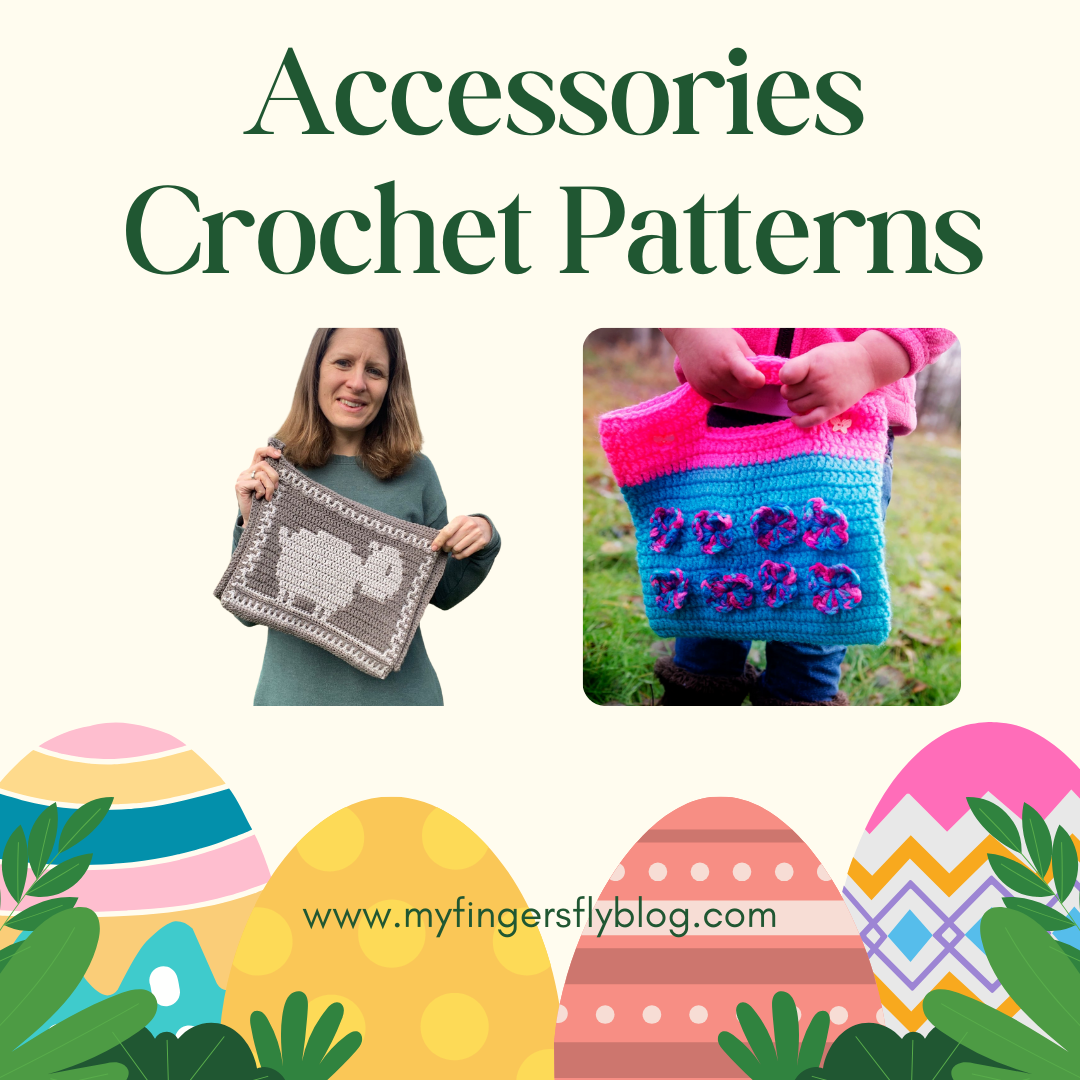
Butterfly Handbag Crochet Pattern

Butterfly Handbag

Measurements: approximately 5 ½ tall x 6” wide

Materials:

Worsted weight yarn      2 oz (MC)

1 oz. (CC)

1 oz. ombre

Size G (4.0 mm) crochet hook

Yarn needle

2 buttons

V-STITCH: Dc, ch 1, dc in same st.

BUTTERFLY STITCH: Work V-stitch. Turn to work around post of 2nd dc of V-stitch, sl st, ch 3, 3 tr, ch 3, sl st, ch 3, 2 dc, ch 3, sl st. Now turn to work around post of 1st dc of V-stitch, work sl st, ch 3, 2 dc, ch 3, sl st, ch 3, 3 tr, ch 3, sl st.

DIRECTIONS:

Rnd 1: With MC, ch 38. Dc in 4th ch from hook, dc in next 33 ch, 3 dc in last ch. Working on opposite side of starting ch, dc in 33 loops, 2 dc in last loop. Join to top of ch-3. (73 dc)

Rnd 2: Ch 1, sc in 1st st, ch 2 (counts as 1st dc), dc in same st, dc in each st around. Join. (74 dc).

Rnd 3: Ch 1, sc in 1st st, ch 2 (counts as 1st dc), dc in each st. Join with sl st.

Rnd 4: Sc, ch 2 in 1st st (counts as 1st dc), dc in 41 sts, *sk next st, V-stitch in next st, sk next st, dc in next 5 sts,* repeat 3 times, dc in last 5 sts, join.

Rnd 5: Sc, ch 2 in 1st st (counts as 1st dc), dc in 41 sts, ch 1, sk next dc, change to ombre yarn, butterfly st in 1st V-stitch, *change to MC, dc in next 5 sts, change to ombre, butterfly st in V-stitch,* repeat 3 times, dc in last 5 sts, join.

Rnd 6: Sc, ch 2 in 1st st (counts as 1st dc), dc in each dc around and V-stitch in each butterfly st.

Rnd 7: Sc, ch 2 in 1st st (counts as 1st dc), dc in each dc and ch-1 sp (74 dc).

Rnd 8: Sc, ch 2 in 1st st (counts as 1st dc), dc in 42 sts, *sk next st, V-stitch in next st, sk next st, dc in next 5 sts,* repeat 3 times, dc in last 4 sts, join.

Rnd 9: Sc, ch 2 in 1st st (counts as 1st dc), dc in 42 sts, change to CC, butterfly st in 1st V-stitch, *change to MC, dc in next 5 sts, change to CC, butterfly st in V-stitch,* repeat 3 times, dc in last 4 sts, join.

Rnd 10: Repeat Rnd 6.

Rnd 11: Repeat Rnd 7.

Rnds 12-13: Ch 1, sc in 1st st, ch 2 (counts as 1st dc), dc in each st. Join with sl st. Fasten off MC.

Rnds 14-15: With CC, ch 1, sc in 1st st, ch 2 (counts as 1st dc), dc in each st. Join with sl st.

Rnd 16: Sc, ch 2 in 1st st (counts as 1st dc), dc in 14 sts, ch 15, sk 13 sts (handle), dc in next 17 sts, ch 1, sk 1 st (buttonhole), dc in next 5 sts, ch 15, sk 13 sts (opposite side of handle), dc in next 5 sts, ch 1, sk 1 st (buttonhole), dc in next 4 sts. Lay purse flat to check placement of handles and adjust if necessary

Rnd 17: Sc, ch 2 in 1st st (counts a 1st dc), dc in each dc and ch around.

Rnd 18: Sc, ch 2 in 1st st (counts as 1st dc), dc in each dc around. Fasten off.

Block purse with damp cloth so that butterflies are straight. Sew on buttons. Watch your little girl prance around with her new purse!

PDF available at Butterfly Handbag Crochet Pattern

Catherine Shawl from Jo’s Crafty Hook. 

This is a great textured, lightweight accessory that you can add to your Easter or Spring outfit.

https://joscraftyhook.com/catherine-shawl-free-crochet-pattern/


Sheep Bag from Concrete Gems Crochet

Made using overlay mosaic crochet for the bag flap and simple stitches for the main body of the bag, this design is fun to make and a delight to use!

Crochet Shoulder Bag Pattern with Cute Sheep Motif!

Knotty Bunny Bag from Viva Crochet

https://yarnynotes.com/2025/04/09/knotty-bunny-bag/

Lacy Infinity Scarf from My Fingers Fly can be made with any yarn you have in your stash. It’s so quick and easy, you can make several in different colors to match all your outfits!

butterfly flip-flops

Zoo Blog Hop Day 6 – Butterflies

These easy flip-flops include a YouTube tutorial.

Today’s free download is Life Cycle of a Butterfly Crossword Puzzle. 


ICYMI (In Case You Missed It)

Day 1 – Bunnies

Day 2 – Chicks

Day 3 – Ducks

Day 4 – Lambs and Goats


Day 5 – Donkey

Day 6 – Baskets 

Day 7 – Easter Eggs

Day 8 – Clothing


Day 10 – Crochet for Children

Day 11 – Crochet for Baby

Day 12 – Home Decor

Day 13 – Flowers


Day 14 – Miscellaneous

More Easter Patterns

free easter crochet pattern

Easter Patterns

National Unicorn Day

unicorn crochet patterns

Unicorn Crochet Patterns


Affiliate Links

This post contains affiliate links. This means I may earn a commission should you chose to sign up for a program or make a purchase using my link. It’s okay – I love all of these companies anyways, and you will too!


Amazon affiliate: https://amzn.to/4hkS5Zd
Easter Eggs prefilled with Colorful Wind-Up Jumping Bunnies and Chicks


Happy Easter Mouse! book (from the author of If You Give a Mouse a Cookie)


Posted on 4 Comments

Easter Advent – Clothing

As the flowers bloom and the weather warms, Easter becomes the perfect time to show off your handmade style. Whether you’re dressing up for a family brunch, attending church, or just enjoying the sunshine, crochet clothing offers a charming, whimsical touch to your spring wardrobe.

Here are some adorable and festive crochet clothing ideas to try this Easter.

The beautiful pastel colors in this Tutti Frutti Poncho would make a perfect wrap for Easter!!

Materials:

Lion Big Scoop Yarn or any DK weight yarn – 5 oz.

(fringe is optional and would require additional yarn)

Size G (4.0 mm) crochet hook

Yarn needle

Size Small (4/6)

Neckline to hem not including fringe):  15″

Neck opening (circumference):  24″

Laying flat at widest point:   24”


Gauge:  5 dc = 1”

Cluster st: yo, insert hook into st, yo and pull through, yo and pull through 2 lps, yo and pull through 1 loop, yo, insert hook into st, yo and pull through, yo and pull through 2 lps, yo and pull through 1 lp, yo, insert hook into st, yo and pull through, yo and pull through 2 lps, yo and pull through all lps.

YouTube Tutorial

NOTE: When making dc in ch sp, work into sp rather than into ch to help cover the color of the chs.

INSTRUCTIONS:

Make 2 (1 front & 1 back)

Row 1:  Ch 108, dc in 4th ch from hook and each ch across (106 dc including beginning ch-3).

Row 2: Ch 3 (counts as 1st dc), turn, sk first st, dc next st, sk next st, ch 1, dc, *ch 2, sk 2 sts, dc next st,* repeat across. End with ch 1, sk 1 st, dc next st, dc in top of ch-3.

Row 3: Ch 3 (counts as 1st dc), turn, dc in next st, 3 dc in each st across, skipping ch spaces. End with dc in last dc, dc in top of ch-3.

Row 4: Ch 3, turn, dc in next st, ch 1, *cluster, ch 2,* repeat across. End with dc in last dc, dc in top of ch-3.

Row 5: Ch 3, turn, dc in 2nd st, ch 1, dc in top of cluster, *ch 2, dc in top of cluster,* repeat across. End with ch 1, dc in last dc, dc in top of ch-3.

Row 6: Ch 3, turn, dc in next st, dc in ch-1 sp, dc in next dc, *2 dc in ch-2 sp, dc in next dc,* repeat across. End with dc in ch-1 sp, dc in last dc, dc in top of ch-3.

Row 7: Ch 3, turn, dc across.

Repeat Rows 2-7, 3 times. Fasten off.

Each panel measures approximately 23” wide x 11” tall.

Even rows are RIGHT side of work; odd rows are BACK side of work. With right sides facing, sew short side of front to top of back on the left. Then sew short side of back to top of front.

Bottom edging: With right side facing, attach yarn to bottom edge and work 1 row of dc evenly spaced around the bottom with 3 dc in front and back corners. Fasten off.

Top edging: Attach yarn to top edge and work 1 row of dc around, decreasing at front and back corners. Fasten off. Weave in all ends.

Fringe: Cut 12” lengths of both colors of yarn. Using 3 pieces of the same color, fold in half and insert hook from back to front of bottom edging. Pull loop through stitch, then pull ends through loop you just made. Work 1 fringe every 2 stitches across bottom, alternating black and ombre.

Tutti Frutti PonchoPDF including Sizes Medium (8/10) and Large (12/14) is 50% off today only.

Crochet Pattern Tutti Frutti Girl’s Poncho

Nellie Summer Tee from Jo’s Crafty Hook 

Add a lightweight tee to your Spring or Summer wardrobe.

Nellie Summer Tee Free Crochet Pattern

Crochet a Pinstripe Sweater in pastel colors for a great cardigan to wear to church on Easter morning.

Toddler Pinstripe Sweater Crochet Pattern

Today’s free download:

Easter Wordsearch Puzzle

More Easter Patterns

free easter crochet pattern

Easter Patterns


ICYMI (In Case You Missed It)

Day 1 – Bunnies

Day 2 – Chicks

Day 3 – Ducks

Day 4 – Lambs and Goats


Day 5 – Donkey

Day 6 – Baskets 

Day 7 – Easter Eggs


Day 9 – Accessories


Day 10 – Crochet for Children

Day 11 – Crochet for Baby

Day 12 – Home Decor

Day 13 – Flowers


Day 14 – Miscellaneous

Affiliate Links

This post contains affiliate links. This means I may earn a commission should you chose to sign up for a program or make a purchase using my link. It’s okay – I love all of these companies anyways, and you will too!


Amazon affiliate: https://amzn.to/4hkS5Zd
Easter Eggs prefilled with Colorful Wind-Up Jumping Bunnies and Chicks


Happy Easter Mouse! book (from the author of If You Give a Mouse a Cookie)


Posted on 3 Comments

Easter Advent – Easter Eggs

Hey there, yarn-loving friend! 🧶
It’s that time of year when spring starts to bloom, the chocolate bunnies come out to play, and we start spotting those colorful little Easter eggs popping up everywhere. But today, I’m not just talking about the kind you dye and hide in the backyard. These are Easter eggs to crochet.

Mr. Eggerton Crochet Pattern

Figure measures approximately 7” tall

 Materials:

Worsted weight yarn

40 yards blue

20 yards white

5 yards yellow

1 yard red

Crochet hook size G (4.0 mm)

15-mm googly eyes

Fiberfill

Directions:

BODY:

Rnd 1: With blue yarn, ch 2 (or magic ring). Sc 6 in second ch from hook. Do not join.

Rnd 2: 2 sc in each sc (12 sc).

Rnd 3: *1 sc in next sc, 2 sc in next sc,* repeat around (18 sc).

Rnd 4: *1 sc in next 2 sc, 2 sc in next sc*, repeat around (24 sc).

Rnd 5: *1 sc in next 3 sc, 2 sc in next sc*, repeat around (30 sc).

Rnd 6: *1 sc in next 4 sc, 2 sc in next sc,* repeat around (36 sc).

Rnd 7: *1 sc in next 5 sc, 2 sc in next sc,* repeat around (42 sc).

Rnds 8-11: Sc in each st. At end of Rnd 11, join with a sl st. Fasten off blue.

Rnds 12-14: With white yarn, sc in each st. Do not join.

Rnd 15: *Dec, sc in next 5 sc,* repeat around (36 sc).

Rnd 16: Sc in each st.

Rnd 17: *Dec, sc in next 4 sc,* repeat around (30 sc).

Rnd 18: Sc in each st.

Rnd 19: *Dec, sc in next 3 sc,* repeat around (24 sc).

Rnd 20: Sc in each st. Begin stuffing body.

Rnd 21: *Dec, sc in next 2 sc,* repeat around (18 sc).

Rnd 22: Sc in each st.

Rnd 23: *Dec, sc in next sc,* repeat around (12 sc).

Rnd 24: Sc in each st. Finish stuffing.

Rnd 25: Dec around (6 sc). Join with sl st. Fasten off white leaving 6” length for sewing. Gather outer loops of remaining 6 sts and pull tightly to close.

LEGS: (Make 2)

Rnd 1: With blue yarn, ch 2. Sc 6 in second ch from hook. Do not join.

Rnd 2: 2 sc in each sc (12 sc).

Rnd 3: *1 sc in next 3 sc, 2 sc in next sc,* repeat around (15 sc).

Rnd 4: Sc in each st.

Rnd 5: *Dec, sc in next 3 sc *, repeat around (12 sc).

Rnds 6-10: Sc in each st. At the end of Rnd 10, join with sl st. Fasten off leaving 12” length for sewing.

Stuff legs firmly and sew to body at Rnds 1-6.

ARMS: (Make 2)

Rnd 1: With white yarn, ch 2. Sc 6 in second ch from hook. Do not join.

Rnd 2: 2 sc in each sc (12 sc).

Rnd 3: Sc in each st.

Rnd 4: *Dec, sc in next 2 sc *, repeat around (9 sc).

Rnds 5-7: Sc in each st. At the end of Rnd 7, join with sl st. Fasten off leaving 12” length for sewing.

Stuff arms firmly and sew to body at Rnds 12-15.

HAT:

Rnd 1: With yellow yarn, ch 2 (or magic ring). Sc 6 in second ch from hook. Do not join.

Rnd 2: 2 sc in each sc (12 sc).

Rnd 3: *1 sc in next sc, 2 sc in next sc,* repeat around (18 sc).

Rnds 4-5: Sc in each st.

Rnd 6: In front loops only, *sc in next st, 2 sc in next st,* repeat around (27 sc).

Rnd 7: Working in both loops, sc in each st. Join with sl st. Fasten off yellow leaving 12” length for sewing. Sew hat to top of head.

Sew (or glue) googly eyes to Rnd 17. Use red yarn to embroider mouth.

Weave in all ends.

PDF download is 50% off today only and includes all 3 egg characters – Mr. Eggerton, Senor Cascarone and Devlin Hardboil

Egg Characters Plush Toy Crochet Pattern


Simple Easter Egg Pattern from Pocket Yarnlings 

Chunky Woven Easter Eggs from Concrete Gems Crochet 

Easter Dish Cloth from Marsha YarnDoodles


Easter Egg Coaster from Marsha YarnDoodles


Rainbow Egg Cozy from My Fingers Fly


Today’s free download is Happy Easter Egg Mindful Coloring Page

Spring Fashion $2 Event 2025

Redhot Peppers Beanie


Today’s feature is the Redhot Peppers Beanie from ViVaCrochet. 

For the duration of the event (April 6-17), each crochet pattern will be on sale for only $2.00 on Ravelry. Coupon code is SPRING25 and is valid for all designs.

A different pattern will be featured each day during the event, but you can get any design for $2.00 through April 17. See all the designs at https://myfingersflyblog.com/?page_id=29346&preview=true


More Easter Patterns

free easter crochet pattern

Easter Patterns

ICYMI (In Case You Missed It)

Day 1 – Bunnies

Day 2 – Chicks

Day 3 – Ducks

Day 4 – Lambs and Goats


Day 5 – Donkey

Day 6 – Baskets 


Day 8 – Clothing


Day 9 – Accessories


Day 10 – Crochet for Children

Day 11 – Crochet for Baby

Day 12 – Home Decor

Day 13 – Flowers


Day 14 – Miscellaneous

Affiliate Links

This post contains affiliate links. This means I may earn a commission should you chose to sign up for a program or make a purchase using my link. It’s okay – I love all of these companies anyways, and you will too!


Amazon affiliate: https://amzn.to/4hkS5Zd
Easter Eggs prefilled with Colorful Wind-Up Jumping Bunnies and Chicks


Happy Easter Mouse! book (from the author of If You Give a Mouse a Cookie)


Posted on 7 Comments

Easter Advent – Easter Baskets

Hop Into Spring: Creative Easter Basket Ideas for Every Bunny

Easter is right around the corner, and that means it’s time to start thinking about those charming little baskets filled with goodies, surprises, and a whole lot of joy. Whether you’re creating one for your child, a friend, or even a furry family member, Easter baskets are the perfect way to celebrate the season of renewal and love.

Easter is a time to celebrate joy, rebirth, and connection—what better way to do that than with a little surprise tucked into a handmade basket? Whether simple or elaborate, what matters most is the love behind it.

Chicken Easter Basket

Materials:

Yarn Bee Fur the Moment yarn:

110-120 yards

Worsted weight yarn:

3 yards red

2 yards yellow

Size L (8.0 mm) and G (4.0 mm) crochet hooks

Yarn needle

Gallon plastic bucket (I used one ice cream bucket and one from Dollar Tree)

12-mm wiggle eyes

Polyfil

Popsicle stick

Stitch markers are highly recommended for this type of yarn

Finished basket measures approximately 8” wide by 6-7” tall, depending on size of bucket used.

Gauge:  5 sc = 2”, 4 rows = 2”

Directions:

Row 1: With Fur the Moment yarn and L hook, ch 2 (or magic ring), 7 sc in 2nd ch from hook. Do not join. Work in continuous rnds unless otherwise specified.

Rnd 2: 2 sc in each st (14 sc).

Rnd 3: *Sc in next st, 2 sc in next st,* repeat around (21 sc).

Rnd 4: *Sc in next 2 sts, 2 sc in next st,* repeat around (28 sc).

Rnd 5: *Sc in next 3 sts, 2 sc in next st,* repeat around (35 sc).

Rnd 6: *Sc in next 4 sts, 2 sc in next st,* repeat around (42 sc).

Rnd 7: *Sc in next 5 sts, 2 sc in next st,* repeat around (49 sc).

Rnd 8: *Sc in next 6 sts, 2 sc in next st,* repeat around (56 sc).

Rnd 9: *Sc in next 13 sts, 2 sc in next st,* repeat around (60 sc).

Rnd 10: Sc in each st.

Repeat Rnd 10 until piece measures as tall as the bucket. (I used 2 different buckets; and they were different heights.) Then work 1 more rnd in sc. The extra rnd will be used to glue along top of bucket.

Join with a sl st. Do not fasten off.

Tail:

Row 1: Ch 1, turn, sk sl st, sc in next 8 sts.

Row 2: Ch 1, turn, dec, sc in next 4 sts, dec (6 sc).

Row 3: Ch 1, turn, dec, sc in next 2 sts, dec (4 sc).

Row 4: Ch 1, turn, dec twice (2 sc). Fasten off.

Head:

Rnd 1: With Fur the Moment yarn and L hook, ch 2, 6 sc in 2nd ch from hook. Do not join. Work head in continuous rnds.

Rnd 2: 2 sc in each st (12 sc).

Rnds 3-6: Sc in each st.

Rnd 7: *Sc in next st, 2 sc in next st,* repeat around (18 sc).

Rnds 8-10: Sc in each st. Join with sl st at end of Rnd 10. Fasten off yarn leaving 12” length for sewing.

Comb:

With red worsted yarn and size G hook, attach yarn at top of head, sc, *ch 3, sc next st,* 2 times, ch 3, sl st. Fasten off yarn and pull both ends inside head. Tie in a knot for extra security.

Beak:

Rnd 1: With yellow worsted yarn and size G hook, ch 2 (or magic ring), 3 sc in 2nd ch from hook. Do not join.

Rnd 2: 2 sc in first st, sc in next 2 sts (4 sc).

Rnd 3: 2 sc in first st, sc in next 3 sts (5 sc). Join with sl st. Fasten off yarn leaving 6” length. Sew beak to front of head. Glue eyes above beak.

Stuff head semi-firmly. Leave enough room at bottom to fold Rnd 10 of head flat. Insert half of the popsicle stick into head. Sew head closed with half the popsicle stick extending down.

Mark center front of basket opposite the center of the tail.

Sew head to top of last rnd of body with popsicle stick at center front between the chicken and the bucket.

Wings: (Make 2)

Row 1: With Pipsqueak yarn, ch 11, sc in 2nd ch from hook and in each remaining ch (10 sc).

Row 2: Ch 1, turn, dec over first 2 sts, sc in next 8 sts (9 sc).

Row 3: Ch 1, turn, sc in next 7 sts, dec over next 2 sts (8 sc).

Row 4: Ch 1, turn, dec over first 2 sts, sc in next 6 sts (7 sc). Fasten off leaving 9” length for sewing.

Sew Row 4 and front edge of wing to side of chicken approximately 2 rnds from top edge with angled edge (at back) and Row 1 hanging free.

PDF is 50% off for one day only – Chicken Easter Basket Crochet Pattern – Digital PDF Download

This basket is perfect for Easter. You can fill it with all kinds of goodies for the kiddies. It would also be a great accent piece to your Home Decor.

https://joscraftyhook.com/braided-basket-crochet-pattern/

Mini Easter Basket from Start Crochet This is a 20-minute easy mini Easter basket crochet pattern, ideal for beginners. You could fill these Easter baskets with painted eggs, chocolate eggs, flowers, or if you’ve got pets, add some pet-friendly treats for your furry friends to enjoy during the holiday festivities. https://startcrochet.com/easy-mini-easter-basket-crochet-pattern-free/


Chunky Woven Basket from Concrete Gems Crochet

This chunky crochet Easter basket is quick, beginner-friendly, and perfect for holding Easter eggs, treats, or gifts!

Free Crochet Easter Basket Pattern in Bulky Yarn


Flower Basket from My Fingers FlyDesigned with spring in mind, this pattern features a sturdy, easy-to-carry basket adorned with sweet crochet flowers and grass—perfect for holding treats, eggs, or a special gift.

Flower Easter Basket Pattern

Today’s free download is an Easter basket to color, cut out and assemble.

Easter Basket Worksheet


ICYMI (In Case You Missed It)

Day 1 – Bunnies

Day 2 – Chicks

Day 3 – Ducks

Day 4 – Lambs and Goats


Day 5 – Donkey


Day 7 – Easter Eggs

Day 8 – Clothing


Day 9 – Accessories


Day 10 – Crochet for Children

Day 11 – Crochet for Baby

Day 12 – Home Decor

Day 13 – Flowers


Day 14 – Miscellaneous


Affiliate Links

This post contains affiliate links. This means I may earn a commission should you chose to sign up for a program or make a purchase using my link. It’s okay – I love all of these companies anyways, and you will too!


Amazon affiliate: https://amzn.to/4hkS5Zd
Easter Eggs prefilled with Colorful Wind-Up Jumping Bunnies and Chicks


Happy Easter Mouse! book (from the author of If You Give a Mouse a Cookie)


Posted on 4 Comments

Easter Advent – Donkey

The Humble Donkey and the Heart of Easter

When we think of Easter, we often picture lilies, sunrise services, and perhaps a bunny or two. But one of the most quietly powerful symbols of Easter is the humble donkey.

In the days leading up to Easter, Jesus entered Jerusalem not on a horse of war, but on a donkey — a creature of peace and humility. This wasn’t just a random detail; it fulfilled an ancient prophecy (Zechariah 9:9) and set the tone for the kind of kingdom Jesus was building — one grounded in gentleness, love, and grace.

Donkeys may not be flashy, but they’re strong, steady, and faithful — much like the spirit of Easter itself. They carry burdens, walk with the weary, and don’t ask for applause. In many ways, they remind us to slow down, stay grounded, and carry love wherever we go.

This Easter, as we celebrate new life and fresh hope, let’s remember the donkey — a quiet hero in the greatest story ever told.

Today’s free download is a bookmark depicting Palm Sunday, when Jesus rode a donkey into Jerusalem.

Palm Sunday Bookmark

Donkey Mandala coloring page
Donkey Tissue Cover crochet pattern


Archie the Donkey Crochet Pattern using Bernat Blanket Yarn


Archie the Donkey

Materials:

Bernat Blanket yarn –

24 oz. Country Blue

3 oz. white

2 oz. black

Size M (9.0 mm) crochet hook

Yarn needle

5 lbs. Fiberfil

Gauge 2 sc = 1”, 2 rows sc = 1”

Finished donkey measures approximately 23” tall (sitting), 18” wide

NOTE: Ch-2 method to start a circle is preferred over magic ring when using blanket yarn. The bulkiness of the yarn prevents the hole that worsted sometimes leaves when using the ch-2 method.

BODY:

Rnd 1: With blue yarn, ch 2 (or magic ring), 8 sc in 2nd ch from hook. Do not join. Work in continuous rnds throughout.

Rnd 2: 2 sc in each sc around (16 sc).

Rnd 3: *Sc in next sc, 2 sc in next sc,* repeat around (24 sc).

Rnd 4: *Sc in next 2 sc, 2 sc in next sc,* repeat around (32 sc).

Rnd 5: *Sc in next 3 sc, 2 sc in next sc,* repeat around (40 sc).

Rnd 6: *Sc in next 4 sc, 2 sc in next sc,* repeat around (48 sc).

Rnd 7: *Sc in next 5 sc, 2 sc in next sc,* repeat around (56 sc).

Rnd 8: *Sc in next 6 sc, 2 sc in next sc,* repeat around (64 sc).

Rnd 9: *Sc in next 7 sc, 2 sc in next sc,* repeat around (72 sc).

Rnd 10: *Sc in next 8 sc, 2 sc in next sc,* repeat around (80 sc).

Rnds 11-23: Sc in each st.

Rnd 24: *Dec next 2 sc, sc next 8 sc,* repeat around (72 sc).

Rnds 25-26: Sc in each st.

Rnd 27: *Dec next 2 sc, sc next 7 sc,* repeat around (64 sc).

Rnds 28-29: Sc in each st.

Rnd 30: *Dec next 2 sc, sc next 6 sc,* repeat around (56 sc).

Rnds 31-32: Sc in each st.

Rnd 33: *Dec next 2 sc, sc next 5 sc,* repeat around (48 sc).

Rnds 34-35: Sc in each st.

Begin stuffing body.

Rnd 36: *Dec next 2 sc, sc next 4 sc,* repeat around (40 sc).

Rnds 37-38: Sc in each st.

Rnd 39: *Dec next 2 sc, sc next 3 sc,* repeat around (32 sc).

Rnds 40-41: Sc in each st.

Rnd 42: *Dec next 2 sc, sc next 2 sc,* repeat around (24 sc).

Rnds 43-44: Sc in each st.

Rnd 45: *Dec next 2 sc, sc next sc,* repeat around (16 sc).Fasten off blue yarn leaving 12” length for sewing on the head. The neck of the body remains open but will be covered when you sew on the head. Finish stuffing body.

LEGS: (Make 4)

Rnd 1: With white yarn, ch 2 (or magic ring), 8 sc in 2nd ch from hook. Do not join. Work in continuous rnds throughout.

Rnd 2: 2 sc in each sc around (16 sc).

Rnd 3: *Sc in next sc, 2 sc in next sc,* repeat around (24 sc).

Rnds 4-6: Sc in each st. Join with sl st at end of Rnd 6 and fasten off white.

Rnd 7: Join blue yarn, sc in each st. Do not join.

Rnds 8-22: Sc in each st. At end of Rnd 22, join with sl st. Fasten off blue leaving length for sewing.

Stuff legs firmly. Sew 2 back legs to bottom of body at front, spacing them about 3” apart at approximately Rnds 12-18. Sew 2 front legs to top body at front, approximately Rnds 30-35 with 1.5” to 2” spacing between the legs.

HEAD:

Rnd 1: With white yarn, ch 2 (or magic ring), 8 sc in 2nd ch from hook. Do not join. Work in continuous rnds throughout.

Rnd 2: 2 sc in each sc around (16 sc).

Rnd 3: *Sc in next sc, 2 sc in next sc,* repeat around (24 sc).

Rnds 4-7: Sc in each sc. At end of Rnd 7, join with sl st and fasten off white yarn.

Rnd 8: Join blue yarn, sc in each st.

Rnd 9: *Sc in next 5 sc, 2 sc in next sc,* repeat around (28 sc).

Rnds 10-12: Sc in each sc.

Rnd 13: *Sc in next 6 sc, 2 sc in next sc,* repeat around (32 sc).

Rnds 14-16: Sc in each sc.

Rnd 17: *Sc in next 7 sc, 2 sc in next sc,* repeat around (36 sc).

Rnds 18-20: Sc in each sc.

Rnd 21: *Sc in next 8 sc, 2 sc in next sc,* repeat around (40 sc).

Rnds 22-25: Sc in each sc.

Rnd 26: *Dec next 2 sc, sc next 3 sc,* repeat around (32 sc). Stuff head.

Rnd 27: *Dec next 2 sc, sc next 2 sc,* repeat around (24 sc).

Rnd 28: *Dec next 2 sc, sc next sc,* repeat around (16 sc).

Rnd 30: *Dec next 2 sc around (8 sc). Join with sl st. Fasten off. Finish stuffing and use ultimate finish to close. Sew Rnds 17-23 of head over opening at top of body. The head should cover the entire neck opening. Sew around twice for a stronger seam. Weave in all ends.

Ultimate Finish Technique –  https://youtu.be/jVpTr8mId3I

TAIL:

Row 1: With blue yarn, ch 6, sc in 2nd ch and next 4 ch (5 sc).

Rows 2-12: Ch 1, turn, sc in each st. Fasten off at end of Row 12 leaving a 12” length for sewing. Fold the tail in half lengthwise and sew sides together. Cut 5 pieces of black yarn 9” long. Fold each piece in half, insert hook into end of tail, pull through loop, pull ends through loop. Repeat around the tail. Sew tail to back of donkey at Rnd 10.

EARS: (Make 2)

Rnd 1: Ch 2 (or magic ring), 6 sc in 2nd ch from hook. Do not join. Work in continuous rnds throughout.

Rnd 2: *Sc in next st, 2 sc in next st (9 sc).

Rnds 3-4: Sc in each st.

Rnd 5: *Sc in next 2 sts, 2 sc in next st,* repeat around (12 sc).

Rnds 6-7: Sc in each st.

Rnd 8: *Sc in next 3 sts, 2 sc in next st,* repeat around (15 sc).

Rnds 9-10: Sc in each st.

Rnd 11: *Dec over next 2 sts, sc in next 4 sts,* repeat once, dec over next 2 sts, sc around (12 sc).

Rnds 12-13: Sc in each st. At end of Rnd 13, join with a sl st and fasten off yarn leaving 12” length for sewing. Fold bottom of ear (Rnd 13) in half and sew to head at Rnd 25 spacing ears approximately 3.5” apart.

EYES: (Make 2)

With white yarn, ch 4, 2 hdc in 2nd ch, hdc in next ch, 4 hdc in last ch. Working on opposite side of ch, hdc next ch, 2 hdc in last ch. Join with sl st. Fasten off leaving length for sewing.

PUPILS:

With black yarn, ch 2 (or magic ring), 6 sc in 2nd ch. Join with sl st. Fasten off leaving length for sewing.

Sew pupils to bottom half of eyes. Sew eyes to head at Rnds 14-18 approximately 1” apart.

MANE:

Cut 9” pieces of black yarn. Starting at front of face just below the years, pull through 2 pieces at a time, making 2 rows going down the neck and top 4 rnds of body. Fold 2 pieces in half, insert hook in st, grab yarn and pull through st. Then pull through loop just made and pull tightly.

CROSS:

Mark a line on the back of the donkey from the tail to 4 rnds below the mane, then another line going across the shoulders. Following markings, work sc in surface crochet in black. Weave in all ends.

Full tutorial for Archie the Donkey available on Youtube.

More Farm Animals

Farm Animals

ICYMI (In Case You Missed It)

Day 1 – Bunnies

Day 2 – Chicks

Day 3 – Ducks

Day 4 – Lambs and Goats


Day 6 – Baskets 

Day 7 – Easter Eggs

Day 8 – Clothing


Day 9 – Accessories


Day 10 – Crochet for Children

Day 11 – Crochet for Baby

Day 12 – Home Decor

Day 13 – Flowers


Day 14 – Miscellaneous


Affiliate Links

This post contains affiliate links. This means I may earn a commission should you chose to sign up for a program or make a purchase using my link. It’s okay – I love all of these companies anyways, and you will too!


Amazon affiliate: https://amzn.to/4hkS5Zd
Easter Eggs prefilled with Colorful Wind-Up Jumping Bunnies and Chicks


Happy Easter Mouse! book (from the author of If You Give a Mouse a Cookie)