Posted on 11 Comments

🍓👻 Strawberry Mummy Amigurumi Crochet Pattern – A Sweet & Spooky Make!

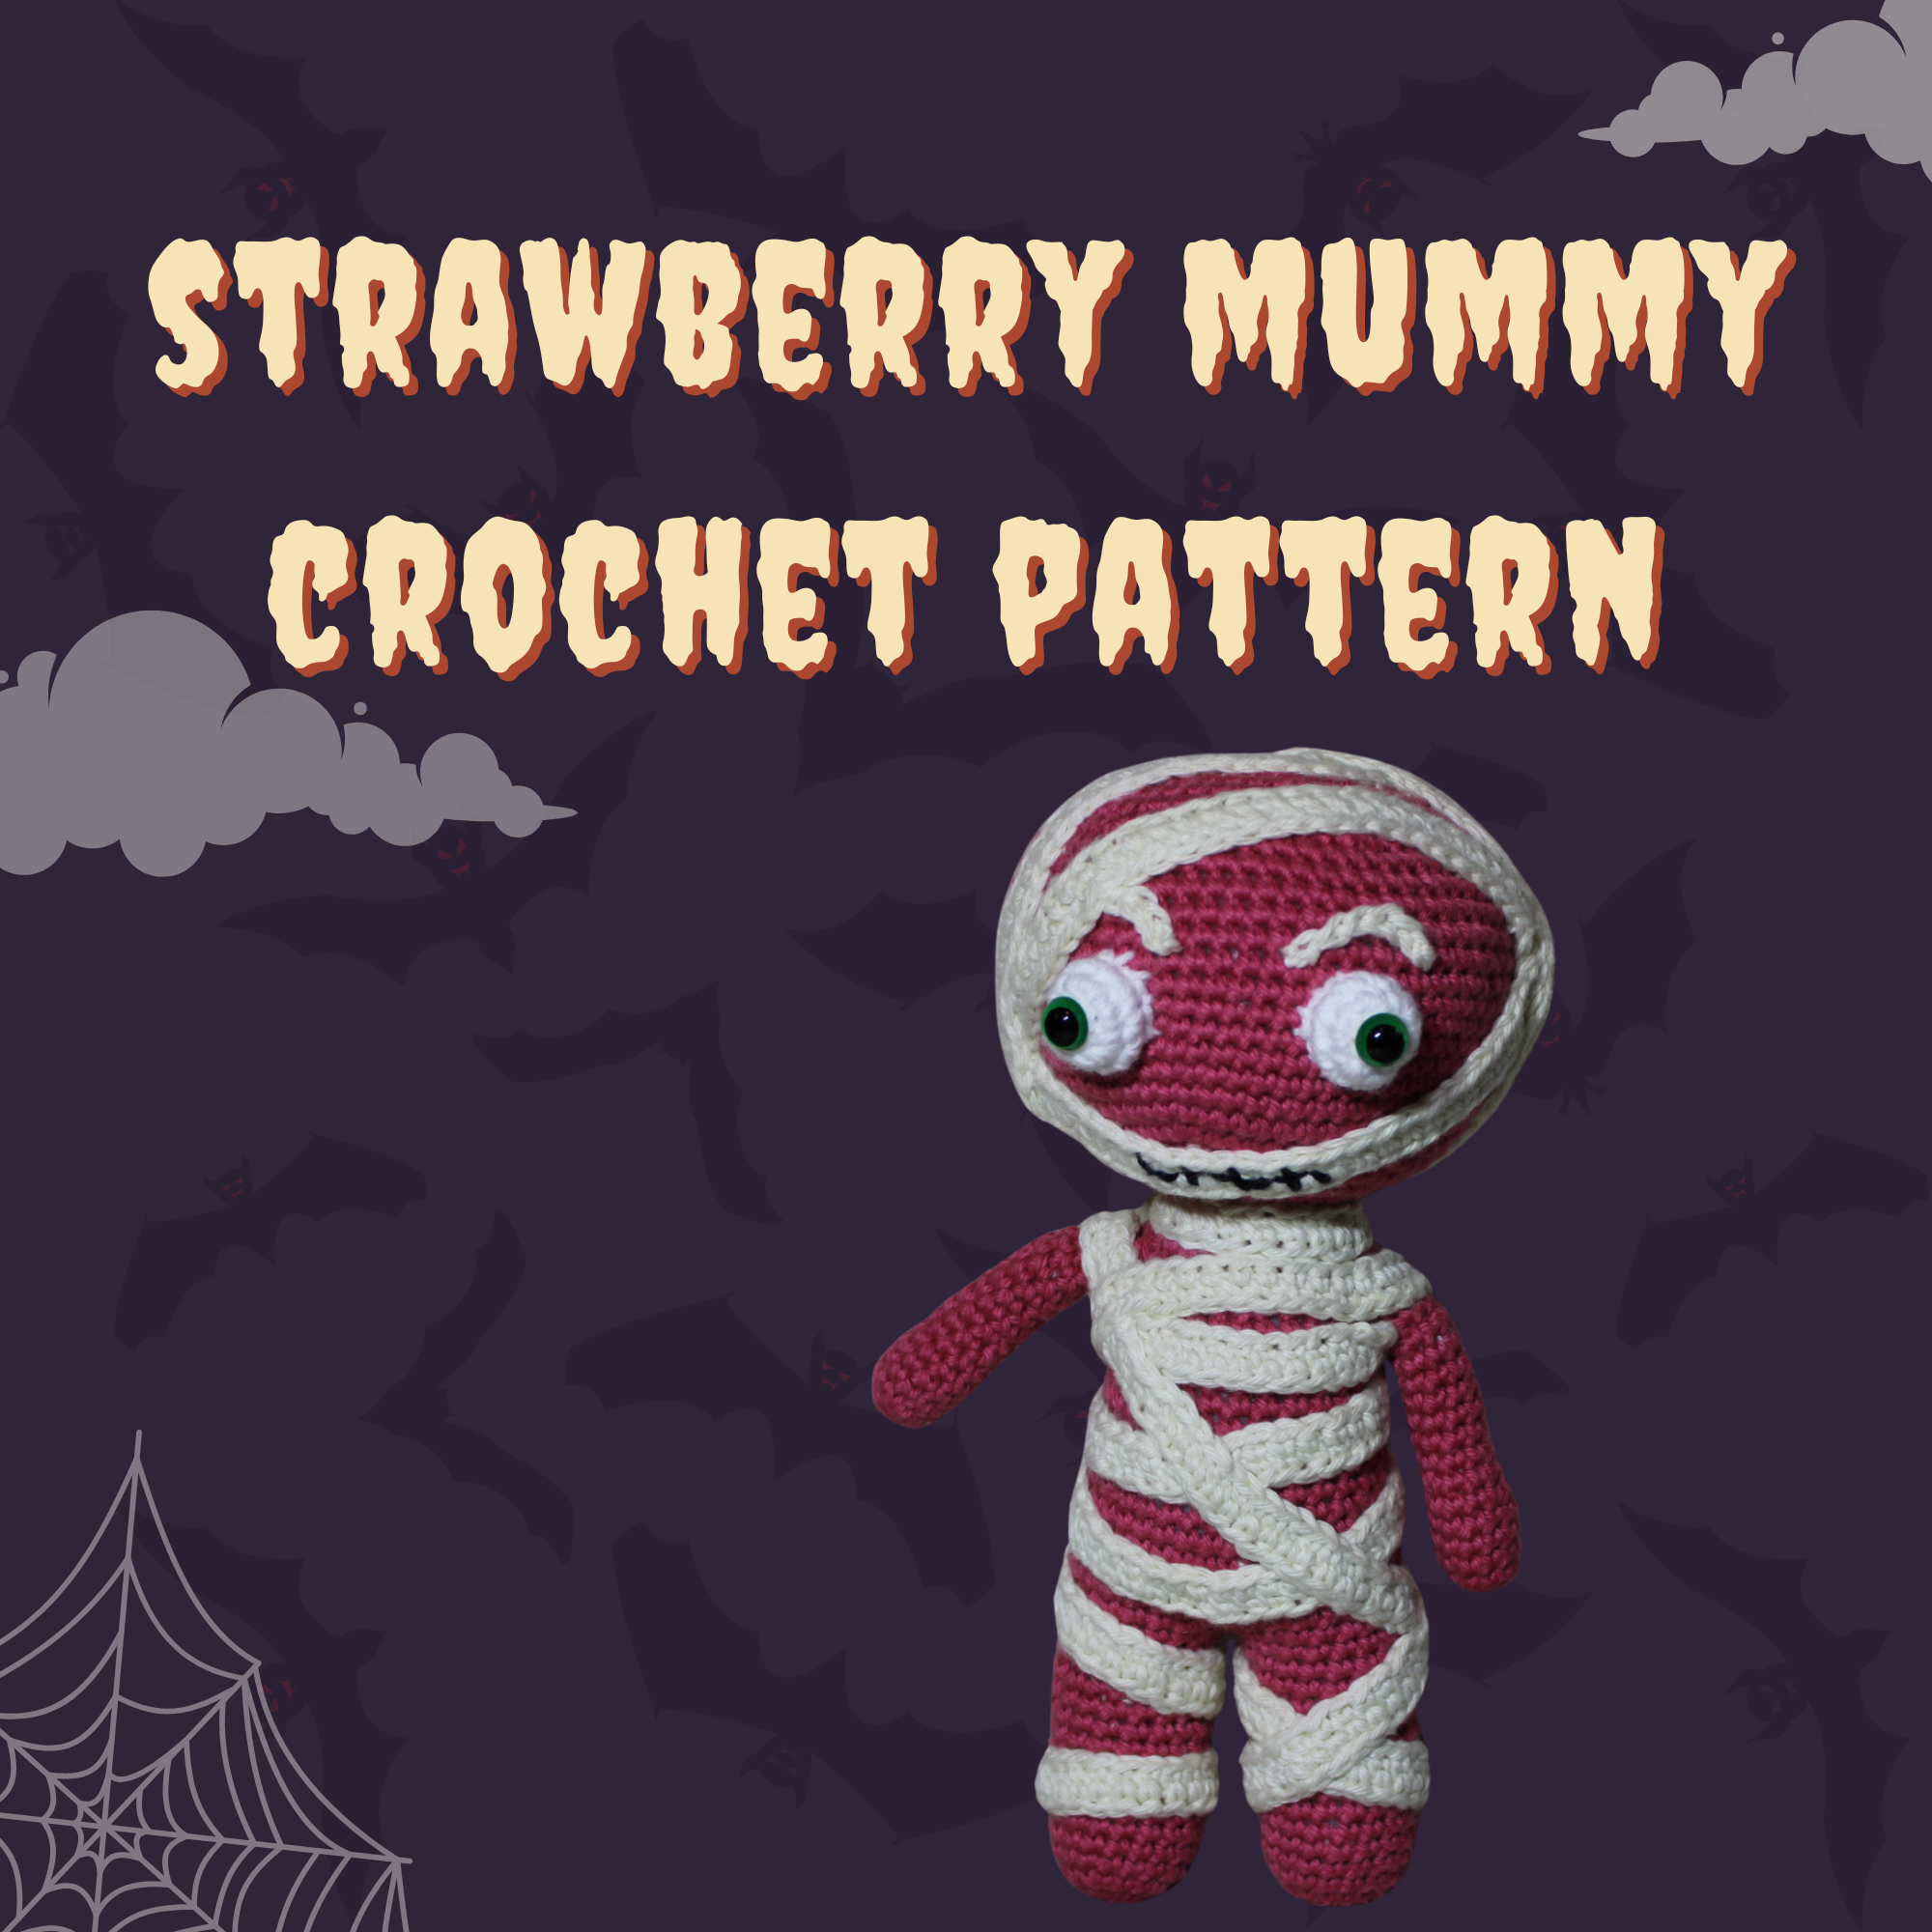
Looking for a crochet project that’s equal parts spooky and sweet? The Strawberry Mummy Amigurumi Crochet Pattern is here to wrap up your Halloween season in the cutest way possible. This little berry isn’t just delicious—it’s also delightfully wrapped in mummy bandages, ready to join your handmade spooky squad.


🧶 About the Pattern

This amigurumi pattern is a fun twist on a classic strawberry design, with added mummy details that make it perfect for fall and Halloween. Whether you’re making it as a seasonal decoration, a playful gift, or just to add to your amigurumi collection, this little berry is bound to charm.

Pattern Features:

  • Step-by-step written instructions (US crochet terms)

  • Beginner-friendly with easy stitches

  • Uses small amounts of yarn (great stash-buster!)

  • Finished size is perfect for décor, gifts, or play


🎃 Why You’ll Love It

  • Adds a sweet & spooky vibe to your handmade collection

  • Quick project – great for last-minute Halloween makes

  • Perfect for gifting to kids, friends, or anyone who loves quirky crochet

  • A fun addition to markets or Halloween craft fairs


📥 Get the Pattern

The Strawberry Mummy Amigurumi Crochet Pattern is available as a PDF instant download in my shop. That means you can grab your hook, pick your yarn, and start stitching your very own spooky-sweet berry today! Get the PDF half price today only.

👉 Strawberry Mummy Amigurumi Crochet Pattern


This Halloween, let your creativity get wrapped up in something adorable. The Strawberry Mummy Amigurumi is proof that not all mummies have to be scary—some are just berry cute. 🍓👻

Materials:

Cotton worsted weight yarn:

100 yards dark pink

25 yards ivory

6 yards white

2 yards black

Size G (4.0 mm) crochet hook

Yarn needle

Fiberfill

Two 10-mm green safety eyes

1 Soft foam curler


Finished mummy measures approximately 11” tall.

Gauge: 9 sc = 2”, 10 rows = 2”


STITCHES:

Invisible decrease: https://youtube.com/shorts/0NC5nXyDvwI?feature=share

Ultimate finish:  https://youtu.be/jVpTr8mId3I


DIRECTIONS:

LEGS: (Make 2)

Rnd 1: With pink yarn, ch 2 (or magic circle), 6 sc in 2nd ch from hook. Do not join. Work in continuous rnds throughout.

Rnd 2: 2 sc in each st (12 sc).

Rnd 3: *Sc in next st, 2 sc in next st,* repeat around (18 sc).

Rnds 4-16:Sc in each st.

At end of Rnd 16, Fasten off for first leg.

For second leg, repeat Rnds 1-16. Do not fasten off.

Rnd 17: Sc in next 7 sts, 2 sc in next st, 2 sc in next st on first leg, sc in next 14 sts of first leg, 2 sc in next st, sk last 2 sts of first leg. Switch back to 2nd leg, sk next 2 sts, 2 sc in next st, sc in next 7 sts (36 sc). Do not join. Sew 2 skipped sts of first leg to 2 skipped sts of 2nd leg.

Rnds 18-21: Sc in each st. Stuff legs.

Rnd 22: Sc in each st.

Rnd 23: *Inv dec, sc in next 4 sts,* repeat around (30 sc).

Rnds 24-31: Sc in each st.

Rnd 32: *Inv dec, sc in next 3 sts,* repeat around (24 sc).

Rnds 33-34: Sc in each st. Insert foam curler into body and let it extend out the top. Stuff body.

Rnd 35: *Inv dec, sc in next 2 sts,* repeat around (18 sc).

Rnd 36: *Inv dec, sc in next st,* repeat around (12 sc). Join with sl st.

Rnd 37: 2 sc in each st (24 sc).

Rnd 38: *Sc in next st, 2 sc in next st,* repeat around (36 sc).

Rnd 39: *Sc in next 2 sts, 2 sc in next st,* repeat around (48 sc).

Rnd 40: *Sc in next 7 sts, 2 sc in next st,* repeat around (54 sc).

Rnd 41: *Sc in next 8 sts, 2 sc in next st,* repeat around (60 sc).

Rnd 42: *Sc in next 9 sts, 2 sc in next st,* repeat around (66 sc).

Rnds 43-55: Sc in each st. Stuff neck.

Rnd 56: *Inv dec, sc in next 9 sts,* repeat around (60 sc).

Rnd 57: *Inv dec, sc in next 8 sts,* repeat around (54 sc).

Rnd 58: *Inv dec, sc in next 7 sts,* repeat around (48 sc).

Rnd 59: *Inv dec, sc in next 6 sts,* repeat around (42 sc).

Rnd 60: *Inv dec, sc in next 5 sts,* repeat around (36 sc).

Rnd 61: *Inv dec, sc in next st,* repeat around (24 sc).

Rnd 62: Inv dec around (12 sc). Join with sl st. Fasten off. Close with ultimate finish.

EYES: (Make 2)

Rnd 1: With white yarn, Ch 2 (or magic circle), 6 sc in 2nd ch from hook. Do not join.

Rnd 2: 2 sc in each st (12 sc).

Rnd 3: Sc in each st. Join with sl st. Fasten off white leaving 6” length for sewing. Insert safety eyes in center of Rnd 1 and sew eyes to face at Rnds 45-45, approximately 5 sts apart.

ARMS: (Make 2)Rnd 1: With white yarn, Ch 2 (or magic circle), 6 sc in 2nd ch from hook. Do not join. Work in continuous rnds throughout.

Rnd 2: 2 sc in each st (12 sc).

Rnds 3-6: Sc in each st. Join with sl st. Fasten off white.

Rnd 7: *Inv dec, sc in next 2 sts,* repeat around (9 sc).

Rnds 8-16: Sc in each st. Join with sl st at end of Rnd 16.  Fasten off leaving 12” length for sewing.

Stuff arms and sew Rnd 16 flat. Sew arms to body at Rnd 32.

BANDAGES: (Make 4)

With ivory yarn, ch 150, sc in 2nd ch from hook and each remaining ch with 3 sc in last ch. Working on opposite side of foundation ch, sc in each lp with 2 sc in last lp. Join with sl st. Fasten off leaving 12” length for sewing. Wrap one bandage around body and sew in place.


Wrap one bandage around legs and sew in place.


Wrap 2 bandages around head with part across the face for the mouth.


Use black yarn to embroider stitches for mouth on bandage that stretches across the face.


EYEBROWS: (Make 2)

With ivory yarn, ch 6. Fasten off leaving 6” length. Sew chs in curved line above eye. If necessary, tuck ends under bandage.


👻🍓 Adorable Chocolate-Dipped Strawberry Mummies 🍫✨

These spooky-sweet treats are almost too cute to eat! Fresh, juicy strawberries are dipped in rich chocolate and wrapped in white chocolate “bandages,” then finished with candy eyes for the perfect mummy look. Fun, festive, and frightfully delicious – the ultimate Halloween party treat or gift! 🎃💖

Check out The Benson Street for this recipe and so much more!

https://www.thebensonstreet.com/chocolate-covered-mummy-strawberries/

Download a free Mummy Mask template

Mummy Mask Template

Weekly Featured Pattern

Triple Crossed Slouch Hat Crochet Pattern from Canoe Mtn Designs. A quick and easy pattern that is crocheted sideways, then cinched at the top. A fun pattern for the whole family.
50% off this week only.

Fall Hat Month

Free Hat Patterns


In addition, any hat pattern in my Ravelry shop will be 50% off for the entire month of September, including my latest design, the Ophelia Beanie.

Crochet meets Shakespeare: a hat stitched with flowers, water, and memory.

Download your copy today and crochet the Opelia hat in time for the release of the song Ophelia. 

https://ravel.me/ophelia-beanie-3


ICYMI (In Case You Missed It)

Kitty Caddy
Cat Gift Bag
Dog Bookmark
Cat Gift Card Holder
Blue Crochet Patterns


Affiliate Links

This post contains affiliate links. This means I may earn a commission should you chose to sign up for a program or make a purchase using my link. It’s okay – I love all of these companies anyways, and you will too!


The October issue of I Like Crochet is now available, and it includes one of my designs – Modern Bowtie Dress.


Subscribe to get a one-year membership to I Like Crochet for only $5

https://www.ilikecrochet.com/subscribe-2col/gctmb559ncmc/?mqsc=AFMYFINGERSFLY


Amazon affiliate: https://amzn.to/4hkS5Zd
Best Seller on Amazon Haul


https://amzn.to/4joumZG


Posted on 2 Comments

Zombie Messy Bun Hat Crochet Pattern

If your crochet hook is craving something creepy-cute this season, the Zombie Hat Crochet Pattern is ready to rise from the yarn stash! Perfect for Halloween, cosplay, or any day you’re feeling a little undead, this project combines spooky charm with cozy handmade fun.

🧠 Why You’ll Love This Pattern

This hat has brains—literally! With fun details like exposed “stitches,” cartoonish scars, and textured yarn that mimics brainy ridges, this crochet zombie hat is equal parts silly and spooky. It’s a great project for adventurous beginners or anyone who loves a good Halloween laugh.

🧶 What You’ll Need

You’ll need a few shades of yarn (greens, reds, grays—whatever zombie vibes you prefer), your trusty crochet hook, and a sense of humor! The pattern includes clear, step-by-step instructions and helpful photos to guide you through each eerie detail.

💀 Perfect For

  • Halloween costumes and parties

  • Fun photo props

  • Gifting to zombie fans or horror lovers

  • Showing off your crochet skills with a playful twist

Because nothing says “handmade with love” like a brain-munching beanie! 🧟‍♀️💚

Get the free download for one day only on 10/21/2025.


Get the bundle of 9 different hat patterns to use for Halloween for only $9 on Ravelry with coupon code CHILLS.

https://www.ravelry.com/redeem/my-fingers-fly-designs?code=CHILLS

Coupon expires 10/31/2025.


Materials:

Worsted weight yarn:

100 yards gray

15 yards red

10 yards black

2 yards tan

3 yards green

5 yards yellow

Size G (4.0 mm) & J (6.0 mm) crochet hooks

Small amount of Fiberfill

Yarn needle

10” piece of elastic

OPTIONAL FOR MASK LINING:

Sewing thread

Small piece of woven fabric

Gauge for J hook – 4 sts, 2 rows = 1”

Gauge for G hook – 5 sc, 5 rows = 1”

Finished hat measures approximately 22” circumference, 6” top of head to bottom

HAT:

Fold elastic with 1” overlapping the other end and sew in place. This will give you a ring measuring 9” circumference.

Rnd 1: With red yarn and J hook, work 50 hdc around the elastic loop. Join with sl st (50 hdc). Fasten off red. Do not turn.

Rnd 2: With gray yarn, ch 1 (does not count as hdc), hdc in each st around. Join with sl st.

Rnd 3: Ch 1, *1 hdc in next 4 sts, 2 hdc in next sc*, repeat from * 9 times (60 hdc). Join with sl st.

Rnd 4: Ch 1, hdc in each st. Join with sl st.

Rnd 5:  Ch 1, *1 hdc in next 5 sts, 2 hdc in next sc*, repeat from * 9 times (70 hdc). Join with sl st.

Rnds 6-14:  Ch 1, hdc in each st. Join with sl st. (Add or remove rows here to shorten or lengthen hat.)

Rnds 15-16: Ch 1, *fp hdc in next st, bp hdc in next st*, repeat around. Join with sl st. Fasten off gray.

RIGHT EYE:

Rnd 1: With G hook and black yarn, ch 2 (or magic circle), 6 sc in 2nd ch. Do not join.

Rnd 2: 2 sc in each st (12 sc). Do not join.

Rnd 3: *Sc in next st, 2 sc in next st,* repeat 5 times (18 sc). Join with sl st. Fasten off leaving 9” end for sewing.

WORMS:

Rnd 1: With G hook and green yarn, ch 2 (or magic circle) 5 sc in 2nd ch. Do not join.

Rnd 2: Sc in each st. Repeat this rnd until worm measures 1-2” in length.

Make as many as you would like of varying lengths and sew ends of worms to eye with body of worms hanging down. Then sew eye to hat between Rnds 6-8.

LEFT EYE:

Rnd 1: With G hook and black yarn, ch 2 (or magic circle), 6 sc in 2nd ch. Do not join.

Rnd 2: 2 sc in each st (12 sc). Join with sl st. Fasten off black.
Rnd 3: With yellow yarn, *sc in next st, 2 sc in next st,* repeat around. (18 sc). Do not join.

Rnd 4: *Sc in next 5 sts, 2 sc in next st,* repeat twice (21 sc). Do not join.

Rnds 5-7: Sc in each st. Do not join.

Rnd 8: *Sc in next 5 sts, dec over next 2 sts,* repeat twice (18 sc). Do not join.

Rnd 9: *Sc in next st, dec over next 2 sts,* repeat around (12 sc). Join with sl st. Fasten off yellow yarn with 12” length for sewing. Stuff eye lightly and sew to face approximately 2” away from right eye.

Let your imagination run wild with black scars or red spots of blood to make your zombie unique.

MASK:

Row 1: With gray yarn and G hook, ch 33, sc in 2nd ch from hook, sc in next 4 ch, hdc in next 8 ch, dc in next 6 ch, hdc in next 8 ch, sc in next 5 ch.

Row 2: Ch 1, turn, sc in 5 sts, hdc in 8 sts, dc in 6 sts, hdc in 8 sts, sc in 5 sts.

Row 3: (wrong side) Ch 1, turn, using gray yarn, sc in 5 sts, hdc in 4 sts, change to red yarn, hdc in 4 sts, dc in 6 sts, hdc in 4 sts, change to gray yarn, hdc in 4 sts, sc in 5 sts.

Row 4: (right side) Ch 1, turn, using gray yarn, sc in 5 sts, hdc in 2 sts, change to red yarn, hdc in 3 sts, change to black yarn, hdc in 3 sts, change to tan yarn hdc in 2 sts, change to black yarn hdc in 2 sts, change to tan yarn hdc in 2 sts, change to black yarn hdc in 2 sts, change to red yarn, hdc in 3 sts, change to gray yarn hdc in 3 sts, sc in 5 sts.

Row 5: Ch 1, turn, using gray yarn, sc in 5 sts, hdc in 3 sts, change to red, hdc in 3 sts, dc in 4 sts, sc in 2 sts, dc in 4 sts, hdc in 3 sts, change to gray yarn, hdc in 3 sts, sc in 5 sts.

Rows 6-11: Use gray yarn for the remainder of the mask. Ch 1, turn, sc in 5 sts, hdc in 8 sts, dc in 6 sts, hdc in 8 sts, sc in 5 sts. Do not fasten off. Ch 28 for ear loop, return to unused loops of foundation ch, sc in 5 ch, hdc in 8 ch, dc in 6 ch, hdc in 8 ch, sc in 5 ch. Ch 28 for ear loop, sl st in first st of Row 12. Fasten off. Weave in all ends.

LINING:

Cut one piece of woven fabric according to pattern below.

Serge or zigzag edges of lining. Pin in place on inside of crocheted mask.

Sew in place along top, one side, and bottom. Leave one side free to insert filter.

Get the free download for one day only on 10/21/2025.


Get the bundle of 9 different hat patterns to use for Halloween for only $9 on Ravelry with coupon code CHILLS.

https://www.ravelry.com/redeem/my-fingers-fly-designs?code=CHILLS

Coupon expires 10/31/2025.


halloween patterns


Halloween Pattern Roundup

Follow My Fingers Fly on social media:  https://linktr.ee/myfingersfly


In Case You Missed It in September

crochet bookmark
Crochet, Coffee and Books Bookmark
sports coloring page
Sports Coloring Page
Fall birthday gift tag
Autumn Birthday Gift Tag
bat scrubby
Bat Scrubby Crochet Pattern
topsy turvy witch
Topsy-Turvy Witch Doll Crochet Pattern
taco scrubby crochet pattern
Taco Scrubby Crochet Pattern
Frankenstein scrubby
Frankenstein Scrubby Crochet Pattern


Coming Soon! 

  • Last Minute Crochet Gifts Giveaway – 1 more week of pattern giveaways!
  • More Halloween & Christmas designs
  • Pug Halloween Costume Hat
  • Instagram giveaway

This post contains affiliate links. If you use these links to buy something, I may earn a commission. Thanks for helping support my crochet blog.

Up to 30% off Sock Yarns


Posted on 25 Comments

Roller Skate Christmas Stocking

Roller skate Christmas stocking

Last week when I published the Roller Skate Pillow pattern, a fellow crocheter on Facebook suggested that it would make a cute Christmas stocking. The next morning I was off to the yarn store to get more red, but they were out of the red in Bernat Blanket yarn. I opted for the Bernat Softee Chunky yarn; the label says it is also a 6-weight yarn, but I found that it gives a slightly smaller gauge than the blanket yarn I used on the pillow. If you prefer to use blanket yarn, please note that the stocking will be slightly larger than the dimensions of the stocking. (Please see Roller Skate Pillow Crochet Pattern for those dimensions.)

Materials:

Bernat Softee Chunky yarn

5.5 oz. red

1 oz. green

1 oz. white

Bernat Pipsqueak yarn

1 oz. white

Size M (9.00 mm) crochet hook

Yarn needle

Fiberfil


Finished stocking measures approximately 14” wide by 15” tall (including wheels).


DIRECTIONS:

BOOT:

Row 1: Beginning at heel with green yarn, ch 4, sc in 2nd ch from hook and in next 2 ch (3 sc).

Row 2: Ch 1, turn, inc in first st, sc in next st, inc in last st (5 sc).

Rows 3-14: Ch 1, turn, sc in each st.

Row 15: Ch 1, turn, inc in first st, sc in next 3 sts, inc in last st (7 sc).

Rows 16-28: Ch 1, turn, sc in each st.

Row 29: Ch 1, turn, dec over first 2 sts, sc in next 3 sts, dec over last 2 sts (5 sc).

Row 30: Ch 1, turn, sc in each st.

Row 31: Ch 1, turn, dec over first 2 sts, sc in next st, dec over last 2 sts (3 sc).

Rnd 32: Ch 1, turn, 2 sc in first st, sc in next st, 2 sc in last st. Working down side, 1 sc in each of the 31 row ends. Working across remaining lps of starting ch, 2 sc in first ch, sc in next ch, 2 sc in last ch. Work down opposite side with 1 sc in each of the 31 row ends (72 sc). Join with sl st in first sc. Fasten off green.

Rnd 33: Join red yarn at center st of heel end. Ch 1, sc in BLO of each st around. Join with sl st.

Rnds 34-37: Ch 1, sc in each st. Join with sl st in first sc of rnd.

Rnd 38: Ch 1, sc in next 36 sts, work 3 sc tog, sc in next 33 sts (70 sc).

Rnd 39: Ch 1, sc in next 35 sts, work 3 sc tog, sc in next 30 sts, work 2 sc tog (67 sc).

Rnd 40:  Ch 1, sc in next 33 sts, work 5 sc tog, sc in next 27 sts, work 2 sc tog (62 sc).

Rnd 41:  Ch 1, sc in next 31 sts, work 5 sc tog, sc in next 26 sts (58 sc).

Rnd 42:  Ch 1, sc in next 29 sts, work 5 sc tog, sc in next 24 sts (54 sc).

Rnd 43:  Ch 1, sc in next 27 sts, work 5 sc tog, sc in next 22 sts (52 sc).

Rnd 44:  Ch 1, sc in next 25 sts, work 5 sc tog, sc in next 20 sts (46 sc).

Rnd 45:  Ch 1, sc in next 23 sts, work 5 sc tog, sc in next 18 sts (42 sc).

Rnds 46-68: Ch 1, sc in each st. Join with sl st in first sc of rnd. Fasten off red.

Rnd 69: Attach white pipsqueak yarn, ch 1, working in FLO, *sc in next 6 sts, 2 sc in next st* repeat around (48 sc). Join with sl st.

Rnds 70-74: Working through both loops, sc in each st. Join with sl st. At end of Rnd 74, fasten off pipsqueak yarn. Fold cuff down over boot.

Hanger: Attach red at top of boot on the outside edge. Ch 10, sl st in same sp. Fasten off.

WHEELS: (Make 2)

Rnd 1: With red yarn, ch 2 (or magic circle), 6 sc in 2nd ch. Do not join.

Rnd 2: 2 sc in each st (12 sc). Join with sl st in first sc of rnd. Fasten off red.

Rnd 3: With white yarn, *sc in next st, 2 sc in next st,* repeat around (18 sc). Do not join.

Rnd 4: Working in BLO, sc in each st. Do not join.

Rnds 5-6: Sc in each st. Join with sl st at end of Rnd 6. Fasten off white leaving 12” length for sewing.

Repeat Rnds 1-6 for second half of wheel. Stuff each section and sew tog end to end. Sew to bottom of skate approximately 2” from heel.

TOE STOP:

Rnd 1: With green yarn, ch 2 (or magic circle), 6 sc in 2nd ch. Do not join.

Rnd 2: 2 sc in each st (12 sc). Do not join.

Rnd 3: Working in BLO, sc in each st. Do not join.

Rnd 4: *Sc in next 2 sts, dec,* repeat twice (9 sc). Do not join.

Rnd 5: *Sc in next st, dec,* repeat twice (6 sc). Join with sl st. Fasten off green leaving 12” length for sewing.

SHOELACE:

Cut a piece of white yarn approximately 3 yards long. Starting near the bottom at center front, lace yarn in cross-cross fashion like shoelaces with the lace inserting every other row going up to just below the fur cuff. Tie in a bow. Cut excess yarn.

PDF download:  Roller Skate Stocking Crochet Pattern


Roller Skate Pillow Crochet Pattern


Also available is a roller skate ornament crochet pattern at https://www.etsy.com/MyFingersFly/listing/877943632/roller-skate-ornament-crochet-pattern?utm_source=Copy&utm_medium=ListingManager&utm_campaign=Share&utm_term=so.lmsm&share_time=1603723843850

More Christmas Projects

Advent Calendar Christmas Ornaments Crochet Pattern Ebook

Melted Snowman Ornament

Christmas in July Blog Hop

Texas Flag Christmas Tree Ornament

Moose Ornament

Nutcracker Cuddler

Free “Handmade with Love” Gift Tags


Posted on 9 Comments

National Taco Day – Free Taco Pillow Pattern

taco pillow

Tacos are part of the culture of San Antonio, so National Taco Day is one of the best days of the year. In our house, we eat tacos several times a week – crispy tacos, breakfast tacos, guisada tacos. The list goes on and on. (I’m making myself hungry!) To celebrate this delicious day, I created a giant taco pillow. It’s easy to crochet using super bulky yarn, and it measures a whopping 31″ wide by 15″ tall.

Materials:

Bernat Blanket or other super bulky (6) yarn

17 oz. tan

4 oz. green

1 oz. brown

½ oz. red

½ oz. yellow

Size M (13.00 mm) crochet hook

Yarn needle

Fiberfil


Finished pillow measures approximately 31” wide by 15” tall.


DIRECTIONS:

SHELL:

Rnd 1: Ch 2 (or magic circle), 7 sc in 2nd ch from hook. Do not join. Work in continuous rnds throughout.

Rnd 2: 2 sc in each st (14 sc).

Rnd 3: *Sc in next st, 2 sc in next st,* repeat around (21 sc).

Rnd 4: *Sc in next 2 sts, 2 sc in next st,* repeat around (28 sc).

Rnd 5: *Sc in next 3 sts, 2 sc in next st,* repeat around (35 sc).

Rnd 6: *Sc in next 4 sts, 2 sc in next st,* repeat around (42 sc).

Rnd 7: *Sc in next 5 sts, 2 sc in next st,* repeat around (49 sc).

Rnd 8: *Sc in next 6 sts, 2 sc in next st,* repeat around (56 sc).

Rnd 9: *Sc in next 7 sts, 2 sc in next st,* repeat around (63 sc).

Rnd 10: *Sc in next 8 sts, 2 sc in next st,* repeat around (70 sc).

Rnd 11: *Sc in next 9 sts, 2 sc in next st,* repeat around (77 sc).

Rnd 12: *Sc in next 10 sts, 2 sc in next st,* repeat around (84 sc).

Rnd 13: *Sc in next 11 sts, 2 sc in next st,* repeat around (91 sc).

Rnd 14: *Sc in next 12 sts, 2 sc in next st,* repeat around (98 sc).

Rnd 15: *Sc in next 13 sts, 2 sc in next st,* repeat around (105 sc).

Rnd 16: *Sc in next 14 sts, 2 sc in next st,* repeat around (112 sc).

Rnd 17: *Sc in next 15 sts, 2 sc in next st,* repeat around (119 sc).

Rnd 18: *Sc in next 16 sts, 2 sc in next st,* repeat around (126 sc).

Rnd 19: *Sc in next 17 sts, 2 sc in next st,* repeat around (133 sc).

Rnd 20: *Sc in next 18 sts, 2 sc in next st,* repeat around (140 sc).

Rnd 21: *Sc in next 19 sts, 2 sc in next st,* repeat around (147 sc).

Rnd 22: *Sc in next 20 sts, 2 sc in next st,* repeat around (154 sc).

Rnd 23: *Sc in next 21 sts, 2 sc in next st,* repeat around (161 sc).

Rnd 24: *Sc in next 22 sts, 2 sc in next st,* repeat around (168 sc).

Rnd 25: *Sc in next 23 sts, 2 sc in next st,* repeat around (175 sc).

Rnd 26: *Sc in next 24 sts, 2 sc in next st,* repeat around (182 sc).

Rnd 27: *Sc in next 25 sts, 2 sc in next st,* repeat around (189 sc).

Rnd 28: *Sc in next 26 sts, 2 sc in next st,* repeat around (196 sc).

Rnd 29: *Sc in next 27 sts, 2 sc in next st,* repeat around (203 sc).

Rnd 30: *Sc in next 28 sts, 2 sc in next st,* repeat around (210 sc). Join with sl st.

Rnd 31: Reverse sc in each st around. Join with sl st. Fasten off.

SALAD:

Row 1: With green, ch 61, hdc in 2nd ch from hook and next 9 ch, *with red hdc in next 3 ch, with green hdc in next 10 ch,* repeat across.

Row 2: Ch 1, hdc in each st across, matching colors of sts to colors in previous row.

Row 3: Ch 1, turn, with green hdc in next 4 sts, *with red hdc in next 3 sts, with green hdc in next 10 sts,* repeat across.

Row 4: Ch 1, hdc in each st across, matching colors of sts to colors in previous row.

Row 5: Ch 1, turn, *with green hdc in next 10 sts, with red hdc in next 3 sts,* repeat across.

Row 6: Ch 1, hdc in each st across, matching colors of sts to colors in previous row.

Row 7:P Ch 1, *hdc in next st, 3 dc in next st,* repeat across. Turn to work across edge of piece with same repeat. Turn to work on opposite side of beg ch with same repeat. Turn to work across other edge with same repeat. Join with sl st. Fasten off.

MEAT:

Row 1: With brown, working behind shell row on edge, 8 hdc across.

Rows 2-7: Ch 1, turn, hdc in each st.

Row 8: Ch 1, turn, dec, hdc in next 4 sts, dec (6 hdc). Fasten off.

ASSEMBLY:

Lay tortilla flat and mark center.

Mark 2” on both sides of this marker. Pin meat section to this 4” section.

Matching centers, pin the long edge of the salad section to the tortilla.

Sew in place. Then pin and sew opposite side of salad to tortilla, stuffing as you go.

CHEESE:

Cut 7” pieces of yellow yarn. Fold a piece in half, insert hook through st at desired spot, pull loop through st, pull ends through loop. Decorate your taco with as much cheese as you like.

PDF is available on Etsy.

taco scrubby crochet pattern


Free Taco Scrubby Crochet Pattern

More pillow patterns:

Super Squishy Pillows and Plushies Crochet Pattern Ebook – Using Bernat Blanket Yarn

Axolotl Pillow

Benjamin Turtle Nap Buddy CAL

The Getty Museum Challenge

Free Polar Bear Pillow Crochet Pattern

Slot Machine Pillow Crochet Pattern

Roller Skate Pillow Crochet Pattern

Do Unicorns Live Forever?

This book is very special to me, because it is my first ever children’s book.

Lily’s favorite toy fell apart in the laundry, but she learns that change isn’t always a bad thing.This book includes instructions to crochet a Boonicorn doll for your little one.


pink ribbon hat

Breast Cancer Awareness Month – Pink Ribbon Hat Addi & Crochet Patterns are always free on my website or Ravelry.


Coming Attractions

For the rest of the year, I’ll be working on clearing up several WIPs that have been recently neglected. Then the focus will be on more Christmas designs and holiday gifts.

Stay safe and happy crocheting!

Posted on 18 Comments

Free Black Cat Crochet Pattern – Spooktacular Crochet Patterns Book

black cat crochet

It feels like it took forever, but it’s finally ready! Spooktacular Crochet Patterns Book contains over 30 patterns for Halloween – apparel, accessories, home decor, and toys. Crochet zombies, spiders, ghosts, black cats, monsters, skulls, and snakes from this amazing collection of patterns.


Halloween Crochet Patterns Book
Spooktacular Crochet Patterns


For this issue’s freebie, I have chosen the Black Cat Crochet Pattern. It just takes a few yards of black and yellow, and you can use the same pattern with different yarn and different hook sizes to make the cat in different sizes. Pattern PDF is available at https://www.etsy.com/MyFingersFly/listing/873927109/black-cat-jewelry-keychain-coaster?utm_source=Copy&utm_medium=ListingManager&utm_campaign=Share&utm_term=so.lmsm&share_time=1600785608043.

black cat crochet

Materials needed for each cat:

Artiste #10 crochet thread:

3 yards Gold Dust

3 yards Coal Black

½ yard green

Size 00 (2.7 mm) steel crochet hook

Crewel needle

Earring hooks or jump ring and chain for necklace


Finished cat measures approximately 1.75”


Directions:

Rnd 1: With Gold, ch 2 (or magic circle), 7 sc in 2nd ch from hook. Do not join.

Rnd 2: 2 sc in each st (14 sc). Do not join.

Rnd 3: *Sc in next st, 2 sc in next st,* repeat around (21 sc). Do not join.

Rnd 4: *Sc in next 2 sts, 2 sc in next st,* twice in Gold, then repeat * to * 5 times in black. Join with sl st. Fasten off Gold.

Rnd 5: Ch 1, turn, sk sl st, *sc in next 3 sts, 2 sc in next st,* 5 times (25 sc).

Rnd 6: Ch 1, turn, *sc in next 4 sts, 2 sc in next st,* sc in next 3 sts, ch 5 for tail, sc in 2nd ch from hook and next 3 ch, sc in next st, 2 sc in next st. Repeat * to * once, sc in next 2 sts, ch 2 for head, in 2nd ch from hook work 6 hdc, picot (ch 3, sl st in 3rd ch), 3 hdc, picot, 3 hdc. Sl st in 1st hdc of head. Sc in next 2 sts, 2 sc in next st, repeat * to * once. Fasten off.

Use green thread to make French knots for eyes. Weave in all ends. Spray with fabric stiffener. Use earring hooks or jump ring and chain to complete your necklace or earrings.

Keychain: 

Materials:

3 yards yellow worsted

3 yards black worsted

½ yard green worsted

Size G (4.0 mm) crochet hook

Black felt

Glue

Key ring

Using the same pattern with worsted yarn and G hook, cat measures approximately 3.25”. Glue black felt to the back to make it stiffer. Add key ring.

Coaster: 

Materials:

9 yards yellow cotton worsted

18 yards black worsted

1 yard green worsted (or googly eyes)

Size I (5.5 mm) crochet hook

Using the same pattern with a double strand of cotton worsted yarn and I hook, cat measures approximately 4”. Use green yarn for eyes or plastic googly eyes (as pictured).

More Cat Patterns

National Hug Your Cat Day – 8 Free Cat Patterns

Addi Fat Cat Pattern

Black Cat Door Hanger Tutorial

More Halloween Patterns

halloween patterns


Halloween Pattern Roundup


Coming Soon

With only three months left in the year, there are still so many things I want to accomplish. By the end of September, I will have a new listing in my shop for a great Christmas gift for crocheters and knitters. In October I will be publishing my first children’s book. Then it will be time to focus on Christmas gifts and my donation box. In the meantime, stay safe and happy crocheting!

Don’t forget the Gnome Election – Make a Republican Gnome or Democrat Gnome to support your candidate.