Posted on — 8 Comments

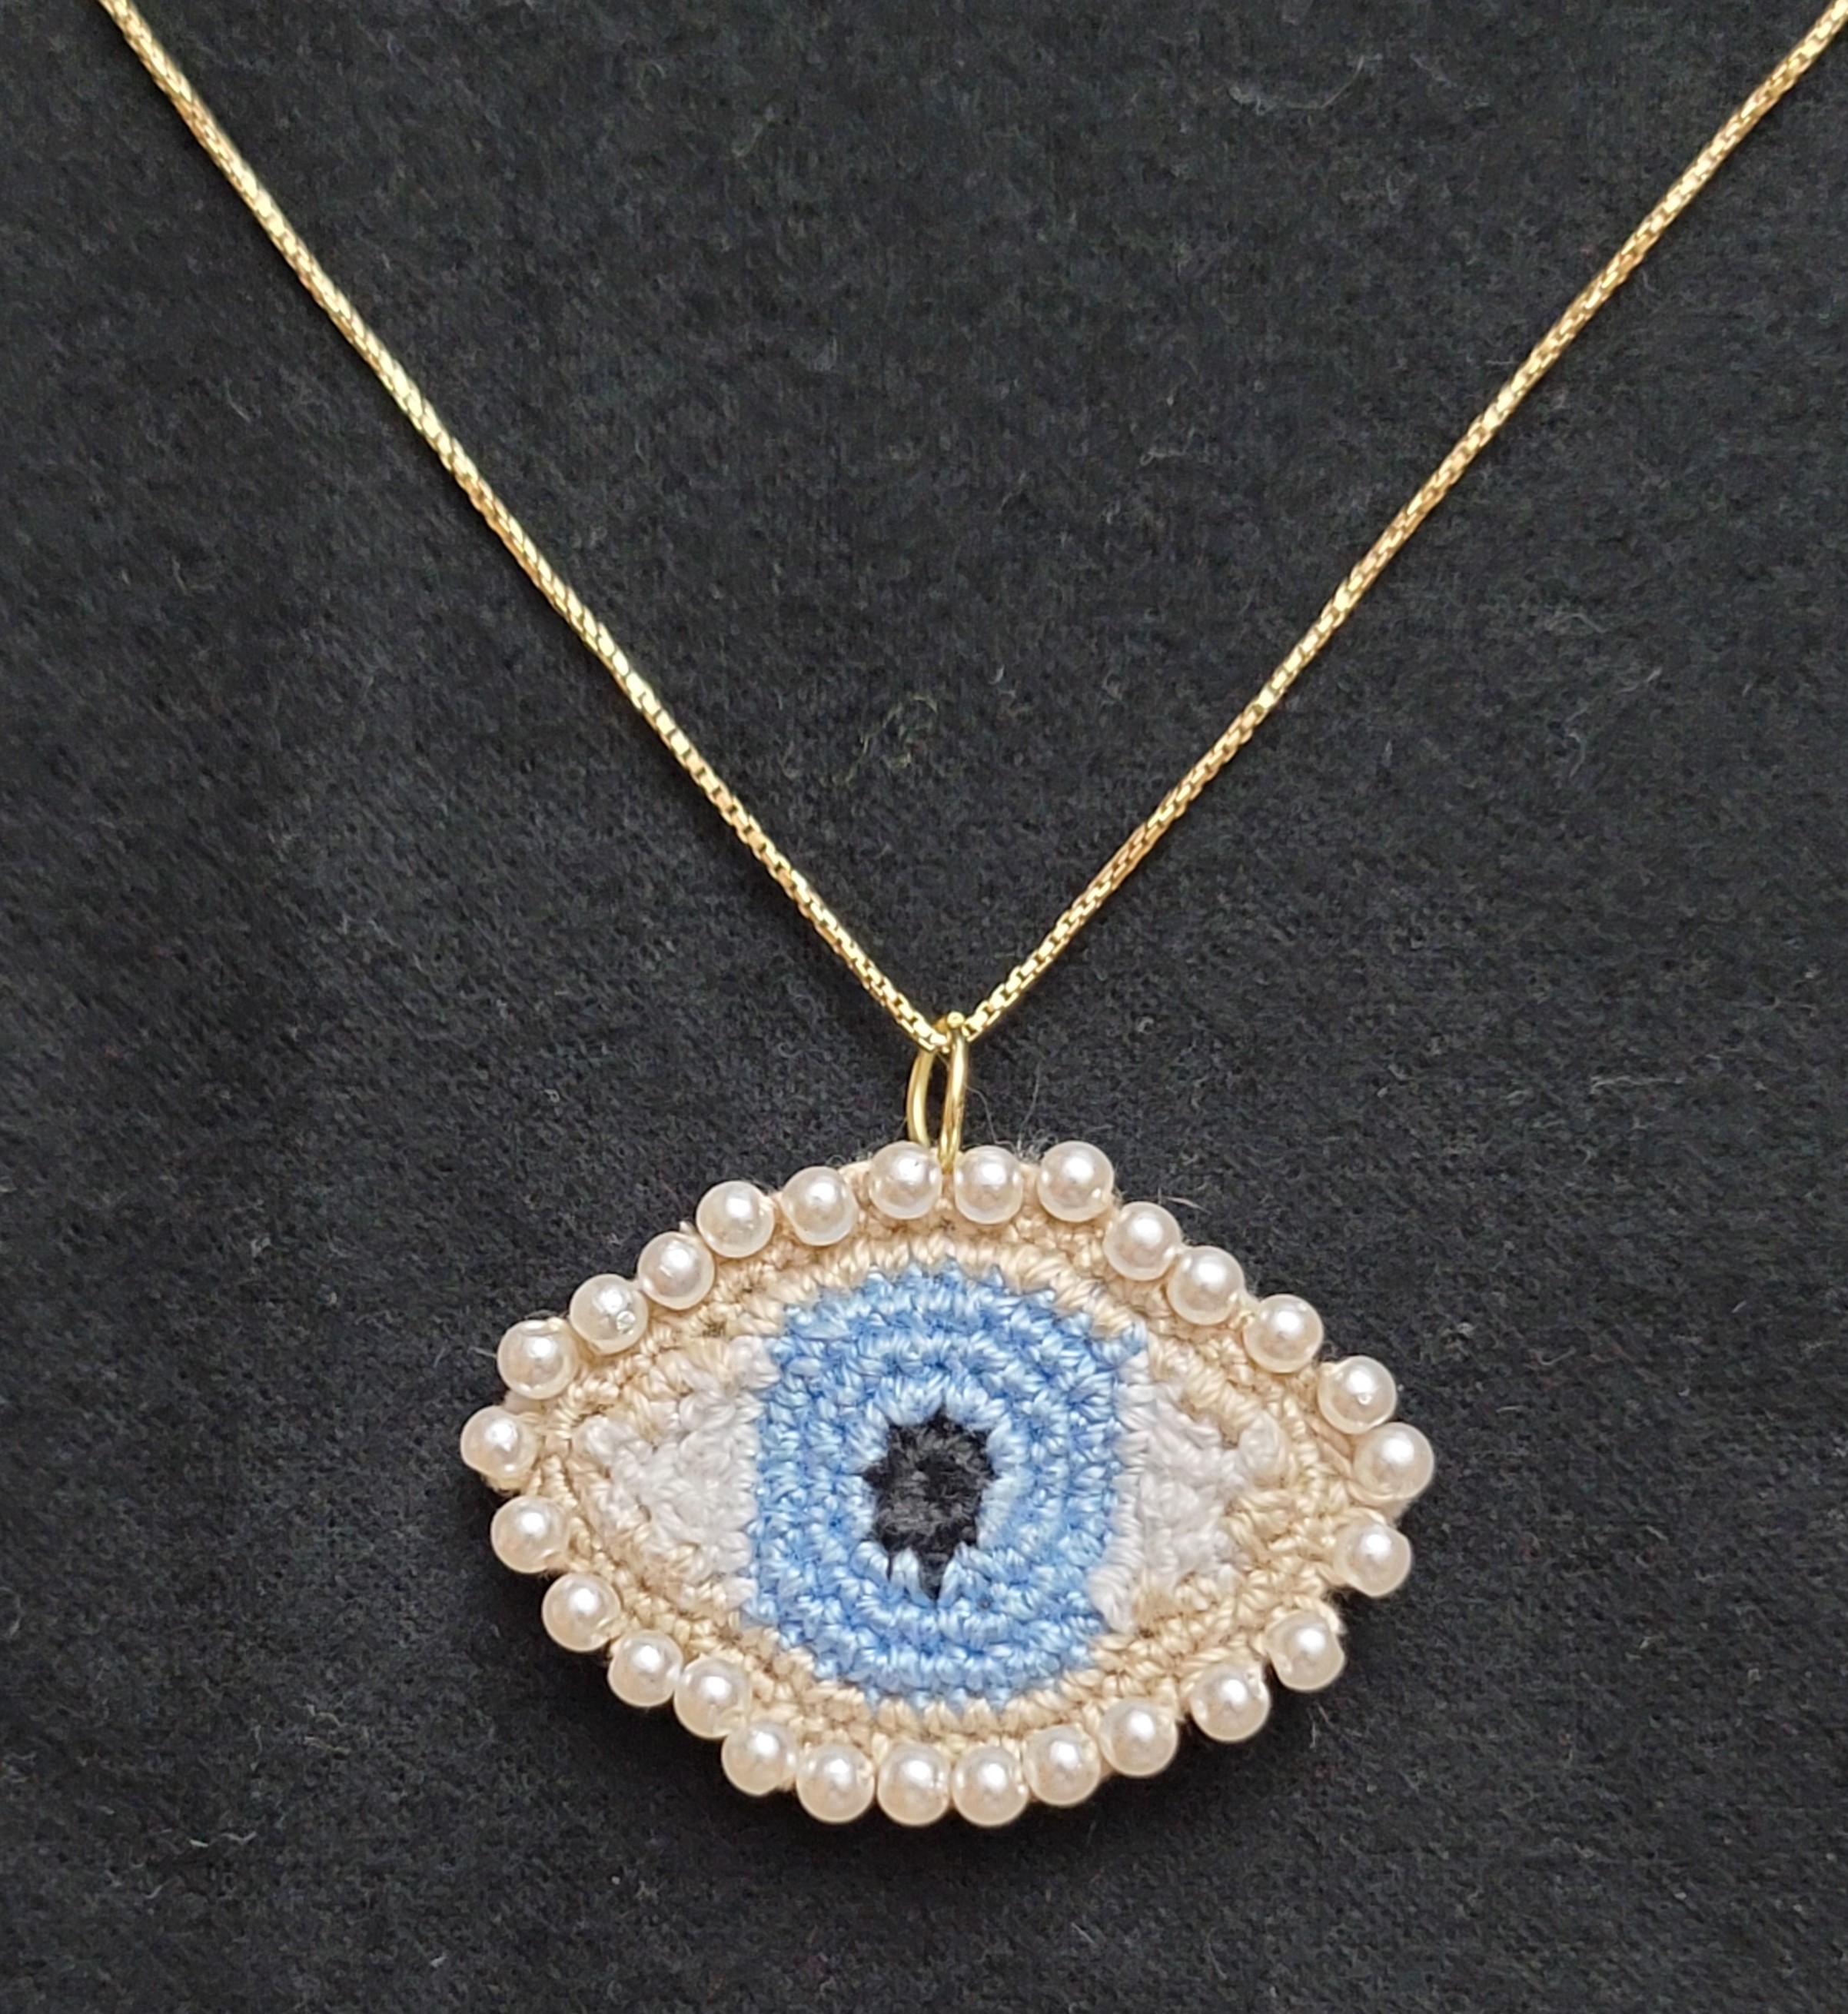
Lover’s Eye Necklace Crochet Pattern

lover's eye necklace

In 1785, Prince George or Wales commissioned a tiny portrait of his eye and sent it to his beloved, Maria Anne Fitzherbert, to convince her to marry him. It worked, and they were married shortly thereafter. The Prince then commissioned a portrait of Fitzherbert’s eye so that he might have her with him all the time. The tiny portraits became popular in England in the late 18th century. Some commissioned them as a token of affection for their lover, and others used them as a memento of a departed family member.

These necklaces have gained a new popularity with the show Bridgerton. If you follow the show, you have likely noticed that Marina wears a lover’s eye necklace on a strand of pearls.

You can crochet your own lover’s eye for a necklace or brooch. This simple pattern takes only an evening to complete and measures approximately 2” wide by 1.25” tall.

lover's eye necklace

Materials:

#10 crochet cotton yarn

4 yards tan

2 yards white

3 yards blue (or desired eye color)

1 yard black

Size 7 steel crochet hook

Crewel needle

28, 4-mm pearl beads

Small piece of tan felt

Jump ring and chain for necklace or pin for brooch

Rnd 1: With black thread, ch 2 (or magic circle), 8 sc in 2nd ch from hook (8 sc). Join with sl st. Fasten off black.

Rnd 2: With blue thread, ch 1, 2 sc in each st (16 sc). Join with sl st.

Rnd 3: Ch 1, *sc in next st, 2 sc in next st,* repeat around. Join with sl st. (24 sc).

Rnd 4: Ch 1, *sc in next 2 sts, 2 sc in next st,* repeat around. Join with sl st. (32 sc). Fasten off blue.

Row 5: Attach white thread, ch 1, sc in same sts, sc in next 6 sts. (7 sc).

Row 6: Ch 1, turn, sc in next 2 sts, work 3 sc tog, sc in next 2 sts (5 sc).

Row 7: Ch 1, turn, sc in next st, work 3 sc tog, sc in next st (3 sc).

Row 8: Ch 1, turn, sc last 3 sts tog. Fasten off white.

Return to Rnd 4, sk 9 sts, and rep Rows 5-8 on the other side of the iris.

lover's eye necklace


Before beginning Rnd 9, thread about 30 beads onto tan thread.

Rnd 9: Attach tan thread at bottom of eye of edge of Row 8 (marked by arrow). Ch 1, sc in same st, sc in ends of Rows 7, 6, and 5. *Working across iris, sc in next 2 sts, 2 sc in next st, sc in next 3 sts, 2 sc in next st, sc in next 2 sts, sc in ends of Rows 5, 6, and 7, 2 sc in end of Row 8.* On top of eye, sc in ends of Rows 8, 7, 6, and 5, rep * to *. Join with sl st (40 sc).

Rnd 10: Ch 1, *2 sc in next st, sc in next 4 sts,* repeat around (48 sc). Join with sl st.

Rnd 11: Ch 1, turn, *sl st in next st including one bead in st, sl st in next st,* repeat around. Join with sl st. Fasten off tan leaving 12” tail. Thread tail through needle and sew in place any beads that are out of line.

To get an ad-free PDF version of the pattern, please visit Lover’s Eye Necklace Crochet Pattern.

More Valentine’s Day Gift Ideas

valentine's day card

Valentine’s Day Card free PDF download

valentine bat


Valentine’s Day Bat Amigurumi


Cupid's Arrow Baby Rattle Crochet Pattern


Cupid’s Arrow Baby Rattle Crochet Pattern


Valentine’s Day Advent Calendar Crochet Patterns – Puppy Love Slippers Crochet Pattern

ICYMI (In Case You Missed It)

puppy love


Puppy Love Dog Toy Crochet Pattern


rabbit crochet patterns


Rabbits/Bunnies


lion heart pillow


Lion Heart Pillow Crochet Pattern


made with love


Carnation Gift Tag


Affiliate Links

This page contains affiliate links. If you choose to purchase after clicking a link, I may receive a commission at no extra cost to you.


Posted on — 3 Comments

Puppy Love Dog Toy Crochet Pattern

puppy love

Do you like to crochet toys for your fur babies? Bruno loves squeaky toys, and I love making him new toys. This week I made a dog-shaped toy out of different sizes of crocheted hearts. It’s an easy pattern using cotton worsted yarn, and it won’t take you long to make it.

Please be aware that all dogs are different; some will eat a toy within a day. Bruno will chew on a toy for about 3-4 months before it’s ready for the trash. Regardless of how long it takes them to finish the toy, cotton yarn and cotton stuffing are best because they can be digested by the dog.

Materials:

Cotton worsted weight yarn:

90 yards Pink

25 yards Red

2 yards White

1 yard Black

Size G (4.0 mm) crochet hook

Yarn needle

Cotton stuffing

Squeakers

Dog toy measures approximately 6” tall by 6.5” wide.

Gauge: 5 sc = 1”, 5 rows = 1”

Directions:

FACE: (Make 2)

Rnd 1: With pink yarn, ch 22, 2 sc in 2nd ch from hook, sc in next 9 ch, 3 sc in next ch (2nd sc is center top), sc in next 9 ch, 3 sc in last ch. Working on opposite side of starting ch, sc in next 8 ch, sk 1 ch, sc in next ch (center bottom), sk 1 ch, sc in next 8 ch, sc in last ch (same lp as first ch with 2 sc). Join with sl st.  (44 sc)

Rnd 2: Ch 1, 2 sc in first 2 sts, sc in next 8 sts, 3 sc in next st (2nd sc is center), sc in next 8 sts, 2 sc in each of next 3 sts, sc in next 7 sts, sk 1 st, sc in next st (center), sk 1 st, sc in next 7 sts, 2 sc in last st. Join with sl st.  (50 sc)

Rnd 3: Ch 1, *sc in next st, 2 sc in next st,* repeat once, sc in next 9 sts, 3 sc in next st (2nd sc is center), sc in next 9 sts, repeat * to * 3 times, sc in next 6 sts, sk 1 st, sc in next st (center), sk 1 st, sc in next 6 sts, repeat * to * once. Join with sl st.  (56 sc)

Rnd 4: Ch 1, *sc in next 2 sts, 2 sc in next st,* repeat once, sc in next 10 sts, 3 sc in next st (2nd sc is center), sc in next 10 sts, repeat * to * 3 times, sc in next 5 sts, sk 1 st, sc in next st (center), sk 1 st, sc in next 5 sts, repeat * to * once. Join with sl st.  (62 sc)

Rnd 5: Ch 1, *sc in next 3 sts, 2 sc in next st,* repeat once, sc in next 11 sts, 3 sc in next st (2nd sc is center top), sc in next 11 sts, repeat * to * 3 times, sc in next 4 sts, sk 1 st, sc in next st (center), sk 1 st, sc in next 4 sts, repeat * to * once. Join with sl st.  (68 sc)

Rnd 6: Ch 1, *sc in next 4 sts, 2 sc in next st,* repeat once, sc in next 12 sts, 3 sc in next st (2nd sc is center), sc in next 12 sts, repeat * to * 3 times, sc in next 3 sts, sk 1 st, sc in next st (center), sk 1 st, sc in next 3 sts, repeat * to * once. Join with sl st.  (74 sc)

Rnd 7: Ch 1, *sc in next 5 sts, 2 sc in next st,* repeat once, sc in next 13 sts, 3 sc in next st (2nd sc is center), sc in next 13 sts, repeat * to * 3 times, sc in next 2 sts, sk 1 st, sc in next st (center), sk 1 st, sc in next 2 sts, repeat * to * once. Join with sl st.  (80 sc)

Rnd 8: Ch 1, *sc in next 6 sts, 2 sc in next st,* repeat once, sc in next 14 sts, 3 sc in next st (2nd sc is center), sc in next 14 sts, repeat * to * 3 times, sc in next st, sk 1 st, sc in next st (center), sk 1 st, sc in next st, repeat * to * once. Join with sl st.  (86 sc)

Rnd 9: Ch 1, *sc in next 7 sts, 2 sc in next st,* repeat once, sc in next 15 sts, 3 sc in next st (2nd sc is center), sc in next 15 sts, repeat * to * 3 times, sk 1 st, sc in next st (center), sk 1 st, repeat * to * once. Join with sl st.  (94 sc)

Fasten off pink.

MUZZLE:

Rnd 1: With red yarn, ch 14, 2 sc in 2nd ch from hook, sc in next 5 ch, 3 sc in next ch (2nd sc is center), sc in next 5 ch, 3 sc in last ch. Working on opposite side of starting ch, sc in next 4 ch, sk 1 ch, sc in next ch (center), sk 1 ch, sc in next 4 ch, sc in last ch (same lp as first ch with 2 sc). Join with sl st.  (28 sc)

Rnd 2: Ch 1, 2 sc in next 2 sts, sc in next 6 sts, 3 sc in next st (2nd sc is center), sc in next 6 sts, 2 sc in next 3 sts, sc in next 3 sts, sk 1 st, sc in next st (center), sk 1 st, sc in next 3 sts, sc in last st (same as first sc with 2 sc). Join with sl st.  (34 sc)

Rnd 3: Ch 1, *sc in next st, 2 sc in next st,* twice, sc in next 7 sts, 3 sc in next st (2nd sc is center), sc in next 7 sts, repeat * to * 3 times, sc in next 2 sts, sk 1 st, sc in next st (center), sk 1 st, sc in next 2 sts, repeat * to * once. Join with sl st.  (40 sc)

Rnd 4: Ch 1, *sc in next 2 sts, 2 sc in next st,* twice, sc in next 8 sts, 3 sc in next st (2nd sc is center), sc in next 8 sts, repeat * to * 3 times, sc in next st, sk 1 st, sc in next st (center), sk 1 st, sc in next st, repeat * to * once. Join with sl st.  (46 sc)

Rnd 5: Ch 1, *sc in next 3 sts, 2 sc in next st,* twice, sc in next 9 sts, 3 sc in next st (2nd sc is center), sc in next 9 sts, repeat * to * 3 times, sk 1 st, sc in next st (center), sk 1 st, repeat * to * once. Join with sl st.  (52 sc)

Fasten off red.

EARS: (Make 2)

Rnd 1: With red yarn, ch 8, 2 sc in 2nd ch from hook, sc in next 2 ch, 3 sc in next ch (2nd sc is center), sc in next 2 ch, 3 sc in last ch. Working on opposite side of starting ch, sc in next ch, sk 1 ch, sc in next ch (center), sk 1 ch, sc in next ch, sc in last ch (same lp as first ch with 2 sc). Join with sl st.  (16 sc)

Rnd 2: Ch 1, 2 sc in next 2 sts, sc in next 3 sts, 3 sc in next st, sc in next 3 sts, 2 sc in next 3 sts, sk next st, sc in next st, sk next st, 2 sc in next st. (22 sc)  Fasten off red.

NOSE:

Rnd 1: With black yarn, ch 6, 2 sc in 2nd ch from hook, sc in next ch, 3 sc in next ch (2nd sc is center), sc in next ch, 3 sc in last ch. Working on opposite side of starting ch, sk 1 ch, sc in next ch (center), sk 1 ch, sc in last ch (same lp as first ch with 2 sc). Join with sl st.  (12 sc). Fasten off black leaving 9” length for sewing.

EYES: (Make 2)

With white yarn, ch 2 (or magic ring), 6 sc in 2nd ch from hook. Join with sl st. Fasten off yarn leaving 6” length for sewing.

Use black yarn to make French knot in center of each eye.

Sew red heart (upside down) centered on the pink heart (right side up). Sew black heart (right side up) centered on top of red heart. Sew eyes above muzzle. Sew ears to top of head approximately 10 sts from center.

EDGING:

Place both large hearts wrong sides together, matching curves and point. Pin in place with one pin marking the center bottom.

Using Pink yarn, insert hook at st after bottom center marker (through both thicknesses). Sc in this st, sc in next 20 sts, *sc in next st, sc in next 5 sts,* 3 times, sc in next 5 sts, sk 1 st, sc in next st (center top), sk next st, sc in next 5 sts, (sc in next 5 sts, 2 sc in next st,* 3 times. Begin stuffing pillow.

Sc in each remaining st with 3 sc in marked st (center bottom), stuffing as you go. Add in 1-2 squeakers with the stuffing. Join with sl st.
Fasten off yarn. Weave in all ends.

PDF Download: Puppy Love Dog Toy Crochet Pattern

ICYMI (In Case You Missed It)

rabbit crochet patterns


Rabbits/Bunnies


lion heart pillow


Lion Heart Pillow Crochet Pattern


made with love


Carnation Gift Tag


smores pillow


Smores Pillow Crochet Pattern


Affiliate Links

This page contains affiliate links. If you choose to purchase after clicking a link, I may receive a commission at no extra cost to you.

 

Posted on — 13 Comments

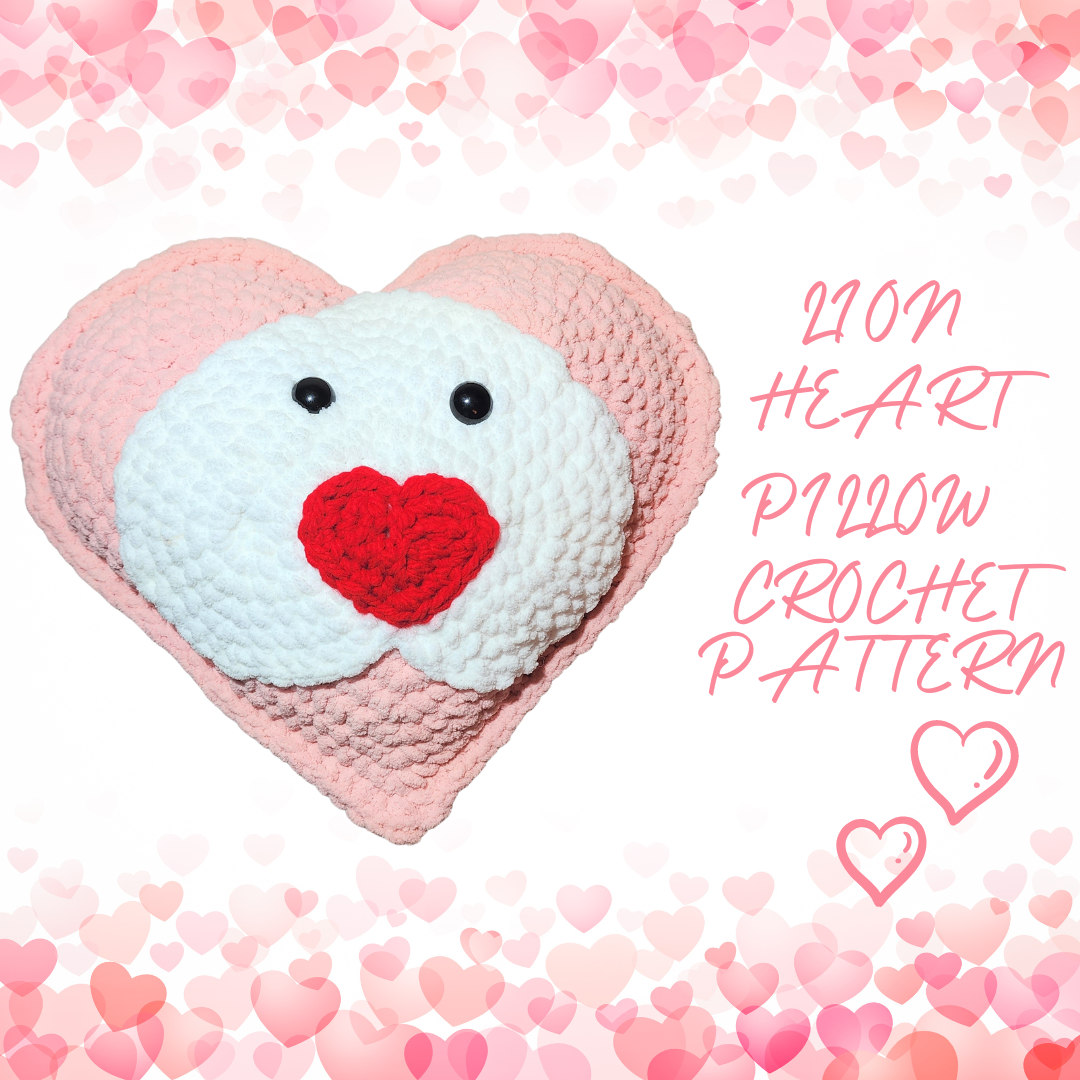
Lion Heart Pillow Crochet Pattern

lion heart pillow

Now that the Christmas holidays are over, and the decorations have been put away for next year (we hope), it’s time to turn our attention to hearts and roses. Valentine’s Day is less than a month away, and I have so many ideas! It’s just so much fun to make cute pink and red animals, I can’t resist. The first Valentine’s Day design for the year is the Lion Heart Pillow, or as I like to call him, King Richard. Using Bernat blanket yarn makes the project go quickly, and he’s just so darned squishy!! Three different sizes of hearts are combined to make this sweet lion pillow for your special someone.

lion heart pillow

Pillow measures approximately 12” tall by 14” wide.

Gauge: 9 sc = 4”, 8 rows = 4”

Materials:

Bernat Blanket Yarn:

30 yards White

150 yards Pink

2 yards Red

Size M crochet hook

Yarn needle

Fiberfill

20-mm safety eyes

Directions:

MANE:

Rnd 1: With pink yarn, ch 22, 2 sc in 2nd ch from hook, sc in next 9 ch, 3 sc in next ch (2nd sc is center top), sc in next 9 ch, 3 sc in last ch. Working on opposite side of starting ch, sc in next 8 ch, sk 1 ch, sc in next ch (center bottom), sk 1 ch, sc in next 8 ch, sc in last ch (same lp as first ch with 2 sc). Join with sl st.  (44 sc)

Rnd 2: Ch 1, 2 sc in first 2 sts, sc in next 8 sts, 3 sc in next st (2nd sc is center), sc in next 8 sts, 2 sc in each of next 3 sts, sc in next 7 sts, sk 1 st, sc in next st (center), sk 1 st, sc in next 7 sts, 2 sc in last st. Join with sl st.  (50 sc)

Rnd 3: Ch 1, *sc in next st, 2 sc in next st,* repeat once, sc in next 9 sts, 3 sc in next st (2nd sc is center), sc in next 9 sts, repeat * to * 3 times, sc in next 6 sts, sk 1 st, sc in next st (center), sk 1 st, sc in next 6 sts, repeat * to * once. Join with sl st.  (56 sc)

Rnd 4: Ch 1, *sc in next 2 sts, 2 sc in next st,* repeat once, sc in next 10 sts, 3 sc in next st (2nd sc is center), sc in next 10 sts, repeat * to * 3 times, sc in next 5 sts, sk 1 st, sc in next st (center), sk 1 st, sc in next 5 sts, repeat * to * once. Join with sl st.  (62 sc)

Rnd 5: Ch 1, *sc in next 3 sts, 2 sc in next st,* repeat once, sc in next 11 sts, 3 sc in next st (2nd sc is center top), sc in next 11 sts, repeat * to * 3 times, sc in next 4 sts, sk 1 st, sc in next st (center), sk 1 st, sc in next 4 sts, repeat * to * once. Join with sl st.  (68 sc)

Rnd 6: Ch 1, *sc in next 4 sts, 2 sc in next st,* repeat once, sc in next 12 sts, 3 sc in next st (2nd sc is center), sc in next 12 sts, repeat * to * 3 times, sc in next 3 sts, sk 1 st, sc in next st (center), sk 1 st, sc in next 3 sts, repeat * to * once. Join with sl st.  (74 sc)

Rnd 7: Ch 1, *sc in next 5 sts, 2 sc in next st,* repeat once, sc in next 13 sts, 3 sc in next st (2nd sc is center), sc in next 13 sts, repeat * to * 3 times, sc in next 2 sts, sk 1 st, sc in next st (center), sk 1 st, sc in next 2 sts, repeat * to * once. Join with sl st.  (80 sc)

Rnd 8: Ch 1, *sc in next 6 sts, 2 sc in next st,* repeat once, sc in next 14 sts, 3 sc in next st (2nd sc is center), sc in next 14 sts, repeat * to * 3 times, sc in next st, sk 1 st, sc in next st (center), sk 1 st, sc in next st, repeat * to * once. Join with sl st.  (86 sc)

Rnd 9: Ch 1, *sc in next 7 sts, 2 sc in next st,* repeat once, sc in next 15 sts, 3 sc in next st (2nd sc is center), sc in next 15 sts, repeat * to * 3 times, sk 1 st, sc in next st (center), sk 1 st, repeat * to * once. Join with sl st.  (94 sc)

Fasten off pink.

Blocking is preferred to allow pieces to lay flat.

FACE:

Rnd 1: With white yarn, ch 16, 2 sc in 2nd ch from hook, sc in next 6 ch, 3 sc in next ch (2nd sc is center), sc in next 6 ch, 3 sc in last ch. Working on opposite side of starting ch, sc in next 5 ch, sk 1 ch, sc in next ch (center), sk 1 ch, sc in next 5 ch, sc in last ch (same lp as first ch with 2 sc). Join with sl st.  (32 sc)

Rnd 2: Ch 1, 2 sc in next 2 sts, sc in next 7 sts, 3 sc in next st (2nd sc is center), sc in next 7 sts, 2 sc in next 3 sts, sc in next 4 sts, sk 1 st, sc in next st (center), sk 1 st, sc in next 4 sts, sc in last st (same as first sc with 2 sc). Join with sl st.  (38 sc)

Rnd 3: Ch 1, *sc in next st, 2 sc in next st,* twice, sc in next 8 sts, 3 sc in next st (2nd sc is center), sc in next 8 sts, repeat * to * 3 times, sc in next 3 sts, sk 1 st, sc in next st (center), sk 1 st, sc in next 3 sts, repeat * to * once. Join with sl st.  (44 sc)

Rnd 4: Ch 1, *sc in next 2 sts, 2 sc in next st,* twice, sc in next 9 sts, 3 sc in next st (2nd sc is center), sc in next 9 sts, repeat * to * 3 times, sc in next 2 sts, sk 1 st, sc in next st (center), sk 1 st, sc in next 2 sts, repeat * to * once. Join with sl st.  (50 sc)

Rnd 5: Ch 1, *sc in next 3 sts, 2 sc in next st,* twice, sc in next 10 sts, 3 sc in next st (2nd sc is center), sc in next 10 sts, repeat * to * 3 times, sc in next st, sk 1 st, sc in next st (center), sk 1 st, sc in next st, repeat * to * once. Join with sl st.  (56 sc)

Rnd 6: Ch 1, *sc in next 4 sts, 2 sc in next st,* twice, sc in next 11 sts, 3 sc in next st (2nd sc is center), sc in next 11 sts, repeat * to * 3 times, sk 1 st, sc in next st (center), sk 1 st, repeat * to * once. Join with sl st.  (62 sc)

Fasten off white.

NOSE:

Rnd 1: With red yarn, ch 8, 2 sc in 2nd ch from hook, sc in next 2 ch, 3 sc in next ch (2nd sc is center), sc in next 2 ch, 3 sc in last ch. Working on opposite side of starting ch, sc in next ch, sk 1 ch, sc in next ch (center), sk 1 ch, sc in next ch, sc in last ch (same lp as first ch with 2 sc). Join with sl st.  (16 sc)

Rnd 2: Ch 1, 2 sc in next 2 sts, sc in next 3 sts, 3 sc in next st, sc in next 3 sts, 2 sc in next 3 sts, sk next st, sc in next st, sk next st, 2 sc in next st. (22 sc)  Fasten off red.

Sew red heart (right side up) on the bottom half of the white heart (upside down). Sew white heart (upside down) centered on top of pink heart (right side up). Insert safety eyes at Rnd 3 of white heart, approximately 2” apart.

EDGING:

Place both large hearts wrong sides together and crochet through both pieces to join. Pin in place with one pin marking the center bottom.

Insert hook at st after bottom center marker (through both thicknesses). Sc in this st, sc in next 20 sts, *sc in next st, sc in next 5 sts,* 3 times, sc in next 5 sts, sk 1 st, sc in next st (center top), sk next st, sc in next 5 sts, (sc in next 5 sts, 2 sc in next st,* 3 times. Begin stuffing pillow.

Sc in each remaining st with 3 sc in marked st (center bottom), stuffing as you go. Join with sl st.
Fasten off yarn. Weave in all ends.

PDF Download (with photos for assembly): Lion Heart Pillow Crochet Pattern

Weekly Featured Pattern

summer in carlingford

This week the featured pattern on the Crochet Designer Community is the Summer in Carlingford Pullover. Pop over to get the code for 50% off. Enjoy!

https://www.facebook.com/CrochetDesignerCommunity?__cft__[0]=AZUw1CuTWnYf0ZfTwABwYzyToEoaE8dPXBzDpotOO2IYWRgoybNaLTiw-FwzsUANS9QBmLuPOEkkLV-Wt0tQgAvNINcJ93GRHGT4T-QPOTE02LwXPQej4Hn-AUxKKVqfAwFnJjJgw2W61qaZ7xwiFGjxDcM4BM2OQZD-6eBexK9fQcoBzRmFCQ8LBK6W7JcGxbxtFxLMYpE_N7GP5UiaFuT4&__tn__=-]K-y-R

More Lion Patterns

lion dog toy
Lion Dog Toy
lion blog hop
Lion Blog Hop


ICYMI (In Case You Missed It)

made with love


Carnation Gift Tag


smores pillow


Smores Pillow Crochet Pattern


Unicorn Bobblehead Crochet Pattern


Unicorn Bobblehead Crochet Pattern

year in review


2022 Year in Review


Affiliate Links

This page contains affiliate links. If you choose to purchase after clicking a link, I may receive a commission at no extra cost to you.


Posted on — Leave a comment

Carnation Gift Tag – Free Download

made with love

The flower for January birthdays is the Carnation, scientific name Dianthus (of Zeus). The ancient Greeks called it “the flower of the gods.” They have a slightly spicy scent, sort of like cloves. Each time I smell a carnation, the scent carries me back to high school – school dance corsages made of red and pink carnations. Today’s free download is a Carnation Gift Tag for the January birthdays.

made with love

More Gift Tags


Gift Tags to Download


ICYMI (In Case You Missed It)

smores pillow


Smores Pillow Crochet Pattern


Unicorn Bobblehead Crochet Pattern


Unicorn Bobblehead Crochet Pattern


crochet resolutions


2023 Crochet Resolutions


year in review


2022 Year in Review


gnome ornament


Skinny Gnome Ornament Crochet Pattern


I 

Affiliate Links

This page contains affiliate links. If you choose to purchase after clicking a link, I may receive a commission at no extra cost to you.


Posted on — 6 Comments

Smores Pillow Crochet Pattern

smores pillow

I have a niece who has never liked sweets from the time she was a baby. The one exception is smores – she LOVES smores. Any time they visit us during cold weather, I make sure to have all the ingredients on hand so they kids can roast marshmallows in the fireplace to make smores. This Christmas I crocheted her a Smores Pillow. It turned out so cute!


Materials:
Bernat Blanket Yarn:
7 oz. White
15 oz. Almond
5 oz. Baby Sand
1 yard Pink
Size M (9.0 mm) crochet hook
Yarn needle
24-mm safety eyes
Fiberfill
2 pieces Poly Foam 1” x 12” x 12”

Gauge: 7 sts = 3”, 6 rows = 3”

Pillow measures approximately 12” tall.

Directions:
MARSHMALLOW:
Rnd 1: With White yarn, ch 2, 7 sc in 2nd ch. Do not join. Work in continuous rnds unless otherwise noted.
Rnd 2: 2 sc in each st (14 sc).
Rnd 3: *Sc in next st, 2 sc in next st,* repeat around (21 sc).
Rnd 4: *Sc in next 2 sts, 2 sc in next st,* repeat around (28 sc).
Rnd 5: *Sc in next 3 sts, 2 sc in next st,* repeat around (35 sc).
Rnd 6: *Sc in next 4 sts, 2 sc in next st,* repeat around (42 sc).
Rnd 7: *Sc in next 5 sts, 2 sc in next st,* repeat around (49 sc).
Rnd 8: *Sc in next 6 sts, 2 sc in next st,* repeat around (56 sc). Join with sl st.
Rnd 9: Working in BLO, sc in each st.
Rnds 10-25: Working in both lps, sc in each st. Join with sl st at end of Rnd 25.
Rnd 26: Working in BLO, *sc in next 6 sts, dec over next 2 sts,* repeat around (49 sc).
Rnd 27: Working in both lps, *sc in next 5 sts, dec over next 2 sts,* repeat around (42 sc).
Rnd 28: *Sc in next 4 sts, dec over next 2 sts,* repeat around (35 sc).
Insert eyes at Rnd 18, approximately 6 sts apart.
Stuff marshmallow but not too firmly. Excess stuffing will pouf out the top and bottom.
Rnd 29: *Sc in next 3 sts, dec over next 2 sts,* repeat around (28 sc).
Rnd 30: *Sc in next 2 sts, dec over next 2 sts,* repeat around (21 sc).
Rnd 31: *Sc in next st, dec over next 2 sts,* repeat around (14 sc). Finish stuffing.
Rnd 32: Dec 7 times (7 sc). Fasten off white yarn leaving a 6” length. Insert length into yarn needle and pull up remaining 7 sts, tighten to close.

CHOCOLATE: (Make 2 pieces)
Rnd 1: With Baby Sand yarn, ch 2, 7 sc in 2nd ch. Do not join. Work in continuous rnds unless otherwise noted.
Rnd 2: 2 sc in each st (14 sc).
Rnd 3: *Sc in next st, 2 sc in next st,* repeat around (21 sc).
Rnd 4: *Sc in next 2 sts, 2 sc in next st,* repeat around (28 sc).
Rnd 5: *Sc in next 3 sts, 2 sc in next st,* repeat around (35 sc).
Rnd 6: *Sc in next 4 sts, 2 sc in next st,* repeat around (42 sc).
Rnd 7: *Sc in next 5 sts, 2 sc in next st,* repeat around (49 sc).
Rnd 8: *Sc in next 6 sts, 2 sc in next st,* repeat around (56 sc).
Rnd 9: *Sc in next 7 sts, 2 sc in next st,* repeat around (63 sc). Join with sl st.
Rnd 10: Working in BLO, sc in each st.
Rnd 11: Working in both lps, *sl st, sc, hdc, dc, hdc, sc, sl st,* repeat around. Join with sl st.
Fasten off yarn leaving 12” length for sewing.
Sew one piece to top and the other piece to the bottom of marshmallow.

GRAHAM CRACKERS: (Make 2)
Row 1: With Almond yarn, ch 27, sc in 2nd ch from hook and each ch across (26 sc).
Row 2: Ch 1, turn, sc in each st.
Rows 3-50: Repeat Row 2 until piece measures 26” long. Finished piece should measure approximately 13” x 26”.
Lay piece flat and place 1 piece of poly foam on one half of top. Fold other half over and sew 3 sides together.
Sew one graham cracker centered on bottom of the Smores and the other centered on top of the Smores.
Embroider mouth with Pink yarn at Rows 11-14.
Weave in all ends.

PDF download (including assembly photos): Smores Pillow Crochet Pattern

ICYMI (In Case You Missed It)

Unicorn Bobblehead Crochet Pattern


Unicorn Bobblehead Crochet Pattern


crochet resolutions


2023 Crochet Resolutions


year in review


2022 Year in Review


gnome ornament


Skinny Gnome Ornament Crochet Pattern


I 

Affiliate Links

This page contains affiliate links. If you choose to purchase after clicking a link, I may receive a commission at no extra cost to you.