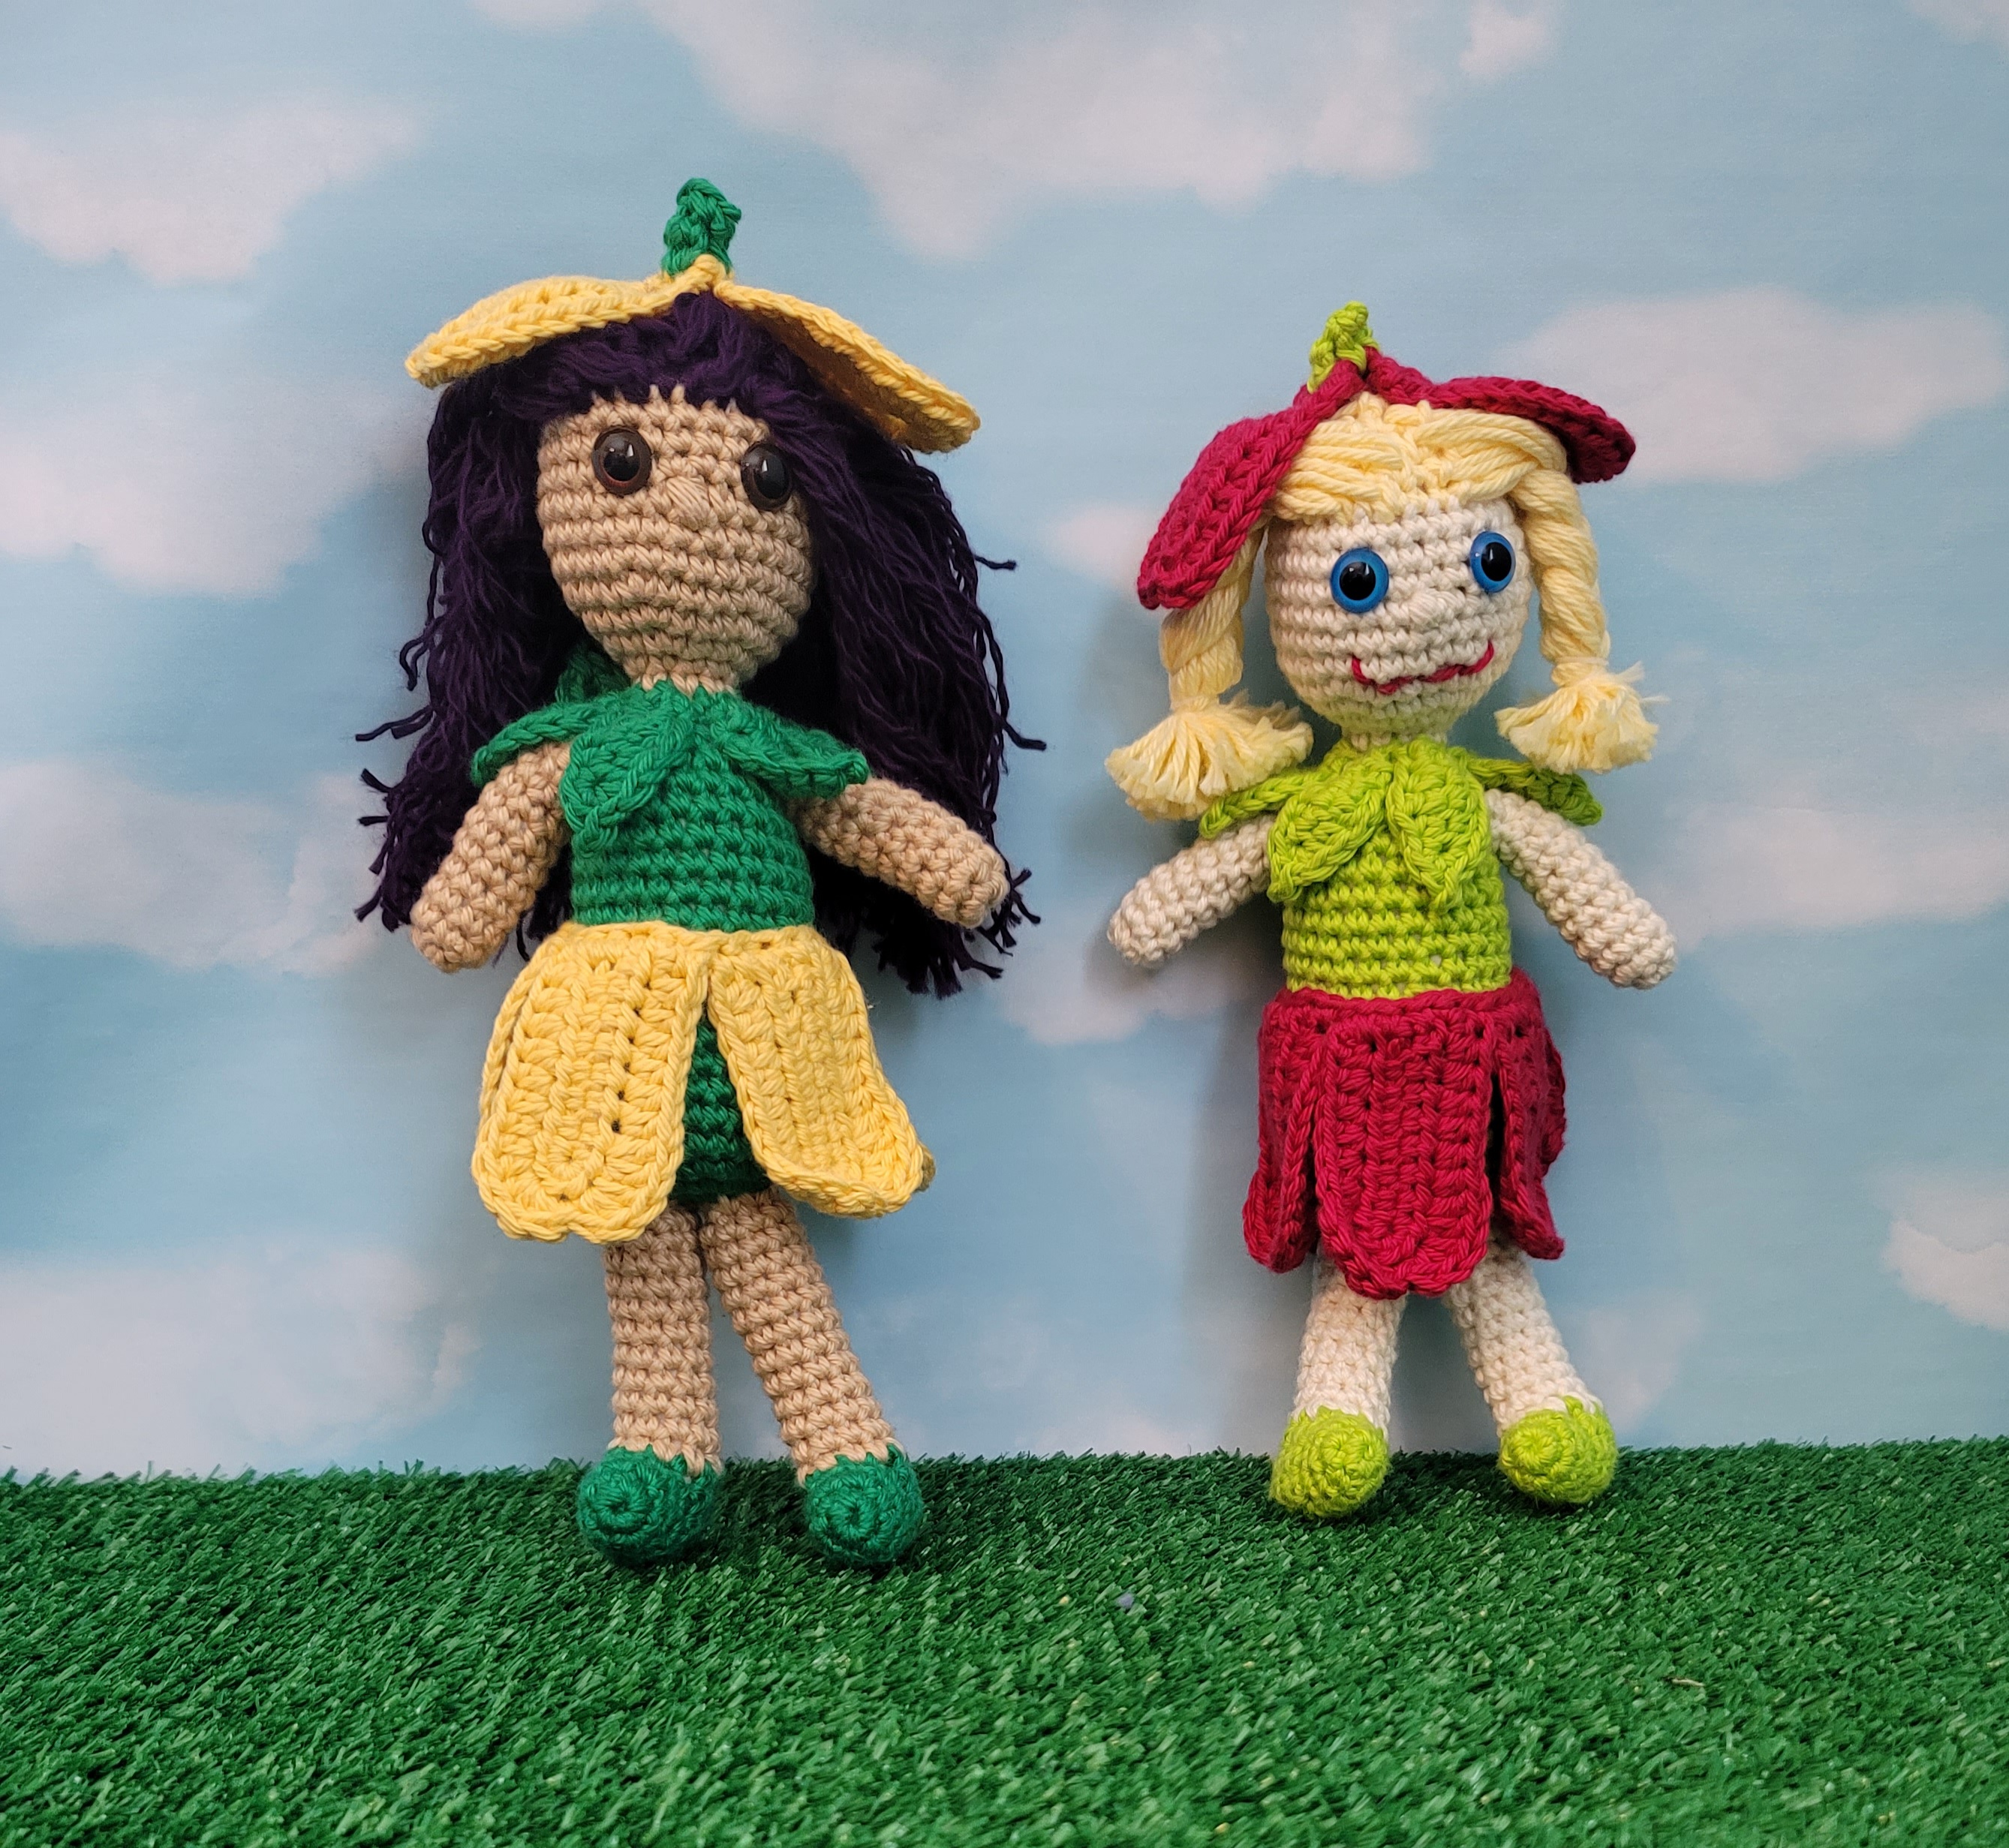
I have always loved springtime! The trees are beginning to get new leaves. Flowers are popping up. Bluebonnets, buttercups and Indian paintbrushes are thick along the Texas highways. I drove out to the hill country for work this week, and the bluebonnets are stunning! My designer brain is working on overload with the constant inspiration from nature. Unfortunately, my fingers can only crochet so fast, so many of these ideas will be relegated to my sketch book for a later time. Last year I published Miss Tulip Amigurumi crochet pattern which can be made in any shade of green you like, along with a multitude of colors for the petals. I hope you enjoy making her as much as I did. There’s also a YouTube video to show how to make amigurumi hair.

Materials:
I Love This Cotton yarn:
0.5 oz. Rosebud (petal color)
0.9 oz. Bright Citrus (leaf color)
0.8 oz. Ivory (skin color)
0.6 oz. Buttercup (hair color)
1 yard pink or red
Size F (3.75 mm) crochet hook
Yarn needle
Fiberfill
12 mm safety eyes
Bobble St: All in same st, (Insert hook into st, yo, pull through) 3 times, yo, pull through all loops.
Directions:
BODY:
Rnd 1: With green yarn, ch 2 (or magic ring), 6 sc in 2nd ch from hook. Do not join. Work in continuous rnds throughout unless otherwise specified.
Rnd 2: 2 sc in each st (12 sc).
Rnd 3: *Sc in next st, 2 sc in next st,* repeat around (18 sc).
Rnd 4: *Sc in next 2 sts, 2 sc in next st,* repeat around (24 sc).
Rnd 5: *Sc in next 3 sts, 2 sc in next st,* repeat around (30 sc).
Rnds 6-11: Sc in each st.
Rnd 12: *Sc in next 3 sts, dec,* repeat around (24 sc). Mark Rnd 12 for waistline.
Rnds 13-18: Sc in each st.
Rnd 19: *Sc in next 2 sts, dec,* repeat around (18 sc). Start stuffing body.
Rnd 20: *Sc in next st, dec,* repeat around (12 sc).
Rnd 21: *Sc in next st, dec,* repeat around (9 sc). Fasten off green.
Rnd 22: Attach Ivory yarn, sc in each st.
Rnd 23: *Sc in next 2 sts, 2 sc in next st,* repeat around (12 sc).
Rnd 24: *Sc in next st, 2 sc in next st,* repeat around (18 sc).
Rnd 25: *Sc in next 2 sts, 2 sc in next st,* repeat around (24 sc).
Rnd 26: *Sc in next 3 sts, 2 sc in next st,* repeat around (30 sc).
Rnds 27-28: Sc in each st.
Rnd 29: Sc in next 15 sts, bobble st for nose in next st, sc in next 14 sts.
Rnds 30-32: Sc in each st. Fasten off Ivory. Insert safety eyes at Rnd 30, 4 sts apart. Stuff body and head. Be sure to stuff neck firmly to support head.
Rnd 33: Attach yellow yarn for wig cap. *Sc in next 3 sts, dec,* repeat around (24 sc).
Rnd 34: *Sc in next 2 sts, dec,* repeat around (18 sc).
Rnd 35: *Sc in next st, dec,* repeat around (12 sc). Finish stuffing head.
Rnd 36: Dec around (6 sc). Fasten off yellow yarn leaving 6” length. Close with ultimate finish.
LEGS:
Rnd 1: With green yarn, ch 2 (or magic ring), 6 sc in 2nd ch. Do not join. Work in continuous rnds throughout unless otherwise specified.
Rnd 2: *Sc in next st, 2 sc in next st,* repeat around (9 sc).
Rnds 3-4: Sc in each st.
Rnd 5: Ch 1, turn, sc in next 8 sts.
Rnds 6-9: Ch 1, turn, sc in each st.
Rnd 10: With right sides together, sc through both thicknesses to close heel (4 sc). Fasten off green.
Rnd 11: Attach ivory yarn at heel. Ch 1, work 10 sc evenly spaced around foot. Do not join. Stuff shoe.
Rnds 12-22: Sc in each st. Do not join. Stuff leg as you go. At end of Rnd 22,join with sl st and fasten off ivory. Leave 12” length for sewing. Sew to bottom of body at Rnds 1-3 with toes pointed forward.
ARMS:
Rnd 1: With Ivory yarn, ch 2 (or magic circle), 6 sc in 2nd ch. Do not join.
Rnd 2: *Sc in next 2 sts, 2 sc in next st,* repeat once (8 sc).
Rnds 3-10: Sc in each st. At end of Rnd 10, join with sl st and fasten off Ivory leaving 9” length. Sew to sides of body with top of arm at Rnd 20 of body.
SKIRT PETALS: (Make 5)
Rnd 1: With Rosebud yarn, ch 9, hdc in 2nd ch, hdc in next 6 ch, 6 hdc in last ch. Working on opposite side of starting ch, hdc in 7 ch (19 hdc).
Rnd 2: Ch 1, turn, hdc in 7 sts, 2 dc in next st, 3 dc in next st, sl st in next st, 3 dc in next st, 2 dc in next st, hdc in next 7 sts. Fasten off.
At the end of the fifth petal, do not fasten off. Ch 1, turn to work across end of petal. Work 6 sc evenly spaced across end of petal, continue with 6 sc evenly spaced across each petal until all 5 petals are connected. Fasten off leaving 12” length for sewing. Block petals, then sew skirt onto doll at marked Rnd of body.
NECK LEAVES: (Make 6)
Rnd 1: With green yarn, ch 6, sc in 2nd ch from hook, hdc in next ch, dc in next ch, hdc in next ch, (2 sc, ch 2, sl st in 2nd ch, 2 sc) in last st. Working on opposite side of starting ch, hdc in next ch, dc in next ch, hdc in next ch, sc in next ch. Join with sl st in first sc. Fasten off with 6” length for sewing. Sew leaves evenly spaced around neck.
HAT PETALS: (Make 3)
Rnd 1: With Rosebud yarn, ch 9, sc in 2nd ch, sc in next 2 ch, hdc in next 4 ch, 5 hdc in last ch. Working on opposite side of starting ch, hdc in 4 ch, sc in 3 ch.
Rnd 2: Ch 1, turn, sc in 4 sts, hdc in 3 sts, 2 hdc in next st, 3 hdc in next st, sl st in next st, 3 hdc in next st, 2 hdc in next st, hdc in next 3 sts, sc in next 4 sts. Fasten off yarn. At end of third petal, do not fasten off. Turn to work across ends of petals, ch 1, 2 sc in end of petal. Work across ends of next 2 petals with 2 sc in each petal (6 sc). Join with sl st. Fasten off.
Stamen:
Rnd 1: Attach green yarn, sc in each st. Do not join.
Rnd 2: *Sc, dec,* repeat (4 sc). Join with sl st. Fasten off green.
HAIR:
Cut approximately 70 pieces of yellow yarn 10” long. Fold one strand of yarn in half, insert hook into wig cap, pull yarn through st, pull both pieces of yarn through loop, pull tight. Repeat until wig cap is filled.
YouTube for Amigurumi Hair: https://youtu.be/pYuLD0mUfuo
Sew hat to head.
Embroider mouth below nose.
More Green Designs

Mother’s Day Handbag Patterns – Summer Amigurumi Crochet Bundle


Alligator Nap Buddy Crochet Pattern

Zoo Blog Hop Day 14 – Alligators!

Baby Military Sweater Crochet Pattern

Easter Enchantment Crochet Patterns Ebook – Over 20 Easter Patterns in PDF Format – On Sale for $9.99 through April 17, 2022
Share your green projects on Facebook: https://www.facebook.com/myfingersfly
ICYMI (In Case You Missed It)
Easter Crochet Pattern Roundup – Over 30 Free Patterns
Red Panda Lovey Crochet Pattern
Texas Flag Potholder Crochet Pattern
Crochet Pattern Book, Adorable Aquatic Animal Crochet Patterns
Affiliate Links
This post contains affiliate links. This means I may earn a commission should you chose to sign up for a program or make a purchase using my link. It’s okay – I love all of these companies anyways, and you will too!
![]()
Free shipping on orders over $40. Use code FSUS40.
![]()
Up to 30% off Top Picks