Posted on 1 Comment

Join the Crochet-Along, Pink Camo Sweater for Girls


This CAL will run exclusively in the MFF Crochet Family Group in August.

August 9 – Back

August 11 – Right Front

August 14 – Left Front

August 16 – Sleeves

August 18 – Assembly & Zipper

August 21 – Pockets & Fringe

Materials needed:

Red Heart Super Saver worsted weight yarn:

14 [15, 16] oz. Pink Camo

2 oz. Petal Pink

1 oz. Pretty ‘n Pink

Size H (5.0 mm) crochet hook (or size needed to obtain gauge) Yarn needle

13” [14”, 15”] pink sweater zipper


Click here to join the group:

https://www.facebook.com/groups/875538646117910


water color month

There are still a few days left in the Water Color Bundle Sale (through July 31). You will get 24 designs from some of the best indie designers, plus a page of 8 different gift tags for your handmade items. Retail value is over $90 if purchased individually; this month only you can get all 24 designs with an 85% savings. Wow!!


handmade gift tags


Do you ever make a gift, then put it away and forget about it? I like to wrap my items when they’re finished and put them all in the same closet so I know where they are when I need them.

As a special bonus, the Water Color Bundle also includes a sheet of 8 different handmade gift tags.


https://myfingersfly.thrivecart.com/water-color-crochet-pattern-bundle/


(ICYMI) In Case You Missed It


Toddler Pinstripe Sweater Crochet Pattern


elephant gift tag


Elephant Birthday Gift Tag


 Lamb Birthday Gift Tag


Affiliate Links

This page contains affiliate links. If you choose to purchase after clicking a link, I may receive a commission at no extra cost to you.

Best Selling Knitting & Crochet Supplies on Amazon


Posted on 1 Comment

Teddy Bear Crochet Pattern

teddy bear

Hug Me, I’m Handmade: Crochet Your Own Teddy Bear! 🧸💕

There’s something timeless and heartwarming about a teddy bear. Whether it’s for a baby shower, a birthday gift, or just a cozy companion, a handmade teddy bear is a gift that says “you’re loved” in every stitch.

If you’re looking for your next adorable project using blanket yarn, this Teddy Bear Crochet Pattern might just steal your heart.

Why Crochet a Teddy Bear?

Teddy bears aren’t just for kids—they’re for anyone who could use a little extra comfort. Crocheting one lets you:

🧶 Use Up Yarn Stash – A perfect project for leftover yarn in browns, creams, pastels, or even bright, whimsical colors.

💖 Make It Personal – Add a bowtie, a little heart patch, or embroider the recipient’s initials. Each bear becomes one-of-a-kind.

🎁 Create a Heirloom – Handmade gifts are cherished for years. Your teddy bear could become someone’s childhood favorite!


What to Expect from the Pattern

Our teddy bear pattern is beginner-friendly with clear instructions and helpful photos, but it also includes a few options to customize your creation:

✔️ Step-by-step instructions (US terms)
✔️ Use safety eyes for older children, crochet eyes for children under 3 years of age
✔️ Approximately finished size: 26 inches tall using super bulky yarn

This pattern is perfect for confident beginners and experienced crocheters alike. If you’ve mastered the magic ring and simple shaping, you’re ready to get started!


Make It a Memory

Whether you keep it, gift it, or sell it at your next craft fair, this teddy bear will bring smiles wherever it goes.

So grab your hook, pick your super bulky or jumbo weight yarn, and start stitching the bear hugs! 🧸✨


Blanket Yarn Teddy Bear

Materials:

2 skeins Bernat Blanket Stripes

Few yards black bulky

Size M (9.00 mm) crochet hook

Yarn needle

Fiberfill

Safety eyes and safety nose (optional)


Finished bear measures approximately 26” tall.

DIRECTIONS:

HEAD:

Rnd 1: Ch 2 (or magic circle), 10 sc in 2nd ch from hook. Do not join. Work in continuous rnds throughout.

Rnd 2: 2 sc in each st (20 sc).

Rnd 3: *Sc in next st, 2 sc in next st,* repeat around (30 sc).

Rnd 4: *Sc in next 2 sts, 2 sc in next st,* repeat around (40 sc).

Rnd 5: Sc in each st.

Rnd 6: *Sc in next 3 sts, 2 sc in next st,* repeat around (50 sc).

Rnds 7-12: Sc in each st.

Rnd 13: *Dec over next 2 sts, sc in next 8 sts,* repeat around (45 sc).

Rnd 14: *Dec over next 2 sts, sc in next 7 sts,* repeat around (40 sc).

Rnd 15: *Dec over next 2 sts, sc in next 6 sts,* repeat around (35 sc).

Rnd 16: *Dec over next 2 sts, sc in next 5 sts,* repeat around (30 sc).

Rnd 17: *Dec over next 2 sts, sc in next 4 sts,* repeat around (25 sc). Stuff head.

Rnd 18: *Dec over next 2 sts, sc in next 3 sts,* repeat around (20 sc).

Rnd 19: *Dec over next 2 sts, sc in next 2 sts,* repeat around (15 sc).

Rnd 20: *Dec over next 2 sts, sc in next st,* repeat around (10 sc). Join with sl st. Fasten off leaving 12” length for sewing. Finish stuffing.

EARS: (Make 2)

Rnd 1: Ch 2 (or magic circle), 10 sc in 2nd ch from hook. Do not join. Work in continuous rnds throughout.

Rnd 2: 2 sc in each st (20 sc).

Fold in half and work through both sides of ear, sc in each st (10 sc).

Sew ears to top of head using photo for placement.

SNOUT:

Rnd 1: Ch 5, sc in 2nd ch from hook and in next 2 ch, 3 sc in next ch. Working on opposite side of starting ch, sc in next 2 ch, 2 sc in last ch (10 sc). Do not join.

Rnd 2: 2 sc in each st (20 sc).

Rnd 3: *2 sc in next st, sc in next st,* repeat around (30 sc).

Rnds 4-5: Sc in each st. Join with sl st and fasten off at end of Rnd 5 leaving 12” length for sewing. Use black yarn to embroider a triangle for the nose, or use black plastic safety nose. Stuff snout and sew to face using photo for placement.

EYES: (Make 2)

With black bulky yarn (or 2 strands of black worsted held together), ch 2 (or magic circle), 6 sc in 2nd ch from hook. Join with sl st. Fasten off leaving 6” length for sewing. Sew eyes to face above the snout.

OPTIONAL:

Use plastic safety eyes for older children.

BODY:

Rnd 1: Ch 2 (or magic circle), 10 sc in 2nd ch from hook. Do not join. Work in continuous rnds throughout.

Rnd 2: 2 sc in each st (20 sc).

Rnd 3: *Sc in next st, 2 sc in next st,* repeat around (30 sc).

Rnd 4: *Sc in next 2 sts, 2 sc in next st,* repeat around (40 sc).

Rnd 5: Sc in each st.

Rnd 6: *Sc in next 3 sts, 2 sc in next st,* repeat around (50 sc).

Rnds 7: Sc in each st.

Rnd 8: *Sc in next 4 sts, 2 sc in next st,* repeat around (60 sc).

Rnd 9: Sc in each st.

Rnd 10: *Sc in next 5 sts, 2 sc in next st,* repeat around (70 sc).

Rnds 11-16: Sc in each st.

Rnd 17: *Dec over next 2 sts, sc in next 12 sts,* repeat around (65 sc).

Rnds 18-19: Sc in each st.

Rnd 20: *Dec over next 2 sts, sc in next 11 sts,* repeat around (60 sc).

Rnds 21-22: Sc in each st.

Rnd 23: *Dec over next 2 sts, sc in next 10 sts,* repeat around (55 sc).

Rnds 24-25: Sc in each st.

Rnd 26: *Dec over next 2 sts, sc in next 9 sts,* repeat around (50 sc).

Rnd 27: Sc in each st.

Rnd 28: *Dec over next 2 sts, sc in next 8 sts,* repeat around (45 sc).

Rnd 29: Sc in each st.

Rnd 30: *Dec over next 2 sts, sc in next 7 sts,* repeat around (40 sc).

Rnd 31: Sc in each st.

Rnd 32: *Dec over next 2 sts, sc in next 6 sts,* repeat around (35 sc).

Rnd 33: Sc in each st. Stuff body.

Rnd 34: *Dec over next 2 sts, sc in next 5 sts,* repeat around (30 sc).

Rnd 35: *Dec over next 2 sts, sc in next 4 sts,* repeat around (25 sc).

Rnd 36: *Dec over next 2 sts, sc in next 3 sts,* repeat around (20 sc). Join with sl st. Fasten off leaving 12” length for sewing. Finish stuffing. Sew head to body.

LEGS: (Make 2)

Rnd 1: Ch 2 (or magic circle), 10 sc in 2nd ch from hook. Do not join. Work in continuous rnds throughout.

Rnd 2: 2 sc in each st (20 sc).

Rnd 3: *Sc in next st, 2 sc in next st,* repeat around (30 sc).

Rnd 4: *Sc in next 5 sts, 2 sc in next st,* repeat around (35 sc).

Rnds 5-6: Sc in each st.

Rnd 7: Dec 5 times, sc around (30 sc).

Rnds 8-15: Sc in each st. At end of Rnd 16, join with sl st. Fasten off leaving 12” length for sewing. Sew legs to bottom of body.

ARMS:

Rnd 1: Ch 2 (or magic circle), 10 sc in 2nd ch from hook. Do not join. Work in continuous rnds throughout.

Rnd 2: 2 sc in each st (20 sc).

Rnds 3-9: Sc in each st. At end of Rnd 9, join with sl st. Fasten off leaving 12” length for sewing. Sew arms to sides of body.


PDF available at:

https://ravel.me/blanket-yarn-teddy-bear


(ICYMI) In Case You Missed It


Toddler Pinstripe Sweater Crochet Pattern


elephant gift tag


Elephant Birthday Gift Tag


 Lamb Birthday Gift Tag


Affiliate Links

This page contains affiliate links. If you choose to purchase after clicking a link, I may receive a commission at no extra cost to you.

Best Selling Knitting & Crochet Supplies on Amazon


Posted on 6 Comments

Spring is Here – Green is the Theme

Miss Tulip Amigurumi Crochet Pattern


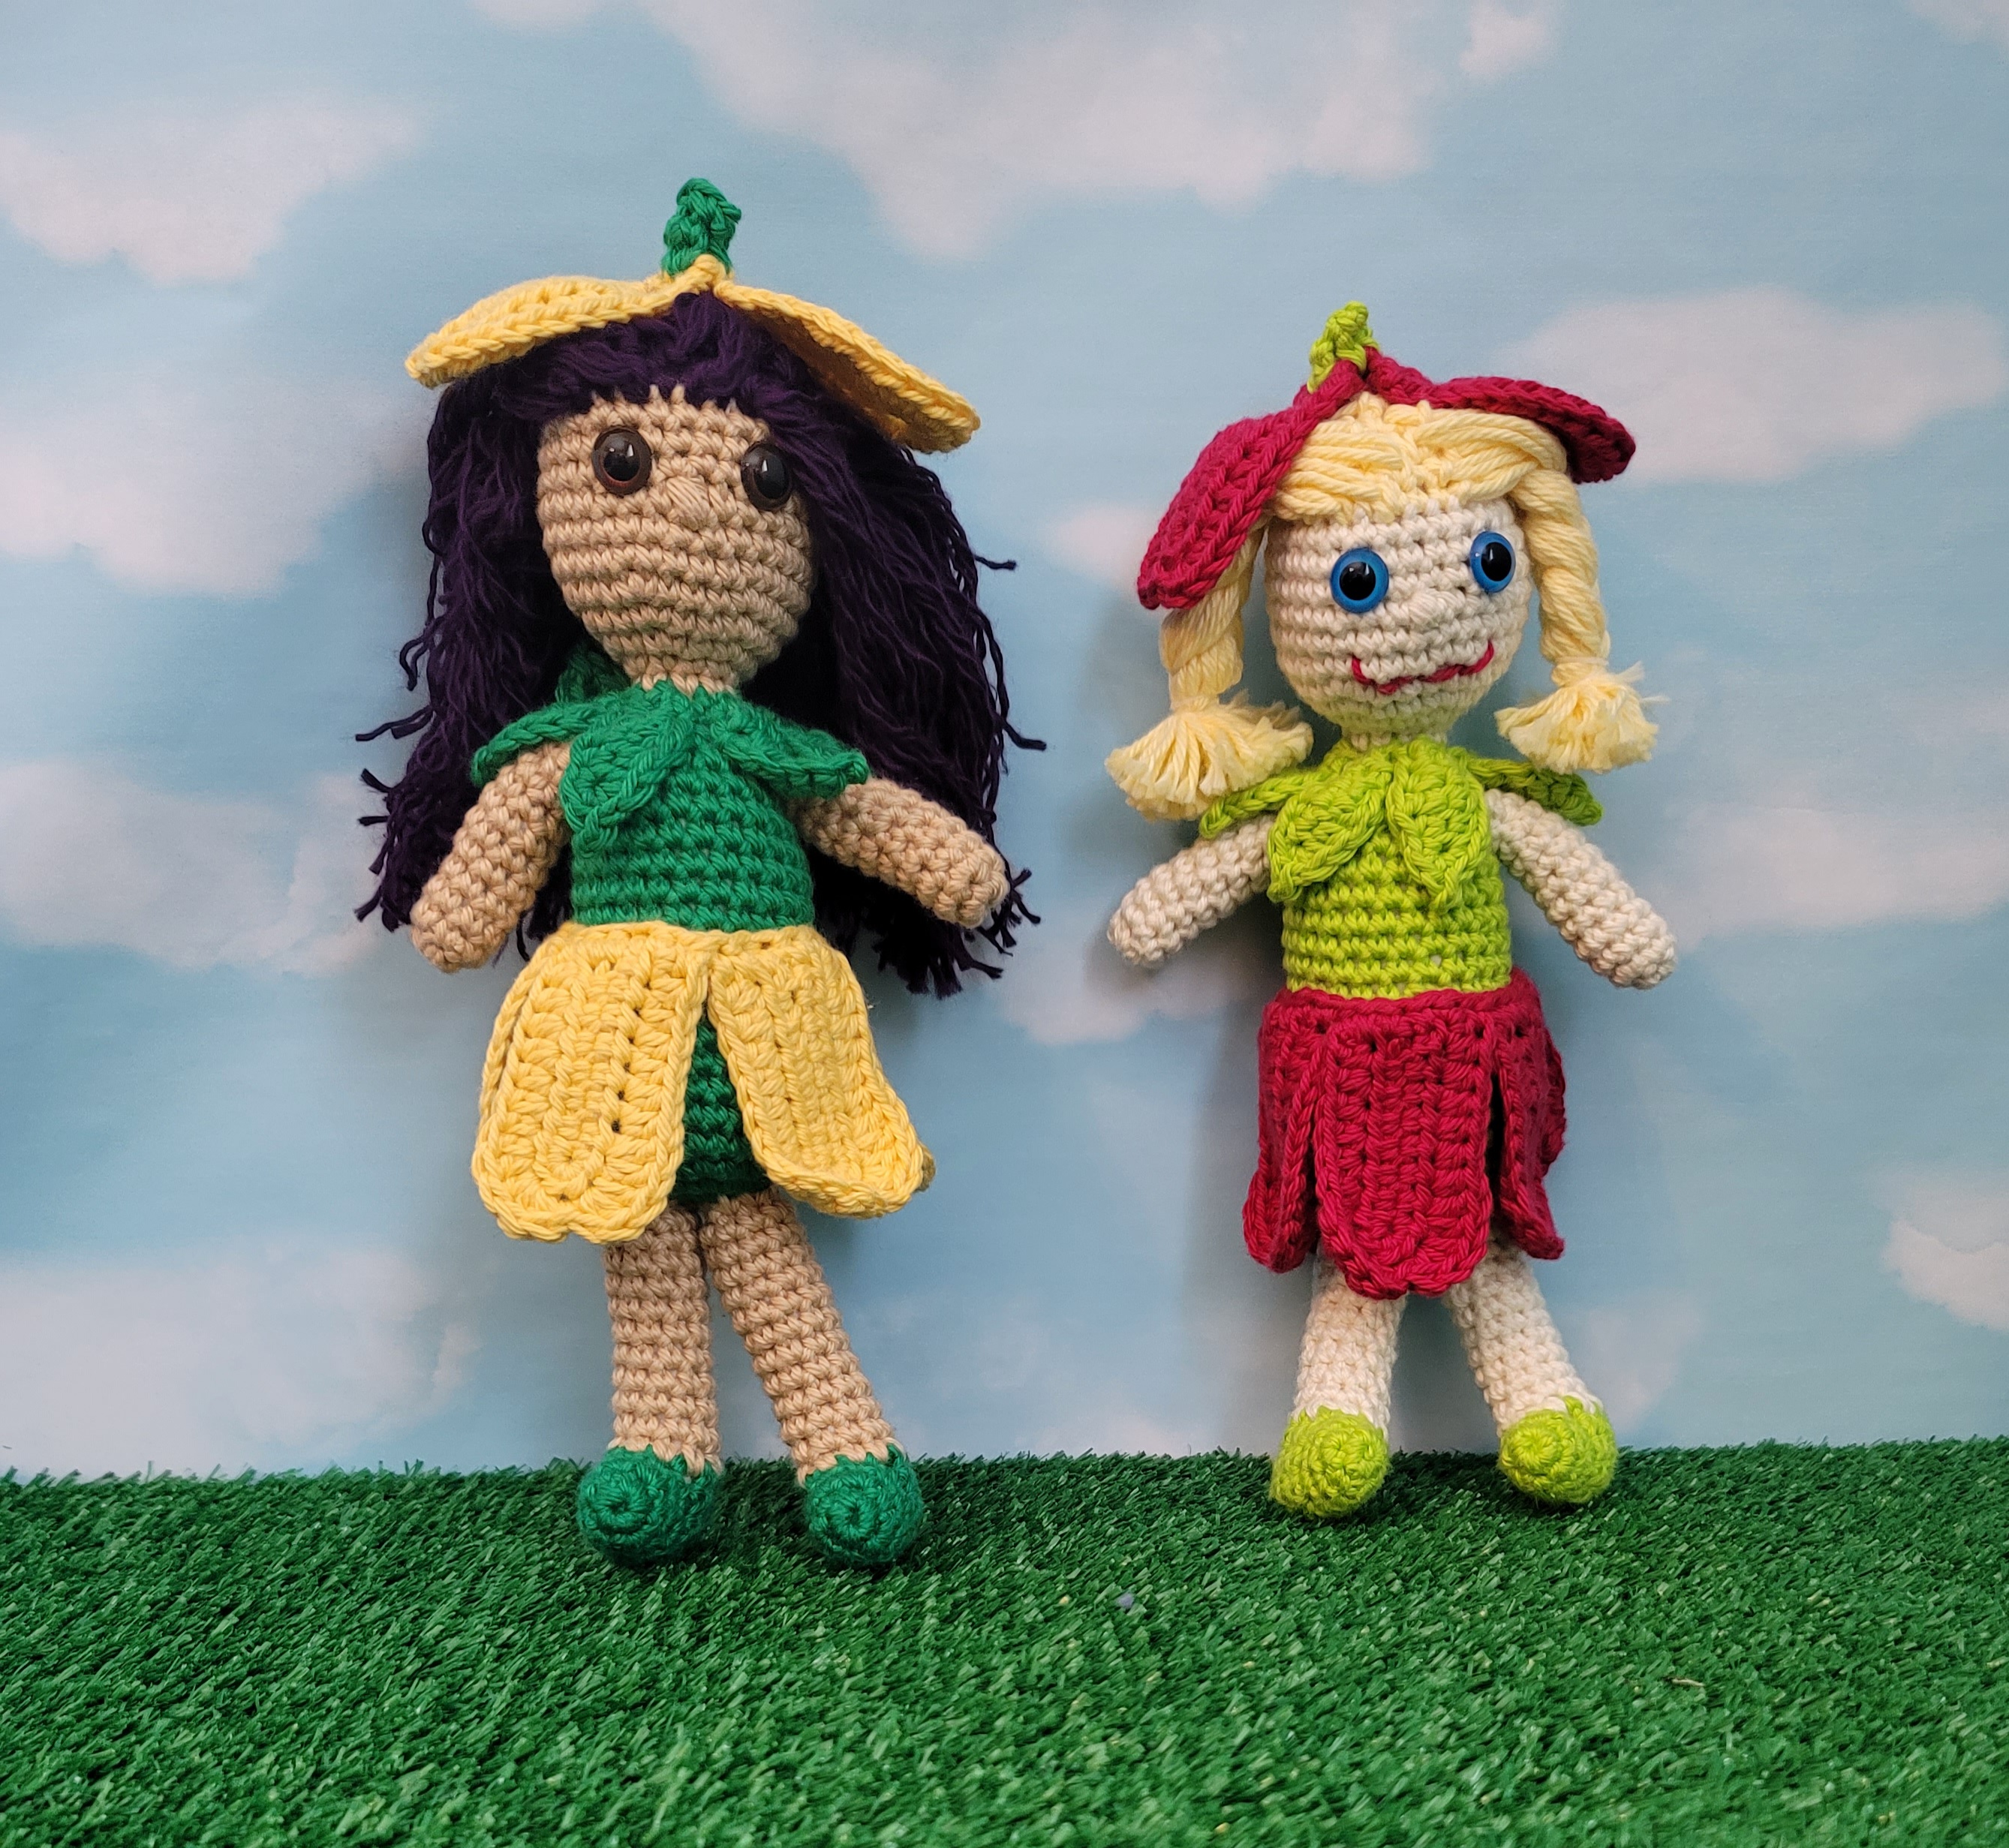
I have always loved springtime! The trees are beginning to get new leaves. Flowers are popping up. Bluebonnets, buttercups and Indian paintbrushes are thick along the Texas highways. I drove out to the hill country for work this week, and the bluebonnets are stunning! My designer brain is working on overload with the constant inspiration from nature. Unfortunately, my fingers can only crochet so fast, so many of these ideas will be relegated to my sketch book for a later time. Last year I published Miss Tulip Amigurumi crochet pattern which can be made in any shade of green you like, along with a multitude of colors for the petals. I hope you enjoy making her as much as I did. There’s also a YouTube video to show how to make amigurumi hair.

Miss Tulip Amigurumi Crochet Pattern


Materials:

I Love This Cotton yarn:

0.5 oz. Rosebud (petal color)

0.9 oz. Bright Citrus (leaf color)

0.8 oz. Ivory (skin color)

0.6 oz. Buttercup (hair color)

1 yard pink or red

Size F (3.75 mm) crochet hook

Yarn needle

Fiberfill

12 mm safety eyes

Bobble St:  All in same st, (Insert hook into st, yo, pull through) 3 times, yo, pull through all loops.

Directions:

BODY:

Rnd 1: With green yarn, ch 2 (or magic ring), 6 sc in 2nd ch from hook. Do not join. Work in continuous rnds throughout unless otherwise specified.

Rnd 2: 2 sc in each st (12 sc).

Rnd 3: *Sc in next st, 2 sc in next st,* repeat around (18 sc).

Rnd 4: *Sc in next 2 sts, 2 sc in next st,* repeat around (24 sc).

Rnd 5: *Sc in next 3 sts, 2 sc in next st,* repeat around (30 sc).

Rnds 6-11: Sc in each st.

Rnd 12: *Sc in next 3 sts, dec,* repeat around (24 sc). Mark Rnd 12 for waistline.

Rnds 13-18: Sc in each st.

Rnd 19: *Sc in next 2 sts, dec,* repeat around (18 sc). Start stuffing body.

Rnd 20: *Sc in next st, dec,* repeat around (12 sc).

Rnd 21: *Sc in next st, dec,* repeat around (9 sc). Fasten off green.

Rnd 22: Attach Ivory yarn, sc in each st.

Rnd 23: *Sc in next 2 sts, 2 sc in next st,* repeat around (12 sc).

Rnd 24: *Sc in next st, 2 sc in next st,* repeat around (18 sc).

Rnd 25: *Sc in next 2 sts, 2 sc in next st,* repeat around (24 sc).

Rnd 26: *Sc in next 3 sts, 2 sc in next st,* repeat around (30 sc).

Rnds 27-28: Sc in each st.

Rnd 29: Sc in next 15 sts, bobble st for nose in next st, sc in next 14 sts.

Rnds 30-32: Sc in each st. Fasten off Ivory. Insert safety eyes at Rnd 30, 4 sts apart. Stuff body and head. Be sure to stuff neck firmly to support head.

Rnd 33: Attach yellow yarn for wig cap. *Sc in next 3 sts, dec,* repeat around (24 sc).

Rnd 34: *Sc in next 2 sts, dec,* repeat around (18 sc).

Rnd 35: *Sc in next st, dec,* repeat around (12 sc). Finish stuffing head.

Rnd 36: Dec around (6 sc). Fasten off yellow yarn leaving 6” length. Close with ultimate finish.

https://youtu.be/jVpTr8mId3I

LEGS:

Rnd 1: With green yarn, ch 2 (or magic ring), 6 sc in 2nd ch. Do not join. Work in continuous rnds throughout unless otherwise specified.

Rnd 2: *Sc in next st, 2 sc in next st,* repeat around (9 sc).

Rnds 3-4: Sc in each st.

Rnd 5: Ch 1, turn, sc in next 8 sts.

Rnds 6-9: Ch 1, turn, sc in each st.

Rnd 10: With right sides together, sc through both thicknesses to close heel (4 sc). Fasten off green.

Rnd 11: Attach ivory yarn at heel. Ch 1, work 10 sc evenly spaced around foot. Do not join. Stuff shoe.

Rnds 12-22: Sc in each st. Do not join. Stuff leg as you go. At end of Rnd 22,join with sl st and fasten off ivory. Leave 12” length for sewing. Sew to bottom of body at Rnds 1-3 with toes pointed forward.

ARMS:

Rnd 1: With Ivory yarn, ch 2 (or magic circle), 6 sc in 2nd ch. Do not join.

Rnd 2: *Sc in next 2 sts, 2 sc in next st,* repeat once (8 sc).

Rnds 3-10: Sc in each st. At end of Rnd 10, join with sl st and fasten off Ivory leaving 9” length. Sew to sides of body with top of arm at Rnd 20 of body.

SKIRT PETALS: (Make 5)

Rnd 1: With Rosebud yarn, ch 9, hdc in 2nd ch, hdc in next 6 ch, 6 hdc in last ch. Working on opposite side of starting ch, hdc in 7 ch (19 hdc).

Rnd 2: Ch 1, turn, hdc in 7 sts, 2 dc in next st, 3 dc in next st, sl st in next st, 3 dc in next st, 2 dc in next st, hdc in next 7 sts. Fasten off.

At the end of the fifth petal, do not fasten off. Ch 1, turn to work across end of petal. Work 6 sc evenly spaced across end of petal, continue with 6 sc evenly spaced across each petal until all 5 petals are connected. Fasten off leaving 12” length for sewing. Block petals, then sew skirt onto doll at marked Rnd of body.

NECK LEAVES: (Make 6)

Rnd 1: With green yarn, ch 6, sc in 2nd ch from hook, hdc in next ch, dc in next ch, hdc in next ch, (2 sc, ch 2, sl st in 2nd ch, 2 sc) in last st. Working on opposite side of starting ch, hdc in next ch, dc in next ch, hdc in next ch, sc in next ch. Join with sl st in first sc. Fasten off with 6” length for sewing. Sew leaves evenly spaced around neck.

HAT PETALS: (Make 3)

Rnd 1: With Rosebud yarn, ch 9, sc in 2nd ch, sc in next 2 ch, hdc in next 4 ch, 5 hdc in last ch.  Working on opposite side of starting ch, hdc in 4 ch, sc in 3 ch.

Rnd 2: Ch 1, turn, sc in 4 sts, hdc in 3 sts, 2 hdc in next st, 3 hdc in next st, sl st in next st, 3 hdc in next st, 2 hdc in next st, hdc in next 3 sts, sc in next 4 sts. Fasten off yarn. At end of third petal, do not fasten off. Turn to work across ends of petals, ch 1, 2 sc in end of petal. Work across ends of next 2 petals with 2 sc in each petal (6 sc). Join with sl st. Fasten off.

Stamen:

Rnd 1: Attach green yarn, sc in each st. Do not join.

Rnd 2: *Sc, dec,* repeat (4 sc). Join with sl st. Fasten off green.

HAIR:

Cut approximately 70 pieces of yellow yarn 10” long. Fold one strand of yarn in half, insert hook into wig cap, pull yarn through st, pull both pieces of yarn through loop, pull tight. Repeat until wig cap is filled.

YouTube for Amigurumi Hair: https://youtu.be/pYuLD0mUfuo

Sew hat to head.

Embroider mouth below nose.

More Green Designs

Floral purse

Mother’s Day Handbag Patterns – Summer Amigurumi Crochet Bundle


Flower Easter Basket Crochet Pattern

Flower Easter Basket Pattern


alligator nap buddy

Alligator Nap Buddy Crochet Pattern


baby gator amigurumi


Zoo Blog Hop Day 14 – Alligators!


baby military sweater


Baby Military Sweater Crochet Pattern

Benjamin Turtle Nap Buddy CAL


Easter Enchantment Crochet Patterns Ebook

Easter Enchantment Crochet Patterns Ebook – Over 20 Easter Patterns in PDF Format – On Sale for $9.99 through April 17, 2022


Share your green projects on Facebook: https://www.facebook.com/myfingersfly


ICYMI (In Case You Missed It)

Easter Crochet Pattern Roundup – Over 30 Free Patterns

Spring Floral Gift Tags

Red Panda Lovey Crochet Pattern

Texas Flag Potholder Crochet Pattern

Crochet Pattern Book, Adorable Aquatic Animal Crochet Patterns

Sunflower Granny Square


Affiliate Links

This post contains affiliate links. This means I may earn a commission should you chose to sign up for a program or make a purchase using my link. It’s okay – I love all of these companies anyways, and you will too!


Lion Brand Yarn

Free shipping on orders over $40. Use code FSUS40.

Up to 30% off Top Picks


Posted on 12 Comments

Red Panda Lovey Crochet Pattern

red panda lovey

Everywhere you look these days, you see red pandas, so I decided to dust off an old pattern and share it with you.

Everyone loves pandas, and red pandas are especially cute! Crochet this red panda lovey using worsted weight yarn for your little one. Also makes a great baby shower gift.

Skill level: Intermediate

Finished item measures approximately 24″ square

red panda lovey
Photos courtesy of Hana Gonzalez Photography

Materials you will need:
Worsted weight yarn
4 oz. red
3 oz. white
Few yards brown and black
Size G and H crochet hooks
Yarn needle
Two 12 mm black safety eyes
Fiberfil

Directions:

HEAD:

Rnd 1: With red yarn and G hook, ch 2, 6 sc in 2nd ch from hook. Do not join.

Rnd 2: 2 sc in each st (12 sc).

Rnd 3: *Sc in next st, 2 sc in next st, repeat around (18 sc).

Rnd 4: *Sc in each of next 2 sts, 2 sc in next st, * repeat around (24 sc).

Rnd 5: *Sc in each of next 3 sc, 2 sc in next st,* repeat around (30 sc).

Rnd 6: *Sc in each of next 4 sts, 2 sc in next st,* repeat around (36 sc).

Rnd 7: *Sc in each of next 5 sc, 2 sc in next st,* repeat around (42 sc).

Rnd 8: *Sc in each of next 6 sts, 2 sc in next st,* repeat around (48 sc).

Rnds 9-16: Sc in each st. Insert safety eyes at Rnd 10.

Rnd 17: *Dec, sc in next 6 sts,* repeat around (42 sc).

Rnd 18: *Dec, sc in next 5 sts,* repeat around (36 sc).

Rnd 19: *Dec, sc in next 4 sts,* repeat around (30 sc).

Rnd 20: *Dec, sc in next 3 sts,* repeat around (24 sc). Stuff head with Fiberfil.

Rnd 21: *Dec, sc in next 2 sts,* repeat around (18 sc).

Rnd 22: *Dec, sc in next st,* repeat around (12 sc). Stuff head with Fiberfil.

Rnd 23: *Dec around (6 sc). Join with sl st. Fasten off leaving 6” length. Thread this length through needle and pull through remaining 6 sts. Pull tight to close.

EARS (Make 2):

Row 1: With brown yarn and G hook, leave 9” length for sewing, ch 5, sc in 2nd ch from hook and next 3 chs (4 sc).

Row 2: Ch 1, turn, sc in st.

Rnd 3: Ch 1, turn, dec twice (2 sc). Fasten off brown. Attach white yarn at side of Row 1. Sc in same sp, sc in end of Row 2, sc in each st of Row 3, sc in other end of Rows 2 and 1. Fasten off white leaving 9” length for sewing. Sew ears to top of head at Rnds 4-7.

MUZZLE:

Rnd 1: With white yarn and G hook, ch 2, 6 sc in 2nd ch from hook. Do not join.

Rnd 2: 2 sc in each st (12 sc).

Rnd 3: *Sc in next st, 2 sc in next st, repeat around (18 sc).

Rnd 4: *Sc in each of next 2 sts, 2 sc in next st, * repeat around (24 sc).

Rnds 5-6: Sc in each st. Fasten off leaving 12” length for sewing. With black yarn, embroider nose and mouth. Sew muzzle to face.

MUZZLE STRIPES: (Make 2)

Row 1: With brown yarn and G hook, ch 7, sc in 2nd ch from hook and each remaining ch (6 sc).

Row 2: Ch 1, turn, sc in next st, 2 sc in next st, sc in each of next 2 sts, 2 sc in next st, sc in next st (8 sc). Fasten off brown.

Row 3: Attach white yarn, ch 1, turn, sc in each of next 2 sts, 2 sc in next st, sc in each of next 2 sts, 2 sc in next st, sc in each of next 2 sts (10 sc).

Row 4: Ch 1, turn, sc in each of next 2 sts, 2 sc in next st, sc in each of next 4 sts, 2 sc in next st, sc in each of next 2 sts (12 sc). Fasten off leaving length for sewing. Sew a stripe to face on each side of muzzle.

Use white yarn to embroider eyebrows above eyes.

ARMS: (Make 2)

Rnd 1: With brown yarn and G hook, ch 2, 5 sc in 2nd ch from hook. Do not join.

Rnd 2: 2 sc in each st (10 sc).

Rnd 3: *Sc in next st, 2 sc in next st, repeat around (15 sc).

Rnds 4-5: Sc in each st.

Rnd 6: *Dec, sc in next 3 sts,* repeat around (12 sc). Fasten off brown.

Rnds 7-23: With red yarn, sc in each st. Fasten off leaving length for sewing.

Stuff arms leaving last 1” empty. Law arms flat and sew to bottom of head approximately 1.5” apart.

BLANKET:

Rnd 1: With red yarn and H hook, ch 4, join to form ring. Ch 3 (counts as 1st dc throughout pattern), 2 dc in ring, *ch 1, 3 dcv in ring,* repeat * to * 3 times, ch 1. Join with sl st into top of ch-3.

Rnd 2: Join white in ch-1 sp, ch 3, 2 dc, ch 1, 3 dc in same sp. *Ch 1, 3 dc, ch 1, 3 dc in next ch-1 sp,* repeat * to * 3 times, ch 1. Join with sl st.

Rnd 3: Join red in corner ch-1 sp. Ch 3, 2 dc, ch 1, 3 dc in same sp. *Ch 1, (3 dc, ch 1, 3 dc) in next ch-1 sp, ch 1 (3 dc, ch 1, 3 dc) in corner ch-1 sp,* repeat * to * 3 times. Join with sl st.

Rnd 4: Join white in corner ch-1 sp, ch 3, 2 dc, ch 1, 3 dc in same sp. *Ch 1, (3 dc, ch 1) in each side ch-1 sp, ch 1 (3 dc, ch 1, 3 dc) in corner ch-1 sp,* repeat * to * 3 times. Join with sl st.

Rnds 5-17: Repeat Rnd 4, alternating red and white rnds.

Sew red panda body to center of blanket securely. Weave in all ends.

PDF Download available at Red Panda Lovey Crochet Pattern

Red Panda coloring page

ICYMI (In Case You Missed It) 

Texas Flag Potholder Crochet Pattern

Crochet Pattern Book, Adorable Aquatic Animal Crochet Patterns

Sunflower Granny Square

Special Handmade Gift Tags – Free PDF Download


Affiliate Links

This post contains affiliate links. This means I may earn a commission should you chose to sign up for a program or make a purchase using my link. It’s okay – I love all of these companies anyways, and you will too!

Lion Brand Yarn

Free shipping on orders over $40. Use code FSUS40.

Up to 30% off Top Picks

Posted on 2 Comments

Special Handmade Gift Tags – Free PDF Download

special handmade gift for you

With all those adorable gifts you’ll be making, you’ll need some gift tags. Download this free PDF any time you need to wrap a gift.

special handmade gift for you


“A Special Handmade Gift For You” Gift Tags


More Gift Tags

gift tags to download


More Gift Tags to Download

Crochet World April 2022

cat kitchen boa

I’m so excited to have my Cat Kitchen Boa design published in Crochet World’s April 2022 issue! I’ve read this magazine for years, and it has been a dream of mine to be published there. Check out the April issue here: https://ravel.me/cat-kitchen-boa

More of my kitchen boa designs:

Fox Kitchen Boa Crochet Pattern

Snowflake Kitchen Boa Crochet Pattern in Tunisian Stitch

Pig Kitchen Boa Crochet Pattern

Christmas Totem Pole Kitchen Boa Crochet Pattern – Reindeer, Elf, Santa Claus


Lion Brand Yarn

Take an additional 25% off already reduced prices! Use the code 25FEBEXTRA at checkout to see final price.

Up to 30% off Top Picks