Posted on 4 Comments

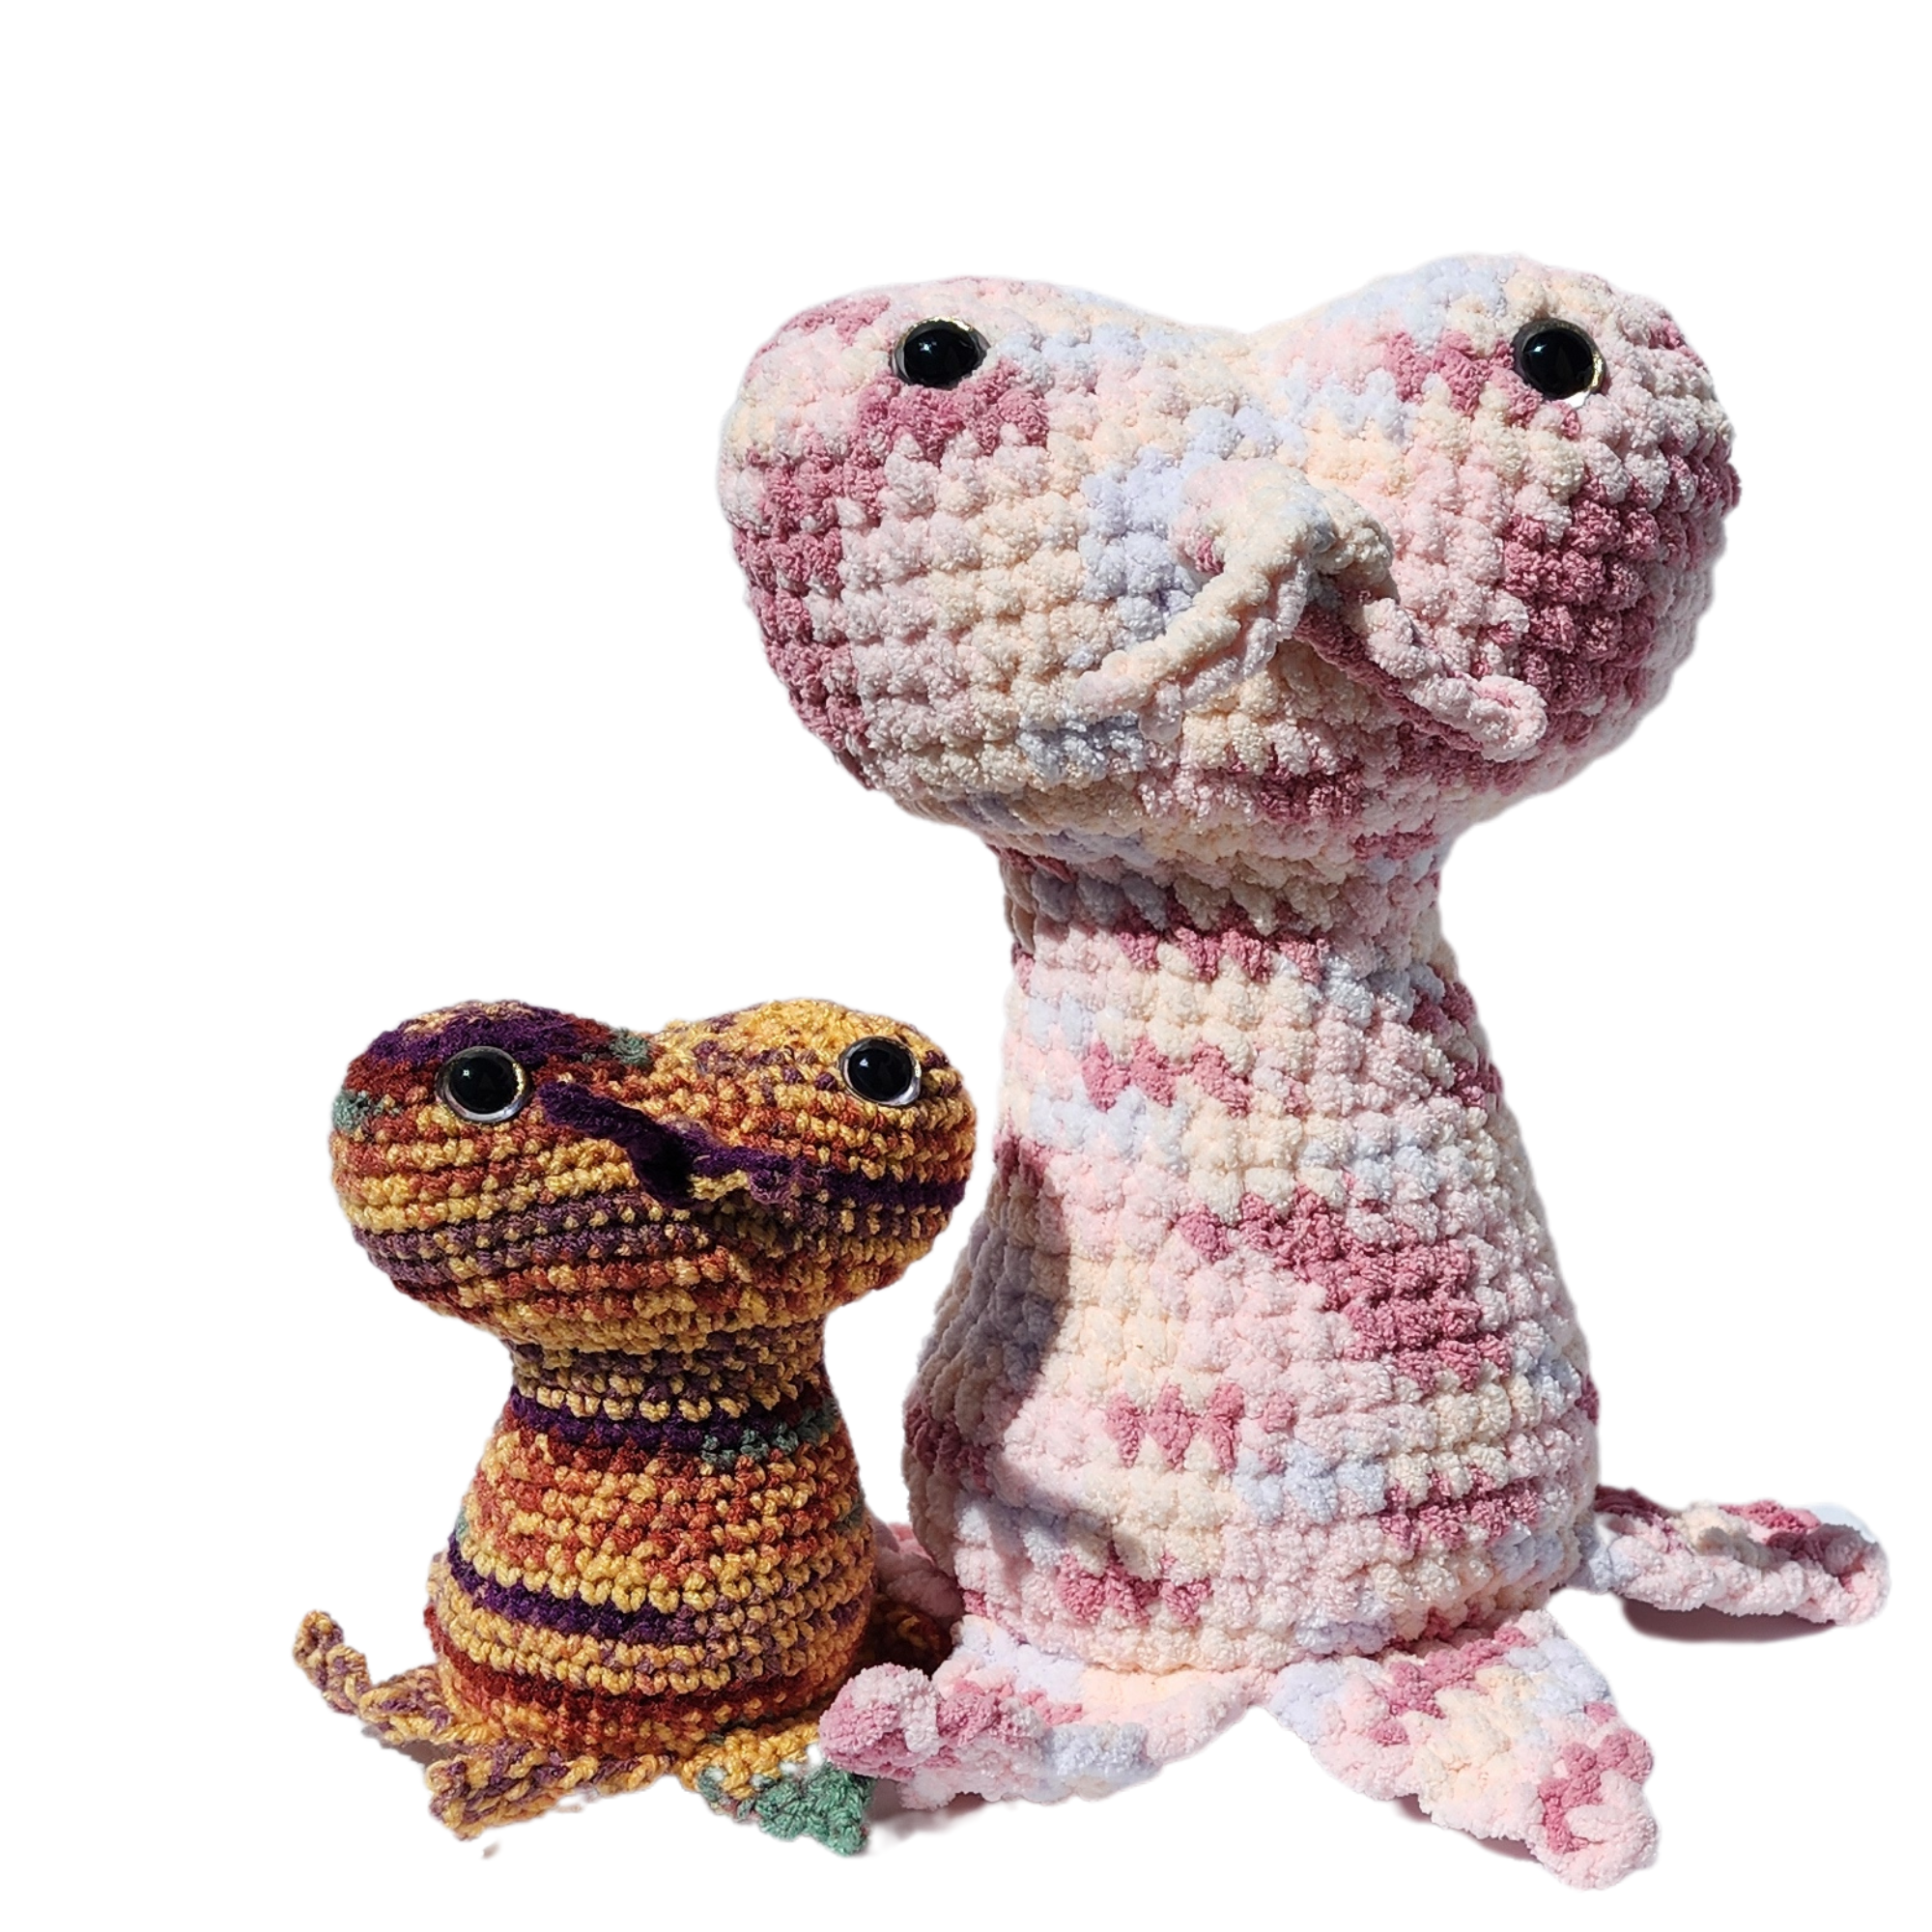
National Science Fiction Day – Alien Amigurumi Crochet Pattern

Welcome to the world of whimsical crochet creatures! The Hexapod Alien Amigurumi Pattern is a delightful and imaginative creation for crochet enthusiasts of all skill levels. This pattern is your ticket to crafting an adorable extraterrestrial friend with six tentacle-like legs, big curious eyes, and a charmingly quirky personality.

With this pattern, you’ll embark on a journey of creativity, bringing to life a unique hexapod alien that’s sure to captivate hearts and spark joy. Whether you’re a seasoned crocheter or just starting out, our detailed instructions and step-by-step guidance make crafting this amigurumi a breeze.

What’s Included:

Comprehensive written instructions: Easy-to-follow guidelines take you through each stitch of this simple, no-sew crochet pattern, from start to finish. Directions are the same for all types of yarn; dimensions are given for worsted weight, blanket weight, and super bulky yarn.

Helpful tips and tricks: Learn handy techniques and tricks to enhance your crochet skills and perfect your amigurumi with the included links to YouTube tutorials.
Put your own spin on the design by choosing your favorite colors and adding personal touches.

We’re confident you’ll love crafting your hexapod alien as much as we loved designing it. If you have any questions or concerns, our friendly support team is here to help.

Join the crochet community and embark on a delightful crafting adventure with our Hexapod Alien Amigurumi Pattern. Let your imagination soar as you create a one-of-a-kind friend from another world!

Blanket yarn:
140 yards
Size L (8.0 mm) crochet hook
Yarn needle
Fiberfill
20-mm safety eyes
Foam interface
Foam curlers

Alien measures 14” tall by 12” wide (including legs) with blanket yarn.

Materials:

Variegated blanket yarn

140 yards

Size L (8.0 mm) crochet hook

Yarn needle

Fiberfill

20-mm safety eyes

Foam interface

Foam curlers

PDF includes all 3 sizes: 14″ tall by 12″ wide with blanket yarn, 15” tall by 13” wide with 7 weight yarn, 7” tall by 7” wide with worsted weight yarn.

Directions are written in English using U.S. crochet terms.


STITCHES:

Invisible decrease: https://youtube.com/shorts/0NC5nXyDvwI?feature=share

Ultimate finish:  https://youtu.be/jVpTr8mId3I

Directions:

BODY:

Rnd 1: Ch 2 (or MR), 7 sc in 2nd ch from hook (7 sc). Do not join. Work in continuous rnds throughout unless otherwise specified.

Rnd 2: 2 sc in each st (14 sc).

Rnd 3: *Sc in next st, 2 sc in next st,* repeat around (21 sc).

Rnd 4: *Sc in next 2 sts, 2 sc in next st,* repeat around (28 sc).

Rnd 5: *Sc in next 3 sts, 2 sc in next st,* repeat around (35 sc).

Rnd 6: *Sc in next 4 sts, 2 sc in next st,* repeat around (42 sc). Put piece on foam interface and mark edges. Cut foam to fit piece and set aside.

Rnd 7: Working in BLO, sc in each st.

Rnds 8-11: Working in both lps, sc in each st.

Rnd 12: *Inv dec, sc in next 5 sts,* repeat around (36 sc).

Rnds 13-14: Sc in each st.

Rnd 15: *Inv dec, sc in next 4 sts,* repeat around (30 sc).

Rnds 16-17: Sc in each st.

Rnd 18: *Inv dec, sc in next 3 sts,* repeat around (24 sc).

Rnds 19-23: Sc in each st.

Rnd 24: 2 sc in each st (48 sc).

Rnd 25: *Sc in next 5 sts, 2 sc in next st,* repeat around (56 sc).

Rnds 26-30: Sc in each st.

Insert foam interface into bottom and stuff body. Insert foam curlers into neck for added support.

Rnd 31: Sc in next 28 sts, ch 2, sk next 28 sts.

Rnd 32: Sc in next 28 sts, sc in each of 2 chs (30 sc).

Rnd 33: *Inv dec, sc in next 3 sts,* repeat around (24 sc).

Rnd 34: *Inv dec, sc in next 2 sts,* repeat around (18 sc).

Insert eye into center of Rnd 32. Stuff this side of head.

Rnd 35: *Inv dec, sc in next st,* repeat around (12 sc). Join with sl st. Close with ult fin.

Go back to unworked sts of Rnd 31. Sc in each sc and each ch (30 sc).

Repeat Rnds 33-35 for this side of head.

LEGS:

Row 1: Attach yarn in any unused lp of Rnd 7 with head facing you. Sc in this st and in next 6 sts (7 sc).

Row 2: Ch 1 turn, dec, sc in 5 sts (6 sc).

Row 3: Ch 1 turn, dec, sc in 4 sts (5 sc).

Row 4: Ch 1 turn, dec, sc in 3 sts (4 sc).

Row 5: Ch 1 turn, dec, sc in 2 sts (3 sc).

Row 6: Ch 1 turn, dec, sc in next st (2 sc).

Row 7: Ch 1, turn, sc last 2 sts tog. Fasten off.

Go back to Rnd 7 of body and repeat leg 5 times.

NOSE:

Rnd 1: Attach yarn in center st of Rnd 29. Work 5 sc in a circle around this st (5 sc). Do not join.

Rnds 2-4: Sc in each st. Do not join.

Rnd 5: Sc in each st. Join with sl st.

Rnd 6: Ch 5, sl st in each ch, sl st in next 2 sc on nose, ch 5, sl st in each ch, sl st in next sc on nose. Fasten off.


Ad-free PDF with all 3 sizes is available at https://myfingersfly.etsy.com/listing/1704026477/hexapod-alien-crochet-pattern-alien

More space-themed patterns are available at Outer Space space coloring page

Stitching the Stars: Space-Inspired Crochet Patterns eBook

Astronaut in Training Coloring Page


Affiliate Links

This post contains affiliate links. This means I may earn a commission should you chose to sign up for a program or make a purchase using my link. It’s okay – I love all of these companies anyways, and you will too!


Posted on 1 Comment

Ladybug Amigurumi using Bernat Blanket Yarn

National Gift of the Ladybug Day

Nature has a way of bestowing upon us small miracles that often go unnoticed in the hustle and bustle of our daily lives. One such enchanting creature that has captured the hearts of many is the ladybug. To honor and appreciate these tiny wonders, we celebrate National Gift of the Ladybug Day each year. This day is not only a reminder of the beauty found in nature but also a call to reflect on the importance of biodiversity and the interconnectedness of all living beings.

Ladybugs, also known as ladybirds or lady beetles, are not only delightful to look at with their vibrant colors and distinct spots, but they also play a crucial role in maintaining ecological balance. These small insects are voracious predators of harmful pests, making them valuable allies in agriculture. The ladybug’s diet consists mainly of aphids, mites, and other destructive insects, helping to protect crops and gardens without the need for harmful pesticides.

Ladybugs have long been regarded as symbols of good luck and protection in various cultures around the world. Their presence is believed to bring good fortune, and many people associate them with positive omens. In some cultures, it is even customary to make a wish when a ladybug lands on you. National Gift of the Ladybug Day serves as an opportunity to explore and celebrate these cultural connections, emphasizing the harmonious relationship between humans and nature.

While ladybugs are celebrated for their positive symbolism and ecological contributions, it’s essential to acknowledge the challenges they face in the modern world. Loss of habitat, pesticide use, and climate change are threatening the populations of these beneficial insects. National Gift of the Ladybug Day encourages individuals and communities to become aware of these issues and take steps to protect and preserve ladybug habitats.

National Gift of the Ladybug Day serves as a wonderful opportunity to connect with nature, appreciate the beauty of these tiny creatures, and raise awareness about the importance of biodiversity. By celebrating the ladybug, we are not only celebrating a symbol of good luck but also acknowledging the intricate web of life that sustains us all. Let us take this day to reflect on our role in preserving the delicate balance of our environment and ensuring a harmonious coexistence with the natural world.

My niece Layla is known as Layleebug to her other aunt, so I made her this cute ladybug amigurumi for Christmas. I just love working with Bernat blanket yarn, because it makes amigurumi super squishy!

Ladybug Amigurumi

Materials:

Bernat Blanket yarn:

140 yards red

30 yards black

Size M (9.0 mm) crochet hook

Yarn needle

Black safety eyes

White felt

Fiberfill

Pipe cleaner

Finished ladybug measures 33” diameter, 10” tall, 11” wide, 13” long.

STITCHES:

Invisible decrease: https://youtube.com/shorts/0NC5nXyDvwI?feature=share

Ultimate finish:  https://youtu.be/jVpTr8mId3I

 Directions:

Rnd 1: With black yarn, ch 2 (or magic ring), work 10 sc into 2nd ch from hook. Do not join. Work in continuous rnds throughout unless otherwise specified.

Rnd 2: 2 sc in each st (20 sc).

Rnd 3: *Sc in next 3 sts, 2 sc in next st,* repeat around (25 sc).

Rnd 4: *Sc in next 4 sts, 2 sc in next st,* repeat around (30 sc).

Rnd 5: *Sc in next 5 sts, 2 sc in next st,* repeat around (35 sc).

Rnd 6: *Sc in next 6 sts, 2 sc in next st,* repeat around (40 sc). Join with sl st. Fasten off black.

Rnd 7: Join red yarn. *Sc in next 3 sts, 2 sc in next st,* repeat around (50 sc).

Rnd 8: *Sc in next 4 sts, 2 sc in next st,* repeat around (60 sc).

Rnd 9: (top) *Sc in next 2 sts, 2 sc in next st,* repeat 9 times, sc in next 30 sts (70 sc).

Rnds 10-22: Sc in each st.

Rnd 23: *Inv dec, sc in next 12 sts,* repeat around (65 sc).

Rnd 24: *Inv dec, sc in next 11 sts,* repeat around (60 sc).

Rnd 25: *Inv dec, sc in next 10 sts,* repeat around (55 sc).

Rnd 26: *Inv dec, sc in next 9 sts,* repeat around (50 sc).

Rnd 27: *Inv dec, sc in next 8 sts,* repeat around (45 sc).

Rnd 28: *Inv dec, sc in next 7 sts,* repeat around (40 sc).

Cut two 1” circles of white peel & stick felt. Insert safety eyes into center. Attach felt circles to top front of ladybug at approximately Rnds 3-4. Stuff body.

Rnd 29: *Inv dec, sc in next 6 sts,* repeat around (35 sc).

Rnd 30: *Inv dec, sc in next 5 sts,* repeat around (30 sc).

Rnd 31: *Inv dec, sc in next 4 sts,* repeat around (25 sc).

Rnd 32: *Inv dec, sc in next 3 sts,* repeat around (20 sc).

Rnd 33: *Inv dec, sc in next 2 sts,* repeat around (15 sc).

Close with Ultimate Finish.

Legs: (Make 4)

Attach black yarn at 4 corners of bottom of ladybug. Ch 1, sc in 2nd ch from hook and next 4 ch. Sl st in same sp as joining. Fasten off.

Mouth:

Use red yarn and straight st to embroider mouth at bottom of Rnd 3 of head.

Insert pipe cleaner through both sides of Rnd 6, leaving it extending upward on both sides. If making for a small child, do not use pipe cleaner.

To purchase the ad-free PDF: Ladybug Crochet Pattern with Bernat Blanket Yarn

ladybug crochet patterns


Free Ladybug Crochet Patterns


ICYMI (In Case You Missed It)

2023 Year in Review
Free Hat Crochet Patterns
Otto Correct Amigurumi

Affiliate Links

This post contains affiliate links. This means I may earn a commission should you chose to sign up for a program or make a purchase using my link. It’s okay – I love all of these companies anyways, and you will too!

Amazon affiliate – https://amzn.to/42wmIqw


Money Saving Offers


Check out this free app that gets you cash back on gas and other errands! Click this link or use promo code 46ZCG to get an extra 15¢/gal bonus the first time you make a purchase. https://upside.app.link/46ZCG

Get $20 off your first Uber Eats order of $25 or more at http://Hungry? Get $20 off your first Uber Eats order of $25 or more. Terms apply. Use my code at checkout: eats-lisaf21461ue https://ubereats.com/feed?promoCode=eats-lisaf21461ue

Hey! Thought you’d like to try Ibotta, a cash back rewards app that I use to make real money every time I shop for groceries, online purchases, and more! Just use my referral code “eugysjd” at registration. Sign up at → https://ibotta.onelink.me/iUfE/8cc13c64?friend_code=eugysjd

Join Rakuten and get $30 cash back. Plus earn money on online purchases.

https://www.rakuten.com/r/LGT111?eeid=28187


Posted on 5 Comments

Turkey Gift Bag Crochet Pattern

Gobble Up the Joy: The Perfect Hostess Gift or Place Setting for Thanksgiving or Christmas

‘Tis the season of giving, and what better way to express your gratitude and spread holiday cheer than with a festive Turkey Gift Bag! Whether you’re celebrating Thanksgiving or Christmas, our Turkey Gift Bag Crochet Pattern is the perfect choice for your gift-giving moments.

Crochet a few different colors and fill with candy for unique place settings for your Thanksgiving table. If you’re a guest at Thanksgiving dinner this year, crochet a turkey and fill with tiny soaps for an adorable hostess gift.

These turkeys are quick and easy to make – I actually timed myself last night and got one done in only an hour!

Materials:

Worsted weight yarn:

30 yards MC

4 yards red

2 yards yellow

Size H (5.0 mm) crochet hook

Yarn needle

Googly eyes

Finished bag measures approximately 3” diameter.

Gauge: 9 rows = 2”, 4 sc = 1”

STITCHES:

Invisible decrease: https://youtube.com/shorts/0NC5nXyDvwI?feature=share

Directions:

Rnd 1: With MC yarn, ch 2 (or magic ring), sc 6 in second ch from hook. Do not join. Work in continuous rnds throughout unless otherwise specified.

Rnd 2: 2 sc in each sc (12 sc).

Rnd 3: *1 sc in next sc, 2 sc in next sc,* repeat around (18 sc).

Rnd 4: *1 sc in next 2 sc, 2 sc in next sc,* repeat around (24 sc).

Rnd 5: *1 sc in next 3 sc, 2 sc in next sc,* repeat around (30 sc).

Rnd 6: *1 sc in next 4 sc, 2 sc in next sc,* repeat around (36 sc).

Rnd 7: *1 sc in next 5 sc, 2 sc in next sc,* repeat around (42 sc).

Rnds 8-13: Sc in each st.

Rnd 14: *Dec over next 2 sc, sc in next 5 sc,* repeat around (36 sc).

Rnd 15: *Dec, sc in each of next 4 sc,* repeat around (30 sc).

Rnd 16: *Dec, sc in each of next 3 sc,* repeat around (24 sc).

Rnd 17: Sc in each st. Join with sl st.

Rnd 18: *Sc in next st, sk next st, ch 1,* repeat around. Join with sl st. Fasten off MC.

Drawstring:

Using red yarn, make a chain 12″ long and knot both ends. Pull through loops made in Rnd 18 of turkey.

Beak:

Rnd 1: With yellow yarn, ch 2 (or magic ring), 3 sc in 2nd ch from hook. Do not join. Work in continuous rnds throughout.

Rnd 2: 2 sc in first st, sc in next 2 sts (4 sc).

Rnd 3: Sc in each st. Join with sl st.

Fasten off yarn leaving 9” length for sewing. Sew beak to Rnds 10-12 of head.

Waddle:

With red yarn, ch 8, sl st in 2nd ch and each remaining ch. Fasten off leaving 6” length for sewing. Wrap across top of beak and sew in place with half of the waddle hanging down on one side.

Glue (or sew) eyes in place above beak.

Weave in all ends.

PDF download is available at: Turkey Gift Bag Crochet Pattern

These gift/goody bags work up quickly in worsted weight yarn, and because they only use a few yards of each color, they are great stash busters. Most are easy to personalize by using different colors and adding embellishments. Choose from Elf, Candy Cane, Reindeer, Snowman, Poinsettia, Ornament, Bell, Nutcracker, Christmas Tree, Santa’s Hat, Snow Globe, Polar Bear, Penguin, Pinata, or Gingerbread House – 15 different bags.
This great ebook is 50% off through 11/11/2025. No coupon required.
Bring the charm of the countryside to your crochet hook with our Barnyard Birds Crochet Pattern eBook! This digital collection features a delightful flock of feathered friends, including chicken, duck, goose, turkey, and baby chick – each brimming with rustic personality and handcrafted charm. Included in the ebook is the very popular Chicken Stocking crochet pattern.
This great ebook is 50% off through 11/11/2025. No coupon required.
turkey crochet
Scared Turkey

Jingle Bell Pattern Hop

DAY 10!
Mrs. Claus Tam from Marsha YarnDoodles is more than a holiday hat—it’s a stylish, beautiful accessory that adds flair to any outfit! Don’t let the name fool you—while it makes a wonderfully festive accessory in classic red and white, this cozy tam looks stunning in any color combination.

Use coupon code 2025JINGLE

Christmas Tree Ornament with Puff Stitch from Easy on the Tongue
These two crochet Christmas tree free patterns are simple, fun, and absolutely adorable! Using just a few puff stitches and some chunky yarn, you can whip up trees for your mantel, gift wrapping, or even your Christmas tree itself.
Get all the details at


Double Thick Potholder from Pam’s Cozy Corner

Gifts Galore 2025 24 free Crochet Christmas Gift Patterns – Carroway Crochet

In Case You Missed It


Get a free gift tag for wrapping your Angel Rattle.

Christmas Angel Gift Tag


Airplane Ornament
Northern Lights Slippers
Horny Toad Keychain


Links

This page contains affiliate links. If you choose to purchase after clicking a link, I may receive a commission at no extra cost to you.

Imagine having hundreds of crochet patterns available at your fingertips…Sweaters. Hats. Afghans. Mittens. Scarves. You name, you can make it!

Whether you’re an experienced crocheter or have just purchased your first hook, you’ll never run out of inspiration, ideas, or patterns when you become a Charter Member of the I Like Crochet Gold Club! You’ll be reaching for your yarn as soon as you see the amazing array of patterns and inspiration.

And as our gift to you, when you join I Like Crochet as a Charter Member, you will receive FREE access to our entire library of past issues, including the past 10 years of festive holiday issues! Enjoy 10 years of Christmas crochet patterns. That’s 125+ holiday patterns!

https://www.ilikecrochet.com/subscribe-2col/gctmb559ncmc/?mqsc=AFMYFINGERSFLY


Posted on 1 Comment

Join the Crochet-Along, Pink Camo Sweater for Girls


This CAL will run exclusively in the MFF Crochet Family Group in August.

August 9 – Back

August 11 – Right Front

August 14 – Left Front

August 16 – Sleeves

August 18 – Assembly & Zipper

August 21 – Pockets & Fringe

Materials needed:

Red Heart Super Saver worsted weight yarn:

14 [15, 16] oz. Pink Camo

2 oz. Petal Pink

1 oz. Pretty ‘n Pink

Size H (5.0 mm) crochet hook (or size needed to obtain gauge) Yarn needle

13” [14”, 15”] pink sweater zipper


Click here to join the group:

https://www.facebook.com/groups/875538646117910


water color month

There are still a few days left in the Water Color Bundle Sale (through July 31). You will get 24 designs from some of the best indie designers, plus a page of 8 different gift tags for your handmade items. Retail value is over $90 if purchased individually; this month only you can get all 24 designs with an 85% savings. Wow!!


handmade gift tags


Do you ever make a gift, then put it away and forget about it? I like to wrap my items when they’re finished and put them all in the same closet so I know where they are when I need them.

As a special bonus, the Water Color Bundle also includes a sheet of 8 different handmade gift tags.


https://myfingersfly.thrivecart.com/water-color-crochet-pattern-bundle/


https://myfingersfly.thrivecart.com/water-color-crochet-pattern-bundle/


(ICYMI) In Case You Missed It


Toddler Pinstripe Sweater Crochet Pattern


elephant gift tag


Elephant Birthday Gift Tag


 Lamb Birthday Gift Tag


Affiliate Links

This page contains affiliate links. If you choose to purchase after clicking a link, I may receive a commission at no extra cost to you.

Best Selling Knitting & Crochet Supplies on Amazon


Get a $10 credit at Stickermule.

etsy logo

Thinking of opening an Etsy shop? Use this link to get 40 free listings. https://etsy.me/3F3kxwc


Money Saving Offers


Check out this free app that gets you cash back on gas and other errands! Click this link or use promo code 46ZCG to get an extra 15¢/gal bonus the first time you make a purchase. https://upside.app.link/46ZCG

Get $20 off your first Uber Eats order of $25 or more at http://Hungry? Get $20 off your first Uber Eats order of $25 or more. Terms apply. Use my code at checkout: eats-lisaf21461ue https://ubereats.com/feed?promoCode=eats-lisaf21461ue

Hey! Thought you’d like to try Ibotta, a cash back rewards app that I use to make real money every time I shop for groceries, online purchases, and more! Just use my referral code “eugysjd” at registration. Sign up at → https://ibotta.onelink.me/iUfE/8cc13c64?friend_code=eugysjd

Join Rakuten and get $30 cash back. Plus earn money on online purchases.

https://www.rakuten.com/r/LGT111?eeid=28187

Posted on 1 Comment

Teddy Bear Crochet Pattern

teddy bear

Hug Me, I’m Handmade: Crochet Your Own Teddy Bear! 🧸💕

There’s something timeless and heartwarming about a teddy bear. Whether it’s for a baby shower, a birthday gift, or just a cozy companion, a handmade teddy bear is a gift that says “you’re loved” in every stitch.

If you’re looking for your next adorable project using blanket yarn, this Teddy Bear Crochet Pattern might just steal your heart.

Why Crochet a Teddy Bear?

Teddy bears aren’t just for kids—they’re for anyone who could use a little extra comfort. Crocheting one lets you:

🧶 Use Up Yarn Stash – A perfect project for leftover yarn in browns, creams, pastels, or even bright, whimsical colors.

💖 Make It Personal – Add a bowtie, a little heart patch, or embroider the recipient’s initials. Each bear becomes one-of-a-kind.

🎁 Create a Heirloom – Handmade gifts are cherished for years. Your teddy bear could become someone’s childhood favorite!


What to Expect from the Pattern

Our teddy bear pattern is beginner-friendly with clear instructions and helpful photos, but it also includes a few options to customize your creation:

✔️ Step-by-step instructions (US terms)
✔️ Use safety eyes for older children, crochet eyes for children under 3 years of age
✔️ Approximately finished size: 26 inches tall using super bulky yarn

This pattern is perfect for confident beginners and experienced crocheters alike. If you’ve mastered the magic ring and simple shaping, you’re ready to get started!


Make It a Memory

Whether you keep it, gift it, or sell it at your next craft fair, this teddy bear will bring smiles wherever it goes.

So grab your hook, pick your super bulky or jumbo weight yarn, and start stitching the bear hugs! 🧸✨


Blanket Yarn Teddy Bear

Materials:

2 skeins Bernat Blanket Stripes

Few yards black bulky

Size M (9.00 mm) crochet hook

Yarn needle

Fiberfill

Safety eyes and safety nose (optional)


Finished bear measures approximately 26” tall.

DIRECTIONS:

HEAD:

Rnd 1: Ch 2 (or magic circle), 10 sc in 2nd ch from hook. Do not join. Work in continuous rnds throughout.

Rnd 2: 2 sc in each st (20 sc).

Rnd 3: *Sc in next st, 2 sc in next st,* repeat around (30 sc).

Rnd 4: *Sc in next 2 sts, 2 sc in next st,* repeat around (40 sc).

Rnd 5: Sc in each st.

Rnd 6: *Sc in next 3 sts, 2 sc in next st,* repeat around (50 sc).

Rnds 7-12: Sc in each st.

Rnd 13: *Dec over next 2 sts, sc in next 8 sts,* repeat around (45 sc).

Rnd 14: *Dec over next 2 sts, sc in next 7 sts,* repeat around (40 sc).

Rnd 15: *Dec over next 2 sts, sc in next 6 sts,* repeat around (35 sc).

Rnd 16: *Dec over next 2 sts, sc in next 5 sts,* repeat around (30 sc).

Rnd 17: *Dec over next 2 sts, sc in next 4 sts,* repeat around (25 sc). Stuff head.

Rnd 18: *Dec over next 2 sts, sc in next 3 sts,* repeat around (20 sc).

Rnd 19: *Dec over next 2 sts, sc in next 2 sts,* repeat around (15 sc).

Rnd 20: *Dec over next 2 sts, sc in next st,* repeat around (10 sc). Join with sl st. Fasten off leaving 12” length for sewing. Finish stuffing.

EARS: (Make 2)

Rnd 1: Ch 2 (or magic circle), 10 sc in 2nd ch from hook. Do not join. Work in continuous rnds throughout.

Rnd 2: 2 sc in each st (20 sc).

Fold in half and work through both sides of ear, sc in each st (10 sc).

Sew ears to top of head using photo for placement.

SNOUT:

Rnd 1: Ch 5, sc in 2nd ch from hook and in next 2 ch, 3 sc in next ch. Working on opposite side of starting ch, sc in next 2 ch, 2 sc in last ch (10 sc). Do not join.

Rnd 2: 2 sc in each st (20 sc).

Rnd 3: *2 sc in next st, sc in next st,* repeat around (30 sc).

Rnds 4-5: Sc in each st. Join with sl st and fasten off at end of Rnd 5 leaving 12” length for sewing. Use black yarn to embroider a triangle for the nose, or use black plastic safety nose. Stuff snout and sew to face using photo for placement.

EYES: (Make 2)

With black bulky yarn (or 2 strands of black worsted held together), ch 2 (or magic circle), 6 sc in 2nd ch from hook. Join with sl st. Fasten off leaving 6” length for sewing. Sew eyes to face above the snout.

OPTIONAL:

Use plastic safety eyes for older children.

BODY:

Rnd 1: Ch 2 (or magic circle), 10 sc in 2nd ch from hook. Do not join. Work in continuous rnds throughout.

Rnd 2: 2 sc in each st (20 sc).

Rnd 3: *Sc in next st, 2 sc in next st,* repeat around (30 sc).

Rnd 4: *Sc in next 2 sts, 2 sc in next st,* repeat around (40 sc).

Rnd 5: Sc in each st.

Rnd 6: *Sc in next 3 sts, 2 sc in next st,* repeat around (50 sc).

Rnds 7: Sc in each st.

Rnd 8: *Sc in next 4 sts, 2 sc in next st,* repeat around (60 sc).

Rnd 9: Sc in each st.

Rnd 10: *Sc in next 5 sts, 2 sc in next st,* repeat around (70 sc).

Rnds 11-16: Sc in each st.

Rnd 17: *Dec over next 2 sts, sc in next 12 sts,* repeat around (65 sc).

Rnds 18-19: Sc in each st.

Rnd 20: *Dec over next 2 sts, sc in next 11 sts,* repeat around (60 sc).

Rnds 21-22: Sc in each st.

Rnd 23: *Dec over next 2 sts, sc in next 10 sts,* repeat around (55 sc).

Rnds 24-25: Sc in each st.

Rnd 26: *Dec over next 2 sts, sc in next 9 sts,* repeat around (50 sc).

Rnd 27: Sc in each st.

Rnd 28: *Dec over next 2 sts, sc in next 8 sts,* repeat around (45 sc).

Rnd 29: Sc in each st.

Rnd 30: *Dec over next 2 sts, sc in next 7 sts,* repeat around (40 sc).

Rnd 31: Sc in each st.

Rnd 32: *Dec over next 2 sts, sc in next 6 sts,* repeat around (35 sc).

Rnd 33: Sc in each st. Stuff body.

Rnd 34: *Dec over next 2 sts, sc in next 5 sts,* repeat around (30 sc).

Rnd 35: *Dec over next 2 sts, sc in next 4 sts,* repeat around (25 sc).

Rnd 36: *Dec over next 2 sts, sc in next 3 sts,* repeat around (20 sc). Join with sl st. Fasten off leaving 12” length for sewing. Finish stuffing. Sew head to body.

LEGS: (Make 2)

Rnd 1: Ch 2 (or magic circle), 10 sc in 2nd ch from hook. Do not join. Work in continuous rnds throughout.

Rnd 2: 2 sc in each st (20 sc).

Rnd 3: *Sc in next st, 2 sc in next st,* repeat around (30 sc).

Rnd 4: *Sc in next 5 sts, 2 sc in next st,* repeat around (35 sc).

Rnds 5-6: Sc in each st.

Rnd 7: Dec 5 times, sc around (30 sc).

Rnds 8-15: Sc in each st. At end of Rnd 16, join with sl st. Fasten off leaving 12” length for sewing. Sew legs to bottom of body.

ARMS:

Rnd 1: Ch 2 (or magic circle), 10 sc in 2nd ch from hook. Do not join. Work in continuous rnds throughout.

Rnd 2: 2 sc in each st (20 sc).

Rnds 3-9: Sc in each st. At end of Rnd 9, join with sl st. Fasten off leaving 12” length for sewing. Sew arms to sides of body.


PDF available at:

https://ravel.me/blanket-yarn-teddy-bear


(ICYMI) In Case You Missed It


Toddler Pinstripe Sweater Crochet Pattern


elephant gift tag


Elephant Birthday Gift Tag


 Lamb Birthday Gift Tag


Affiliate Links

This page contains affiliate links. If you choose to purchase after clicking a link, I may receive a commission at no extra cost to you.

Best Selling Knitting & Crochet Supplies on Amazon