
Hug Me, I’m Handmade: Crochet Your Own Teddy Bear! 🧸💕
There’s something timeless and heartwarming about a teddy bear. Whether it’s for a baby shower, a birthday gift, or just a cozy companion, a handmade teddy bear is a gift that says “you’re loved” in every stitch.
If you’re looking for your next adorable project using blanket yarn, this Teddy Bear Crochet Pattern might just steal your heart.
Why Crochet a Teddy Bear?
Teddy bears aren’t just for kids—they’re for anyone who could use a little extra comfort. Crocheting one lets you:
🧶 Use Up Yarn Stash – A perfect project for leftover yarn in browns, creams, pastels, or even bright, whimsical colors.
💖 Make It Personal – Add a bowtie, a little heart patch, or embroider the recipient’s initials. Each bear becomes one-of-a-kind.
🎁 Create a Heirloom – Handmade gifts are cherished for years. Your teddy bear could become someone’s childhood favorite!
What to Expect from the Pattern
Our teddy bear pattern is beginner-friendly with clear instructions and helpful photos, but it also includes a few options to customize your creation:
✔️ Step-by-step instructions (US terms)
✔️ Use safety eyes for older children, crochet eyes for children under 3 years of age
✔️ Approximately finished size: 26 inches tall using super bulky yarn
This pattern is perfect for confident beginners and experienced crocheters alike. If you’ve mastered the magic ring and simple shaping, you’re ready to get started!
Make It a Memory
Whether you keep it, gift it, or sell it at your next craft fair, this teddy bear will bring smiles wherever it goes.
So grab your hook, pick your super bulky or jumbo weight yarn, and start stitching the bear hugs! 🧸✨
Blanket Yarn Teddy Bear
Materials:
2 skeins Bernat Blanket Stripes
Few yards black bulky
Size M (9.00 mm) crochet hook
Yarn needle
Fiberfill
Safety eyes and safety nose (optional)
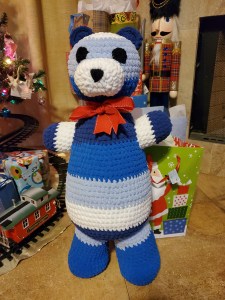
Finished bear measures approximately 26” tall.
DIRECTIONS:
HEAD:
Rnd 1: Ch 2 (or magic circle), 10 sc in 2nd ch from hook. Do not join. Work in continuous rnds throughout.
Rnd 2: 2 sc in each st (20 sc).
Rnd 3: *Sc in next st, 2 sc in next st,* repeat around (30 sc).
Rnd 4: *Sc in next 2 sts, 2 sc in next st,* repeat around (40 sc).
Rnd 5: Sc in each st.
Rnd 6: *Sc in next 3 sts, 2 sc in next st,* repeat around (50 sc).
Rnds 7-12: Sc in each st.
Rnd 13: *Dec over next 2 sts, sc in next 8 sts,* repeat around (45 sc).
Rnd 14: *Dec over next 2 sts, sc in next 7 sts,* repeat around (40 sc).
Rnd 15: *Dec over next 2 sts, sc in next 6 sts,* repeat around (35 sc).
Rnd 16: *Dec over next 2 sts, sc in next 5 sts,* repeat around (30 sc).
Rnd 17: *Dec over next 2 sts, sc in next 4 sts,* repeat around (25 sc). Stuff head.
Rnd 18: *Dec over next 2 sts, sc in next 3 sts,* repeat around (20 sc).
Rnd 19: *Dec over next 2 sts, sc in next 2 sts,* repeat around (15 sc).
Rnd 20: *Dec over next 2 sts, sc in next st,* repeat around (10 sc). Join with sl st. Fasten off leaving 12” length for sewing. Finish stuffing.
EARS: (Make 2)
Rnd 1: Ch 2 (or magic circle), 10 sc in 2nd ch from hook. Do not join. Work in continuous rnds throughout.
Rnd 2: 2 sc in each st (20 sc).
Fold in half and work through both sides of ear, sc in each st (10 sc).
Sew ears to top of head using photo for placement.
SNOUT:
Rnd 1: Ch 5, sc in 2nd ch from hook and in next 2 ch, 3 sc in next ch. Working on opposite side of starting ch, sc in next 2 ch, 2 sc in last ch (10 sc). Do not join.
Rnd 2: 2 sc in each st (20 sc).
Rnd 3: *2 sc in next st, sc in next st,* repeat around (30 sc).
Rnds 4-5: Sc in each st. Join with sl st and fasten off at end of Rnd 5 leaving 12” length for sewing. Use black yarn to embroider a triangle for the nose, or use black plastic safety nose. Stuff snout and sew to face using photo for placement.
EYES: (Make 2)
With black bulky yarn (or 2 strands of black worsted held together), ch 2 (or magic circle), 6 sc in 2nd ch from hook. Join with sl st. Fasten off leaving 6” length for sewing. Sew eyes to face above the snout.
OPTIONAL:
Use plastic safety eyes for older children.
BODY:
Rnd 1: Ch 2 (or magic circle), 10 sc in 2nd ch from hook. Do not join. Work in continuous rnds throughout.
Rnd 2: 2 sc in each st (20 sc).
Rnd 3: *Sc in next st, 2 sc in next st,* repeat around (30 sc).
Rnd 4: *Sc in next 2 sts, 2 sc in next st,* repeat around (40 sc).
Rnd 5: Sc in each st.
Rnd 6: *Sc in next 3 sts, 2 sc in next st,* repeat around (50 sc).
Rnds 7: Sc in each st.
Rnd 8: *Sc in next 4 sts, 2 sc in next st,* repeat around (60 sc).
Rnd 9: Sc in each st.
Rnd 10: *Sc in next 5 sts, 2 sc in next st,* repeat around (70 sc).
Rnds 11-16: Sc in each st.
Rnd 17: *Dec over next 2 sts, sc in next 12 sts,* repeat around (65 sc).
Rnds 18-19: Sc in each st.
Rnd 20: *Dec over next 2 sts, sc in next 11 sts,* repeat around (60 sc).
Rnds 21-22: Sc in each st.
Rnd 23: *Dec over next 2 sts, sc in next 10 sts,* repeat around (55 sc).
Rnds 24-25: Sc in each st.
Rnd 26: *Dec over next 2 sts, sc in next 9 sts,* repeat around (50 sc).
Rnd 27: Sc in each st.
Rnd 28: *Dec over next 2 sts, sc in next 8 sts,* repeat around (45 sc).
Rnd 29: Sc in each st.
Rnd 30: *Dec over next 2 sts, sc in next 7 sts,* repeat around (40 sc).
Rnd 31: Sc in each st.
Rnd 32: *Dec over next 2 sts, sc in next 6 sts,* repeat around (35 sc).
Rnd 33: Sc in each st. Stuff body.
Rnd 34: *Dec over next 2 sts, sc in next 5 sts,* repeat around (30 sc).
Rnd 35: *Dec over next 2 sts, sc in next 4 sts,* repeat around (25 sc).
Rnd 36: *Dec over next 2 sts, sc in next 3 sts,* repeat around (20 sc). Join with sl st. Fasten off leaving 12” length for sewing. Finish stuffing. Sew head to body.
LEGS: (Make 2)
Rnd 1: Ch 2 (or magic circle), 10 sc in 2nd ch from hook. Do not join. Work in continuous rnds throughout.
Rnd 2: 2 sc in each st (20 sc).
Rnd 3: *Sc in next st, 2 sc in next st,* repeat around (30 sc).
Rnd 4: *Sc in next 5 sts, 2 sc in next st,* repeat around (35 sc).
Rnds 5-6: Sc in each st.
Rnd 7: Dec 5 times, sc around (30 sc).
Rnds 8-15: Sc in each st. At end of Rnd 16, join with sl st. Fasten off leaving 12” length for sewing. Sew legs to bottom of body.
ARMS:
Rnd 1: Ch 2 (or magic circle), 10 sc in 2nd ch from hook. Do not join. Work in continuous rnds throughout.
Rnd 2: 2 sc in each st (20 sc).
Rnds 3-9: Sc in each st. At end of Rnd 9, join with sl st. Fasten off leaving 12” length for sewing. Sew arms to sides of body.
PDF available at:
https://ravel.me/blanket-yarn-teddy-bear
(ICYMI) In Case You Missed It

Toddler Pinstripe Sweater Crochet Pattern

Elephant Birthday Gift Tag

Lamb Birthday Gift Tag
Affiliate Links
This page contains affiliate links. If you choose to purchase after clicking a link, I may receive a commission at no extra cost to you.

Best Selling Knitting & Crochet Supplies on Amazon



 Teddy Bear


 Easter Advent Crochet Patterns


