Every year, National Daughter’s Day gives us the chance to pause and celebrate the joy, love, and laughter that daughters bring into our lives. Whether she’s a little one just learning about the world, a teenager discovering her dreams, or an adult building her own path, today is all about recognizing how special she truly is.
🌸 Why We Celebrate
Daughters hold a unique place in families. They are often our confidants, our giggling partners, and our daily reminders of hope and resilience. National Daughter’s Day is an opportunity to show gratitude, strengthen bonds, and let our daughters know just how deeply they’re loved.
Free Crochet Patterns to Celebrate National Daughter’s Day
Looking for thoughtful ways to make the day special? Here are a few ideas:
While National Daughter’s Day is a wonderful occasion, the truth is, daughters deserve to be celebrated every day. A kind word, a hug, or a simple “I’m proud of you” can mean the world.
So today—and every day—take a moment to let your daughter know just how loved she is. 💕Here are some free crochet patterns to spark your creativity.
Get ready to stitch up some spooky fun with Wickedly Cute Crochet! This digital eBook is packed with 12 Halloween-inspired amigurumi patterns that are more adorable than alarming. From playful pumpkins and charming ghosts to creepy-cute critters, each design is perfect for bringing handmade magic to your spooky season.
This ebook is on sale just in time for Halloween – only $9.99 for 12 spooky amigurumi patterns. (Expires 9/30/2025)
This post contains affiliate links. This means I may earn a commission should you chose to sign up for a program or make a purchase using my link. It’s okay – I love all of these companies anyways, and you will too!
The October issue of I Like Crochet is now available, and it includes one of my designs – Modern Bowtie Dress.
Subscribe to get a one-year membership to I Like Crochet for only $5
The 2025 Cancer Cozy Comforts Facebook Hop kicked off on February 1 with some amazing projects to crochet for cancer patients in need of a little bit of comfort. Today’s feature is my Kick Cancer Cuddler Doll. The Kane Doll is an always-free pattern on the blog, and you can get the PDF free today only.
The PDF of all 4 dolls (Kane, Koa, Kylie, and Kendra) along with their accessories (mask, chemo hat, wig, and crown) will be half price for the duration of the Cancer Cozy Comforts Hop.
Use code COMFORT to get 50% off through 2/28/2025.
The dolls are crocheted with cotton worsted weight yarn, as it makes a softer toy – better for sensitive skin.
KANE DOLL
Materials:
Cotton worsted weight yarn:
100 yards blue
115 yards red
35 yards tan
5 yards yellow
2 yards white
Size G (4.0 mm) crochet hook
Polyfil
10-mm safety eyes
Finished doll measures approximately 7” wide by 11.5” tall.
STITCHES:
dc4tog: yo, (insert hook, yo, pull through, yo, pull through 2 lps) 4 times, yo, pull through all lps.
DIRECTIONS:
FRONT:
Row 1: With red yarn, ch 33, sc in 2nd ch from hook and in each remaining ch (32 sc).
Rows 2-3: Ch 1, turn, sc in each st.
Row 4: Ch 1, turn, dec, sc in next 28 sts, dec (30 sc).
Row 5: Ch 1, turn, dec, sc in next 26 sts, dec (28 sc).
Row 6: Ch 1, turn, dec, sc in next 24 sts, dec (26 sc). Fasten off red.
Row 7: Turn, sk 3 sc, attach blue in 4th sc, ch 1, sc in next 20 sts (20 sc).
Rows 8-22: Ch 1, turn, sc in each st. Attach red yarn at end of Row 22, ch 3.
Row 23: Turn, sc in 2nd ch from hook, sc in next ch, blue sc in next 20 sts, 2 red fsc (24 sc). Attach blue to end of row, ch 2.
Row 24: Turn, blue sc in 2nd ch, red inc in next st, red sc in next st, blue sc in next 20 sts, red sc in next st, red inc in next st, blue fsc (28 sc).
Row 25: Ch 1, turn, blue inc in first st, red sc in next 3 sts, blue sc in next 20 sts, red sc in next 3 sts, blue inc in last st (30 sc).
Row 26: Ch 1, turn, blue inc in first st, blue sc in next st, red sc in next 3 sts, blue sc in next 20 sts, red sc in next 3 sts, blue sc in next st, blue inc in last st (32 sc).
Row 27: Ch 1, turn, blue sc in first 3 sts, red sc in next st, white sc in next 2 sts, red sc in next 20 sts, white sc in next 2 sts, red sc in next st, blue sc in next 3 sts (32 sc).
Row 28: Ch 1, turn, blue sc in first 4 sts, white sc in next 2 sts, red sc in next 20 sts, white sc in next 2 sts, blue sc in last 4 sts (32 sc). Fasten off red.
Rows 29-31: Ch 1, turn, blue sc in first 4 sts, white sc in next 2 sts, blue sc in next 20 sts, white sc in next 2 sts, blue sc in last 4 sts (32 sc).
Row 32: Ch 1, turn, blue sc in first 5 sts, white sc in next st, blue sc in next 20 sts, white sc in next st, blue sc in last 5 sts (32 sc). Fasten off white.
Rows 33-35: Ch 1, turn, blue sc in each st (32 sc). Continue in only blue through Row 40.
Row 36: Ch 1, turn, dec, sc in next 28 sts, dec (30 sc).
Row 37: Ch 1, turn, dec, sc in next 26 sts, dec (28 sc).
Row 38: Ch 1, turn, dec, sc in next 24 sts, dec (26 sc).
Row 39: Ch 1, turn, dec, sc in next 22 sts, dec (24 sc).
Row 40: Ch 1, turn, dec, sc in next 20 sts, dec (22 sc).
Row 41: Ch 1, turn, blue dec, blue sc in next 3 sts, red sc in next 12 sts, blue sc in next 3 sts, blue dec (20 sc). Fasten off blue and red.
Row 42: Turn, sk first 5 sc, attach tan in 6th st, ch 1, sc in same st, sc in next 9 sts (10 sc). Leave last 5 sts unworked. Work in tan only through Row 55.
Row 43: Ch 1, turn, inc, sc in next 8 sts, inc (12 sc).
Row 44: Ch 1, turn, inc, sc in next 10 sts, inc (14 sc).
Row 45: Ch 1, turn, inc, sc in next 12 sts, inc (16 sc).
Rows 46-48: Ch 1, turn, sc in each st (16 sc).
Row 49: (Right side) Ch 1, turn, sc in next 7 sts, dc4tog (nose), sc in next 8 sts.
Rows 50-51: Ch 1, turn, sc in each st (16 sc).
Row 52: Ch 1, turn, dec, sc in next 12 sts, dec (14 sc).
Row 53: Ch 1, turn, dec, sc in next 10 sts, dec (12 sc).
Row 54: Ch 1, turn, dec, sc in next 8 sts, dec (10 sc).
Row 55: Ch 1, turn, dec, sc in next 6 sts, dec (8 sc). Fasten off tan.
Insert eyes at Row 50, 4 sts apart. Use red yarn to embroider mouth in desired shape at Rows 45-46.
BACK:
Repeat Rows 1-48 of front.
Rows 49-51: Ch 1, turn, sc in each st (16 sc).
Row 52: Ch 1, turn, dec, sc in next 12 sts, dec (14 sc).
Row 53: Ch 1, turn, dec, sc in next 10 sts, dec (12 sc).
Row 54: Ch 1, turn, dec, sc in next 8 sts, dec (10 sc).
Row 55: Ch 1, turn, dec, sc in next 6 sts, dec (8 sc). Fasten off tan.
With right sides tog, pin front to back. Attach red yarn at bottom center. Sc through both thicknesses all the way around the dill with 2 sc at corners. Curves may also require 2 sc at some spots. Change colors as needed to match colors of doll. When you get to the head, sk Row 48, 5 dc in Row 49, sk Row 50 (ear). Continue around top of head. On opposite side, sk Row 51, 5 dc in Row 49, sk Row 48, continue in sc around the rest of the doll. Start stuffing at this point and continue to stuff as you close the coll.
With white yarn, make straight sts through both layers around edges of white section. Pull sts tight to create elbows.
With matching yarn, sew a line of straight sts from bottom to Row 16. Pull sts tight to separate legs.
Cape:
Row 1: With red yarn, ch 19, sc in 2nd ch from hook and each remaining ch (18 sc).
Rows 2-10: Ch 1, turn, inc first st, sc across, inc last st (36 sc at end of Row 10).
Rows 11-34: Ch 1, turn, sc in each st. Fasten off yarn at end of Row 34.
Blocking cape is recommended for it to drape nicely. Sew Row 1 of cape to back doll’s neck at Row 41.
Emblem:
Row 1: With yellow yarn, ch 2, 2 sc in 2nd ch from hook.
Row 2: Ch 1, turn, inc twice (4 sc).
Row 3: Ch 1, turn, inc, sc in next 2 sts, inc (6 sc).
Row 4: Ch 1, turn, inc, sc in next 4 sts, inc (8 sc).
Row 5: Ch 1, turn, inc, sc in next 6 sts, inc (10 sc).
Rows 6-8: ch 1, turn, sc in each st. Fasten off yellow.
Attach red yarn to bottom at Row 1 and sc around entire piece with 2 sc in each corner. Join with sl st. Fasten off red leaving 12” length for sewing.
With red yarn, ch 15, working in back lp, sc in 2nd ch and next 13 ch. Fasten off leaving 9” length for sewing. Shape into cancer ribbon and sew to center of emblem.
Sew emblem centered to front at Rows 29-38.
Hat: (30 yards yarn in desired color)
Rnd 1: With blue yarn, ch 2 (or magic ring), 6 sc in 2nd ch from hook. Do not join. Work in continuous rnds throughout hat.
Rnd 2: 2 sc in each st (12 sc).
Rnd 3: *Sc in next st, 2 sc in next st,* repeat around (18 sc).
Rnd 4: *Sc in next 2 sts, 2 sc in next st,* repeat around (24 sc).
Rnd 5: *Sc in next 3 sts, 2 sc in next st,* repeat around (30 sc).
Rnd 6: *Sc in next 4 sts, 2 sc in next st,* repeat around (36 sc).
Rnd 7: *Sc in next 5 sts, 2 sc in next st,* repeat around (42 sc).
Rnd 8: *Sc in next 6 sts, 2 sc in next st,* repeat around (48 sc). Join with sl st.
Rnds 9-11: Ch 1, *fphdc, bphdc,* repeat around. Join with sl st. Fasten off at end of Rnd 11.
Are you looking for the perfect bunny to make for Spring? This no-sew bunny pattern from Stitch by Fay ticks all the boxes – it’s quick, easy and cute!
This post contains affiliate links. This means I may earn a commission should you chose to sign up for a program or make a purchase using my link. It’s okay – I love all of these companies anyways, and you will too!
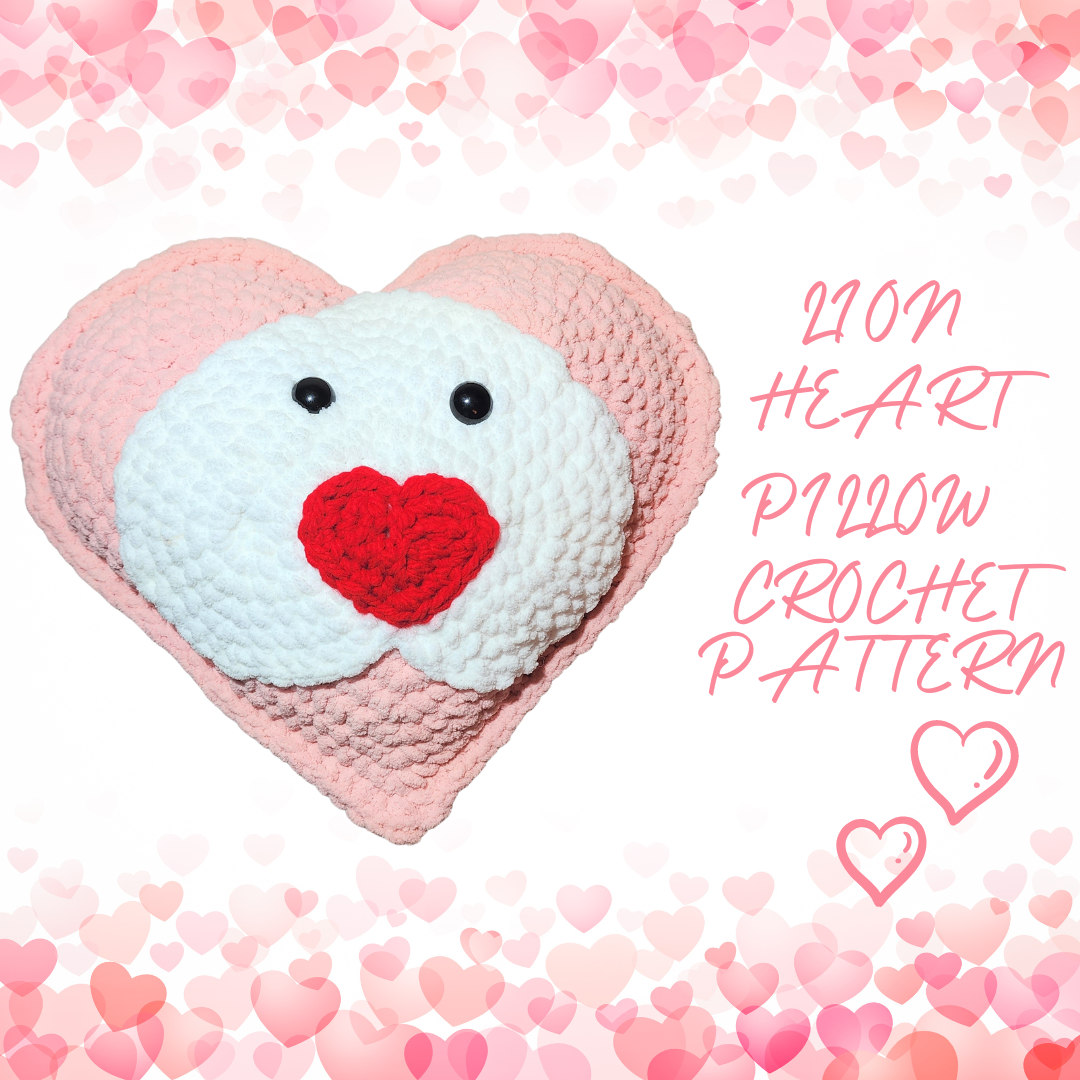
Now that the Christmas holidays are over, and the decorations have been put away for next year (we hope), it’s time to turn our attention to hearts and roses. Valentine’s Day is less than a month away, and I have so many ideas! It’s just so much fun to make cute pink and red animals, I can’t resist. The first Valentine’s Day design for the year is the Lion Heart Pillow, or as I like to call him, King Richard. Using Bernat blanket yarn makes the project go quickly, and he’s just so darned squishy!! Three different sizes of hearts are combined to make this sweet lion pillow for your special someone.
Pillow measures approximately 12” tall by 14” wide.
Gauge: 9 sc = 4”, 8 rows = 4”
Materials:
Bernat Blanket Yarn:
30 yards White
150 yards Pink
2 yards Red
Size M crochet hook
Yarn needle
Fiberfill
20-mm safety eyes
Directions:
MANE:
Rnd 1: With pink yarn, ch 22, 2 sc in 2nd ch from hook, sc in next 9 ch, 3 sc in next ch (2nd sc is center top), sc in next 9 ch, 3 sc in last ch. Working on opposite side of starting ch, sc in next 8 ch, sk 1 ch, sc in next ch (center bottom), sk 1 ch, sc in next 8 ch, sc in last ch (same lp as first ch with 2 sc). Join with sl st. (44 sc)
Rnd 2: Ch 1, 2 sc in first 2 sts, sc in next 8 sts, 3 sc in next st (2nd sc is center), sc in next 8 sts, 2 sc in each of next 3 sts, sc in next 7 sts, sk 1 st, sc in next st (center), sk 1 st, sc in next 7 sts, 2 sc in last st. Join with sl st. (50 sc)
Rnd 3: Ch 1, *sc in next st, 2 sc in next st,* repeat once, sc in next 9 sts, 3 sc in next st (2nd sc is center), sc in next 9 sts, repeat * to * 3 times, sc in next 6 sts, sk 1 st, sc in next st (center), sk 1 st, sc in next 6 sts, repeat * to * once. Join with sl st. (56 sc)
Rnd 4: Ch 1, *sc in next 2 sts, 2 sc in next st,* repeat once, sc in next 10 sts, 3 sc in next st (2nd sc is center), sc in next 10 sts, repeat * to * 3 times, sc in next 5 sts, sk 1 st, sc in next st (center), sk 1 st, sc in next 5 sts, repeat * to * once. Join with sl st. (62 sc)
Rnd 5: Ch 1, *sc in next 3 sts, 2 sc in next st,* repeat once, sc in next 11 sts, 3 sc in next st (2nd sc is center top), sc in next 11 sts, repeat * to * 3 times, sc in next 4 sts, sk 1 st, sc in next st (center), sk 1 st, sc in next 4 sts, repeat * to * once. Join with sl st. (68 sc)
Rnd 6: Ch 1, *sc in next 4 sts, 2 sc in next st,* repeat once, sc in next 12 sts, 3 sc in next st (2nd sc is center), sc in next 12 sts, repeat * to * 3 times, sc in next 3 sts, sk 1 st, sc in next st (center), sk 1 st, sc in next 3 sts, repeat * to * once. Join with sl st. (74 sc)
Rnd 7: Ch 1, *sc in next 5 sts, 2 sc in next st,* repeat once, sc in next 13 sts, 3 sc in next st (2nd sc is center), sc in next 13 sts, repeat * to * 3 times, sc in next 2 sts, sk 1 st, sc in next st (center), sk 1 st, sc in next 2 sts, repeat * to * once. Join with sl st. (80 sc)
Rnd 8: Ch 1, *sc in next 6 sts, 2 sc in next st,* repeat once, sc in next 14 sts, 3 sc in next st (2nd sc is center), sc in next 14 sts, repeat * to * 3 times, sc in next st, sk 1 st, sc in next st (center), sk 1 st, sc in next st, repeat * to * once. Join with sl st. (86 sc)
Rnd 9: Ch 1, *sc in next 7 sts, 2 sc in next st,* repeat once, sc in next 15 sts, 3 sc in next st (2nd sc is center), sc in next 15 sts, repeat * to * 3 times, sk 1 st, sc in next st (center), sk 1 st, repeat * to * once. Join with sl st. (94 sc)
Fasten off pink.
Blocking is preferred to allow pieces to lay flat.
FACE:
Rnd 1: With white yarn, ch 16, 2 sc in 2nd ch from hook, sc in next 6 ch, 3 sc in next ch (2nd sc is center), sc in next 6 ch, 3 sc in last ch. Working on opposite side of starting ch, sc in next 5 ch, sk 1 ch, sc in next ch (center), sk 1 ch, sc in next 5 ch, sc in last ch (same lp as first ch with 2 sc). Join with sl st. (32 sc)
Rnd 2: Ch 1, 2 sc in next 2 sts, sc in next 7 sts, 3 sc in next st (2nd sc is center), sc in next 7 sts, 2 sc in next 3 sts, sc in next 4 sts, sk 1 st, sc in next st (center), sk 1 st, sc in next 4 sts, sc in last st (same as first sc with 2 sc). Join with sl st. (38 sc)
Rnd 3: Ch 1, *sc in next st, 2 sc in next st,* twice, sc in next 8 sts, 3 sc in next st (2nd sc is center), sc in next 8 sts, repeat * to * 3 times, sc in next 3 sts, sk 1 st, sc in next st (center), sk 1 st, sc in next 3 sts, repeat * to * once. Join with sl st. (44 sc)
Rnd 4: Ch 1, *sc in next 2 sts, 2 sc in next st,* twice, sc in next 9 sts, 3 sc in next st (2nd sc is center), sc in next 9 sts, repeat * to * 3 times, sc in next 2 sts, sk 1 st, sc in next st (center), sk 1 st, sc in next 2 sts, repeat * to * once. Join with sl st. (50 sc)
Rnd 5: Ch 1, *sc in next 3 sts, 2 sc in next st,* twice, sc in next 10 sts, 3 sc in next st (2nd sc is center), sc in next 10 sts, repeat * to * 3 times, sc in next st, sk 1 st, sc in next st (center), sk 1 st, sc in next st, repeat * to * once. Join with sl st. (56 sc)
Rnd 6: Ch 1, *sc in next 4 sts, 2 sc in next st,* twice, sc in next 11 sts, 3 sc in next st (2nd sc is center), sc in next 11 sts, repeat * to * 3 times, sk 1 st, sc in next st (center), sk 1 st, repeat * to * once. Join with sl st. (62 sc)
Fasten off white.
NOSE:
Rnd 1: With red yarn, ch 8, 2 sc in 2nd ch from hook, sc in next 2 ch, 3 sc in next ch (2nd sc is center), sc in next 2 ch, 3 sc in last ch. Working on opposite side of starting ch, sc in next ch, sk 1 ch, sc in next ch (center), sk 1 ch, sc in next ch, sc in last ch (same lp as first ch with 2 sc). Join with sl st. (16 sc)
Rnd 2: Ch 1, 2 sc in next 2 sts, sc in next 3 sts, 3 sc in next st, sc in next 3 sts, 2 sc in next 3 sts, sk next st, sc in next st, sk next st, 2 sc in next st. (22 sc) Fasten off red.
Sew red heart (right side up) on the bottom half of the white heart (upside down). Sew white heart (upside down) centered on top of pink heart (right side up). Insert safety eyes at Rnd 3 of white heart, approximately 2” apart.
EDGING:
Place both large hearts wrong sides together and crochet through both pieces to join. Pin in place with one pin marking the center bottom.
Insert hook at st after bottom center marker (through both thicknesses). Sc in this st, sc in next 20 sts, *sc in next st, sc in next 5 sts,* 3 times, sc in next 5 sts, sk 1 st, sc in next st (center top), sk next st, sc in next 5 sts, (sc in next 5 sts, 2 sc in next st,* 3 times. Begin stuffing pillow.
Sc in each remaining st with 3 sc in marked st (center bottom), stuffing as you go. Join with sl st.
Fasten off yarn. Weave in all ends.
Thinking of opening an Etsy shop? Use this link to get 40 free listings. https://etsy.me/3F3kxwc
Money Saving Offers
Check out this free app that gets you cash back on gas and other errands! Click this link or use promo code 46ZCG to get an extra 15¢/gal bonus the first time you make a purchase. https://upside.app.link/46ZCG
Hey! Thought you’d like to try Ibotta, a cash back rewards app that I use to make real money every time I shop for groceries, online purchases, and more! Just use my referral code “eugysjd” at registration. Sign up at → https://ibotta.onelink.me/iUfE/8cc13c64?friend_code=eugysjd
Join Rakuten and get $30 cash back. Plus earn money on online purchases.
I have a niece who has never liked sweets from the time she was a baby. The one exception is smores – she LOVES smores. Any time they visit us during cold weather, I make sure to have all the ingredients on hand so they kids can roast marshmallows in the fireplace to make smores. This Christmas I crocheted her a Smores Pillow. It turned out so cute!
Materials:
Bernat Blanket Yarn:
7 oz. White
15 oz. Almond
5 oz. Baby Sand
1 yard Pink
Size M (9.0 mm) crochet hook
Yarn needle
24-mm safety eyes
Fiberfill
2 pieces Poly Foam 1” x 12” x 12”
Gauge: 7 sts = 3”, 6 rows = 3”
Pillow measures approximately 12” tall.
Directions:
MARSHMALLOW:
Rnd 1: With White yarn, ch 2, 7 sc in 2nd ch. Do not join. Work in continuous rnds unless otherwise noted.
Rnd 2: 2 sc in each st (14 sc).
Rnd 3: *Sc in next st, 2 sc in next st,* repeat around (21 sc).
Rnd 4: *Sc in next 2 sts, 2 sc in next st,* repeat around (28 sc).
Rnd 5: *Sc in next 3 sts, 2 sc in next st,* repeat around (35 sc).
Rnd 6: *Sc in next 4 sts, 2 sc in next st,* repeat around (42 sc).
Rnd 7: *Sc in next 5 sts, 2 sc in next st,* repeat around (49 sc).
Rnd 8: *Sc in next 6 sts, 2 sc in next st,* repeat around (56 sc). Join with sl st.
Rnd 9: Working in BLO, sc in each st.
Rnds 10-25: Working in both lps, sc in each st. Join with sl st at end of Rnd 25.
Rnd 26: Working in BLO, *sc in next 6 sts, dec over next 2 sts,* repeat around (49 sc).
Rnd 27: Working in both lps, *sc in next 5 sts, dec over next 2 sts,* repeat around (42 sc).
Rnd 28: *Sc in next 4 sts, dec over next 2 sts,* repeat around (35 sc).
Insert eyes at Rnd 18, approximately 6 sts apart.
Stuff marshmallow but not too firmly. Excess stuffing will pouf out the top and bottom.
Rnd 29: *Sc in next 3 sts, dec over next 2 sts,* repeat around (28 sc).
Rnd 30: *Sc in next 2 sts, dec over next 2 sts,* repeat around (21 sc).
Rnd 31: *Sc in next st, dec over next 2 sts,* repeat around (14 sc). Finish stuffing.
Rnd 32: Dec 7 times (7 sc). Fasten off white yarn leaving a 6” length. Insert length into yarn needle and pull up remaining 7 sts, tighten to close.
CHOCOLATE: (Make 2 pieces)
Rnd 1: With Baby Sand yarn, ch 2, 7 sc in 2nd ch. Do not join. Work in continuous rnds unless otherwise noted.
Rnd 2: 2 sc in each st (14 sc).
Rnd 3: *Sc in next st, 2 sc in next st,* repeat around (21 sc).
Rnd 4: *Sc in next 2 sts, 2 sc in next st,* repeat around (28 sc).
Rnd 5: *Sc in next 3 sts, 2 sc in next st,* repeat around (35 sc).
Rnd 6: *Sc in next 4 sts, 2 sc in next st,* repeat around (42 sc).
Rnd 7: *Sc in next 5 sts, 2 sc in next st,* repeat around (49 sc).
Rnd 8: *Sc in next 6 sts, 2 sc in next st,* repeat around (56 sc).
Rnd 9: *Sc in next 7 sts, 2 sc in next st,* repeat around (63 sc). Join with sl st.
Rnd 10: Working in BLO, sc in each st.
Rnd 11: Working in both lps, *sl st, sc, hdc, dc, hdc, sc, sl st,* repeat around. Join with sl st.
Fasten off yarn leaving 12” length for sewing.
Sew one piece to top and the other piece to the bottom of marshmallow.
GRAHAM CRACKERS: (Make 2)
Row 1: With Almond yarn, ch 27, sc in 2nd ch from hook and each ch across (26 sc).
Row 2: Ch 1, turn, sc in each st.
Rows 3-50: Repeat Row 2 until piece measures 26” long. Finished piece should measure approximately 13” x 26”.
Lay piece flat and place 1 piece of poly foam on one half of top. Fold other half over and sew 3 sides together.
Sew one graham cracker centered on bottom of the Smores and the other centered on top of the Smores.
Embroider mouth with Pink yarn at Rows 11-14.
Weave in all ends.
Weekly Featured Pattern from Crochet Designer Community
The Ladies’ Sugar Skull Poncho has been one of my most popular designs. The one-size-fits-all design is an intermediate pattern using two colors of worsted weight yarn (cotton or acrylic). It is truly a must-have for anyone who loves sugar skulls.
This bundle is packed full of the top selling patterns from 40 indie designers hand picked for the new 2023 Season at over 90% off.
From shawls and cardigans to adorable amigurumi and blankets, this bundle has every pattern you could ever need for this winter. This bundle has so many gorgeous patterns, you’ll have no shortage of new crochet projects to keep you busy on those cold winter nights.
Thinking of opening an Etsy shop? Use this link to get 40 free listings. https://etsy.me/3F3kxwc
Money Saving Offers
Check out this free app that gets you cash back on gas and other errands! Click this link or use promo code 46ZCG to get an extra 15¢/gal bonus the first time you make a purchase. https://upside.app.link/46ZCG
Hey! Thought you’d like to try Ibotta, a cash back rewards app that I use to make real money every time I shop for groceries, online purchases, and more! Just use my referral code “eugysjd” at registration. Sign up at → https://ibotta.onelink.me/iUfE/8cc13c64?friend_code=eugysjd
Join Rakuten and get $30 cash back. Plus earn money on online purchases.
Anyone who knows me knows that I love ice cream, especially soft serve ice cream. When the children were young, we used to take them to walk the Poteet flea market, La Pulga. The children were interested in raspas (snow cones), but my favorite stand was the soft ice cream stand. The best vanilla soft serve in the San Antonio area!
For my mom’s birthday, I got her a Cuisinart ice cream maker. She loved it so much, I got one for myself. Last week I made homemade peach ice cream. Tonight I’ll be making lemon sorbet. It’s so easy – just freeze the bowl for 24 hours, then combine your ingredients and pour them in. When you turn it on, the bowl spins slowly, and 20 minutes later you have wonderful homemade ice cream. Yummy!
I love ice cream so much, I made an ice cream cone pillow using Bernat blanket yarn. It’s nearly 3 feet tall and super squishy!
Materials:
Bernat Blanket or other super bulky (6) yarn
12 oz. Sunsoaked (yellow)
10 oz. Whipped Cream (ivory)
Size M (13.00 mm) crochet hook
Yarn needle
Fiberfill
Finished pillow measures approximately 32” tall by 44” diameter (at widest point).
DIRECTIONS:
CONE:
Rnd 1: Ch 2 (or magic circle), 7 sc in 2nd ch from hook. Do not join. Work in continuous rnds throughout.
Rnd 2: 2 sc in each st (14 sc).
Rnd 3: *Sc in next st, 2 sc in next st,* repeat around (21 sc).
Rnd 4: *Sc in next 2 sts, 2 sc in next st,* repeat around (28 sc).
Rnd 5: *Sc in next 3 sts, 2 sc in next st,* repeat around (35 sc).
Rnd 6: *Sc in next 4 sts, 2 sc in next st,* repeat around (42 sc).
Rnd 7: *Sc in next 5 sts, 2 sc in next st,* repeat around (49 sc).
Rnd 8: *Sc in next 6 sts, 2 sc in next st,* repeat around (56 sc).
Rnd 9: *Sc in next 7 sts, 2 sc in next st,* repeat around (63 sc).
Rnd 10: *Sc in next 8 sts, 2 sc in next st,* repeat around (70 sc).
Rnd 11: Working in BLO, sc in each st.
Rnds 12-29: Working in both loops, sc in each st.
Rnd 30: Working in FLO, *sc in next 3 sts, 2 sc in next st,* repeat around (87 sc).
Rnd 31: Working in both loops, *sc in next 9 sts, 2 sc in next st,* repeat around (96 sc).
Rnd 32: Working in BLO, sc in each st.
Rnds 33-37: Working in both loops, sc in each st. Join with sl st at end of Rnd 37. Fasten off Sunsoaked. Stuff.
ICE CREAM:
Rnd 38: Attach Whipped Cream, working in BLO, sc in each st.
Rnd 39: Working in both loops, sc in each st.
Rnd 40: *Dec, sc in next 14 sts,* repeat around (90 sc).
Rnd 41: Sc in each st.
Rnd 42: *Dec, sc in next 13 sts,* repeat around (84 sc).
Rnd 43: Sc in each st.
Rnd 44: *Dec, sc in next 12 sts,* repeat around (78 sc).
Rnd 45: Sc in each st.
Rnd 46: *Dec, sc in next 11 sts,* repeat around (72 sc).
Rnd 47: Sc in each st.
Rnd 48: *Dec, sc in next 10 sts,* repeat around (66 sc).
Rnd 49: Sc in each st.
Rnd 50: *Sc in next 10 sts, 2 sc in next st,* repeat around (72 sc).
Rnd 51: *Sc in next 11 sts, 2 sc in next st,* repeat around (78 sc).
Rnds 52-53: Sc in each st.
Rnd 54: *Dec, sc in next 11 sts,* repeat around (72 sc).
Rnd 55: Sc in each st.
Rnd 56: *Dec, sc in next 10 sts,* repeat around (66 sc).
Rnd 57:*Dec, sc in next 9 sts,* repeat around (60 sc).
Rnd 58:*Dec, sc in next 8 sts,* repeat around (54 sc).
Rnd 59:*Dec, sc in next 7 sts,* repeat around (48 sc). Stuff.
Rnd 60:*Dec, sc in next 6 sts,* repeat around (42 sc).
Rnd 61:*Dec, sc in next 5 sts,* repeat around (36 sc).
Rnd 62: Sc in each st.
Rnd 63:*Dec, sc in next 4 sts,* repeat around (30 sc).
Rnd 64: Sc in each st.
Rnd 65:*Dec, sc in next 3 sts,* repeat around (24 sc).
Rnd 66: Sc in each st.
Rnd 67:*Dec, sc in next 2 sts,* repeat around (18 sc).
Rnd 68: Sc in each st.
Rnd 69:*Dec, sc in next st,* repeat around (12 sc).
This post contains affiliate links. This means I may earn a commission should you chose to sign up for a program or make a purchase using my link. It’s okay – I love all of these companies anyways, and you will too!


 Red Heart Crochet Kit


 The Ladies’ Sugar Skull Poncho has been one of my most popular designs. The one-size-fits-all design is an intermediate pattern using two colors of worsted weight yarn (cotton or acrylic). It is truly a must-have for anyone who loves sugar skulls.


