Posted on — 11 Comments

Sweater Crochet Pattern for the New Puppy

Pug Puppy Sweater


Did you get a new puppy for Christmas? Maybe you’re planning to adopt a pet in the new year. It can be difficult to find a sweater for toy breed puppies. This easy crochet pattern will fit your new puppy who is approximately 2 pounds. Finished measurements are approximately 6″ length by 13.5″ diameter to fit a pug, Boston terrier, French bulldog and other similar stocky-built dogs who are about 2 months old. Remove a few stitches to make the sweater for a thinner dog such as a poodle or chihuahua. Add a few rows for a longer dog such as a dachshund. Add your revisions to the blog to help other puppy owners make their own tiny sweater.

Pug Puppy Sweater
Pug Puppy Sweater Crochet Pattern


Materials:

Sport weight yarn –

50 yards MC

20 yards CC

Size F (3.75 mm) & G (4.0 mm) crochet hooks

Yarn needle

Finished sweater measures approximately 6” long (at widest point) by 13.5” diameter.

Directions:

BODY:

Rnd 1: With MC yarn and G hook, ch 57, hdc in 2nd ch and each remaining ch (56 hdc). Join with sl st in first hdc.

Rnds 2-3: Ch 1, turn, hdc in each st. Join with sl st.

Rnd 4: (leg openings) Ch 1, turn, hdc in first 2 sts, ch 10, sk 10 sts, hdc in next 32 sts, ch 10, sk 10 sts, hdc in last 2 sts. Join with sl st.

Rnd 5: Ch 1, turn, hdc in first 2 sts, hdc in each ch, hdc in next 32 sts, hdc in each ch, hdc in last 2 sts (56 hdc). Join with sl st.

Rnds 6-14: Ch 1, turn, hdc in each st. Join with sl st.

Rnd 15: Ch 1, turn, sl st in first 4 sts, hdc dec over next 2 sts, hdc in next 44 sts, hdc dec over next 2 sts, leave remining 4 sts unworked (46 hdc).

Rnd 16: Ch 1, turn, Hdc dec over first 2 sts, hdc in next 42 sts, hdc dec over last 2 sts (44 hdc).

Rnd 17: Ch 1, turn, Hdc dec over first 2 sts, hdc in next 40 sts, hdc dec over last 2 sts (42 hdc).

Rnd 18: Ch 1, turn, Hdc dec over first 2 sts, hdc in next 38 sts, hdc dec over last 2 sts (40 hdc). Fasten off MC.

Rnd 19: With right side facing, attach CC yarn at center bottom of Rnd 15. Sc in 4 sts, sc in the edges of Rnds 16-18, sc around Rnd 18, sc in edges of Rnds 16-18, sc in last 4 sts of Rnd 15. Join with sl st. Fasten off CC.

LEG OPENINGS:

With CC yarn, sc around openings in Rnd 5.

COLLAR:

Rnd 1: Using CC and F hook, hdc in unused lps of starting ch, join with sl st in first hdc (56 hdc).

Rnd 2: Ch 1, *hdc in 6 sts, dec,* repeat around (49 hdc). Join with sl st.

Rnds 3-5: Ch 1, *fpdc, bpdc,* repeat round. Join with sl st. Fasten off at end of Rnd 5.

Weave in all ends.

Update 1/13/2021:

Bruno is a growing puppy, so I added 3 rows to the collar section and 2 rows to the body. Next month I may have to make a bigger sweater.


Next week I’ll post an easy dog bed pattern using double strand of worsted yarn.

Small Dog Bed Crochet Pattern

Pug Puppy Sweater Update – New Size

Zoo Blog Hop Day 25 – Dogs

Pug Crochet Bundle
pug ornament
Pug Ornament


Happy New Year! Happy Crocheting!

Posted on — 3 Comments

Suffragette Hat Ornament Crochet Pattern

Suffragette Hats

Suffragette Hats
Suffragette Hats

Suffragette Hat Ornament Crochet Pattern

Materials:
12 yards white sport weight yarn
Crochet hook size F (3.75 mm)
Yarn needle
Ribbon or cord
Flowers or other decorations, as desired

Directions:
Rnd 1: Ch 2 (or magic circle), 6 sc in 2nd ch from hook. Do not join. Work in continuous rnds unless otherwise specified.
Rnd 2: 2 sc in each st (12 sc).
Rnd 3: *Sc in next st, 2 sc in next st,* repeat around (18 sc).
Rnd 4: Working in BLO, sc in each st.
Rnds 5-6: Sc in each st.
Rnd 7: Working in FLO, *sc in next st, 2 sc in next st,* repeat around (27 sc).
Rnd 8: Working in both loops, sc in each st.
Rnd 9: *Sc in next 2 sts, 2 sc in next st,* repeat around (36 sc).
Rnd 10: Sc in each st. Join with sl st. Fasten off white. Block hat.

Glue on ribbon or flowers as desired for the hat band. Cut a piece of cord or ribbon about 10” long. Pull through a stitch at the top of the back of the hat and make a knot.

PDF download on Etsy


More Christmas Patterns

Advent Calendar Christmas Ornaments Crochet Pattern Ebook

Melted Snowman Ornament

Deck the Halls with Yarn Blog Hop 2020

Christmas Pattern Giveaway

Roller Skate Pillow Crochet Pattern

Christmas in July Blog Hop

Ultimate Christmas Pattern Bundle

Steer Skull Ornament

Free “Handmade with Love” Gift Tags


Posted on — 25 Comments

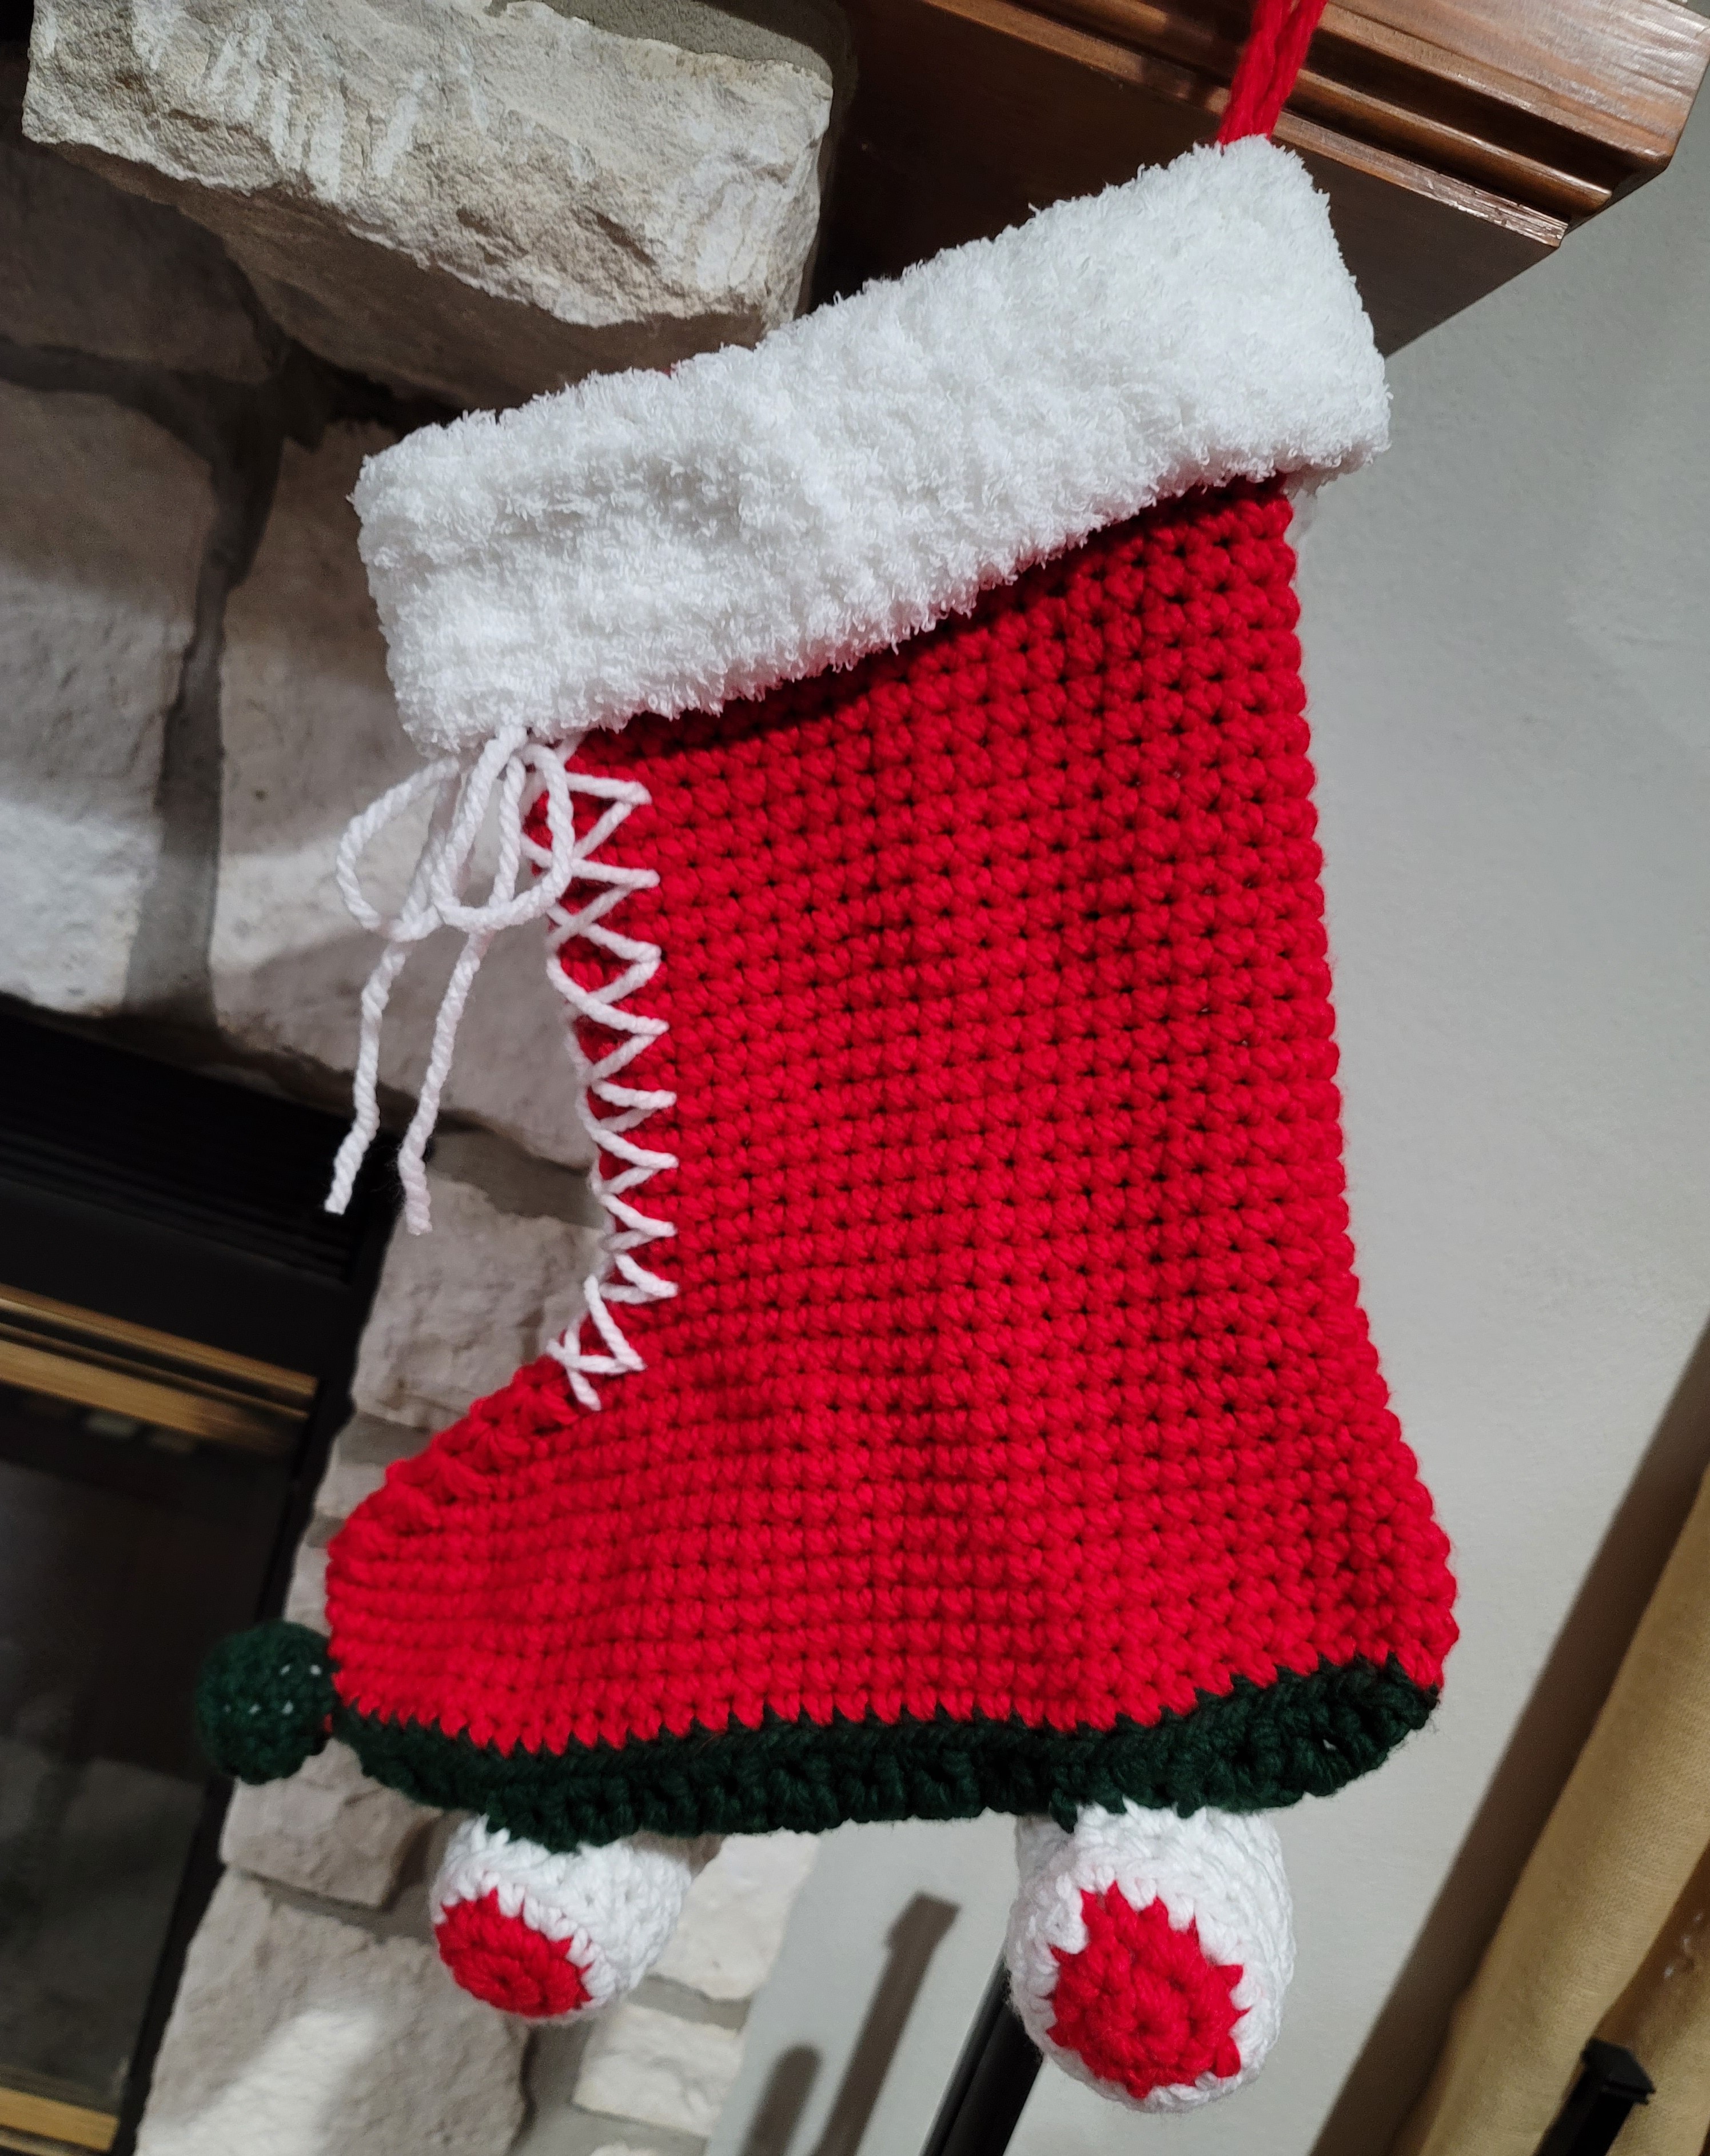
Roller Skate Christmas Stocking

Roller skate Christmas stocking

Last week when I published the Roller Skate Pillow pattern, a fellow crocheter on Facebook suggested that it would make a cute Christmas stocking. The next morning I was off to the yarn store to get more red, but they were out of the red in Bernat Blanket yarn. I opted for the Bernat Softee Chunky yarn; the label says it is also a 6-weight yarn, but I found that it gives a slightly smaller gauge than the blanket yarn I used on the pillow. If you prefer to use blanket yarn, please note that the stocking will be slightly larger than the dimensions of the stocking. (Please see Roller Skate Pillow Crochet Pattern for those dimensions.)

Materials:

Bernat Softee Chunky yarn

5.5 oz. red

1 oz. green

1 oz. white

Bernat Pipsqueak yarn

1 oz. white

Size M (9.00 mm) crochet hook

Yarn needle

Fiberfil


Finished stocking measures approximately 14” wide by 15” tall (including wheels).


DIRECTIONS:

BOOT:

Row 1: Beginning at heel with green yarn, ch 4, sc in 2nd ch from hook and in next 2 ch (3 sc).

Row 2: Ch 1, turn, inc in first st, sc in next st, inc in last st (5 sc).

Rows 3-14: Ch 1, turn, sc in each st.

Row 15: Ch 1, turn, inc in first st, sc in next 3 sts, inc in last st (7 sc).

Rows 16-28: Ch 1, turn, sc in each st.

Row 29: Ch 1, turn, dec over first 2 sts, sc in next 3 sts, dec over last 2 sts (5 sc).

Row 30: Ch 1, turn, sc in each st.

Row 31: Ch 1, turn, dec over first 2 sts, sc in next st, dec over last 2 sts (3 sc).

Rnd 32: Ch 1, turn, 2 sc in first st, sc in next st, 2 sc in last st. Working down side, 1 sc in each of the 31 row ends. Working across remaining lps of starting ch, 2 sc in first ch, sc in next ch, 2 sc in last ch. Work down opposite side with 1 sc in each of the 31 row ends (72 sc). Join with sl st in first sc. Fasten off green.

Rnd 33: Join red yarn at center st of heel end. Ch 1, sc in BLO of each st around. Join with sl st.

Rnds 34-37: Ch 1, sc in each st. Join with sl st in first sc of rnd.

Rnd 38: Ch 1, sc in next 36 sts, work 3 sc tog, sc in next 33 sts (70 sc).

Rnd 39: Ch 1, sc in next 35 sts, work 3 sc tog, sc in next 30 sts, work 2 sc tog (67 sc).

Rnd 40:  Ch 1, sc in next 33 sts, work 5 sc tog, sc in next 27 sts, work 2 sc tog (62 sc).

Rnd 41:  Ch 1, sc in next 31 sts, work 5 sc tog, sc in next 26 sts (58 sc).

Rnd 42:  Ch 1, sc in next 29 sts, work 5 sc tog, sc in next 24 sts (54 sc).

Rnd 43:  Ch 1, sc in next 27 sts, work 5 sc tog, sc in next 22 sts (52 sc).

Rnd 44:  Ch 1, sc in next 25 sts, work 5 sc tog, sc in next 20 sts (46 sc).

Rnd 45:  Ch 1, sc in next 23 sts, work 5 sc tog, sc in next 18 sts (42 sc).

Rnds 46-68: Ch 1, sc in each st. Join with sl st in first sc of rnd. Fasten off red.

Rnd 69: Attach white pipsqueak yarn, ch 1, working in FLO, *sc in next 6 sts, 2 sc in next st* repeat around (48 sc). Join with sl st.

Rnds 70-74: Working through both loops, sc in each st. Join with sl st. At end of Rnd 74, fasten off pipsqueak yarn. Fold cuff down over boot.

Hanger: Attach red at top of boot on the outside edge. Ch 10, sl st in same sp. Fasten off.

WHEELS: (Make 2)

Rnd 1: With red yarn, ch 2 (or magic circle), 6 sc in 2nd ch. Do not join.

Rnd 2: 2 sc in each st (12 sc). Join with sl st in first sc of rnd. Fasten off red.

Rnd 3: With white yarn, *sc in next st, 2 sc in next st,* repeat around (18 sc). Do not join.

Rnd 4: Working in BLO, sc in each st. Do not join.

Rnds 5-6: Sc in each st. Join with sl st at end of Rnd 6. Fasten off white leaving 12” length for sewing.

Repeat Rnds 1-6 for second half of wheel. Stuff each section and sew tog end to end. Sew to bottom of skate approximately 2” from heel.

TOE STOP:

Rnd 1: With green yarn, ch 2 (or magic circle), 6 sc in 2nd ch. Do not join.

Rnd 2: 2 sc in each st (12 sc). Do not join.

Rnd 3: Working in BLO, sc in each st. Do not join.

Rnd 4: *Sc in next 2 sts, dec,* repeat twice (9 sc). Do not join.

Rnd 5: *Sc in next st, dec,* repeat twice (6 sc). Join with sl st. Fasten off green leaving 12” length for sewing.

SHOELACE:

Cut a piece of white yarn approximately 3 yards long. Starting near the bottom at center front, lace yarn in cross-cross fashion like shoelaces with the lace inserting every other row going up to just below the fur cuff. Tie in a bow. Cut excess yarn.

PDF download:  Roller Skate Stocking Crochet Pattern


Roller Skate Pillow Crochet Pattern


Also available is a roller skate ornament crochet pattern at https://www.etsy.com/MyFingersFly/listing/877943632/roller-skate-ornament-crochet-pattern?utm_source=Copy&utm_medium=ListingManager&utm_campaign=Share&utm_term=so.lmsm&share_time=1603723843850

More Christmas Projects

Advent Calendar Christmas Ornaments Crochet Pattern Ebook

Melted Snowman Ornament

Christmas in July Blog Hop

Texas Flag Christmas Tree Ornament

Moose Ornament

Nutcracker Cuddler

Free “Handmade with Love” Gift Tags


Posted on — 5 Comments

Roller Skate Pillow Crochet Pattern

Roller skating was big in the 70s, and it seems to be making a comeback. My husband was a jam skater in his youth, and our children were true rink rats. If the rink was open, they were there! We even tried buying a skating business at the time, the but owner just couldn’t part with her rink. October is National Skating Month, so I made this cute pillow shaped like a roller skate. It uses blanket yarn, so it’s quick and super squishy. Crochet a few different colors for your tween’s bedroom, or add a couple to your game room decor. Show me your color combinations on Instagram.

Roller Skate Pillow with Blanket Yarn

Materials:

Bernat Blanket or other super bulky (6) yarn

8 oz. red

1 oz. gray

1 oz. black

1 oz. white

Size M (13.00 mm) crochet hook

Yarn needle

Fiberfil


Finished pillow measures approximately 16” wide by 17” tall (including wheels).

DIRECTIONS:

BOOT:

Row 1: Beginning at heel with gray yarn, ch 4, sc in 2nd ch from hook and in next 2 ch (3 sc).

Row 2: Ch 1, turn, inc in first st, sc in next st, inc in last st (5 sc).

Rows 3-14: Ch 1, turn, sc in each st.

Row 15: Ch 1, turn, inc in first st, sc in next 3 sts, inc in last st (7 sc).

Rows 16-28: Ch 1, turn, sc in each st.

Row 29: Ch 1, turn, dec over first 2 sts, sc in next 3 sts, dec over last 2 sts (5 sc).

Row 30: Ch 1, turn, sc in each st.

Row 31: Ch 1, turn, dec over first 2 sts, sc in next st, dec over last 2 sts (3 sc).

Rnd 32: Ch 1, turn, 2 sc in first st, sc in next st, 2 sc in last st. Working down side, 1 sc in each of the 31 row ends. Working across remaining lps of starting ch, 2 sc in first ch, sc in next ch, 2 sc in last ch. Work down opposite side with 1 sc in each of the 31 row ends (72 sc). Join with sl st in first sc. Fasten off gray.

Rnd 33: Join red yarn at center st of heel end. Ch 1, sc in BLO of each st around. Join with sl st.

Rnds 34-37: Ch 1, sc in each st. Join with sl st in first sc of rnd.

Rnd 38: Ch 1, sc in next 36 sts, work 3 sc tog, sc in next 33 sts (70 sc).

Rnd 39: Ch 1, sc in next 35 sts, work 3 sc tog, sc in next 30 sts, work 2 sc tog (67 sc).

Rnd 40:  Ch 1, sc in next 33 sts, work 5 sc tog, sc in next 27 sts, work 2 sc tog (62 sc).

Rnd 41:  Ch 1, sc in next 31 sts, work 5 sc tog, sc in next 26 sts (58 sc).

Rnd 42:  Ch 1, sc in next 29 sts, work 5 sc tog, sc in next 24 sts (54 sc).

Rnd 43:  Ch 1, sc in next 27 sts, work 5 sc tog, sc in next 22 sts (52 sc).

Rnd 44:  Ch 1, sc in next 25 sts, work 5 sc tog, sc in next 20 sts (46 sc).

Rnd 45:  Ch 1, sc in next 23 sts, work 5 sc tog, sc in next 18 sts (42 sc).

Rnds 46-59: Ch 1, sc in each st. Join with sl st in first sc of rnd. Stuff boot.

Rnd 60: Ch 1, working in BLO, *dec, sc in next 5 sts,* repeat around (36 sc). Do not join for the remaining rnds.

Rnd 61: Working through both loops, *dec, sc in next 4 sts,* repeat around (30 sc).

Rnd 62: *Dec, sc in next 3 sts,* repeat around (24 sc). Stuff.

Rnd 63: *Dec, sc in next 2 sts,* repeat around (18 sc).

Rnd 64: *Dec, sc in next st,* repeat around (12 sc).

Rnd 65: Dec around (6 sc). Close with ultimate finish.

BACK WHEELS:

Rnd 1: With white yarn, ch 2 (or magic circle), 6 sc in 2nd ch. Do not join.

Rnd 2: 2 sc in each st (12 sc). Join with sl st in first sc of rnd. Fasten off white.

Rnd 3: With black yarn, *sc in next st, 2 sc in next st,* repeat around (18 sc). Do not join.

Rnd 4: Working in BLO, sc in each st. Do not join.

Rnds 5-6: Sc in each st. Join with sl st at end of Rnd 6. Fasten off black leaving 12” length for sewing.

Repeat Rnds 1-6 for second half of wheel. Stuff each section and sew tog end to end. Sew to bottom of skate approximately 2” from heel.

FRONT WHEELS:

Rnd 1: With white yarn, ch 2 (or magic circle), 6 sc in 2nd ch. Do not join.

Rnd 2: 2 sc in each st (12 sc). Join with sl st in first sc of rnd. Fasten off white.

Rnd 3: With black yarn, *sc in next st, 2 sc in next st,* repeat around (18 sc). Do not join.

Rnd 4: Working in BLO, sc in each st. Do not join.

Rnds 5-7: Sc in each st. Join with sl st at end of Rnd 6. Fasten off black leaving 12” length for sewing.

Repeat Rnds 1-7 for second half of wheel. Stuff each section and sew tog end to end. Sew to bottom of skate approximately 3” from toe.

TOE STOP:

Rnd 1: With black yarn, ch 2 (or magic circle), 6 sc in 2nd ch. Do not join.

Rnd 2: 2 sc in each st (12 sc). Do not join.

Rnd 3: Working in BLO, sc in each st. Do not join.

Rnd 4: *Sc in next 2 sts, dec,* repeat twice (9 sc). Do not join.

Rnd 5: *Sc in next st, dec,* repeat twice (6 sc). Join with sl st. Fasten off black leaving 12” length for sewing.

TOPSTITCHING:

Heel: Mark center bottom of heel. Mark 10 sts on each side of center mark. With black yarn, straight st a curve from marker to Rnd 41 on each side.

Tongue: Mark a 3” wide section from approximately Rnd 42 to Rnd 60. Straight st the tongue outline using black yarn.

Cut a piece of white yarn approximately 3 yards long. Starting at bottom of tongue section, lace yarn in cross-cross fashion like shoelaces with the lace inserting every other row going up to Rnd 59. Tie in a bow. Cut excess yarn.


For a downloadable PDF of this pattern, please visit My Fingers Fly on Etsy.

YouTube

UPDATE: A fellow crocheter on Instagram challenged me to turn this pattern into a Christmas tree ornament.

https://www.etsy.com/MyFingersFly/listing/877943632/roller-skate-ornament-crochet-pattern?utm_source=Copy&utm_medium=ListingManager&utm_campaign=Share&utm_term=so.lmsm&share_time=1603476124572

Another suggestion from a fellow crocheter – Roller Skate Christmas Stocking

More Pillow Patterns

Do Unicorns Live Forever


Paperbacks are now available in my Etsy shop, as well as children’s graphic t-shirts with Lily & Boonicorn. Makes a great gift for any little girl on your Christmas list!

Eyeglass Holder Crochet Patterns Ebook

https://www.etsy.com/MyFingersFly/listing/575328461/eyeglass-holder-crochet-pattern-ebook-15?utm_source=Copy&utm_medium=ListingManager&utm_campaign=Share&utm_term=so.lmsm&share_time=1603134749437

New patterns have been added, so the book now contains 17 adorable eyeglass holders – tiger, heart, Christmas gnome, elephants (bull, girl, and baby), pig, Frankenstein’s monster, owl, clown, panda bear, poodle, lamb, little red bull, octopus, koala, Santa Claus, reindeer, and the debate fly. These designs are quick and easy and make great gifts for anyone on your list who always loses their glasses. If there’s an animal or character you would like to see, please feel free to reach out. (No trademarked characters please) Owl Eyeglass Holder and Lamb Eyeglass Holder are available on the blog.

Happy crocheting!

Posted on — 10 Comments

National Taco Day – Free Taco Pillow Pattern

taco pillow

Tacos are part of the culture of San Antonio, so National Taco Day is one of the best days of the year. In our house, we eat tacos several times a week – crispy tacos, breakfast tacos, guisada tacos. The list goes on and on. (I’m making myself hungry!) To celebrate this delicious day, I created a giant taco pillow. It’s easy to crochet using super bulky yarn, and it measures a whopping 31″ wide by 15″ tall.

Materials:

Bernat Blanket or other super bulky (6) yarn

17 oz. tan

4 oz. green

1 oz. brown

½ oz. red

½ oz. yellow

Size M (13.00 mm) crochet hook

Yarn needle

Fiberfil


Finished pillow measures approximately 31” wide by 15” tall.


DIRECTIONS:

SHELL:

Rnd 1: Ch 2 (or magic circle), 7 sc in 2nd ch from hook. Do not join. Work in continuous rnds throughout.

Rnd 2: 2 sc in each st (14 sc).

Rnd 3: *Sc in next st, 2 sc in next st,* repeat around (21 sc).

Rnd 4: *Sc in next 2 sts, 2 sc in next st,* repeat around (28 sc).

Rnd 5: *Sc in next 3 sts, 2 sc in next st,* repeat around (35 sc).

Rnd 6: *Sc in next 4 sts, 2 sc in next st,* repeat around (42 sc).

Rnd 7: *Sc in next 5 sts, 2 sc in next st,* repeat around (49 sc).

Rnd 8: *Sc in next 6 sts, 2 sc in next st,* repeat around (56 sc).

Rnd 9: *Sc in next 7 sts, 2 sc in next st,* repeat around (63 sc).

Rnd 10: *Sc in next 8 sts, 2 sc in next st,* repeat around (70 sc).

Rnd 11: *Sc in next 9 sts, 2 sc in next st,* repeat around (77 sc).

Rnd 12: *Sc in next 10 sts, 2 sc in next st,* repeat around (84 sc).

Rnd 13: *Sc in next 11 sts, 2 sc in next st,* repeat around (91 sc).

Rnd 14: *Sc in next 12 sts, 2 sc in next st,* repeat around (98 sc).

Rnd 15: *Sc in next 13 sts, 2 sc in next st,* repeat around (105 sc).

Rnd 16: *Sc in next 14 sts, 2 sc in next st,* repeat around (112 sc).

Rnd 17: *Sc in next 15 sts, 2 sc in next st,* repeat around (119 sc).

Rnd 18: *Sc in next 16 sts, 2 sc in next st,* repeat around (126 sc).

Rnd 19: *Sc in next 17 sts, 2 sc in next st,* repeat around (133 sc).

Rnd 20: *Sc in next 18 sts, 2 sc in next st,* repeat around (140 sc).

Rnd 21: *Sc in next 19 sts, 2 sc in next st,* repeat around (147 sc).

Rnd 22: *Sc in next 20 sts, 2 sc in next st,* repeat around (154 sc).

Rnd 23: *Sc in next 21 sts, 2 sc in next st,* repeat around (161 sc).

Rnd 24: *Sc in next 22 sts, 2 sc in next st,* repeat around (168 sc).

Rnd 25: *Sc in next 23 sts, 2 sc in next st,* repeat around (175 sc).

Rnd 26: *Sc in next 24 sts, 2 sc in next st,* repeat around (182 sc).

Rnd 27: *Sc in next 25 sts, 2 sc in next st,* repeat around (189 sc).

Rnd 28: *Sc in next 26 sts, 2 sc in next st,* repeat around (196 sc).

Rnd 29: *Sc in next 27 sts, 2 sc in next st,* repeat around (203 sc).

Rnd 30: *Sc in next 28 sts, 2 sc in next st,* repeat around (210 sc). Join with sl st.

Rnd 31: Reverse sc in each st around. Join with sl st. Fasten off.

SALAD:

Row 1: With green, ch 61, hdc in 2nd ch from hook and next 9 ch, *with red hdc in next 3 ch, with green hdc in next 10 ch,* repeat across.

Row 2: Ch 1, hdc in each st across, matching colors of sts to colors in previous row.

Row 3: Ch 1, turn, with green hdc in next 4 sts, *with red hdc in next 3 sts, with green hdc in next 10 sts,* repeat across.

Row 4: Ch 1, hdc in each st across, matching colors of sts to colors in previous row.

Row 5: Ch 1, turn, *with green hdc in next 10 sts, with red hdc in next 3 sts,* repeat across.

Row 6: Ch 1, hdc in each st across, matching colors of sts to colors in previous row.

Row 7:P Ch 1, *hdc in next st, 3 dc in next st,* repeat across. Turn to work across edge of piece with same repeat. Turn to work on opposite side of beg ch with same repeat. Turn to work across other edge with same repeat. Join with sl st. Fasten off.

MEAT:

Row 1: With brown, working behind shell row on edge, 8 hdc across.

Rows 2-7: Ch 1, turn, hdc in each st.

Row 8: Ch 1, turn, dec, hdc in next 4 sts, dec (6 hdc). Fasten off.

ASSEMBLY:

Lay tortilla flat and mark center.

Mark 2” on both sides of this marker. Pin meat section to this 4” section.

Matching centers, pin the long edge of the salad section to the tortilla.

Sew in place. Then pin and sew opposite side of salad to tortilla, stuffing as you go.

CHEESE:

Cut 7” pieces of yellow yarn. Fold a piece in half, insert hook through st at desired spot, pull loop through st, pull ends through loop. Decorate your taco with as much cheese as you like.

PDF is available on Etsy.

taco scrubby crochet pattern


Free Taco Scrubby Crochet Pattern

More pillow patterns:

Super Squishy Pillows and Plushies Crochet Pattern Ebook – Using Bernat Blanket Yarn

Axolotl Pillow

Benjamin Turtle Nap Buddy CAL

The Getty Museum Challenge

Free Polar Bear Pillow Crochet Pattern

Slot Machine Pillow Crochet Pattern

Roller Skate Pillow Crochet Pattern

Do Unicorns Live Forever?

This book is very special to me, because it is my first ever children’s book.

Lily’s favorite toy fell apart in the laundry, but she learns that change isn’t always a bad thing.This book includes instructions to crochet a Boonicorn doll for your little one.


pink ribbon hat

Breast Cancer Awareness Month – Pink Ribbon Hat Addi & Crochet Patterns are always free on my website or Ravelry.


Coming Attractions

For the rest of the year, I’ll be working on clearing up several WIPs that have been recently neglected. Then the focus will be on more Christmas designs and holiday gifts.

Stay safe and happy crocheting!