Posted on — 8 Comments

Snowflake Kitchen Boa Crochet Pattern in Tunisian Stitch

Snowflake Kitchen Boa Crochet Pattern in Tunisian Stitch

If you’ve ever looked at a crochet project and thought, “That almost looks knitted,” chances are it was made using Tunisian crochet.

Tunisian stitch is a beautiful technique that blends the look of knitting with the comfort of crochet — and the best part? It’s much easier to learn than it looks.

If you’re ready to try something new with your yarn, this is a great place to start.


What Is Tunisian Crochet?

Tunisian crochet uses a long hook (similar to a knitting needle with a hook on the end) and works in two steps:

  1. Forward pass – you pick up loops across the row

  2. Return pass – you work those loops back off the hook

Unlike regular crochet, you don’t turn your work after every row. This creates a thicker fabric with gorgeous texture.


Why Crocheters Love Tunisian Stitch

Tunisian crochet is popular because it:

  • Creates a knit-like look

  • Has beautiful texture

  • Makes a warm, sturdy fabric

  • Is perfect for blankets, scarves, hats, and dishcloths

  • Uses familiar crochet motions — just slightly different

It’s a wonderful next step once you’re comfortable with basic crochet stitches.


The Basic Tunisian Simple Stitch (TSS)

The Tunisian Simple Stitch is usually the first stitch beginners learn.

Here’s the basic idea:

  • Insert your hook under the vertical bar

  • Yarn over and pull up a loop

  • Leave the loop on the hook

You repeat this across the row, then work the return pass by yarn over and pulling through loops until one loop remains.

That’s it — you’ve just completed a Tunisian row!

Snowflake Kitchen Boa Crochet Pattern in Tunisian Stitch


I made several styles of kitchen boas for Christmas gifts, and this is one that can brighten up your kitchen throughout the winter. If you’re well versed in Tunisian stitch, this will be a simple project for you. If you’ve never done it before, this is the perfect easy project to learn Tunisian or afghan stitch. There’s also a YouTube tutorial to help you through it. https://youtu.be/_4QHPqtdys4

Materials:

I Love This Cotton worsted weight yarn

3.5 oz blue

1 oz. white

Crochet hook size G (4.0 mm)

Yarn needle

8” x 20” (20 cm x 51 cm) Kitchen Towel

Needle and Thread


Directions:

Row 1: With blue yarn, ch 20, Tunisian st in 2nd ch and each rem ch (19 sc). This should measure approximately 4” across.

Row 2: Work in Tunisian st until piece measures 37”. Bind off blue yarn. When sewn to both sides of the kitchen towel, the boa will measure approximately 68”. If shorter or longer boa is needed, adjust the length of the crocheted piece.

Work snowflake pattern in white yarn using cross-stitch (or duplicate st if you prefer). Skip 2 rows and work another snowflake above it. Repeat 2 snowflakes on opposite end.

Snowflake Chart
Cross-Stitch Chart


Cut towel in half and serge or zigzag raw edges. Fold edges to middle and sew edge.

Fold edges again to middle and sew in place. This will give you a width of approximately 4”.

Hand sew or machine sew this edge of towel to back side of crocheted piece.

Block boa and weave in all ends.

PDF download is available at Snowflake Kitchen Boa Crochet Pattern in Tunisian Stitch


January’s New Designs

Pink Power Pillow Crochet Pattern - Rainbow Power Pillow Crochet Pattern
Pink Power Pillow Crochet Pattern – Rainbow Power Pillow Crochet Pattern


Lover's Eye Necklace Crochet Pattern

Lover’s Eye Necklace Crochet Pattern


Coming Soon

February will be an amazing month for blog roundups including:


Affiliate Links

This post contains affiliate links. This means I may earn a commission should you chose to sign up for a program or make a purchase using my link. It’s okay – I love all of these companies anyways, and you will too!

Lion Brand Yarn
Black Friday Sale – up to 70% off bundles


Amazon affiliate: https://amzn.to/4hkS5Zd


Posted on — 8 Comments

Small Dog Bed Crochet Pattern

dog bed

My new puppy needed a bed, and I had soooo much red yarn, so I whipped up this simple pattern.

Bed measures approximately 19” diameter with 4” deep sides

Materials: 

Caron One Pound – 20 oz.

Size J (6.0 mm) crochet hook

Fiberfil

Yarn needle

Foam stabilizer

Directions: 

CUSHION (Make 2):

Rnd 1: With 2 strands of yarn, magic circle, 12 dc in magic circle. Join with sl st.

Rnd 2: Ch 1, 2 dc in each st (24 dc). Join with sl st.

Rnd 3: Ch 1, *dc in next st, 2 dc in next st,* repeat around (36 dc). Join with sl st.

Rnd 4: Ch 1, *dc in each of next 2 sts, 2 dc in next st,* repeat around (48 dc). Join with sl st.

Rnd 5: Ch 1,*dc in each of next 3 sts, 2 dc in next st,* repeat around (60 dc). Join with sl st.

Rnd 6: Ch 1, *dc in each of next 4 sts, 2 dc in next st,* repeat around (72 dc). Join with sl st.

Rnd 7: Ch 1, *dc in each of next 5 sts, 2 dc in next st,* repeat around (84 dc). Join with sl st.

Rnd 8: Ch 1, *dc in each of next 6 sts, 2 dc in next st,* repeat around (96 dc). Join with sl st.

Rnd 9: Ch 1,*dc in each of next 7 sts, 2 dc in next st,* repeat around (108 dc). Join with sl st.

Rnd 10: Ch 1, *dc in each of next 8 sts, 2 dc in next st,* repeat around (120 dc). Join with sl st.

Rnd 11: Ch 1, *dc in each of next 9 sts, 2 dc in next st,* repeat around (132 dc). Join with sl st.

Rnd 12: Ch 1,*dc in each of next 10 sts, 2 dc in next st,* repeat around (144 sc). Join with sl st.

Rnd 13: Ch 1, *dc in each of next 11 sts, 2 dc in next st,* repeat around (156 sc). Join with sl st. Do not fasten off yarn.

ASSEMBLY:

Place both pieces together with a little Fiberfil or quilt batting in the middle. Sc through both thicknesses all the way around to close cushion.

SIDE:

Row 1: Ch 1, working in BLO, sc in 116 sts. Leave rem sts unworked.

Rows 2-6: Ch 1, turn, dc in each st.

Row 7: Ch 1, working BLO, dc in each st.

Rows 8-12: Ch 1, working in both loops, dc in each st. Fasten off yarn.

Measure length of side (approximately 45”) and height of Rows 1-6 (approximately 4”). Cut a piece of foam stabilizer to this dimension. This will give the side of the bed a little extra support. Sew Row 12 of side to Row 1 of side, inserting foam stabilizer in between as you go.

Sweater Crochet Pattern for the New Puppy

Pug Puppy Sweater Update – New Size

Dog Crochet Patterns

Zoo Blog Hop Day 25 – Dogs

Poodle Eyeglass Holder Crochet Pattern

Dog Crochet Patterns
Dog Bookmark
Posted on — 11 Comments

Sweater Crochet Pattern for the New Puppy

Pug Puppy Sweater


Did you get a new puppy for Christmas? Maybe you’re planning to adopt a pet in the new year. It can be difficult to find a sweater for toy breed puppies. This easy crochet pattern will fit your new puppy who is approximately 2 pounds. Finished measurements are approximately 6″ length by 13.5″ diameter to fit a pug, Boston terrier, French bulldog and other similar stocky-built dogs who are about 2 months old. Remove a few stitches to make the sweater for a thinner dog such as a poodle or chihuahua. Add a few rows for a longer dog such as a dachshund. Add your revisions to the blog to help other puppy owners make their own tiny sweater.

Pug Puppy Sweater
Pug Puppy Sweater Crochet Pattern


Materials:

Sport weight yarn –

50 yards MC

20 yards CC

Size F (3.75 mm) & G (4.0 mm) crochet hooks

Yarn needle

Finished sweater measures approximately 6” long (at widest point) by 13.5” diameter.

Directions:

BODY:

Rnd 1: With MC yarn and G hook, ch 57, hdc in 2nd ch and each remaining ch (56 hdc). Join with sl st in first hdc.

Rnds 2-3: Ch 1, turn, hdc in each st. Join with sl st.

Rnd 4: (leg openings) Ch 1, turn, hdc in first 2 sts, ch 10, sk 10 sts, hdc in next 32 sts, ch 10, sk 10 sts, hdc in last 2 sts. Join with sl st.

Rnd 5: Ch 1, turn, hdc in first 2 sts, hdc in each ch, hdc in next 32 sts, hdc in each ch, hdc in last 2 sts (56 hdc). Join with sl st.

Rnds 6-14: Ch 1, turn, hdc in each st. Join with sl st.

Rnd 15: Ch 1, turn, sl st in first 4 sts, hdc dec over next 2 sts, hdc in next 44 sts, hdc dec over next 2 sts, leave remining 4 sts unworked (46 hdc).

Rnd 16: Ch 1, turn, Hdc dec over first 2 sts, hdc in next 42 sts, hdc dec over last 2 sts (44 hdc).

Rnd 17: Ch 1, turn, Hdc dec over first 2 sts, hdc in next 40 sts, hdc dec over last 2 sts (42 hdc).

Rnd 18: Ch 1, turn, Hdc dec over first 2 sts, hdc in next 38 sts, hdc dec over last 2 sts (40 hdc). Fasten off MC.

Rnd 19: With right side facing, attach CC yarn at center bottom of Rnd 15. Sc in 4 sts, sc in the edges of Rnds 16-18, sc around Rnd 18, sc in edges of Rnds 16-18, sc in last 4 sts of Rnd 15. Join with sl st. Fasten off CC.

LEG OPENINGS:

With CC yarn, sc around openings in Rnd 5.

COLLAR:

Rnd 1: Using CC and F hook, hdc in unused lps of starting ch, join with sl st in first hdc (56 hdc).

Rnd 2: Ch 1, *hdc in 6 sts, dec,* repeat around (49 hdc). Join with sl st.

Rnds 3-5: Ch 1, *fpdc, bpdc,* repeat round. Join with sl st. Fasten off at end of Rnd 5.

Weave in all ends.

Update 1/13/2021:

Bruno is a growing puppy, so I added 3 rows to the collar section and 2 rows to the body. Next month I may have to make a bigger sweater.


Next week I’ll post an easy dog bed pattern using double strand of worsted yarn.

Small Dog Bed Crochet Pattern

Pug Puppy Sweater Update – New Size

Zoo Blog Hop Day 25 – Dogs

Pug Crochet Bundle
pug ornament
Pug Ornament


Happy New Year! Happy Crocheting!

Posted on — 3 Comments

Suffragette Hat Ornament Crochet Pattern

Suffragette Hats

Suffragette Hats
Suffragette Hats

Suffragette Hat Ornament Crochet Pattern

Materials:
12 yards white sport weight yarn
Crochet hook size F (3.75 mm)
Yarn needle
Ribbon or cord
Flowers or other decorations, as desired

Directions:
Rnd 1: Ch 2 (or magic circle), 6 sc in 2nd ch from hook. Do not join. Work in continuous rnds unless otherwise specified.
Rnd 2: 2 sc in each st (12 sc).
Rnd 3: *Sc in next st, 2 sc in next st,* repeat around (18 sc).
Rnd 4: Working in BLO, sc in each st.
Rnds 5-6: Sc in each st.
Rnd 7: Working in FLO, *sc in next st, 2 sc in next st,* repeat around (27 sc).
Rnd 8: Working in both loops, sc in each st.
Rnd 9: *Sc in next 2 sts, 2 sc in next st,* repeat around (36 sc).
Rnd 10: Sc in each st. Join with sl st. Fasten off white. Block hat.

Glue on ribbon or flowers as desired for the hat band. Cut a piece of cord or ribbon about 10” long. Pull through a stitch at the top of the back of the hat and make a knot.

PDF download on Etsy


More Christmas Patterns

Advent Calendar Christmas Ornaments Crochet Pattern Ebook

Melted Snowman Ornament

Deck the Halls with Yarn Blog Hop 2020

Christmas Pattern Giveaway

Roller Skate Pillow Crochet Pattern

Christmas in July Blog Hop

Ultimate Christmas Pattern Bundle

Steer Skull Ornament

Free “Handmade with Love” Gift Tags


Posted on — 25 Comments

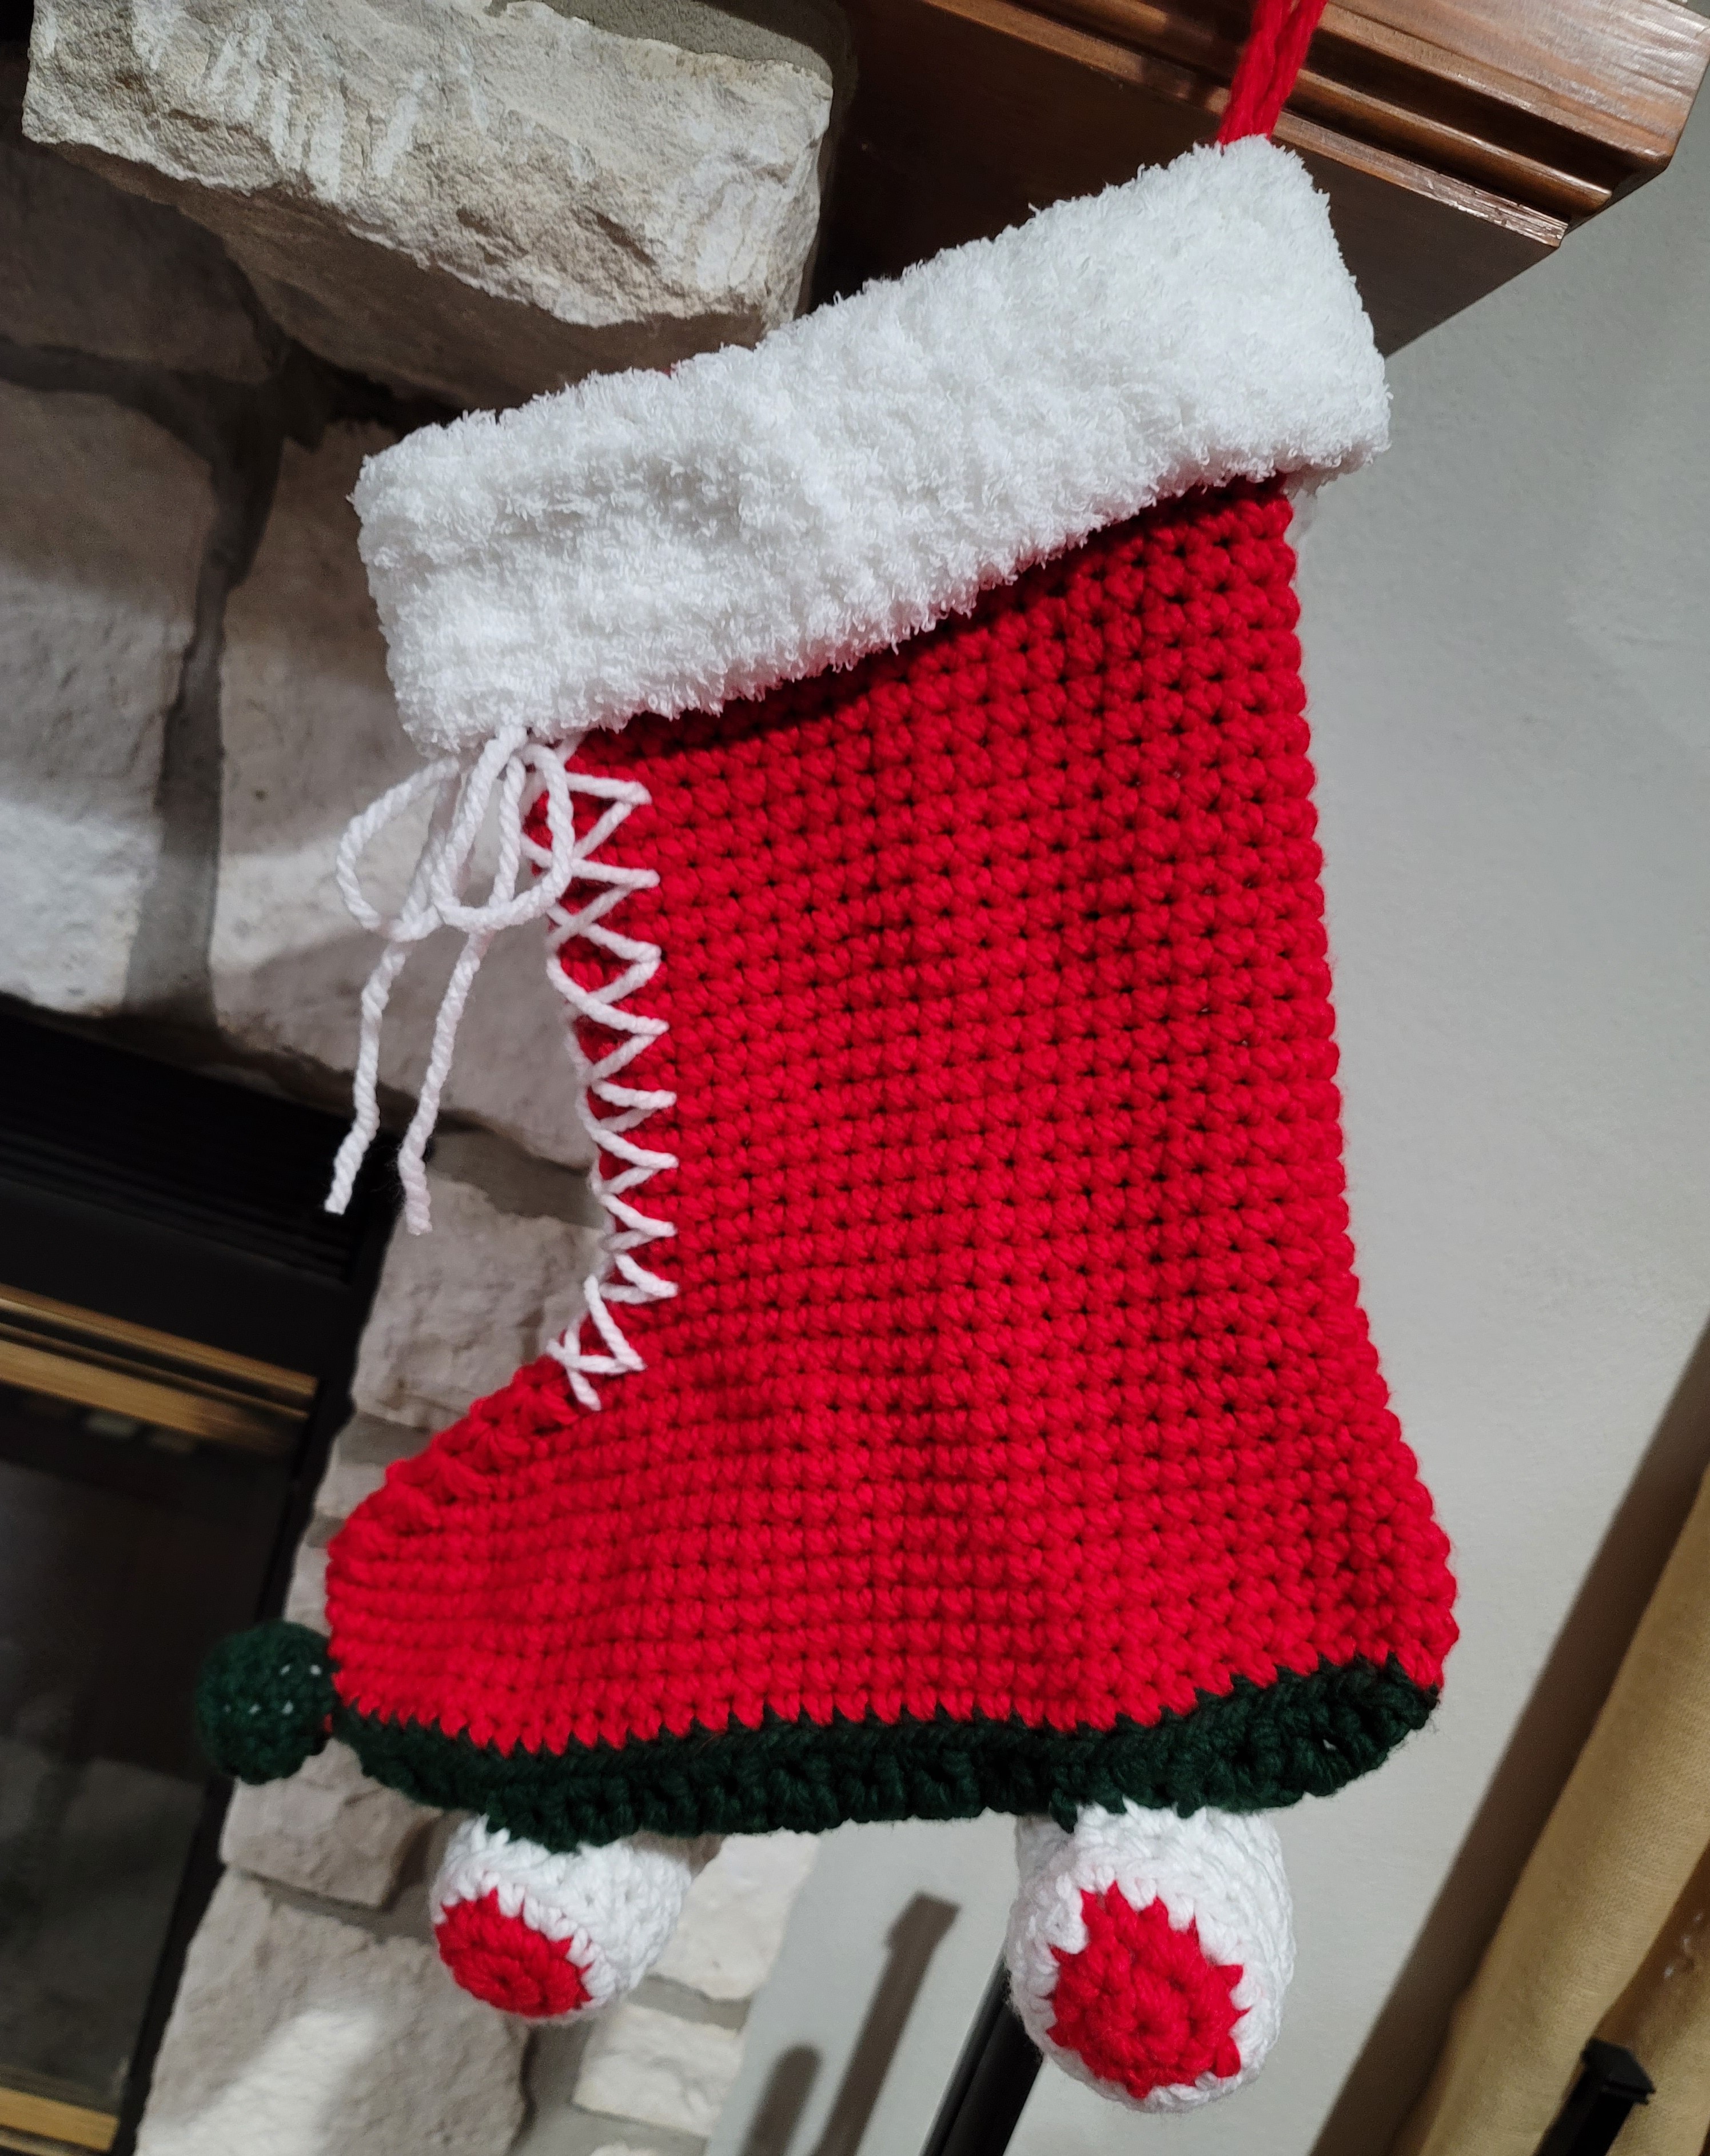
Roller Skate Christmas Stocking

Roller skate Christmas stocking

Last week when I published the Roller Skate Pillow pattern, a fellow crocheter on Facebook suggested that it would make a cute Christmas stocking. The next morning I was off to the yarn store to get more red, but they were out of the red in Bernat Blanket yarn. I opted for the Bernat Softee Chunky yarn; the label says it is also a 6-weight yarn, but I found that it gives a slightly smaller gauge than the blanket yarn I used on the pillow. If you prefer to use blanket yarn, please note that the stocking will be slightly larger than the dimensions of the stocking. (Please see Roller Skate Pillow Crochet Pattern for those dimensions.)

Materials:

Bernat Softee Chunky yarn

5.5 oz. red

1 oz. green

1 oz. white

Bernat Pipsqueak yarn

1 oz. white

Size M (9.00 mm) crochet hook

Yarn needle

Fiberfil


Finished stocking measures approximately 14” wide by 15” tall (including wheels).


DIRECTIONS:

BOOT:

Row 1: Beginning at heel with green yarn, ch 4, sc in 2nd ch from hook and in next 2 ch (3 sc).

Row 2: Ch 1, turn, inc in first st, sc in next st, inc in last st (5 sc).

Rows 3-14: Ch 1, turn, sc in each st.

Row 15: Ch 1, turn, inc in first st, sc in next 3 sts, inc in last st (7 sc).

Rows 16-28: Ch 1, turn, sc in each st.

Row 29: Ch 1, turn, dec over first 2 sts, sc in next 3 sts, dec over last 2 sts (5 sc).

Row 30: Ch 1, turn, sc in each st.

Row 31: Ch 1, turn, dec over first 2 sts, sc in next st, dec over last 2 sts (3 sc).

Rnd 32: Ch 1, turn, 2 sc in first st, sc in next st, 2 sc in last st. Working down side, 1 sc in each of the 31 row ends. Working across remaining lps of starting ch, 2 sc in first ch, sc in next ch, 2 sc in last ch. Work down opposite side with 1 sc in each of the 31 row ends (72 sc). Join with sl st in first sc. Fasten off green.

Rnd 33: Join red yarn at center st of heel end. Ch 1, sc in BLO of each st around. Join with sl st.

Rnds 34-37: Ch 1, sc in each st. Join with sl st in first sc of rnd.

Rnd 38: Ch 1, sc in next 36 sts, work 3 sc tog, sc in next 33 sts (70 sc).

Rnd 39: Ch 1, sc in next 35 sts, work 3 sc tog, sc in next 30 sts, work 2 sc tog (67 sc).

Rnd 40:  Ch 1, sc in next 33 sts, work 5 sc tog, sc in next 27 sts, work 2 sc tog (62 sc).

Rnd 41:  Ch 1, sc in next 31 sts, work 5 sc tog, sc in next 26 sts (58 sc).

Rnd 42:  Ch 1, sc in next 29 sts, work 5 sc tog, sc in next 24 sts (54 sc).

Rnd 43:  Ch 1, sc in next 27 sts, work 5 sc tog, sc in next 22 sts (52 sc).

Rnd 44:  Ch 1, sc in next 25 sts, work 5 sc tog, sc in next 20 sts (46 sc).

Rnd 45:  Ch 1, sc in next 23 sts, work 5 sc tog, sc in next 18 sts (42 sc).

Rnds 46-68: Ch 1, sc in each st. Join with sl st in first sc of rnd. Fasten off red.

Rnd 69: Attach white pipsqueak yarn, ch 1, working in FLO, *sc in next 6 sts, 2 sc in next st* repeat around (48 sc). Join with sl st.

Rnds 70-74: Working through both loops, sc in each st. Join with sl st. At end of Rnd 74, fasten off pipsqueak yarn. Fold cuff down over boot.

Hanger: Attach red at top of boot on the outside edge. Ch 10, sl st in same sp. Fasten off.

WHEELS: (Make 2)

Rnd 1: With red yarn, ch 2 (or magic circle), 6 sc in 2nd ch. Do not join.

Rnd 2: 2 sc in each st (12 sc). Join with sl st in first sc of rnd. Fasten off red.

Rnd 3: With white yarn, *sc in next st, 2 sc in next st,* repeat around (18 sc). Do not join.

Rnd 4: Working in BLO, sc in each st. Do not join.

Rnds 5-6: Sc in each st. Join with sl st at end of Rnd 6. Fasten off white leaving 12” length for sewing.

Repeat Rnds 1-6 for second half of wheel. Stuff each section and sew tog end to end. Sew to bottom of skate approximately 2” from heel.

TOE STOP:

Rnd 1: With green yarn, ch 2 (or magic circle), 6 sc in 2nd ch. Do not join.

Rnd 2: 2 sc in each st (12 sc). Do not join.

Rnd 3: Working in BLO, sc in each st. Do not join.

Rnd 4: *Sc in next 2 sts, dec,* repeat twice (9 sc). Do not join.

Rnd 5: *Sc in next st, dec,* repeat twice (6 sc). Join with sl st. Fasten off green leaving 12” length for sewing.

SHOELACE:

Cut a piece of white yarn approximately 3 yards long. Starting near the bottom at center front, lace yarn in cross-cross fashion like shoelaces with the lace inserting every other row going up to just below the fur cuff. Tie in a bow. Cut excess yarn.

PDF download:  Roller Skate Stocking Crochet Pattern


Roller Skate Pillow Crochet Pattern


Also available is a roller skate ornament crochet pattern at https://www.etsy.com/MyFingersFly/listing/877943632/roller-skate-ornament-crochet-pattern?utm_source=Copy&utm_medium=ListingManager&utm_campaign=Share&utm_term=so.lmsm&share_time=1603723843850

More Christmas Projects

Advent Calendar Christmas Ornaments Crochet Pattern Ebook

Melted Snowman Ornament

Christmas in July Blog Hop

Texas Flag Christmas Tree Ornament

Moose Ornament

Nutcracker Cuddler

Free “Handmade with Love” Gift Tags