Posted on — 7 Comments

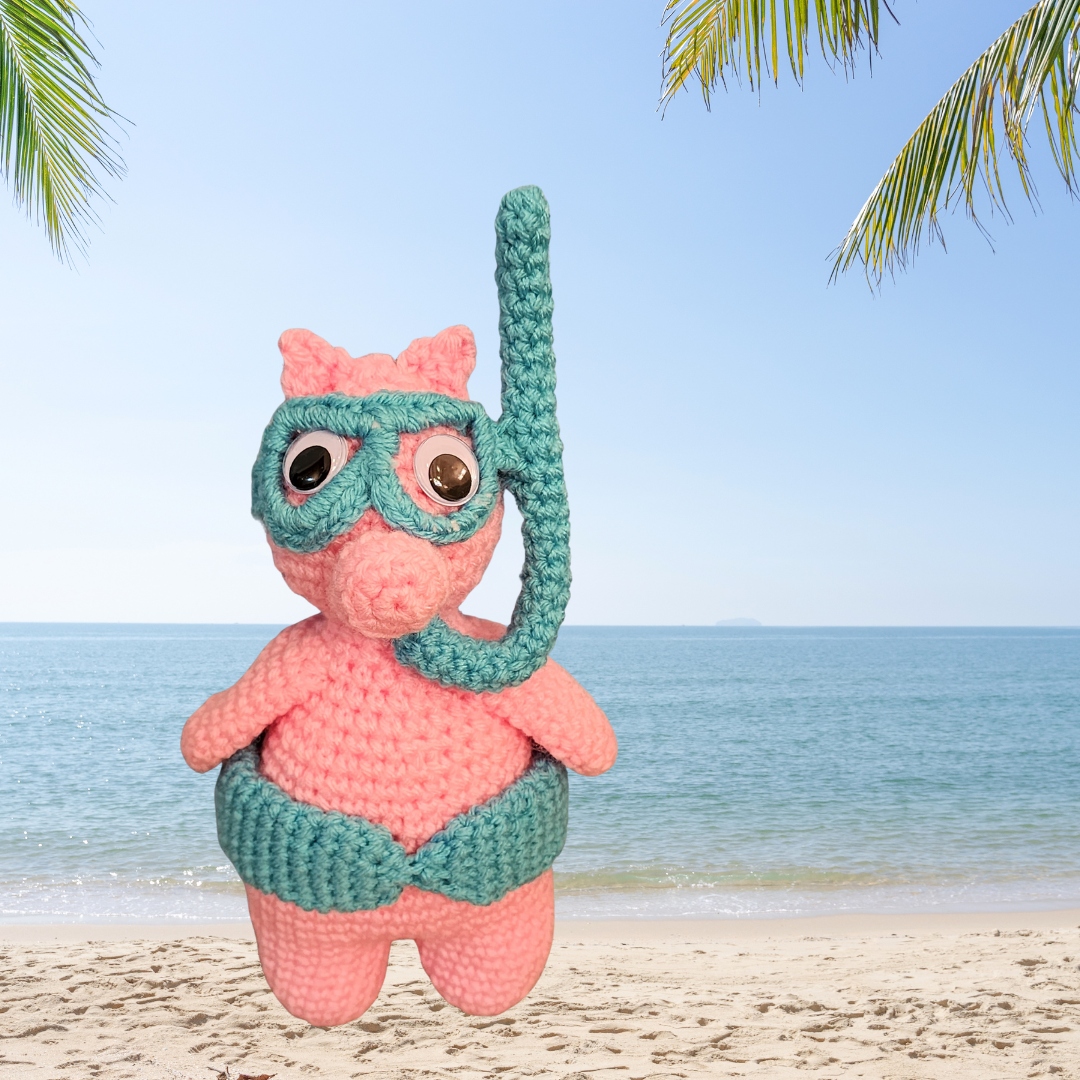
Snorkeling Pig Amigurumi Pattern

snorkeling pig


It’s June again, National Zoo & Aquarium Month. Each day this month, there will be links to all sorts of free animal crochet patterns from some of the most talented crochet designers in the world.

National Zoo & Aquarium Month Blog Hop

June 1 is World Reef Awareness Day, so we started the hop 2 years ago with different types of fish patterns. This year I have something a little different. I know, I know, pigs aren’t animals that live along a reef, but here’s my logic for this pattern.

Last month I traveled to Nassau, Bahamas with my husband on his company trip. There are so many excursions available to tourists that it was really hard to decide. The one that caught my eye was going to Pig Beach to swim with the pigs. I immediately thought, “I’ll have to crochet a swimming pig!” Well, the excursion that we went on was on a catamaran to a coral reef for some snorkeling. So that’s how my swimming pig turned into a snorkeling pig! I really hope you enjoy making him as much as I did.


Visit the All Summer Crochet Hop for free patterns every day through June 15

All Summer Crochet Blog Hop 2026 | 15 Free Patterns, 15 Days, One Beautiful Summer


Get the Snorkeling Pig Amigurumi pattern as a free download for one day only on June 10

Snorkeling Pig Amigurumi Crochet Pattern


NOTE: Downloading this pattern adds you to my email list where I share new patterns, exclusive discounts, and crochet inspiration. You can unsubscribe anytime—no hard feelings!

Snorkeling Pig


Finished pig measures approximately 10” tall (including snorkel).


Materials:

Worsted weight yarn:

75 yards pink

40 yards blue

Size G (4.0 mm) crochet hook

Yarn needle

Fiberfill

Two 18-mm wiggle eyes

Two 12” pipe cleaners

Soft foam curler

STITCHES:

Invisible decrease: https://youtube.com/shorts/0NC5nXyDvwI?feature=share

Ultimate finish:  https://youtu.be/jVpTr8mId3I

DIRECTIONS:

LEGS: (Make 2)

Rnd 1: With pink yarn, ch 2 (or magic circle), 6 sc in 2nd ch from hook. Do not join. Work in continuous rnds throughout.

Rnd 2: 2 sc in each st (12 sc).

Rnd 3: *Sc in next st, 2 sc in next st,* repeat around (18 sc).

Rnds 4-9: Sc in each st. At end of Rnd 9, Fasten off for first leg.

For second leg, repeat Rnds 1-9. Do not fasten off.

Rnd 10: Sc in next 7 sts, 2 sc in next st, 2 sc in next st on first leg, sc in next 14 sts of first leg, 2 sc in next st, sk last 2 sts of first leg. Switch back to 2nd leg, sk next 2 sts, 2 sc in next st, sc in next 7 sts (36 sc). Do not join. Sew 2 skipped sts of first leg to 2 skipped sts of 2nd leg.

Rnd 11: Sc in each st.

Rnd 12: *Sc in next 5 sts, 2 sc in next st,* repeat around (42 sc).

Rnds 13-16: Sc in each st.

Rnd 17: *Dec, sc in next 5 sts,* repeat around (36 sc).

Rnds 18-19: Sc in each st.

Rnd 20: *Dec, sc in next 4 sts,* repeat around (30 sc).

Rnds 21-22: Sc in each st.  Stuff legs.

Rnd 23: *Dec, sc in next 3 sts,* repeat around (24 sc).

Rnds 24-25: Sc in each st. Insert foam curler into body and let it extend out the top. Stuff body.

Rnd 26: *Dec, sc in next 2 sts,* repeat around (18 sc).

Rnd 27: *Dec, sc in next st,* repeat around (12 sc).

Rnd 28: Sc in each st.

Rnd 29: *Sc in next st, 2 sc in next st,* repeat around (18 sc).

Rnd 30: *Sc in next 2 sts, 2 sc in next st,* repeat around (24 sc).

Rnd 31: *Sc in next 3 sts, 2 sc in next st,* repeat around (30 sc).

Rnds 32-36: Sc in each st. Stuff neck. Trim curler if needed.

Rnd 37: *Dec, sc in next 3 sts,* repeat around (24 sc).

Rnd 38: *Dec, sc in next 2 sts,* repeat around (18 sc). Finish stuffing.

Rnd 39: *Dec, sc in next st,* repeat around (12 sc).

Rnd 40: Dec around (6 sc). Join with sl st. Fasten off. Close with ultimate finish.

LEFT EAR:

Row 1: Attach pink yarn in top of head at Rnd 36. Sc in Rnd 36, sc in Rnd 37, sc in Rnd 38 (3 sc).

Row 2: Ch 1, turn, sc in first st, sk next st, sc in last st (2 sc).

Row 3: Ch 1, turn, sc last 2 sts tog (1 sc). Fasten off.

RIGHT EAR:

Row 1: Skip Rnd 39, attach pink yarn in Rnd 38. Sc in Rnd 38, sc in Rnd 37, sc in Rnd 36 (3 sc).

Row 2: Ch 1, turn, sc in first st, sk next st, sc in last st (2 sc).

Row 3: Ch 1, turn, sc last 2 sts tog (1 sc). Fasten off.

Surface Crochet Video

SNOUT:

Rnd 1: With pink yarn, ch 2 (or magic circle), 6 sc in 2nd ch from hook (6 sc). Do not join.

Rnd 2: 2 sc in each st (12 sc). Join with sl st.

Rnd 3: Working in BLO, sc in each st.

Rnd 4: Working in both lps, sc in each st. Join with sl st. Fasten off leaving 9” length for sewing. Sew snout to head at Rnds 29-32.

ARMS: (Make 2)

Rnd 1: Ch 2 (or magic circle), 6 sc in 2nd ch from hook. Do not join. Work in continuous rnds throughout.

Rnd 2: 2 sc in each st (12 sc).

Rnd 3: *Sc in next 3 sts, 2 sc in next st,* repeat around (15 sc).

Rnds 4-10: Sc in each st. At end of Rnd 10, join with sl st. Fasten off leaving 12” length for sewing. Sew Rnds 9-10 of arms to sides of body at Rnds 25-26.

DIVING BELT:

Rnd 1: With blue yarn, ch 2 (or magic circle), 6 sc in 2nd ch from hook. Do not join. Work in continuous rnds throughout.

Rnd 2: 2 sc in each st (12 sc).

Rnd 3: Sc in each st.

Repeat Rnd 3 until belt is 10” long (or long enough to encircle pig’s belly).

Next Rnd: Dec around (6 sc). Close with Ultimate Finish. Fasten off yarn leaving 12” length for sewing. Wrap belt around belly and sew in place.

GOGGLES:

Bend pipe cleaner into shape of goggles, being sure to leave enough space to see eyes.

With blue yarn, sc around frame. Join with sl st. Do not fasten off.

STRAP:

Row 1: Sc in next 2 sts on side of frame.

Row 2: Ch 1, turn, sc in 2 sts.

Repeat Row 2 until strap measures approximately 5” (or correct length to wrap around head). Fasten off leaving 12” length for sewing. Sew in place above snout. Sew on (or glue on) eyes in center of goggle lenses.

SNORKLE:

Row 1: Rnd 1: With blue yarn, ch 2 (or magic circle), 6 sc in 2nd ch from hook. Do not join. Work in continuous rnds throughout.

Row 2: Sc in each st.

Repeat Row 2 until piece measures 6”. Join with sl st. Fold pipe cleaner in half and insert into snorkel. Close with Ultimate Finish.

Sew end of snorkel under snout.

Bend bottom of snorkel. Sew to side of goggles with top of snorkel extending approximately 1” above ears.

snorkeling pig


To get a free copy of the PDF, please join My Fingers Fly Group on Facebook for this exclusive offer.

https://www.facebook.com/groups/875538646117910


More Pig Crafts

Three Little Pigs Panhandlers Crochet Pattern
Pig Eyeglass Holder Crochet Pattern
Pig Kitchen Boa Crochet Pattern
Pigskin Amigurumi Pattern
Pig Crochet Pattern Bundle

(ICYMI) In Case You Missed It

rainbow towel holder


Rainbow Towel Holder Crochet Pattern


Crochet Pattern Book, Crochet a Rainbow Ebook


Affiliate Links

This page contains affiliate links. If you choose to purchase after clicking a link, I may receive a commission at no extra cost to you.


Posted on — 7 Comments

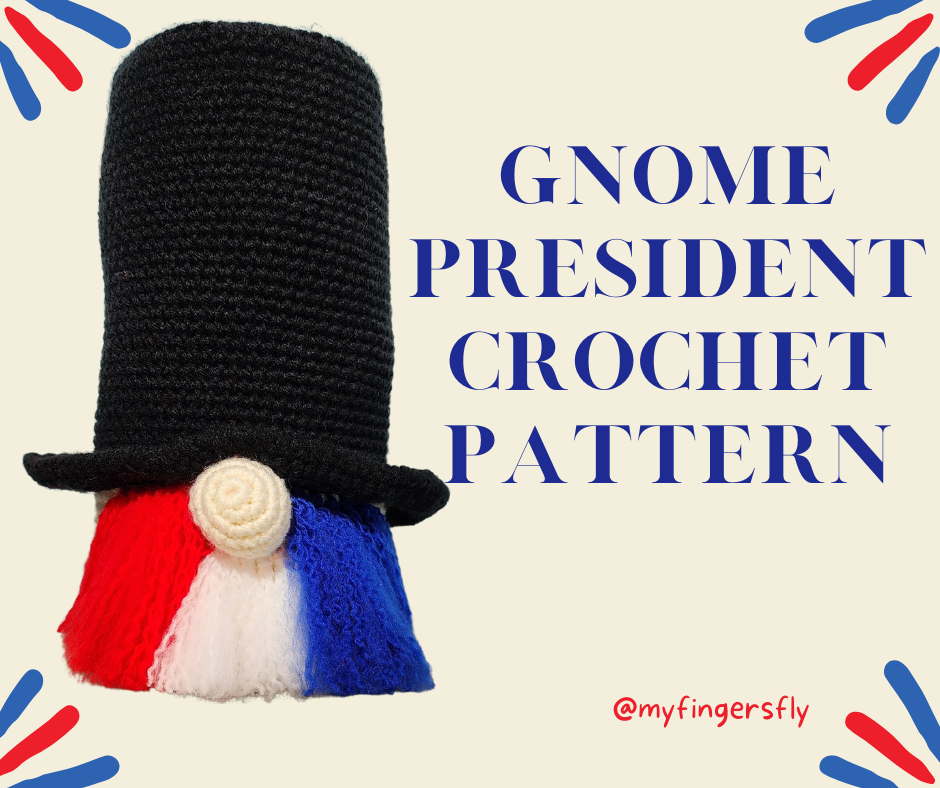
Gnome President Crochet Pattern

gnome president

It’s the beginning of the President’s Day weekend. Will you have the day off on Monday? A day off means extra crochet time!

My husband wanted something for his office to signify President’s Day, and I love gnomes, so I came up with Lincoln, the Gnome President. He’s so cute and easy to make! The only sewing involved is attaching his nose to his face.

Gnome measures approximately 11” tall.

Materials:

Worsted weight yarn –

170 yards black

75 yards ivory

5 yards each red, white, blue

Size H (5.0 mm) crochet hook

Yarn needle

Fiberfil

Cardboard

Directions:

HEAD:

Rnd 1: With ivory yarn, ch 2 (or magic ring), 6 sc in 2nd ch from hook. Do not join. Work in continuous rnds throughout unless otherwise specified.

Rnd 2: 2 sc in each st (12 sc).

Rnd 3: *Sc in next st, 2 sc in next st, repeat around (18 sc).

Rnd 4: *Sc in each of next 2 sts, 2 sc in next st, * repeat around (24 sc).

Rnd 5: *Sc in each of next 3 sc, 2 sc in next st,* repeat around (30 sc).

Rnd 6: *Sc in each of next 4 sts, 2 sc in next st,* repeat around (36 sc).

Rnd 7: *Sc in each of next 5 sc, 2 sc in next st,* repeat around (42 sc).

Rnd 8: *Sc in each of next 6 sts, 2 sc in next st,* repeat around (48 sc).

Rnd 9: *Sc in each of next 7 sts, 2 sc in next st,* repeat around (54 sc).

Rnd 10: *Sc in each of next 8 sts, 2 sc in next st,* repeat around (60 sc). Join with sl st. Ch 1.

Rnd 11: Working in back loops only, sc in each sc.

Rnd 12: Working in both loops, sc in each sc.

Rnds 13-24: Sc in each sc around. Join at end of Rnd 24 and fasten off ivory.

Rnd 25: With wrong side facing you, attach black yarn and work in back loops only. *Sc in next 4 sts, 2 sc in next st,* repeat around (72 sc). Do not join. Work in continuous rnds for remainder of hat brim.

Rnd 26: *Sc in next 5 sts, 2 sc in next st,* repeat around (84 sc).

Rnd 27: *Sc in next 6 sts, 2 sc in next st,* repeat around (96 sc).

Rnd 28: Sc in each sc. Fasten off black.

HAT:

Rnd 1: With black yarn, ch 2 (or magic ring), 6 sc in 2nd ch from hook. Do not join. Work in continuous rnds throughout unless otherwise specified.

Rnd 2: 2 sc in each st (12 sc).

Rnd 3: *Sc in next st, 2 sc in next st, repeat around (18 sc).

Rnd 4: *Sc in each of next 2 sts, 2 sc in next st, * repeat around (24 sc).

Rnd 5: *Sc in each of next 3 sc, 2 sc in next st,* repeat around (30 sc).

Rnd 6: *Sc in each of next 4 sts, 2 sc in next st,* repeat around (36 sc).

Rnd 7: *Sc in each of next 5 sc, 2 sc in next st,* repeat around (42 sc).

Rnd 8: *Sc in each of next 6 sts, 2 sc in next st,* repeat around (48 sc).

Rnd 9: *Sc in each of next 7 sts, 2 sc in next st,* repeat around (54 sc).

Rnd 10: *Sc in each of next 8 sts, 2 sc in next st,* repeat around (60 sc). Join with sl st.

Place top of hat on cardboard (or fusible foam) and mark. Cut out circle and set aside.

Rnd 11: Working in BLO, ch 1, sc in same st and in each sc around. Join with sl st.

Rnds 12-40: Working in both loops, ch 1, sc in each st around. Do not join.

Rnd 41: For brim, work in front loops only. *Sc in next 4 sts, 2 sc in next st,* repeat around (72 sc). Do not join. Work in continuous rnds for remainder of hat brim.

Rnd 42: *Sc in next 5 sts, 2 sc in next st,* repeat around (84 sc).

Rnd 43: *Sc in next 6 sts, 2 sc in next st,* repeat around (96 sc).

Rnd 44: Sc in each sc. Do not fasten off black yarn.

Insert cardboard into top of hat. Stuff head firmly. Pin head and hat together and sew Rnd 25 of head to Rnd 41 of hat.

Rnd 45: Pick up black yarn and work 1 rnd of reverse sc (crab st) through both thicknesses. Join with sl st. Fasten off.

NOSE:

Rnd 1: With ivory yarn, ch 2 (or magic ring), 6 sc in 2nd ch from hook. Do not join. Work in continuous rnds throughout unless otherwise specified.

Rnd 2: 2 sc in each st (12 sc).

Rnd 3: *Sc in next st, 2 sc in next st, repeat around (18 sc).

Rnds 4-6: Sc in each st.

Rnd 7: *Sc in next st, dec over next 2 sts,* repeat around (12 sc). Join with sl st. Fasten off ivory yarn leaving 12” length for sewing. Stuff nose and sew to face just beneath brim of hat.

BEARD:

Cut 7” lengths of white yarn. Pull 2 strands through each st at bottom of nose (approximately 6-7 spaces). Measure across white beard so you can make the red and white portions the same width.

Cut 10” lengths of red and blue yarn. Pull 2 strands through each st at top of face from trunk to ears (approximately 6-7 spaces each side) with red on one side of nose and blue on the other side of nose.

Use a yarn needle to split yarn into separate strands. Trim bottom (if desired).

If a fluffier beard is desired, pull a dog brush through the beard several times, being careful to clean the brush after each color so you don’t transfer the colors.

Weave in all ends.

Get an ad-free copy (with assembly photos) at: Gnome President Crochet Pattern

president's day activity sheet


More Gnomes

Skinny Gnome Ornament Crochet Pattern

Gnome Crochet Patterns Ebook


ICYMI (In Case You Missed It)


lion heart pillow


Lion Heart Pillow Crochet Pattern


lover's eye necklace


Lover’s Eye Necklace Crochet Pattern


friendship card


National Send a Card to a Friend Day


frog Valentine card


Frog Valentine’s Card


Affiliate Links

This page contains affiliate links. If you choose to purchase after clicking a link, I may receive a commission at no extra cost to you.


Posted on — Leave a comment

Halloween Treat Bags

halloween treat bag

Halloween is finally here! Did you finish your Halloween crochet projects? Show us what you made at https://www.instagram.com/myfingersfly.

Remember how special you felt as a child when someone gave out candy in those little white Halloween bags? I have created a PDF that you can download to make those bags at home and fill with candy.

Printable Halloween Treat Bags

halloween treat bag

YouTube: https://youtu.be/Sgs7MMnua18

More Halloween Freebies

halloween patterns

Halloween Pattern Roundup


Halloween Activity Page


Here’s a Halloween activity to keep the kids busy while you finish up their costumes.

Halloween Activity Page


Sugar Skull Gift Tag


Sugar Skull Gift Tags for Halloween

Halloween Coloring Book


ICYMI (In Case You Missed It)

unicorn butt ornament


Unicorn Butt Ornament Crochet Pattern


la llorona puppet


La Llorona Hand Puppet


horse butt ornament


Horse Butt Ornament Crochet Pattern


Affiliate Links

This post contains affiliate links. This means I may earn a commission should you chose to sign up for a program or make a purchase using my link. It’s okay – I love all of these companies anyways, and you will too!


Lion Brand YarnGet 50% off new colors added to clearance. 

Up to 55% off your faves!


Posted on — 11 Comments

Unicorn Butt Ornament Crochet Pattern

unicorn butt ornament

The response to the Horse Butt Ornament has been overwhelming! I just couldn’t resist turning them into unicorns, so I got out my scrap basket and played around with colors to use the same pattern to create a Unicorn Butt Ornament. Using white or rainbow yarn as the MC and adding different kinds of tails will allow you to create so many different unicorns for your Christmas tree. Instead of a boring bow, how about a unicorn to decorate your Christmas gifts?


Materials:

Worsted weight yarn:

30 yards MC (white or rainbow)

10 yards CC (gold or rainbow)

Size G (4.0 mm) crochet hook

Ribbon

Gauge: 9 sc = 2″, 9 rows = 2″

Directions:

Rnd 1: With MC yarn, ch 2 (or magic ring), 10 sc in 2nd ch from hook. Do not join. Work in continuous rnds throughout.

Rnd 2: *Sc in next st, 2 sc in next st,* repeat around (15 sc).

Rnd 3: *Sc in next 2 sts, 2 sc in next st,* repeat around (20 sc).

Rnd 4: *Sc in next 3 sts, 2 sc in next st,* repeat around (25 sc).

Rnds 5-11: Sc in each st.

Rnd 12: *Dec over next 2 sts, sc in next 3 sts,* repeat around (20 sc).

Rnds 13-14: Sc in each st.

Rnd 15: *Dec over next 2 sts, sc in next 3 sts,* repeat around (16 sc).

Rnds 16-18: Sc in each st. Join with sl st at end of Rnd 18. Fasten off MC.

Rnd 19: Join CC, sc in each st.

Rnd 20: Sc in each st.

Rnd 21: Lay flat and sc through both sides. 2 sc in first st, sc across, 2 sc in last st (10 sc).

Use CC yarn to embroider line between legs from bottom up to Rnd 12.

Tail:

Cut 6 pieces of yarn 8” long (10” for braid, 12” for curly tail) and fold in half. Insert hook into top center of Rnd 1. Pull yarn through st, then pull ends of yarn through center lp. Pull tight.

Add a bow to the tail for decoration.

Cut a piece of ribbon approximately 12” long and fold. Pull through top of unicorn butt and tie off for hanger.

Weave in all ends.

How to Make a Curly Tail

PDF Download: Unicorn Butt Ornament Crochet Pattern


Download the Ornament Advent Calendar with links to all 24 patterns

Ornament Advent Calendar

Purchase the bundle of all 24 ornaments for only $9.99

https://www.ravelry.com/redeem/my-fingers-fly-designs?sale=410562

More Unicorn Designs

unicorn stocking


Do Unicorns Live Forever?


Do Unicorns Live Forever? – a children’s book


Unicorn Fanny Pack Crochet Pattern


National Unicorn Day


Unicorn Crochet Patterns Ebook

National First Responders Day


Firefighter's Jacket Baby Sweater crochet pattern, NB-3M, 6-9M or 12-18M sizes with axe rattle pattern
https://ravel.me/firefighter-baby-sweater
https://ravel.me/paramedic-baby-sweater
Baby Police Officer Sweater Crochet Pattern
https://ravel.me/police-officer-baby-sweater


First Responder Baby Sweaters Crochet Patterns Ebook - Baby Firefighter, Baby Policeman, Baby Paramedic
First Responder Baby Sweaters Crochet Patterns Ebook – Baby Firefighter, Baby Policeman, Baby Paramedic


ICYMI (In Case You Missed It)

halloween patterns


Halloween Pattern Roundup


Halloween Activity Page


Here’s a Halloween activity to keep the kids busy while you finish up their costumes.

Halloween Activity Page


la llorona puppet


La Llorona Hand Puppet


rocket nap buddy

Rocket Nap Buddy Crochet Along

We’re still looking for a winner! Post your finished project on Ravelry: https://ravel.me/rocket-nap-buddy

or in My Fingers Fly Facebook Group. https://www.facebook.com/groups/875538646117910


horse butt ornament


Horse Butt Ornament Crochet Pattern


Affiliate Links

This post contains affiliate links. This means I may earn a commission should you chose to sign up for a program or make a purchase using my link. It’s okay – I love all of these companies anyways, and you will too!

Lion Brand YarnGet 30% off yarn and kits. 

Up to 50% off yarn packs


Posted on — 6 Comments

La Llorona Hand Puppet

la llorona puppet

Last week we went back to San Antonio for a conference for my husband’s job. We stayed at the historic Menger Hotel, so I was really hoping for a supernatural experience. The Menger is said to be haunted by as many as 40-50 different spirits, including some famous dignitaries. The Menger Bar is where Teddy Roosevelt recruited his Rough Riders in 1898 in preparation for the Spanish-American War, although at the time they were called Teddy’s Terrors. Roosevelt is occasionally still spotted sitting at a table in the bar, just as he did on his recruiting visits. One poor janitor got locked into the bar after closing one night. He saw Teddy sitting at the bar and was so frightened he tried to leave, but he found that he had been locked in. He made so much noise, the night watchman came and unlocked the door for him. The janitor quit his job soon after.

menger hotel
Menger Hotel


Another famous guest who still refuses to leave is Richard King, the founder of the King Ranch. He was staying at the Menger in his own personal suite at the time of his death, and the suite still contains the bed in which he died. Residents have reported a red orb rotating above the bed.

Although I personally did not experience anything supernatural, one of my husband’s colleagues experienced lights turning on and off in her suite and the television changing channels by itself. Another coworker said the doorknobs in his suite kept rattling as though someone (or something) was trying to get in.

dias de los muertos
Dias de Los Muertos Alter at Menger Hotel


The haunted Menger hotel in October, so close to Halloween and Dias de los Muertos – what else could I make this week other than La Llorona? Have you heard her story? There are many versions of the story dating back hundreds of years. Maria was born in Mexico to a peasant family, but her beauty caught the attention of a wealthy man who married her. After the birth of their two children, his eyes began to wander to other women. She takes her children to the river and drowns them, then drowns herself. However, she is refused entry into heaven until she brings her children with her. She has since been wandering the afterlife searching for her children, crying out, “Mis hijos.” Mexican children (and Mexican-American children) grow up worried that La Llorona will take them if they misbehave.

la llorona hand puppet

La Llorona Hand Puppet

Materials:
Worsted weight yarn:
100 yards white
60 yards black
5 yards light gray (or light tan)
Size G (4.0 mm) crochet hook
Yarn needle

Measures approximately 8” wide by 8.5” tall.

Gauge: 5 sc = 1”, 5 rows = 1”

Directions:
BACK:
Row 1: Ch 21, sc in 2nd ch from hook and in next 19 ch (20 sc).
Rows 2-4: Ch 1, turn, sc in each st.
Row 5: Ch 1, turn, working in BLO, sc in each st.
Rows 6-8: Ch 1, turn, sc in each st (both lps).
Row 9: Ch 1, turn, working in BLO, sc in each st.
Rows 10-12: Ch 1, turn, sc in each st (both lps).
Row 13: Ch 1, turn, working in BLO, sc in each st.
Rows 14-16: Ch 1, turn, sc in each st (both lps).
Row 17: Ch 1, turn, working in BLO, sc in each st.
Rows 18-20: Ch 1, turn, sc in each st (both lps). Ch 11 at end of Row 20.
Row 21: Sc in 2nd ch, sc in next 9 ch, sc in next 20 sc, fsc 10 times (40 sc).
Rows 22-27: Ch 1, turn, sc in each st. Fasten off white.
Row 28: Turn, attach black yarn in 13th st. Sc in this st and in next 15 sts (16 sc).
Rows 29-36: Ch 1, turn, sc in each st.
Rows 37-41: Ch 1, turn, dec over first 2 sts, sc across, dec over last 2 sts (6 sc at end of Row 41). Fasten off black after Row 41 leaving 9” length for sewing.
FRONT:
Repeat Rows 1-27 of Back.
Row 28: Turn, attach light gray yarn in FLO of 13th st. Working in FLO, sc in this st and in next 15 sts (16 sc).
Rows 29-32: Ch 1, turn, sc in each st.
Row 33: Ch 1, turn, sc in first 7 sts, in next st work 4 hdc in same st, pull up lp in last st, insert hook in first st, pull lp through (modified
popcorn st for nose).
Rows 34-36: Ch 1, turn, sc in each st.
Rows 37-41: Ch 1, turn, dec over first 2 sts, sc across, dec over last 2 sts (6 sc at end of Row 41). Fasten off light gray yarn after Row 41
leaving 9” length for sewing.
EYES: (Make 2)
With black yarn, ch 2 (or magic ring), 6 sc in 2nd ch. Join with sl st. Fasten off leaving 9” length for sewing. Sew eyes to Rows 34-35
approximately 4 sts apart. Use excess yarn to straight st 2-3 black lines coming from bottoms of eyes.
MOUTH:
With black yarn, ch 4, sc in 2nd ch from hook, sc in next ch, 3 sc in next ch. Working on opposite side of beg ch, sc in next ch, 2 sc in last ch (8 sc).
Join with sl st. Fasten off black yarn leaving 6” length for sewing. Sew mouth centered under nose.
With right sides together, sew front and back together. Be sure the remaining lps of Rows 5, 9, 13, 17, and 28 are on the right sides.
COLLAR:
Turn puppet upside down. Join white yarn in front lp of Row 28. Using remaining front lps, *sc, sk 1 st, 5 dc in next st, sk 1 st,* repeat
across.
RUFFLES:
Join white yarn in front lp of Rnd 17. Using remaining front lps, *sc, sk 1 st, 5 dc in next st, sk 1 st,* repeat across front and back. Join with
sl st. Fasten off.
Repeat on front lps of Rnds 5, 9, and 13.
HAIR:
Cut black and white yarn approximately 12” long. Fold 2 strands of yarn in half, insert hook into back of head cap, pull yarn through st, pull
both pieces of yarn through loop, pull tight. Repeat until back of head and seam between front and back of head are filled.

YouTube for Amigurumi Hair:
https://youtu.be/pYuLD0mUfuo

PDF download is 50% off through Halloween: La Llorona Hand Puppet Crochet Pattern

halloween patterns


Halloween Pattern Roundup

The Big Book of Crochet Tips and Tricks

crochet tips and tricks

Whether you’re new to the craft or have been crocheting for a lifetime, there’s always something new to learn.

  • Price $17.99
  • 216 pages of crochet tips and tricks from the best crochet designers
  • Collaboration of 38 crochet designers
  • Comprehensive guides on popular crochet topics
  • Supported by photo and video tutorials (where applicable)
  • Lots of useful info in one beautifully formatted eBook
  • Links to designers’ websites and social media channels


big book of crochet patterns

The companion book, The Big Book of Crochet Patterns contains 37 amazing projects from the same top crochet designers.


bobble tastic coin purse


Today’s free pattern in the Bobble-tastic Coin Purse by The Wool Nest. 

Each pattern is available as a free download for 24 hours.

ICYMI (In Case You Missed It)

astronaut dolls


Astronaut Doll Crochet Pattern


autumn birthday gift tag


Autumn Birthday Gift Tag


rocket nap buddy

Rocket Nap Buddy Crochet Along

We’re still looking for a winner! Post your finished project on Ravelry: https://ravel.me/rocket-nap-buddy

or in My Fingers Fly Facebook Group. https://www.facebook.com/groups/875538646117910


horse butt ornament


Horse Butt Ornament Crochet Pattern


etsy logo

Thinking of opening an Etsy shop? Use this link to get 40 free listings. https://etsy.me/3F3kxwc


Lion Brand YarnGet 30% off yarn & kits! 

Up to 45% off sock yarns

Money Saving Offers

Get $15 off when you try Madison Reed Hair Color – https://refer.madison-reed.com/Lisa465

Shutterfly – Get a free white mug or desktop plaque

https://invite-shutterfly.com/x/G95T2B

Open a new qualifying Chase checking account and get rewarded

https://accounts.chase.com/raf/share/2620659599

With gas prices getting higher, we could all use a little cash back.

Check out this free app that gets you cash back on gas and other errands! Click this link or use promo code 46ZCG to get an extra 15¢/gal bonus the first time you make a purchase. https://upside.app.link/46ZCG

Get $20 off your first Uber Eats order of $25 or more at http://Hungry? Get $20 off your first Uber Eats order of $25 or more. Terms apply. Use my code at checkout: eats-lisaf21461ue https://ubereats.com/feed?promoCode=eats-lisaf21461ue

Hey! Thought you’d like to try Ibotta, a cash back rewards app that I use to make real money every time I shop for groceries, online purchases, and more! Just use my referral code “eugysjd” at registration. Sign up at → https://ibotta.onelink.me/iUfE/8cc13c64?friend_code=eugysjd

Join Rakuten and get $30 cash back. Plus earn money on online purchases.

https://www.rakuten.com/r/LGT111?eeid=28187