Posted on — 18 Comments

Flashlight Baby Rattle Crochet Pattern

Flashlight Shaped Baby Rattle Crochet Pattern

Have you noticed all the baby posts on social media?

The Flashlight Baby Rattle Crochet Pattern uses a baby aspirin bottle filled with beans and yarn from your scrap basket to make a cute little toy that any baby will love!

Flashlight Shaped Baby Rattle Crochet Pattern


Materials:

Small amounts of worsted weight yarn in desired colors

Size G (4.0 mm) crochet hook

Fiberfill

Yarn needle

Small plastic baby aspirin bottle and lid (washed thoroughly) filled with a few beans (or rattle insert)

Directions:

Body: Rnd 1: With CC yarn, ch 2, 6 sc in 2nd ch from hook. Do not join.

Rnd 2: Work 2 sc in each sc around (12 sc).

Rnd 3: *Work 1 sc in next sc, 2 sc in next sc, repeat from * around (18 sc).

Rnd 4: *Work 1 sc in each of next 2 sc, 2 sc in next sc, repeat from * around (24 sc).

Rnd 5: *Work 1 sc in each of next 3 sc, 2 sc in next sc, repeat from * around (30 sc). Join. End off CC.

Rnd 6: Join MC yarn. Working in back loops only, sc in each sc around. Do not join. Work even on 30 sc until the MC portion measures the same length as the pill bottle, then work another 4 rows of sc.  End off.

Lens: With white yarn, repeat Rnds 1-5 of body. End off leaving length for sewing. Add a few beans to the pill bottle to make rattle noise. Seal and place inside body of flashlight, surrounding bottle with fiberfill. Sew lens to open end of body and weave in ends.

Lens cover: Row 1: With CC yarn, ch 4, sc in 2nd ch from hook and next 2 ch. Ch 1, turn.

Row 2: Working in back loops only, sc in each sc. Ch 1 turn. Repeat Row 2 until piece measures long enough to wrap around flashlight body (approximately 30 rows). End off leaving length for sewing. Sew around end of flashlight where body meets lens.

Handle: Rnd 1: With CC yarn, leave length for sewing, ch 8, join. Sc in each ch around. Do not join.

Rnd 2: 2 sc in each ch around (8 sc). Continue to work even on 8 sc until handle measures approximately 4”. Join, end off yarn leaving 12” length for sewing. Stuff handle firmly with fiberfill and sew each end to top of flashlight.

SPIRAL OPTION:

Work body as above until you complete first 5 rounds. On Rnd 6, *work 1 sc white, 1 sc blue, repeat from *. Increase 1 sc on Rnd 6 so that you have an odd number of stitches (31 sc). Repeat this pattern until body reaches desired length.

Flashlight baby rattle crochet pattern
Spiral Flashlight


The flashlight rattle is also included in the Big Book of Baby Rattles – Occupational Edition along with 7 other baby rattles designed to look like Mom’s and Dad’s work tools.

Big Book of Baby Rattles
Big Book of Baby Rattles Crochet Patterns Ebook


Baby Shower Gift Tags

More Designs for Baby

Preemie Crochet Challenge 2021

Impact Wrench Baby Rattle Crochet Pattern

First Responder Baby Sweaters Crochet Patterns Ebook – Baby Firefighter, Baby Policeman, Baby Paramedic

Baby’s Bundle of Joy Crochet Patterns – Angel Baby Rattle

Military Baby Sweaters Crochet Patterns Ebook – Air Force, Green Camo Fatigue, Coastal Military, Marine Corps, Sailor

Posted on — 13 Comments

National Unicorn Day

Unicorn Fanny Pack Crochet Pattern

It’s National Unicorn Day, and here’s an easy design to make for your little unicorn lovers.  They’ll want to wear it everywhere!

Unicorn Fanny Pack Crochet Pattern

Materials:

Worsted weight yarn  –

1.5 oz. white

Few yards pink, red, orange, yellow, green, blue, purple, black

Size H (5.00 mm) crochet hook

Yarn needle

4” zipper – see instructions for shortening zipper at https://youtu.be/s8fyr_As-tA

Needle and thread

Utility strap with quick-release buckle

Black fabric paint (optional)

Gauge 16 sts = 4”

18 rows = 4”

Finished unicorn bag approximately 5” tall by 5” wide

Directions:

PURSE:

Row 1: With white yarn, ch 51, sc in 2nd ch and each remaining ch.

Row 2: Ch 1, turn, sc in each st .

Rows 3-24: Repeat Row 2. Do not fasten off. Fold purse in half. Holding both sides together, sc through both sides to close. Repeat on opposite side. Fasten off white. Adjust zipper size and sew into top of purse.

EARS: (Make 2)

With pink yarn, ch 4, sc in 2nd ch from hook, sc in next ch, 3 sc in last ch. Working on opposite side of starting ch, sc in each of next 2 ch (7 sc). Fasten off pink.

Repeat with white yarn but do not fasten off. Ch 1, turn. Holding wrong sides together (1 pink and 1 white), working through both pieces, sc in each of 1st 2 sc, 2 sc in next 3 sc, sc in each of next 2 sc. Fasten off leaving length for sewing. Sew 1 ear to each side of purse near the top.

HORN:

Rnd 1: With gold yarn, ch 2, 3 sc in 2nd ch from hook. Do not join.

Rnd 2: 2 sc in 1st st, sc in remaining sc (4 sc).

Rnds 3-8: Repeat Rnd 2 (10 sc at end of Rnd 8).

Fasten off leaving length for sewing. Stuff horn and sew to middle of forehead between ears.

MANE:

With red yarn, ch 11, 3 dc in 2nd ch from hook and each rem ch. Fasten off. Repeat with orange, yellow, green, blue, and purple yarn. Sew pieces of mane around the horn.

Sew utility strap with quick-release buckle to back of purse securely using several rows of stitches for strength.

back of fanny pack


PDF Download: Unicorn Fanny Pack Crochet Pattern


Unicorn Crochet Patterns Ebook

7 unicorns patterns for $7.00

Do Unicorns Live Forever?

Lily’s favorite toy fell apart in the laundry, but she learns that change isn’t always a bad thing. This book includes instructions to crochet a Boonicorn doll for your little one.

Unicorn Quotes Coloring Book
It’s a Girl Gift Tag
unicorn butt ornament
Unicorn Butt Ornament
unicorn stocking
Unicorn Stocking


Children's Unicorn Hoodie Crochet Pattern, Sizes 4, 6, and 8
Children’s Unicorn Hoodie Crochet Pattern, Sizes 4, 6, and 8
Unicorn Bobblehead Crochet Pattern
Unicorn Bobblehead, My Fingers Fly


Posted on — 10 Comments

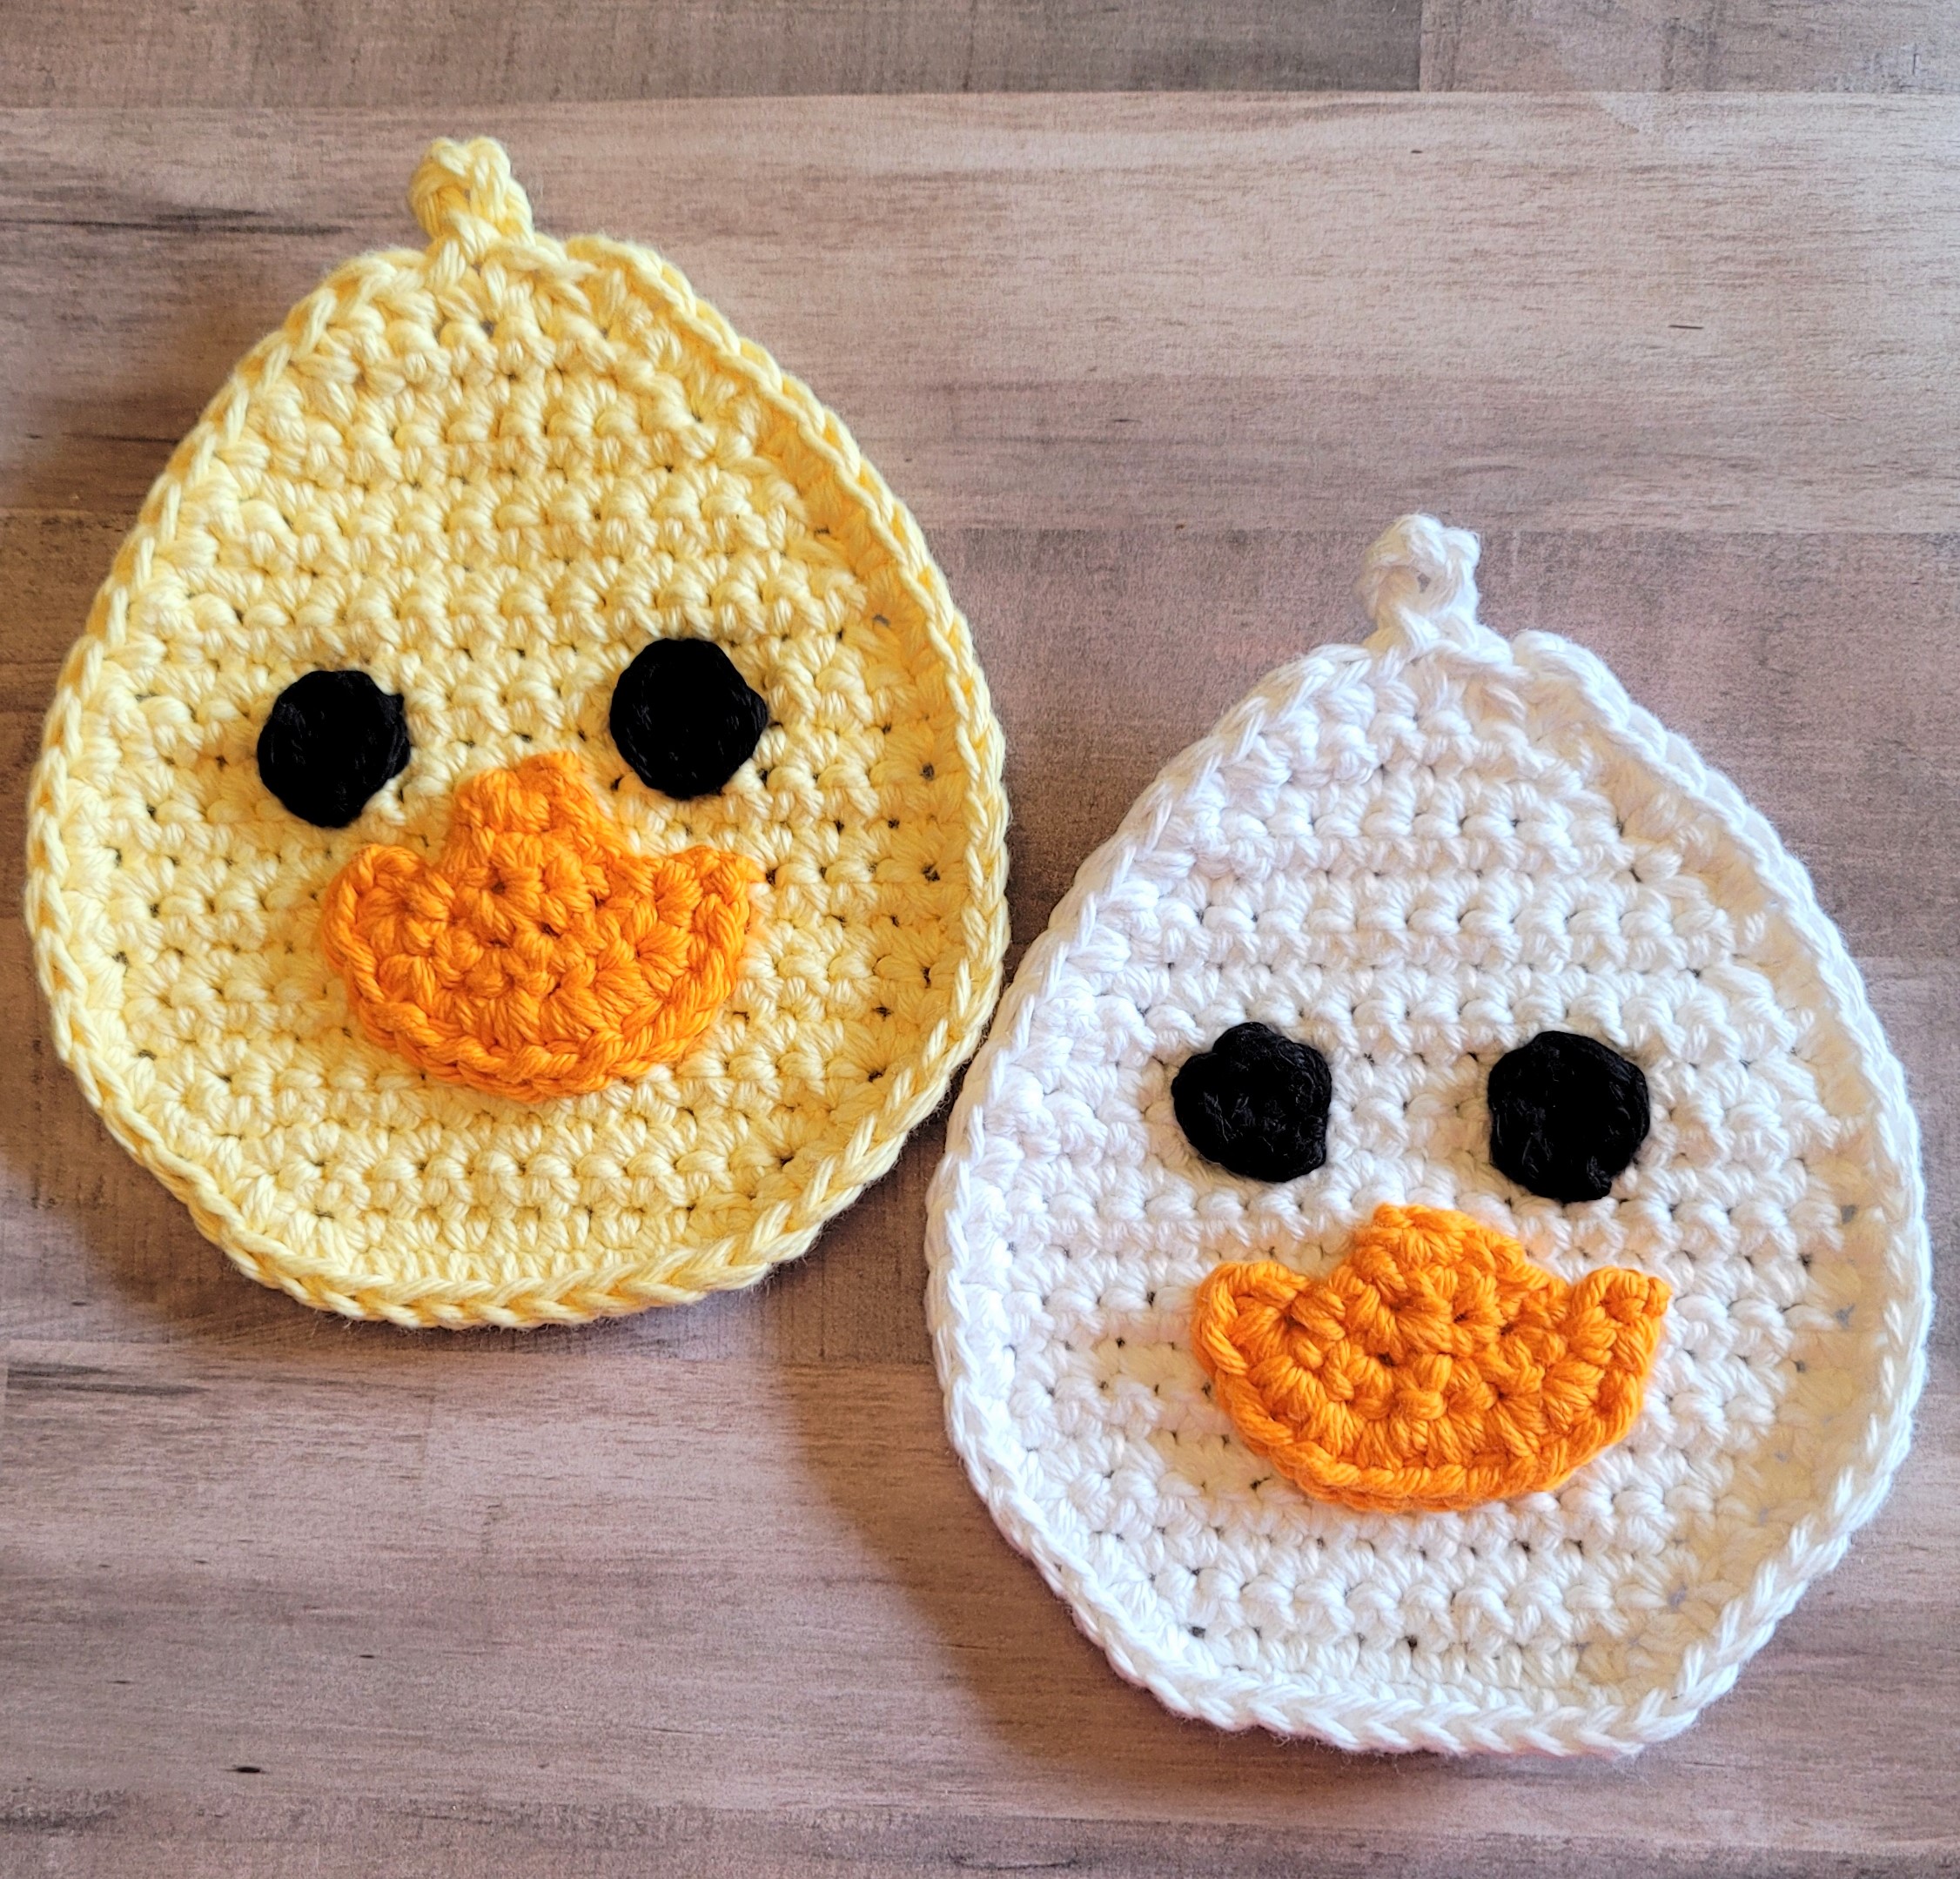
Smiling Duck Potholder Crochet Pattern – Happy Easter!

Duck Potholder Crochet Pattern

Hello everyone! This will be my last post before Easter, and it is chock-full of special offers. These adorable smiling ducks will brighten up your kitchen for the holiday, especially if you have a farm animal theme in your home.

Duck Potholder Crochet Pattern


Materials:
I Love This Cotton yarn –
1 oz. yellow or white
6 yards orange
4 yards black
Size I (5.5 mm) crochet hook
Yarn needle
Measurements:
Approximately 5.5” wide by 6” tall

Directions:
HEAD:
Row 1: With a double strand of yellow (or white), ch 10 (9 sc).
Row 2: Ch 1, turn, 2 sc in first st, sc in next 7 sts, 2 sc in last st (11 sc).
Row 3: Ch 1, turn, 2 sc in first st, sc in next 9 sts, 2 sc in last st (13 sc).
Row 4: Ch 1, turn, 2 sc in first st, sc in next 11 sts, 2 sc in last st (15 sc).
Row 3: Ch 1, turn, 2 sc in first st, sc in next 13 sts, 2 sc in last st (17 sc).
Rows 6-11: Ch 1, turn, sc in each st.
Rows 12-17: Ch 1, turn, dec over first 2 sts, sc in remaining sts (11 sc at end of Row 17).
Rows 18-20: Ch 1, turn, dec over first 2 sts, sc across, dec over last 2 sts (5 sc at end of Row 20).
Row 21: Ch 1, turn, sec over first 2 sts, sc in next st, ch 5, sl st in 5th ch, sc in same st as last sc, dec over last 2 sts of top. Working down the side of the potholder, sc in each row end. Working across bottom (unused loop of foundation ch), 2 sc in first loop, sc across foundation ch, 2 sc in last loop. Working up the other side of the potholder, sc in each row end.
Join with sl st in first sc.
BILL:
Row 1: With double strand of orange yarn, ch 2, 2 sc in 2nd ch.
Rows 2-3: Ch 1, turn, 2 sc in first st, sc across (4 sc at end of Row 3).
Row 4: Ch 1, turn, 2 sc in each st (8 sc).
Row 5: Ch 1, turn, 2 sc in each st (16 sc). Fasten off orange leaving 12” length for sewing. Sew bill to face with bottom at Row 6 of head.
EYES:
With double strand of black yarn, ch 2 (or magic circle), 5 sc in 2nd ch from hook. Join with sl st.
Fasten off black leaving 6” length for sewing.
Sew eyes to face at Rows 11-13.

Add-free PDF version is available at Smiling Duck Potholder Crochet Pattern

Easter Advent Day 3, Duck crochet patterns

More Easter Designs

Zoo Blog Hop Day 15 – Bunnies!

Flower Easter Basket Pattern

Bunny Goody Bag Crochet Pattern

Bunny Bath Pouf Pattern


Bunny Nap Buddy Crochet Pattern

Easter Bunny Hot Rod Crafts

Bunny Scrubby Pattern

Fashion Doll Easter Bonnet

Easter Enchantment Crochet Patterns Ebook – Over 20 Easter Patterns in PDF Format

Easter Lamb Free Pattern

Duck Gift Basket on Addi Knitting Machines

Easter Crochet Pattern Roundup – Over 30 Free Patterns

Butterfly Baby Dress Crochet Pattern

Butterfly Baby Dress Crochet Pattern


21 Fab Rainbow Crochet Patterns

https://greenfoxfarmsdesigns.com/?s=rainbow


Posted on — 10 Comments

Fashion Doll Easter Bonnet

Fashion Doll Easter Bonnet Crochet Pattern

Easter will be here soon, and everyone is busy with their holiday preparations. Your little girls love their new dresses and hats, but they also want their dolls to have new Easter outfits. With this quick and easy pattern, you can crochet an Easter bonnet for each of their fashion dolls using yarn from your scrap basket. They also make cute decorations if your family has an Easter tree.

Doll Easter Bonnet
Doll Easter Bonnet

Materials:

12 yards I Love This Cotton yarn

Crochet hook size G (4.0 mm)

Yarn needle

Flowers, ribbons, or other decorations, as desired

Finished hat measures 2.75” across at brim.

Directions:

Rnd 1: Ch 2 (or magic circle), 6 sc in 2nd ch from hook. Do not join. Work in continuous rnds unless otherwise specified.

Rnd 2: 2 sc in each st (12 sc).

Rnd 3: *Sc in next st, 2 sc in next st,* repeat around (18 sc).

Rnd 4: Working in BLO, sc in each st.

Rnds 5-6: Sc in each st (both loops).

Rnd 7: Working in FLO, *sc in next st, 2 sc in next st,* repeat around (27 sc).

Rnd 8: Working in both loops, sc in each st.

Rnd 9: *Sc in next 2 sts, 2 sc in next st,* repeat around (36 sc).

Rnd 10: Sc in each st. Join with sl st. Fasten off white. Block hat.

Glue on ribbon or flowers as desired for the hat band. For a hanging decoration, cut a piece of cord or ribbon about 10” long. Pull through a stitch at the top of the back of the hat and make a knot.

chicken hat

Sew a 4″ piece of elastic to the sides to create a chicken bonnet.

YouTube tutorial: https://youtu.be/Cm20_JFTA7U

PDF download available at Fashion Doll Easter Bonnet Crochet Pattern and is included in my new ebook – Easter Enchantment Crochet Patterns Ebook – Over 20 Easter Patterns in PDF Format

More Easter Projects

Easter Crochet Pattern Roundup – Over 30 Free Patterns

Bunny Goody Bag Crochet Pattern

Easter Lamb Free Pattern

Duck in Easter Egg Cuddler Crochet Pattern

Flower Easter Basket Pattern

Easter Bunny Hot Rod Crafts

Bunny Bath Pouf Pattern

Duck Gift Basket on Addi Knitting Machines

Owl Eyeglass Holder

Last year I was overwhelmed at the response to my Owl Eyeglass Holder. Because some crocheters aren’t familiar with the crocodile stitch, this week I created a video tutorial. This is a simple project for learning the crocodile stitch, and the owl is just so darn cute! Originally it was designed as an eyeglass holder, but it also makes a cute little plush toy.

More Eyeglass Holders

Poodle Eyeglass Holder

Eyeglass Holder Crochet Patterns Ebook


Lovecrafts Sale

https://www.lovecrafts.com/en-gb/?utm_medium=affiliate&a_aid=343ae146

Posted on — 10 Comments

Flower Easter Basket Pattern

easter basket

Wow! February in South Texas went out like a lion this year. The Snowpocalypse took us by surprise. Fortunately, our home made it through relatively unscathed other than a crack in the water softener line in the garage. Bruno really enjoyed playing in the snow. He doesn’t usually like the cold, so I was surprised to see him jumping around eating snow. https://www.tiktok.com/@myfingersfly/video/6929576274033691909?lang=en&is_copy_url=0&is_from_webapp=v2&sender_device=pc&sender_web_id=6936262251352638982

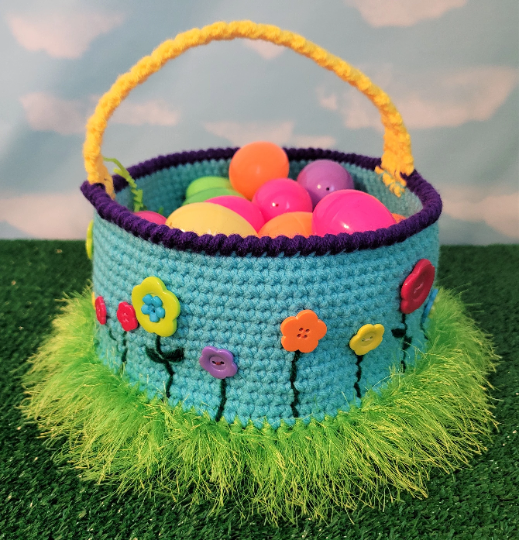
Flower Easter Basket Crochet Pattern

The Flower Easter Basket crochet pattern which is this week’s free pattern. Using a double strand of worsted, a little bit of eyelash yarn for the “grass” and a few colorful buttons to make a field of flowers, this simple pattern can be worked up in an evening.

Flower Easter Basket Crochet Pattern

Materials:

Worsted weight yarn:

2.5 oz. lime green

3.5 oz. baby blue

0.5 oz. yellow

0.5 oz. purple

4 yards leaf green

Eyelash yarn – 1 oz. lime green

Crochet hook size H (5.00 mm)

Multicolored flower buttons

Yarn needle

Needle & thread

9” cardboard circle

Stitch markers are highly recommended for this type of yarn.

Measures approximately 9” diameter by 5” deep

Gauge:  7 sts = 2”, 7 rows = 2”

Directions:

BASKET:

Rnd 1: With 2 strands of lime green yarn, ch 2 (or magic circle), 6 sc in 2nd ch from hook. Do not join. Work in continuous rnds throughout unless otherwise specified.

Rnd 2: 2 sc in each sc around (12 sc).

Rnd 3: *Sc in next sc, 2 sc in next sc,* repeat around (18 sc).

Rnd 4: *Sc in next 2 sc, 2 sc in next sc,* repeat around (24 sc).

Rnd 5: *Sc in next 3 sc, 2 sc in next sc,* repeat around (30 sc).

Rnd 6: *Sc in next 4 sc, 2 sc in next sc,* repeat around (36 sc).

Rnd 7: *Sc in next 5 sc, 2 sc in next sc,* repeat around (42 sc).

Rnd 8: *Sc in next 6 sc, 2 sc in next sc,* repeat around (48 sc).

Rnd 9: *Sc in next 7 sc, 2 sc in next sc,* repeat around (54 sc).

Rnd 10: *Sc in next 8 sc, 2 sc in next sc,* repeat around (60 sc).

Rnd 11: *Sc in next 9 sc, 2 sc in next sc,* repeat around (66 sc).

Rnd 12: *Sc in next 10 sc, 2 sc in next sc,* repeat around (72 sc).

Rnd 13: *Sc in next 11 sc, 2 sc in next sc,* repeat around (78 sc).

Rnd 14: *Sc in next 12 sc, 2 sc in next sc,* repeat around (84 sc).

Rnd 15: *Sc in next 13 sc, 2 sc in next sc,* repeat around (90 sc).

Rnd 16: Working in BLO, sc in each st. Join with sl st at end of rnd. Turn. Cut one strand of lime green.

Rnd 17: Add one strand of eyelash yarn and work the next 3 rows with 1 strand of worsted and 1 strand of eyelash. Working in both loops, sc in each st.

Rnds 18-19: Sc in each st. Join with sl st at end of Rnd 19. Fasten off both strands of yarn.

Rnd 20: Attach double strand of blue yarn. Turn, sc in each st. Do not join.

Rnds 21-34: Sc in each st. Join with sl st at end of Rnd 34. Fasten off both strands of blue yarn.

Rnd 35: Attach double strand of purple yarn. Work crab st in each st. Join with sl st. Fasten off purple yarn.

HANDLE:

Row 1: With double strand of yellow yarn, ch 5, sc in 2nd ch from hook and next 3 ch.

Rows 2-40: Ch 1, turn, sc in each st. Fasten off yellow at end of Rnd 40. Sew one end of handle to each side of basket. For extra strength, sew Rows 1 and 40 to Rnd 34 of basket with blue yarn, then sew Rows 2 and 39 of handle to Rnd 35 of basket with purple yarn.

FLOWERS:

Use single strand of leaf green yarn and straight st to embroider flower stems approximately 1.5”-2” apart around basket, varying in length from “grass” portion to 1”-3” high. At top of each stem, sew a flower button.

BOTTOM:
If you would like a firm bottom to the basket, measure the bottom diameter of the basket (it should be approximately 9”).


Mark a circle on cardboard with 9” diameter (or desired diameter), cut and place it into bottom of basket.

PDF available at https://myfingersflyblog.com/product/flower-easter-basket-crochet-pattern/

More Easter Patterns

Easter Crochet Pattern Roundup – Over 30 Free Patterns

Fashion Doll Easter Bonnet Crochet Pattern
Fashion Doll Easter Bonnet Crochet Pattern – use worsted yarn and a size G hook to turn the Suffragette Hat into an Easter Bonnet for your fashion dolls.

Easter Lamb Free Pattern

Fashion Doll Easter Bonnet

Bunny Nap Buddy Crochet Pattern

Easter Bunny Hot Rod Crafts

Miss Tulip Amigurumi Crochet Pattern

Duck Gift Basket on Addi Knitting Machines

Bunny Bath Puff Pattern

Archie the Donkey Crochet Pattern using Bernat Blanket Yarn

Bunny Scrubby Pattern

Butterfly Baby Dress Crochet Pattern

Mission Inn – Bell Wall Hanging

Don’t forget St. Patrick’s Day


Lovecrafts Sale