Posted on 3 Comments

Northern Lights Slippers Crochet Pattern

This past spring, I made a trip to Edmonton for the Gathering Threads Festival.
At the time, I had just published my Crochet a Rainbow book, so I wore my Rainbow Squares cardigan. A man approached me and told me how much he loved the colors in my sweater and that he could see me all the way across the auditorium because of the bright colors. The next day I went shopping for yarn and met him again – it was Richard, AKA The Notorious Black Shirt Guy from Numana Yarns. While I spoke with Richard and Tammy about how I love to travel and buy local yarns everywhere I go, my eyes were roaming their booth trying to choose from all the lovely yarns they had on display.
Salisbury Bulky – Hypercolored caught my eye, and I grabbed 2 skeins. Richard exclaimed, “I knew you were going to pick that one.!” They are such lovely people, and their yarns are gorgeous!!
Several months later, I took out that yarn to play around with it and find out what it wanted to be.
Because I wanted to design something to represent the beautiful city of Edmonton, and because of the vivid colors of the yarn, we (the yarn and I) decided on a pair of Northern Lights Slippers. Super comfy and easy to crochet.
Ad-free PDF version available at Northern Lights Slippers

Northern Lights Slippers

Women’s Sizes 5/6, 7/8, 9/10

Materials:

MC – 200 [210, 220] yards Numana Yarns, Salisbury Bulky, Hypercolored or any 5-weight yarn

CC –  30 [35, 40] yards 5-weight chenille or velvet yarn

Crochet hook size G (4.0 mm) & H (5.00 mm)

Yarn needle

Foam interface

Gauge: 9 rows = 2”, 8 sc = 2”

Directions are given for size 5/6 with sizes 7/8 and 9/10 in []

SOLE (Make 2):

Row 1: With MC yarn, ch 6, sc in 2nd ch from hook and in each of the rem chs (5 sc).

Row 2: Ch 1, turn, inc in first st, sc across, inc in last st (7 sc).

Rows 3-4: Repeat Row 2 (11 sc).

Rows 5-16 [20,22]: Ch 1, turn, sc in each st.

Row 17 [21,23]: Ch 1, turn, inc in first st, sc across (12 sc).

Row 18 [22,24]: Ch 1, turn, sc in each st.

Row 19 [23,25]: Ch 1, turn, inc in first st, sc across (13 sc).

Row 20 [24,26]: Ch 1, turn, sc in each st.

Row 21 [25,27]: Ch 1, turn, inc in first st, sc across (15 sc).

Rows 22 [26,28]-28[32,34]: Ch 1, turn, sc in each st.

Rows 29 [33,25]-36 [40,42]: Ch 1, turn, dec over first 2 sts, sc across (7 sc at end of Row 36 [40,42]).

Row 37 [41,43]: Ch 1, turn, sc in each st, working down the side, sc in each row end, working across bottom, sc in each loop of beg ch, working up other side sc in each row end. Join with sl st in first sc. Fasten off leaving 12” length for sewing.

Repeat Rows 1-37 [41,43] but do not fasten off.

Row 38 [42,44]: Ch 1, in back loops only, sc in each st. Join with sl st. Fasten off leaving 12” length for sewing.

Measure sole on foam interface and cut interface slightly inside the marked line. (I cut 2 pieces for each sole and glued together to make thicker sole.)

Sew 2 sole pieces together with foam interface in the middle. Both soles are for the same foot, so flip one upside down.

TOE (Make 2):

Row 1: Ch 25, sc in 2nd ch from hook and remaining sc (24 sc).

Rows 2-4: Ch 1, turn, sc in each st.

Rows 5-6: Ch 1, turn, dec over first 2 sts, sc across (22 sc).

Rows 7-8: Ch 1, turn, sc in each st.

Rows 9-10: Repeat Row 5 (20 sc).

Rows 11-12: Ch 1, turn, sc in each st.

Rows 13-14: Repeat Row 5 (18 sc).

Rows 15-16: Ch 1, turn, sc in each st.

Rows 17-20: Repeat Row 5 (14 sc).

Row 21: Ch 1, turn, dec across (7 sc).

Row 22: Ch 1, turn, sc 2 sts tog, sc 3 sts tog, sc 2 sts tog (3 sc). Fasten off leaving 12” length.

Measure toe on foam insulation, mark and cut slightly inside the lines. Glue onto back of toe piece.

Before beginning to make lining piece, check your gauge. You may need to use size G hook for the lining due to the difference in chenille or velvet yarn.

LINING (Make 2):

Row 1: Using CC yarn, ch 23, sc in 2nd ch from hook and remaining sc (22 sc).

Rows 2-4: Ch 1, turn, sc in each st.

Rows 5-6: Ch 1, turn, dec over first 2 sts, sc across (20 sc).

Rows 7-8: Ch 1, turn, sc in each st.

Rows 9-10: Repeat Row 5 (18 sc).

Rows 11-12: Ch 1, turn, sc in each st.

Rows 13-14: Repeat Row 5 (16 sc).

Rows 15-16: Ch 1, turn, sc in each st.

Row 17: Ch 1, turn, dec across (8 sc).

Row 18: Ch 1, turn, dec across (4 sc).

Sew lining to underside of toe.

Edging:

Row 1: Attach CC yarn to Row 1. With top side facing using H hook, work through both thicknesses (toe piece and lining piece) to join the 2 pieces together.

Rows 2-5: Ch 1, turn, sc in each st. Fasten off CC yarn. Flip rows over top of toe and sew in place.

Center toe over front of sole, pin in place and sew together.

Weave in all ends.


More Slippers

Children’s Airplane Slippers
Elephant Slippers pattern for Addi Pro knitting machine
big toe slippers
Big Toe Slippers


Gathering Threads Festival

Gathering Threads Fashion Show
Wild Rose Scarf Crochet Pattern
Ski Slope Hat


Discover the rustic charm and timeless elegance of Alberta through the art of crochet with our exquisite pattern collection. Whether you’re a seasoned crocheter or just starting your journey, this ebook contains 25 patterns offer a delightful array of projects inspired by the natural beauty and rich heritage of Alberta, Canada.

Crochet Alberta Style Ebook – My Fingers Fly


Links

This page contains affiliate links. If you choose to purchase after clicking a link, I may receive a commission at no extra cost to you.


Posted on 11 Comments

Polar Bear Butt Ornament Crochet Pattern

polar bear butt ornament

What’s a more iconic animal at Christmas than a reindeer or a polar bear? Last week I posted the Reindeer Butt Ornament, and today I have a Polar Bear Butt Ornament for you to crochet. It’s so quick and easy, you can easily make a few in just one evening.

Materials:
15 yards white Bernat Pipsqueak yarn (or other
fluffy yarn):
2 yards pink worsted weight yarn
Size G (4.0 mm) crochet hook
Ribbon

Gauge: 9 sc = 2″, 9 rows = 2″

Ornament measures 4” wide by 4” tall

Directions:
Body:

Row 1: With white yarn, ch 6, sc in 2nd ch from hook, sc in next 3 ch, 4 sc in last ch. Working on opposite side of starting ch, sc in next 4 lps (12 sc).
Row 2: Ch 1, turn, sc in next 4 sts, 2 sc in each of next 4 sts, sc in next 4 sts (16 sc).
Row 3: Ch 1, turn, sc in next 4 sts, *sc in next st, 2 sc in next st,* 4 times, sc in next 4 sts, ch 6 (20 sc).
Row 4: Turn, sc in 2nd ch from hook, sc in next 4 ch, sc in next 4 sts, *sc in next 2 sts, 2 sc in next st,* 4 times, sc in next 4 sts, fsc 5 times (34 sc).
Row 5: Ch 1, turn, sc in 5 fsc, sc in next 4 sc, *sc in next 3 sts, 2 sc in next st,* 4 times, sc in next 9 sts (38 sc).
Row 6: Ch 1, turn, sc in next 9 sts, *sc in next 4 sts, 2 sc in next st,* 4 times, sc in next 9 sts (42 sc).
Row 7: Ch 1, turn, sc in next 9 sts, *sc in next 5 sts, 2 sc in next st,* 4 times, sc in next 9 sts (46 sc). Fasten off yarn. Weave in all ends.
Tail:
Attach white yarn in center of Row 4, ch 4, sc in 2nd ch from hook and in next 2 ch. Sl st in same st in Row 4. Fasten off yarn.
Heart:
With pink yarn, ch 3, in 3rd ch from hook work 3
dc, 2 hdc, ch 1, 2 hdc, 3 dc, ch 2, sl st in same sp.
Pull center tight. Fasten off yarn leaving 9”
length. Sew centered just below the tail.
Add a bow above the tail for decoration.
Cut a piece of ribbon approximately 12” long
and fold. Pull through top of ornament and tie
off for hanger.

PDF Download: Polar Bear Butt Ornament Crochet Pattern

More Polar Bears

Polar Bear Crochet Patterns


Etsy Sale

Running out of time to give everyone a handmade gift? All in-stock items are 25%. You can even tell them you made it yourself! I promise not to tell anyone. 😁

https://etsy.me/2Za7p5W


penguin amigurumi

Yellow Rose of Texas Afghan Crochet Pattern Texas Bluebonnet Shawl Crochet Pattern


ICYMI (In Case You Missed It)

reindeer butt ornament


Reindeer Butt Ornament Crochet Pattern


penguin gift bag


Penguin Gift Bag Crochet Pattern


penguin ski mask


Penguin Ski Mask Crochet Pattern


Christmas gift tag


Christmas Gift Tags


WISH LIST


Crocheter’s Christmas Wish List

Affiliate Links

This page contains affiliate links. If you choose to purchase after clicking a link, I may receive a commission at no extra cost to you.


Posted on 3 Comments

Benjamin Turtle Nap Buddy CAL Part 2

Good morning everyone! We had a cool front come in this week with gorgeous morning temps. It will be a hot one in the afternoon, but I’ve been enjoying my morning coffee on the patio enjoying the 70-degree weather.

Benjamin is proving to be as popular with crocheters as I had hoped – he’s just so cute! Please share your color combinations on Instagram or Facebook. This week we’ll be making the African flower motifs for his shell and putting them together. Next week will be making the turtle head and bottom flap, then attaching the blanket to the turtle shell.

Part 1 is available at Benjamin Turtle Nap Buddy CAL.

Part 3 is available at Benjamin Turtle CAL Part 3

Free Turtle Jewelry Pattern

Turtle Directions

African Flower (Make 10):

Rnd 1: With Sungold yarn, Magic Ring (MR), ch 3 (counts as dc), dc, ch 1, *2 dc, ch 1,* repeat 4 times, join with sl st in top of beg ch-3. Fasten off Sungold.

Rnd 2: Attach Mild Green yarn in any ch-1 sp, ch 3 (counts as dc), dc, ch 1, 2 dc in same sp, (2 dc, ch 1, 2 dc) in next 5 ch-1 sps. Join with sl st in top of beg ch-3.

Rnd 3: Sl st into ch-1 sp, ch 3 (counts as dc), 6 dc in same ch-1 sp, 7 dc in remaining 5 ch-1 sps. Join with sl st in top of beg ch-3. Fasten off Mild Green.

Rnd 4: Attach Toasted Almond yarn at first dc of any 7-dc group, ch 1, *sc in each of 7 dc across top of shell, sc in sp between shells two rows below in Rnd 2,* repeat 5 times. Join with sl st in top of first sc. Fasten off Toasted Almond yarn.

Rnd 5: Attach Dark Olive Yarn, ch 1 (does not count as st), *hdc in each of 8 sc across side of hexagon, ch 1,* repeat 5 times. Join with sl st in top of first hdc. Fasten off Dark Olive Yarn. Block squares and sew together in the following configuration.

turtle assembly

Each side of the hexagon is 8 hdc with a ch at each end. Sew these sts together. On the hexagons that form the outer edge (as indicated in photo below by arrows), continue this seam for an additional 4 sts.

turtle hexagon arrows

Edging:

Rnd 1: Attach Dark Olive yarn at any st, ch 3 (counts as dc), dc in next st and each st around. Some hexagons will still have ch-1 sps. Skip these. At seam, work dc dec across both sides of seam. Join with sl st in top of ch-3. Fasten off Dark Olive.

Rnd 2: Attach Sungold yarn, ch 1, sc in same st, *sk 2 sts, 6 dc in next st, sk 2 sts, sc in next st,* repeat around. It may be necessary to manipulate the skipped sts towards the end of the rnd in order to finish with a shell st rather than a sc. Join with sl st in first sc. Fasten off Sungold.

Don’t hesitate to reach out if you have any questions on this pattern. The pattern PDF is available at My Fingers Fly. If you prefer Ravelry, turtles are the featured animal on June 13 – Benjamin Turtle. Each day in June, a different animal pattern is half price.

Rainbow Nap Buddy

Bunny Nap Buddy Crochet Pattern

More Turtle Patterns

World Oceans Day – 4 Free Turtle Patterns

Free Turtle Earrings Pattern

Turtle Christmas Ornament

June2020calendar

National Zoo & Aquarium Month 2021 Blog Hop

Last year I published an Elephant Crochet Pattern ebook, but I just wasn’t satisfied with the amount of patterns, so I added a few more patterns. The ebook PDF is now available on Etsy and My Fingers Fly. Kindle and paperback versions are also available on Amazon. ElephantBookCover

Miles the Jazzy Elephant was so much fun to make; I hope you’ll enjoy him too. Elephant patterns are also available separately on Ravelry, Etsy, Lovecrafts, and My Fingers Fly. Also included in the book is an Elephant Ear Saver Crochet Pattern (free on the blog).

Miles and Benjamin will both be included in my next book, A to Z Animal Crochet. Animal patterns are so much fun!

I still have a few 2020 Crochet Calendars left – just pay shipping. Even though the year is almost half gone, the 12 kitchen crochet patterns can be used forever.

Stay safe and happy crocheting!

Posted on 5 Comments

Manchester, NH – CGOA Chain Link Conference – Elf Gift Bag Crochet Pattern

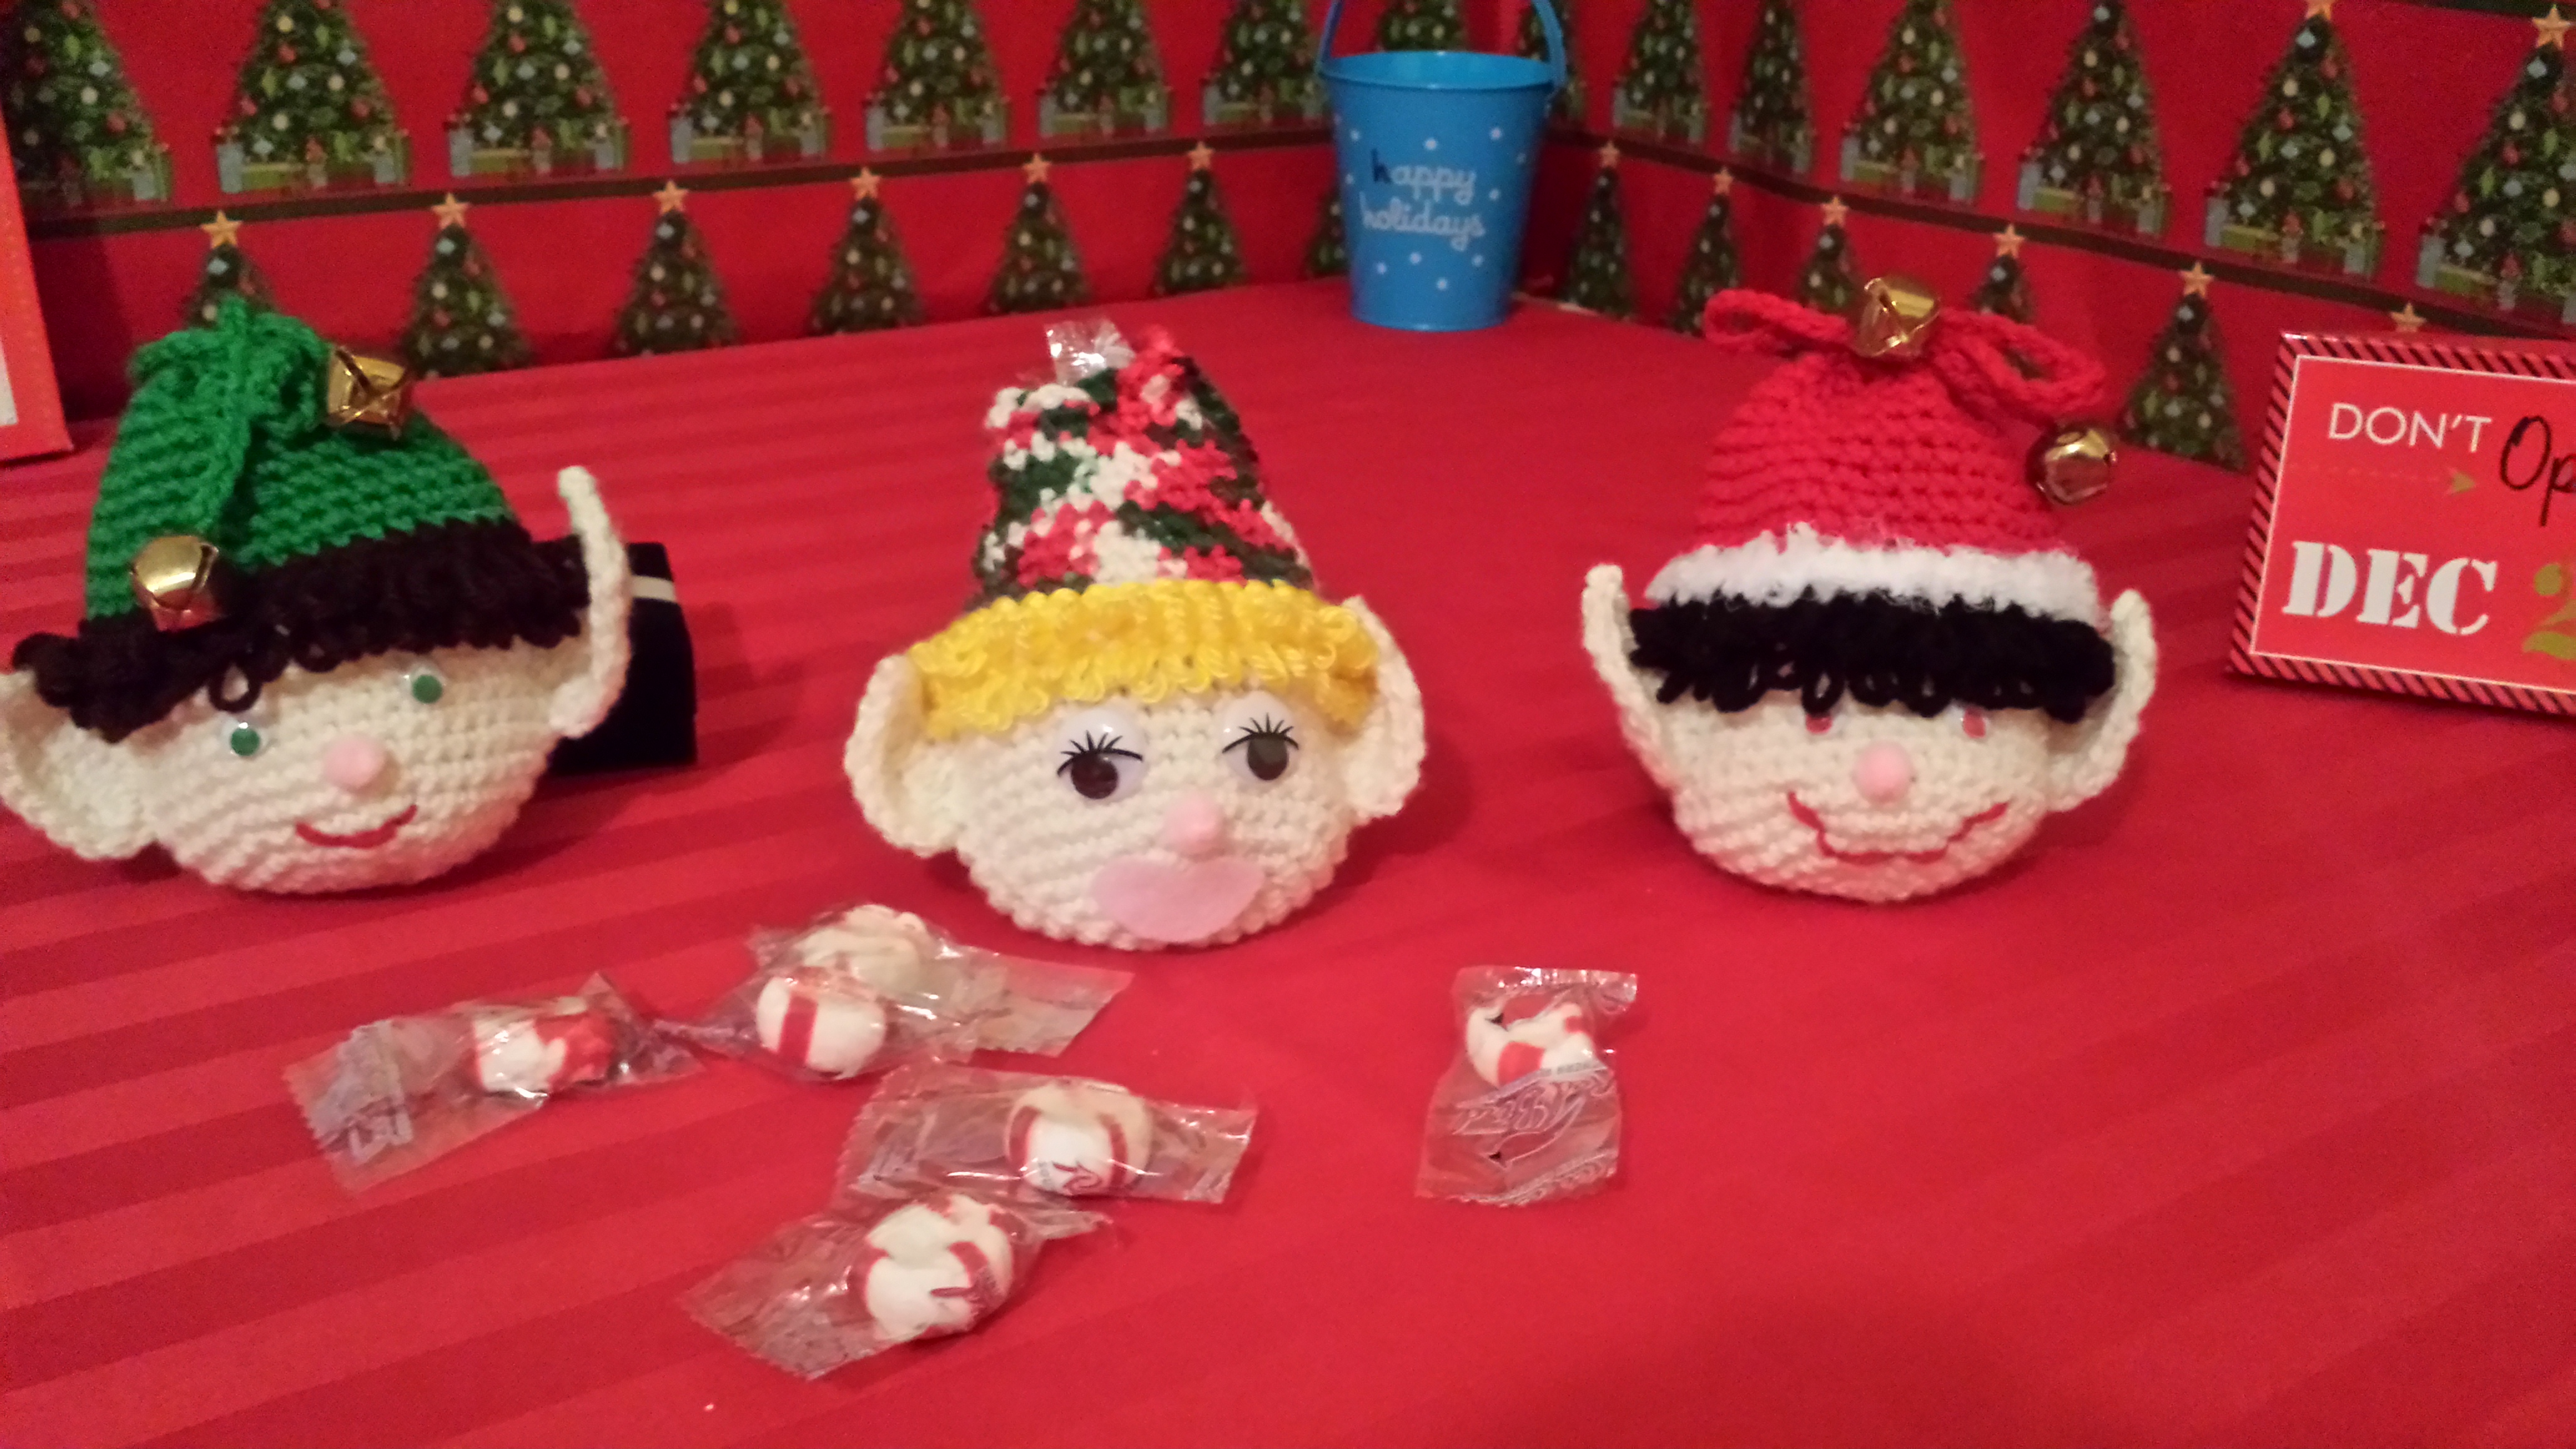
Christmas Elf Gift Bag Crochet Pattern

I recently had the opportunity to visit Manchester for the first time. All my preconceived ideas of New England came true! It’s such a beautiful city, full of history. I only wish I could have stayed longer. The people, the food, the weather – everything was lovely!

https://www.youtube.com/watch?v=kP27RNyGrKk&t=49s

Chain Link Conference 2019

I can’t believe that I’ve been crocheting for most of my life but only found out about the Crochet Guild of America a few years ago. The conference was so much fun – meeting other crocheters from around the world, seeing their creations, hearing their ideas for new projects. Talk about idea overload! I may not sleep for a month with all the designs floating around in my head. One of the classes I took was Irish crochet, and I have so many ideas for future projects. For anyone who wants to learn, Susan Lowman does beautiful work, and she explains everything so well. My class piece isn’t finished yet, but hopefully this weekend I can get to it.

To thank all the wonderful people I met and learned from, My Fingers Fly is offering free shipping on t-shirts and leggings for crocheters. Just use code CGOA by July 31, 2019. https://www.myfingersfly.com/collections/t-shirts

This week’s free pattern is another Christmas in July theme. These little elf gift bags are so cute and versatile.


Materials:

Small amounts of worsted yarn – ivory, brown or black, red or green.

Crochet hook size H

Small pom poms, google eyes, 2 jingle bells

Directions:

Rnd 1: With ivory yarn, ch 2. Sc 6 in second ch from hook. Do not join.

Rnd 2: 2 sc in each sc (12 sc).

Rnd 3: 1 sc in next sc, 2 sc in next sc, repeat (18 sc).

Rnd 4: 1 sc in next 2 sc, 2 sc in next sc, repeat (24 sc).

Rnd 5: 1 sc in next 3 sc, 2 sc in next sc, repeat (30 sc).

Rnd 6: 1 sc in next 4 sc, 2 sc in next sc, repeat (36 sc).

Rnds 7-13: Work even. Finish off ivory. Turn.

Rnd 14-15: With black (or brown) yarn, loop st in each st around. Join with sl st. Fasten off.

Rnds 16: Ch1, turn. Attach desired color for hat. Work even on 36 sc. Do not join.

Rnds 17-18: Work even on 36 sc.

Rnd 19: Dec, sc in next 4 sc, repeat (30 sc).

Rnds 20-21: Work even.

Rnd 22: Dec, sc in next 3 sc, repeat (24 sc).

Rnds 23-24: Work even. Join.

Rnd 25: Sc, ch 1, skip 1 sc, repeat. Join. Fasten off.  

Drawstring: Using same color yarn as hat, make a chain 12″ long and knot both ends. Pull through loops made in Rnd 22 of hat.

Ears: (Make 2)

With ivory yarn, ch 9, 3 dc in 4th ch from hook, 1 dc in each of next 2 ch, hdc next ch, sc next ch, sl st next ch, ch 1, sl st in this ch. (This makes point of ear.) Working down opposite side of starting ch, sl st next ch, sc next ch, hdc next ch, 1 dc in each of next 2 ch, 3 dc last ch. Join with sl st to beg ch-3. Sew one ear to each side of face from Rnds 9-13.

Glue on google eyes and pom pom for nose. Embroidery with straight stitch in pink or red for mouth. Sew a jingle bell to each side of drawstring.

Decorate hat as you wish with pom poms, rick rack, etc. You can sc Rnd 16 of hat with eyelash or bulky yarn to make a fringe. For the elf in the picture with the red hat, I used Yarn Bee Cameo Bulky in white.

This pattern is also available printed on note card at https://www.etsy.com/MyFingersFly/listing/574255967/christmas-elf-goody-bags-crochet-pattern?utm_source=Copy&utm_medium=ListingManager&utm_campaign=Share&utm_term=so.lmsm&share_time=1563564900966

or as a PDF download at https://www.etsy.com/listing/640459076/christmas-elf-goody-bag-crochet-pattern?ref=listing_published_alert

To purchase the Christmas Goody Bag paperback book, please visit my Amazon page at https://www.amazon.com/dp/1549546732

More Christmas Ideas

Bearded Elf Christmas Ornament Crochet Pattern

Christmas in July Blog Hop

Texas Flag Christmas Tree Ornament

Moose Ornament

Crown Ornament

Fox Christmas Ornament

This weekend I will be catching up on housework (and crochet) and resting a bit before we’re off to Houston next week to see Queen and The Rolling Stones. Hopefully I can get my Adam Lambert and Brian May dolls finished before we leave.

Pattern testers are always wanted. Join my Facebook group at https://www.facebook.com/pg/myfingersfly/groups/?ref=page_internal

Happy crocheting!

Posted on 7 Comments

New York Trip, Lion Yarn Studio – Free Father’s Day Pattern

Fish towel

During the nearly 10 years that I lived in Queens, NY in the 80s, most of my yarn shopping was at Nelson Yarns in Ridgewood. Several years ago, I took my daughter to the Macy’s Thanksgiving Parade and drove down Fresh Pond Road, but Nelson Yarns was no longer there. Fortunately, I found out that Lion Brand has a studio in Chelsea, so I jumped at the chance to accompany my husband on a business trip to New Jersey. For eight years, I commuted from Queens to Midtown on the subway, but riding NJ Transit trains was a new experience for me. We stayed at the Courtyard Marriott in Woodbridge, NJ, and the staff was amazing, as usual. Not knowing how far the train station was from the hotel, I took an Uber on Monday and took note of the streets along the way. Since it was only a 5-minute drive, I decided to walk on Tuesday. The weather was beautiful, and I thoroughly enjoyed the walk down Main Street.

As usual, Penn Station is a hive of activity with commuters rushing to catch their trains or enjoying a meal or coffee while they wait. There are shops that sell souvenirs, magazines, clothing, cell phone accessories, and so much more. Street musicians perform for tips, filling the area with their music.

Violinist in Penn Station

On my last trip to New York, the new buildings in the World Trade Center had not yet started. This week I was fortunate to be able to visit the new Freedom Tower and the Oculus. Another treat was lunch with some family members who I had not seen in many years.

Lion Yarn Studio is located on 15th Street in Chelsea, an unassuming little shop with an amazing window display. Inside, they sell Lion Brand products including yarn, hooks, and notions. Their “On The Table” display provides free patterns for Lion yarns. Classes and workshops of all types and for all skill levels are offered on weekends and in the evenings. It’s definitely a stop you’ll want to add to your itinerary if you’re planning a trip to New York. My next trip to the area will be to the Lion Yarn Outlet in New Jersey, but I will have to remember to take an empty suitcase with me to hold all the yarn I’m going to buy!

For our last dinner in Woodbridge, we tried a local restaurant, Miller’s Ale House. We don’t drink beer, but the food was excellent, and so was the service. I look forward to trying more of their menu if I’m ever in Woodbridge again.

Pork Osso Buco

For the Father’s Day Friday Freebie, I chose a fish-shaped dish towel that I designed for my father last year to use when he barbeques.

PDF available at
https://www.myfingersfly.com/products/fish-dish-towel-crochet-pattern

Fish Dish Towel

Materials:

Sugar ‘n Cream Cotton yarn – 1 oz MC (If you want to use a separate color for the tail and fins, you need 0.7 oz MC and 0.3 oz CC.)

Size G crochet hook

Yarn needle

1 ½” plastic ring

Towel measures approximately 11” x 7” (not incuding ring).

Directions:

BODY: Row 1: Work 5 sc through ring. Ch 1, turn.

Rows 2-6: Work 2 hdc in 1st st, hdc across to last st, 2 hdc in last st. Ch 1, turn. (16 hdc at end of Row 6).

Rows 7-10: Work 2 hdc in 1st st, hdc in each st across. Ch 1, turn. (19 hdc at end of Row 10).

Rows 11-20: Work even in hdc. Ch 1, turn.

Rows 21-27: Dec, hdc across to last 2 st, dec. Ch 1, turn. (5 hdc at end of Row 27).

TAIL: (If using contrasting colors, change colors here.)

Row 1: 2 hdc in each st across. Ch 1, turn. (10 hdc)

Row 2: *Hdc in next st, 2 hdc in next st,* repeat across. Ch 1, turn. (15 hdc)

Row 3: *Hdc in next 2 sts, 2 hdc in next st,* repeat across. Ch 1, turn. (20 hdc)

Row 4: Hdc across. Fasten off.

LARGE FIN:

Row 1: Attach yarn at end of Row 11 of body. Make 12 sc evenly spaced across top of fish.

Row 2: Dec over 1st 2 sts, sc across. Ch 1, turn. (11 sc).

Row 3: Sc across to last 2 sts, dec over last 2 sts. Ch 1, turn. (10 sc).

Row 4: Repeat Row 2 (9 sc).

Row 5: Repeat Row 3 (8 sc).

Row 6: Hdc in each of next 3 sts, sc in each of next 3 sts, sl st in each of last 2 sts. Fasten off.

SMALL FIN: On bottom of fish, attach yarn at opposite end of row where the top fin ends. Ch 2, 2 dc, 2 hdc, and 2 sc evenly spaced across ends of rows. Sl st. Fasten off.

More Fish Patterns

National Zoo & Aquarium Month Blog Hop, Day 1 World Reef Awareness Day


Ebook Update –

Unicorn Crochet Patterns Ebook has a new pattern – Unicorn Waist Bag (Fanny Pack)


National Unicorn Day 2021 – Free Unicorn Fanny Pack Crochet Pattern

Zoo Blog Hop Day 13 – Mystical, Magical Unicorns!

Flag Day Pattern

Also available for Addi Express Knitting Machine https://www.myfingersfly.com/products/thin-blue-line-afghan-pattern-for-addi-pro-thin-red-line-afghan-pattern-for-addi-pro

Thin Blue Line Afghan Addi Express Pattern

Happy Father’s Day ** Happy Flag Day ** Happy Birthday Army ** Happy Crocheting